KNOWLEDGE
Case StudiesBlogsEventsSupport & Starting
Support Articles & HubSupport Videos (Youtube)Try Leadoo Free (Leadoo Lite)Partners & Careers
PartnershipsCareersSecurity & Privacy
Security at Leadoo AIGeneral Terms & ConditionsData & GDPRKNOWLEDGE
Case StudiesBlogsEventsSupport & Starting
Support Articles & HubSupport Videos (Youtube)Try Leadoo Free (Leadoo Lite)Partners & Careers
PartnershipsCareersSecurity & Privacy
Security at Leadoo AIGeneral Terms & ConditionsData & GDPR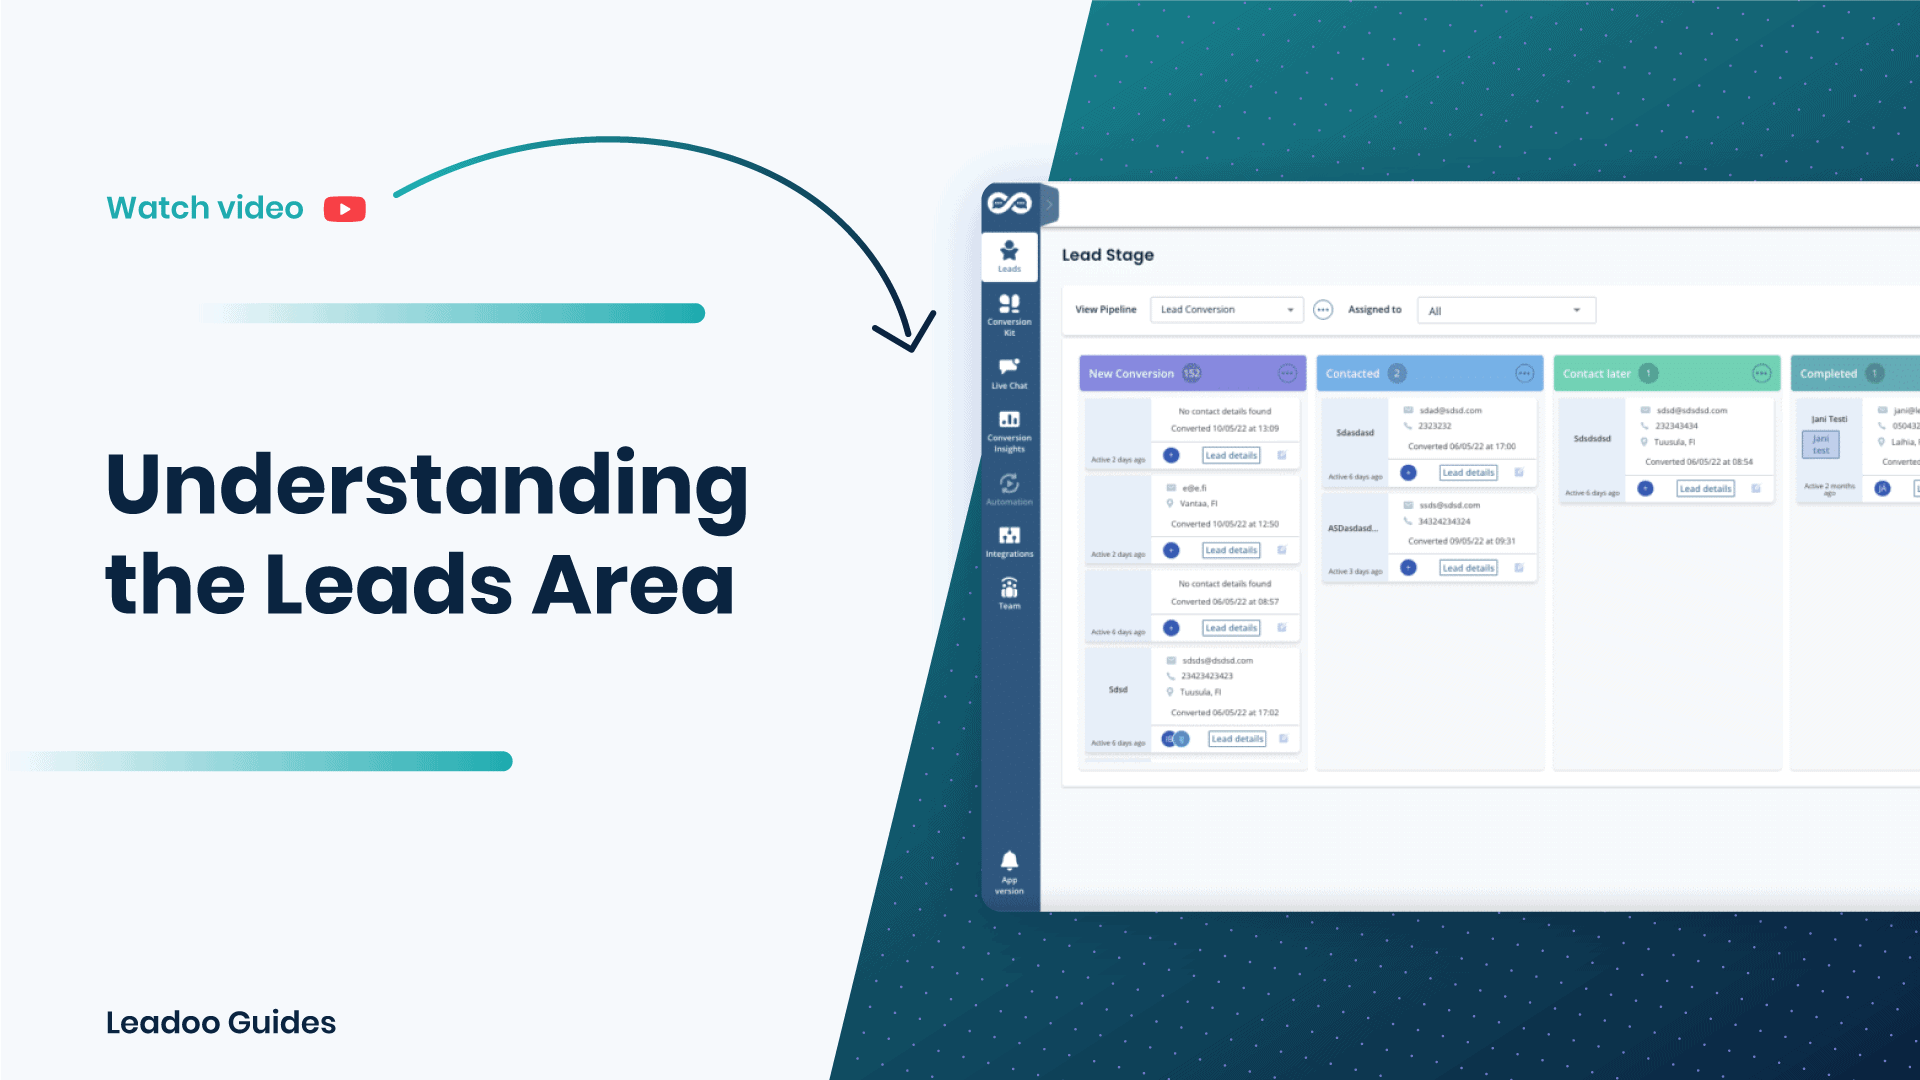
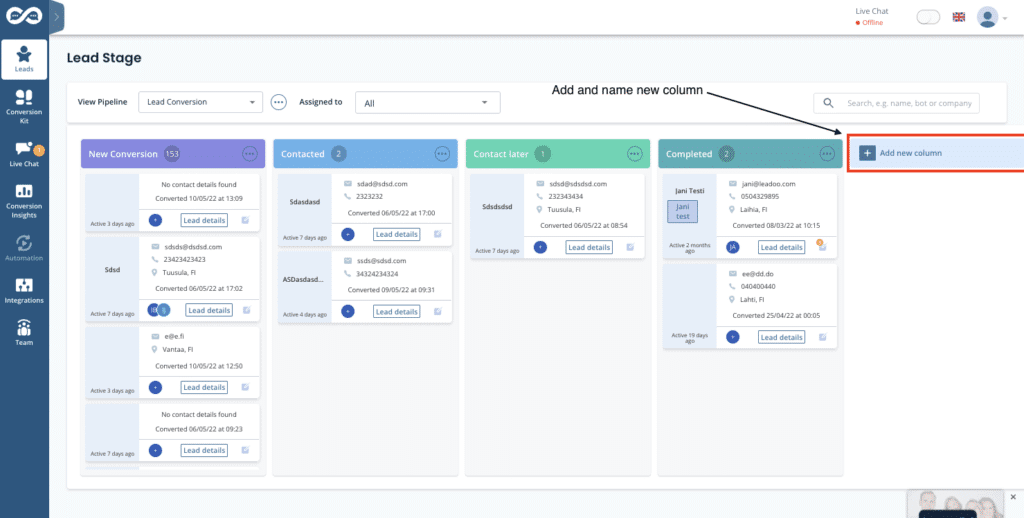
Lead stage is like a mini CRM within Leadoo’s app. You can create custom pipelines for example for sales and follow the progress of different leads. Pipelines can contain as many steps as you need and you can name them to match your process. That way you can have an accurate view of your sales funnel.
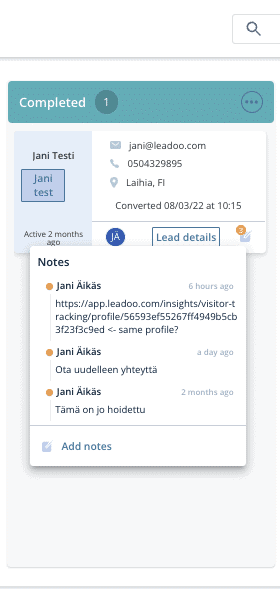
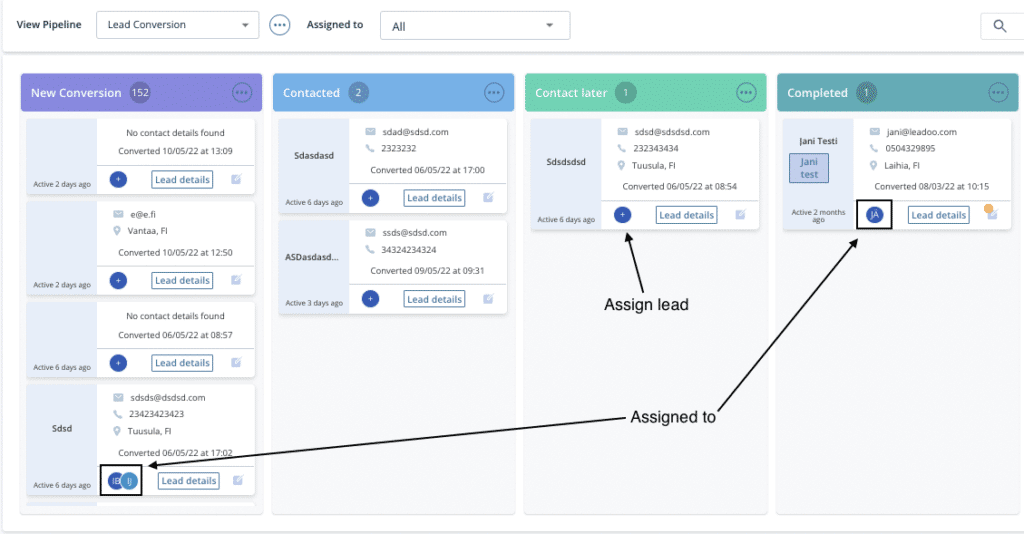
When a new lead is converted from Leadoo’s conversion tool, it will be automatically added to the first step of your pipeline. From there you can assign it to a specific person (Leadoo user) or have a user manage all incoming leads. You can leave notes on a specific lead card for all users to see if you have something to comment about the lead. When the sales process progresses you can move the lead card forward on your pipeline.
Lead details and comments will be visible through the process with time stamps stating the time the comments were added.
Lead Stage can be found from the left hand side menu under ”Leads” option. If it is not visible, please contact your Leadoo Customer Success Manager and they will assist you to enable the feature.
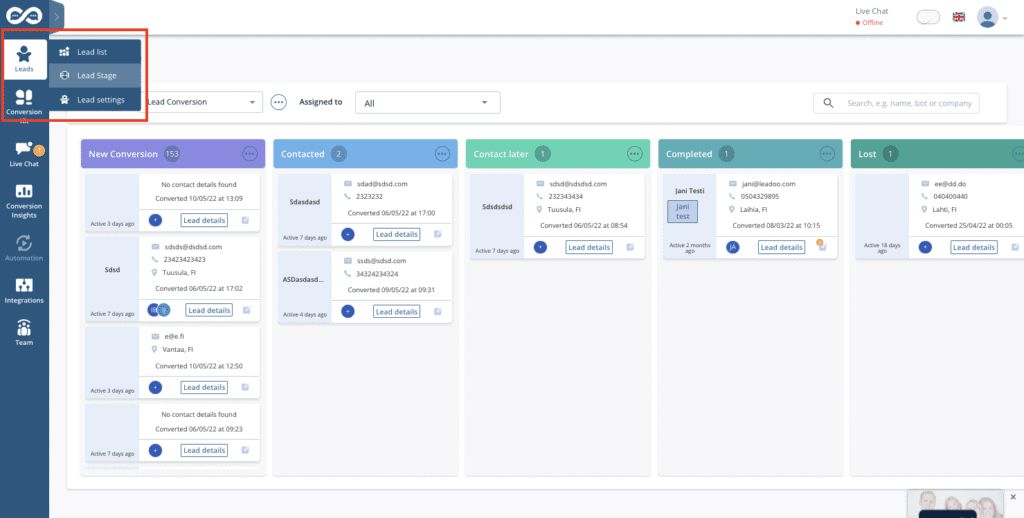
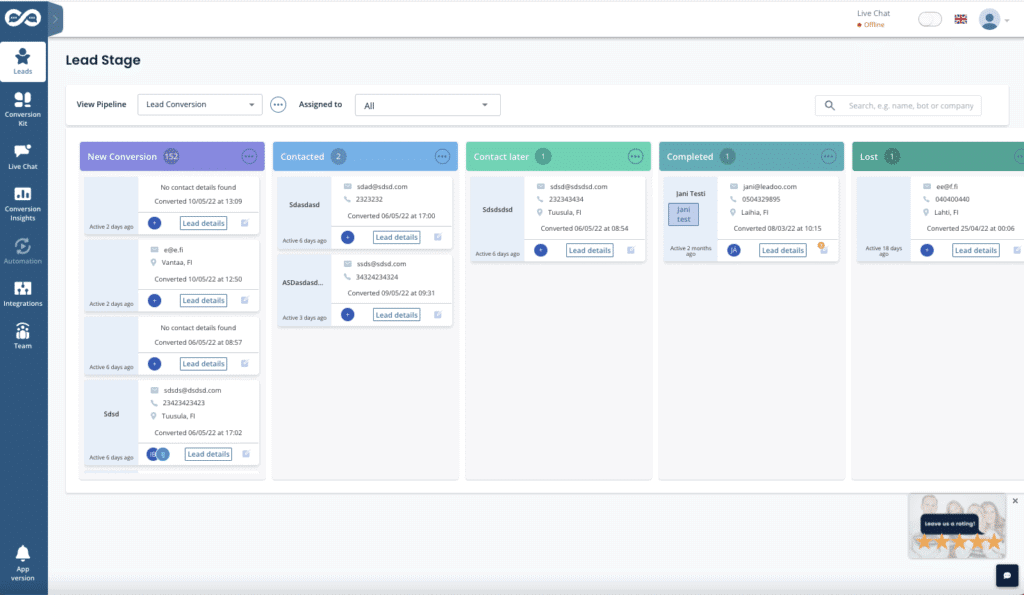
You can assign a lead to a specific user by clicking the ”+” icon on a lead card. This opens up a dropdown of all the users to whom a specific lead. Select the user you want to assign the lead to. One lead can be assigned to multiple users.
From the top of the Lead Stage view you can search specific leads that are assigned to a specific user. It’s also possible to look for specific leads based on e.g. name, bot or company name.
You can rearrange/sort columns by clicking the three dots on the top of each column, then selecting ”Rearrange/sort” and then selecting which order you want the leads to be presented to you.
All the filters mentioned above can be used at the same time.

Contact your Customer Success Manager at Leadoo at [email protected]
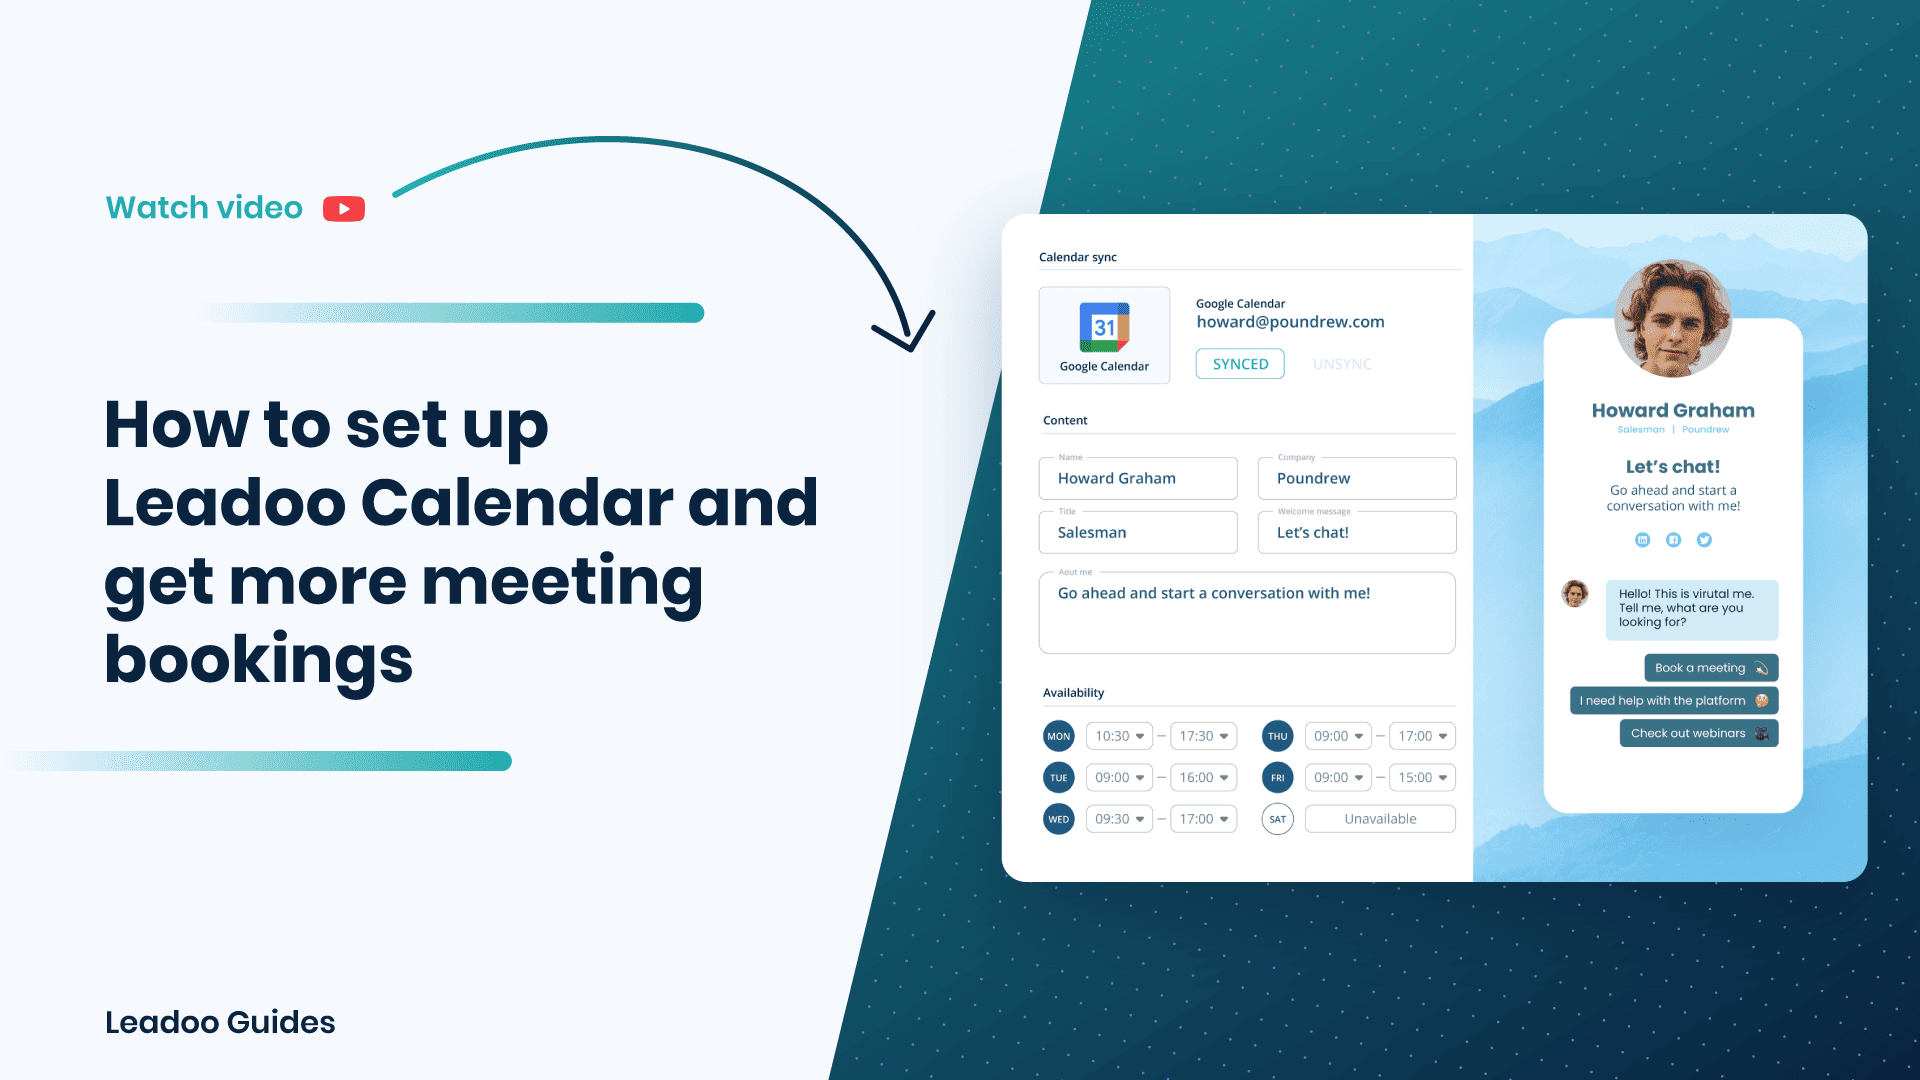
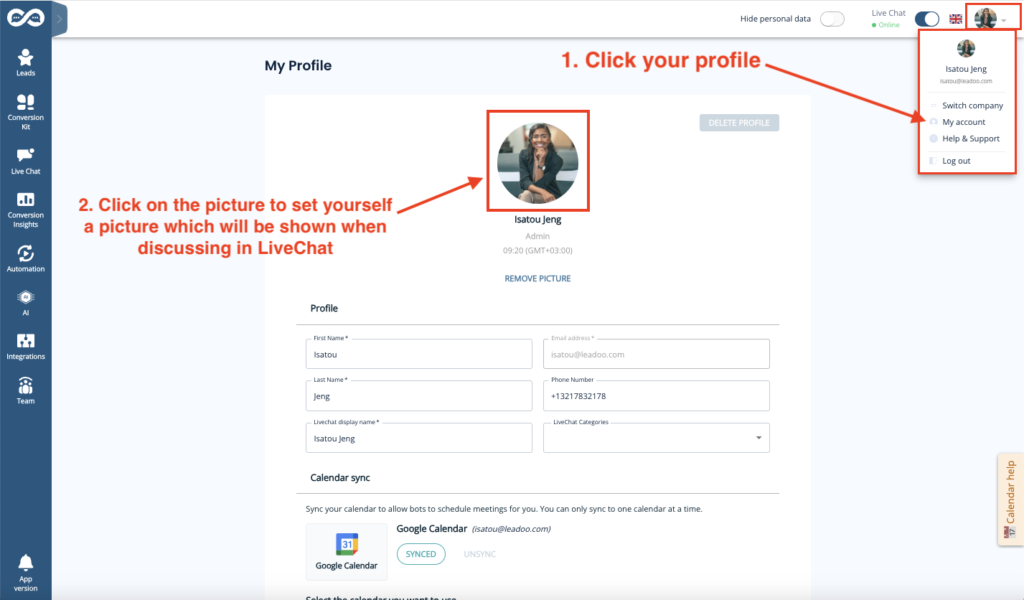
Click your profile image in the top right navigation open your profile menu. In the menu, select “My account” to open the profile settings

Scroll down the page to find the section called “Calendar sync“
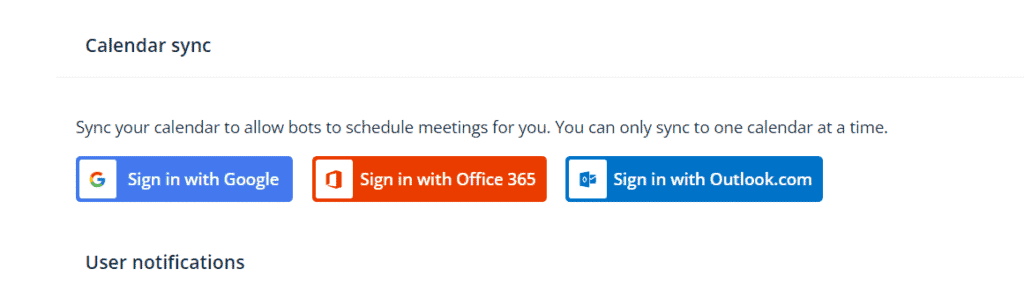
If you want to use Google Hangouts conferencing links in your meetings → use a Google account email.
If you want to use Teams conferencing links in your meetings → use a Microsoft account email.

*The system prefills the email field with the address you use in your Leadoo account.
If you want to use another email, replace the prefilled text with the preferred email address.
Also make sure your calendar is not in read-only mode! (Only publicly available calendars can be synced)
If you are unable to edit your email address or click on the Sign with XX ask your Customer Success Manager to check that the feature is enabled for you 👇

Select sign in button depending on the type of calendar service your email uses.
Google Calendar → Sign in with Google
Outlook calendar→ Sign in with Microsoft personal calendars
Office 365 → Sign in with Microsoft business calendars
Allow Leadoo to manage your calendar
A separate third-party popup will open to finalize the sync.
In order for the calendar sync to succeed, make sure to check all boxes to give Leadoo full permissions to read and modify your calendar, i.e. handle meeting bookings for you.
Leadoo will not use these rights to anything else than making incoming bookings through bots that have booking node where your calendar is linked. Leadoo will not e.g. in any circumstance delete any meetings from your calendar.
When you see this or similar view, your calendar sync was successful. If this doesn’t appear or you get error messages, the sync has failed.

Some reasons why sync might fail:
After the calendar shows synced choose to which hours in the day, how far in future and in what intervals calendar bookings can be made to your calendar.

Availability allows you to choose your time zone and the hours within which calendar bookings can be made each day. Ie. Always from 9am to 12pm and 1pm to 5pm (if you want to block bookings over lunch) or Mondays from 10pm to 5pm so you can start your week by emails and planning.
Remember that despite these availability hours the existing bookings in your calendar will also block anyone from scheduling overlapping meetings. Ie if you have a recurring team meeting every Monday morning this will automatically be unavailable in your calendar.

Allow scheduling
Here you can decide how far in future your calendar can be viewed and meetings scheduled.

Buffer time
This comes handy if you want to always have a short break in between meetings so that meetings cannot be booked back to back in your calendar.

Don’t allow scheduling
If you want to make sure there will be no surprise meetings for the same day or no new meetings for next X hours or days. With this rule your calendar can only be viewed and booked starting after the set time. This is also the minimum time that you will have for preparing for the meeting.
Once a meeting has been scheduled from your calendar both you and the scheduler will get an calendar invite. In default meeting details you can choose what will this calendar invitation state.
Google Calendar → Select Google Meet
Outlook calendar→ Select Teams
Office 365 → Select Teams

NB!
If you have included the scheduling of different meeting types you can also set the meeting details per bot or dialogue branch within the bot editor.
Once the setup is complete your Leadoo Customer SUccess Manager will add you to receive any leads that come through your own personal calendar integration. This way you will both get the calendar invitation as well as the bot dialogue and other lead details collected on the bot.
Once your calendar sync is set and your calendar has been added to the desired Leadoo bot always remember to test your calendar booking before you start using it.
This way you will make sure that you get the meeting booking notifications by email, events in your calendar, meeting details correctly and the meeting link all correctly as you wanted.
Learn how to create your own Leadoo Sales Assistant or add calendar bookings to your existing bots, below.
Contact your Customer Success Manager at Leadoo at [email protected]
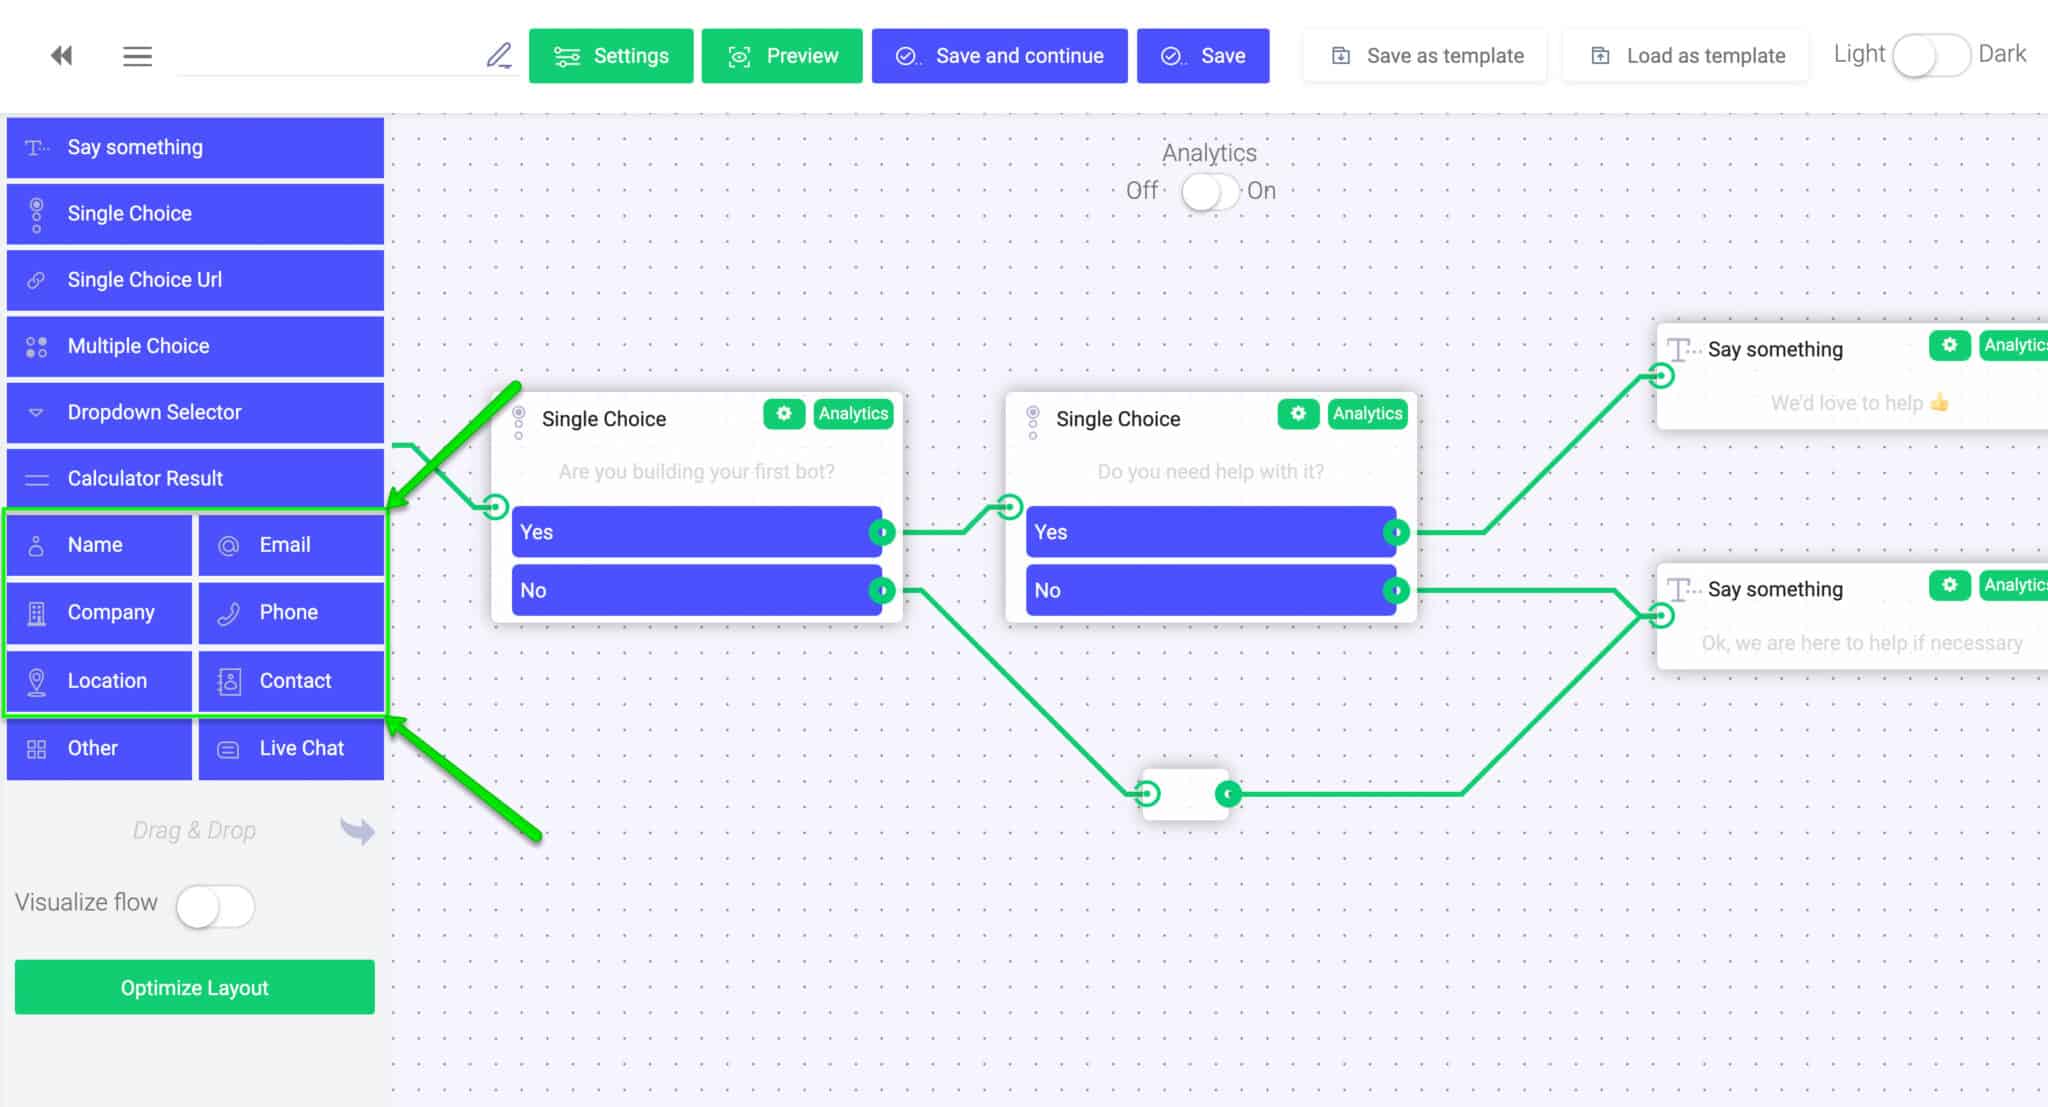
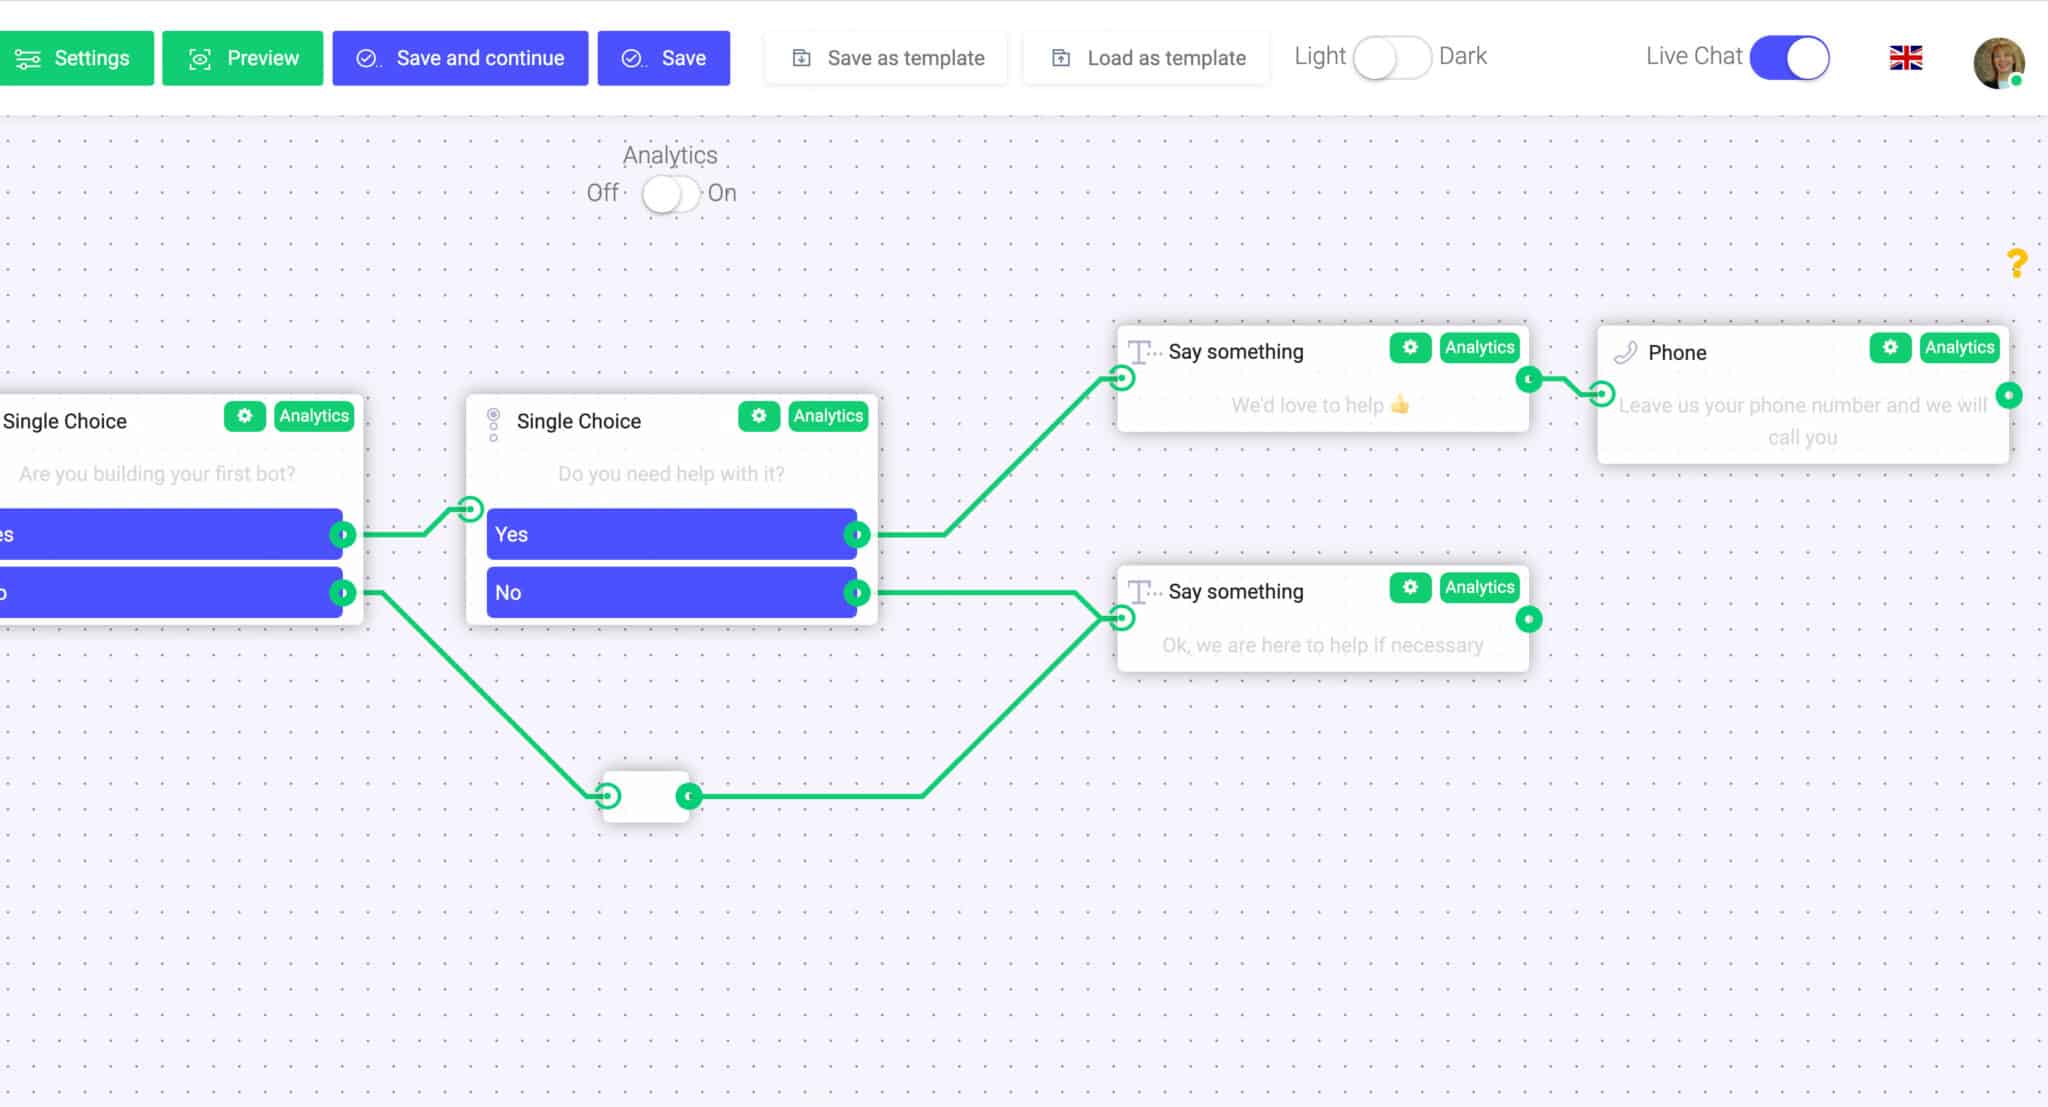
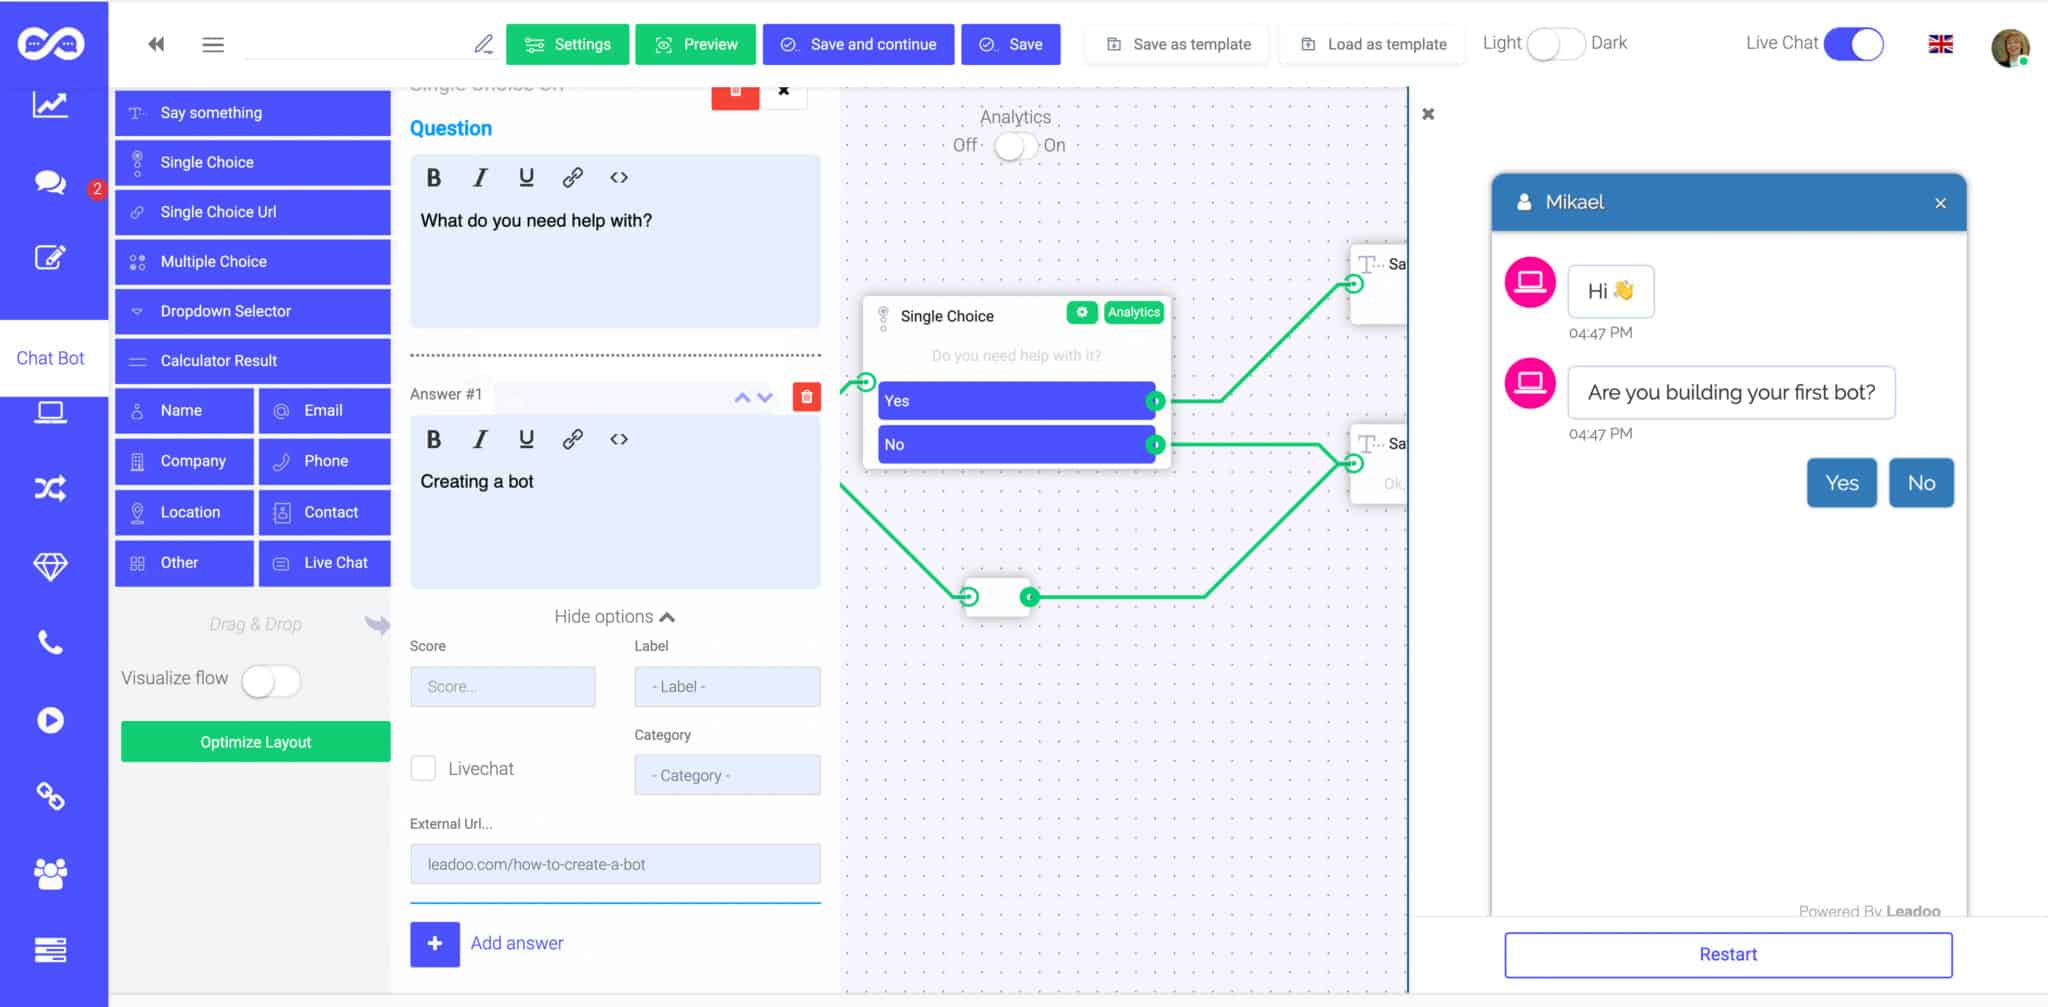
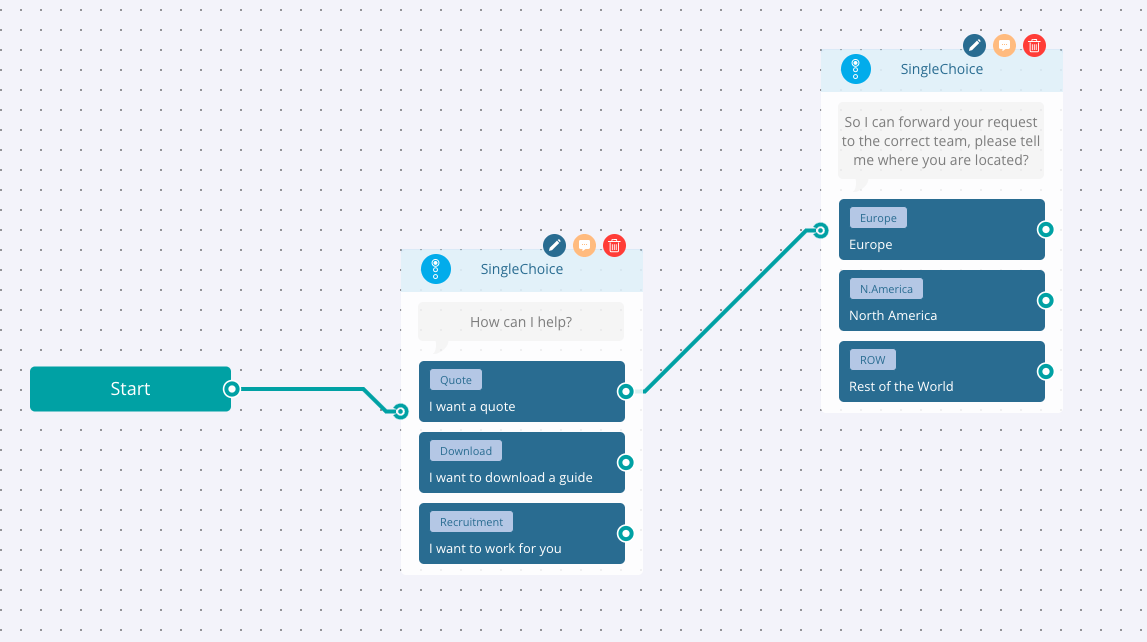
Building chatbots with Leadoo visual bot builder is easy. In the following article, you’ll learn how to build a simple chatbot that asks the user about their needs and then converts them into a lead.
Outline of the example
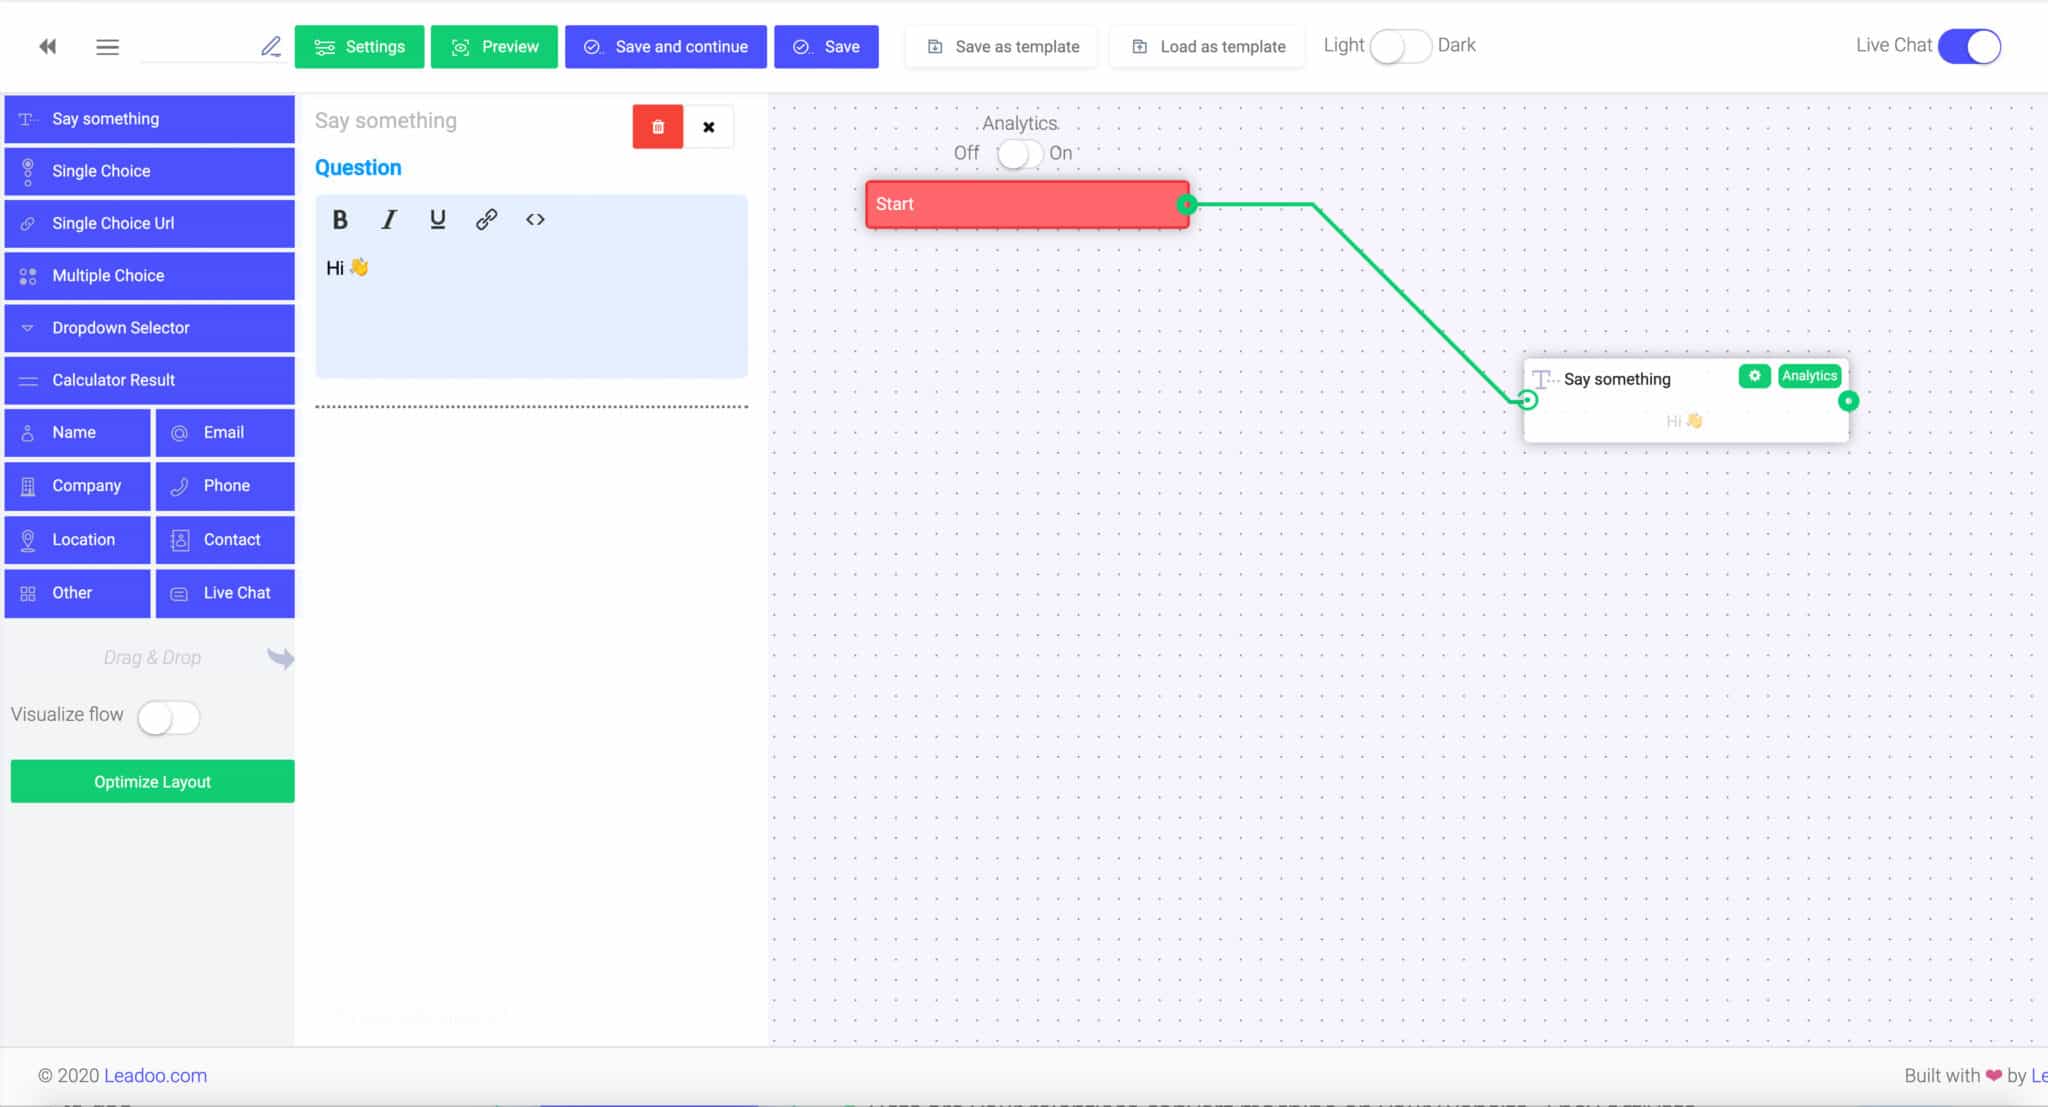
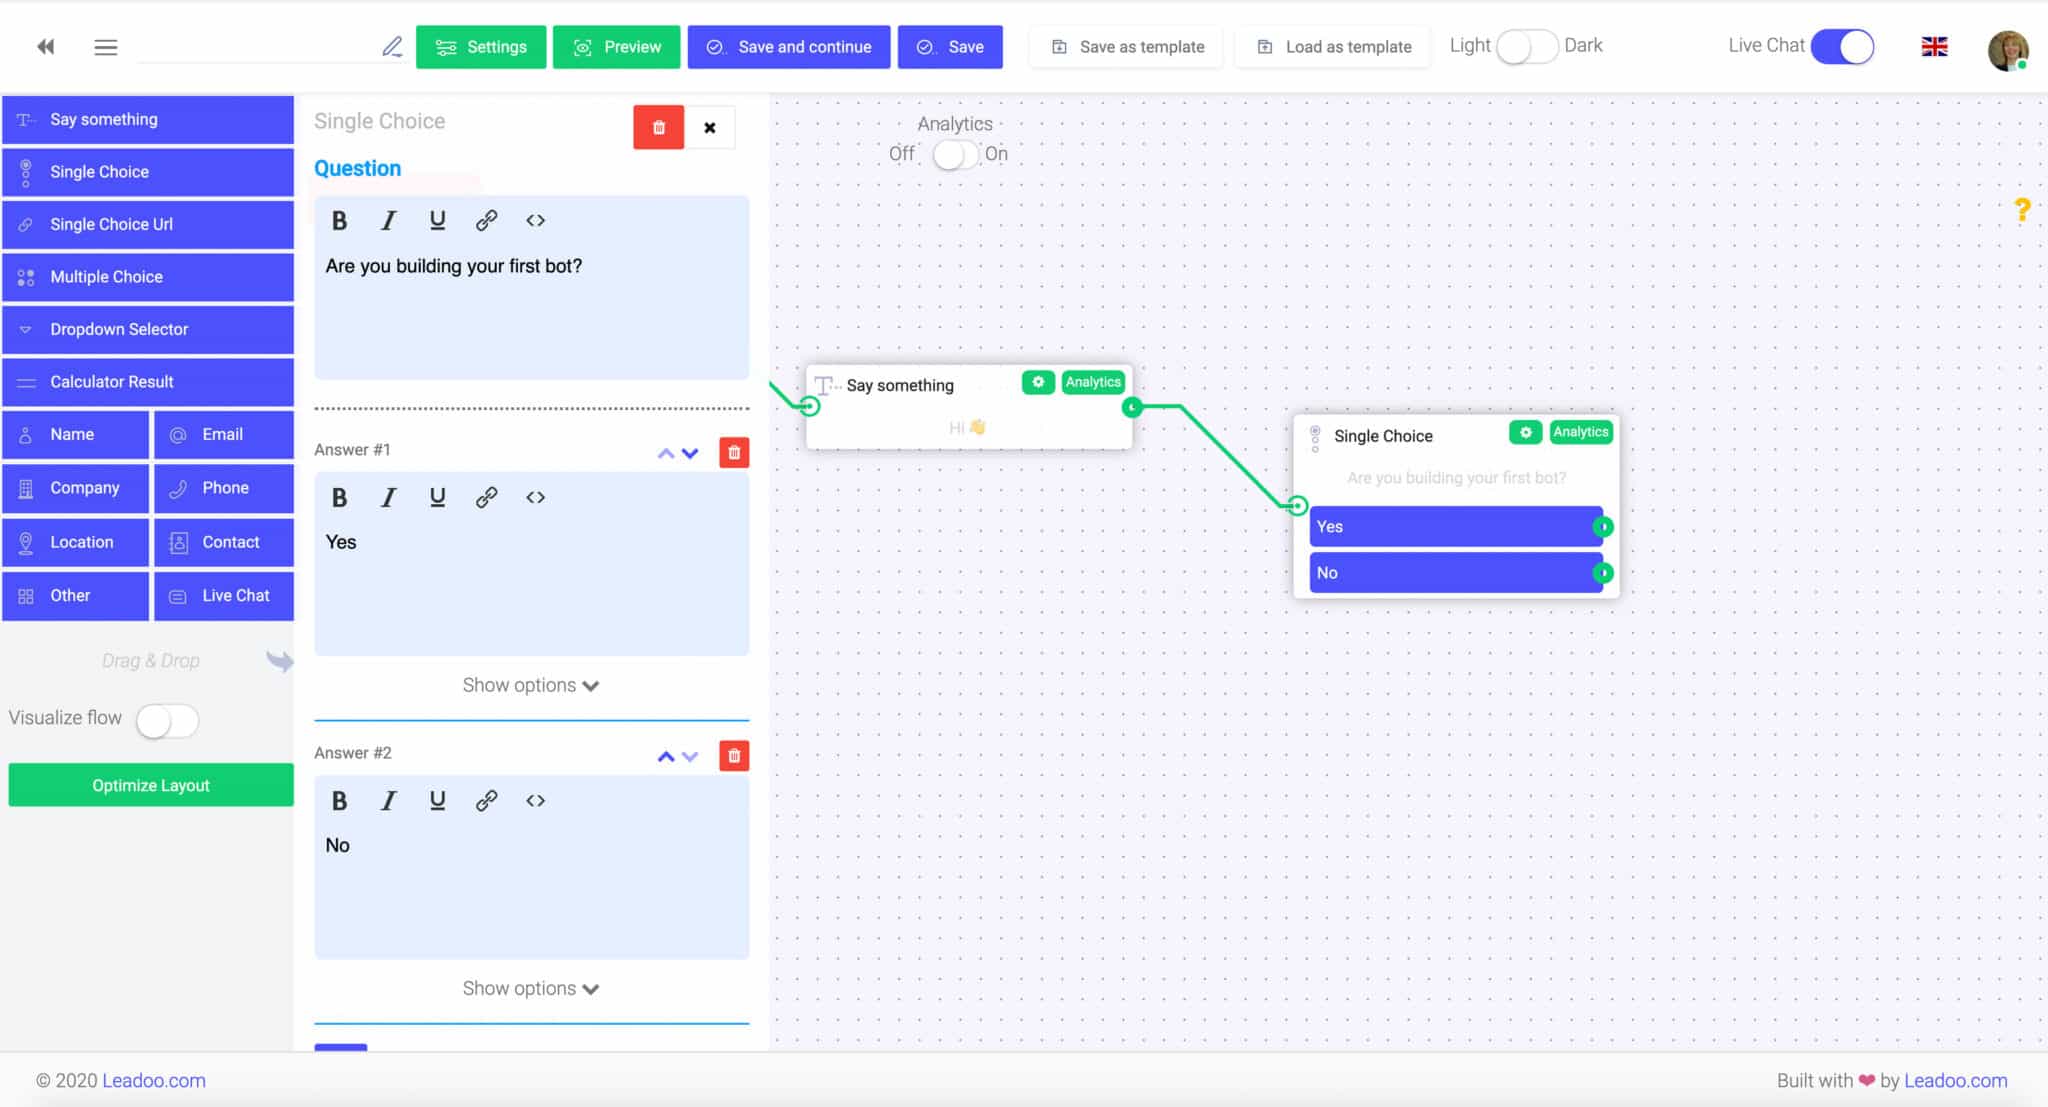
1. Greeting users and reacting to their answers with “Say Something” node.
2. Asking qualifying questions from the user with the “Single choice” node.
3. Providing solution in exchange for contact information with a contact node, such as the “Phone”.
“Say Something”-node:
This one-way interaction field is used for a salutation, a statement, reaction or for a simple intro on your product or service. With this field, you cannot create a question or an enquiry that includes two-way interaction, such as a direct answer from the user. Rather, it is just a great way to make the conversation more lively and human-like!
“Single Choice”-node:
With a “Single choice” node you can to create questions with answer choices such as “yes” or “no”, which require an answer from the user. For each answer choice, you can choose to guide the user to a different dialogue path/conversation flow. This can be done easily by dragging a line from the green dot to the next node you want to use.
“Single Choice URL”:
“Single choice with url” is just like Single Choice, except that you can choose to connect an URL to each answer choice. This node is perfect when you want to guide user to a specific landing page straight from their answer choice. For example, asking an e-commerce visitor what kind of product he/she is looking for, you can easily direct them straight to the appropriate landing page from a single interaction with the chatbot.
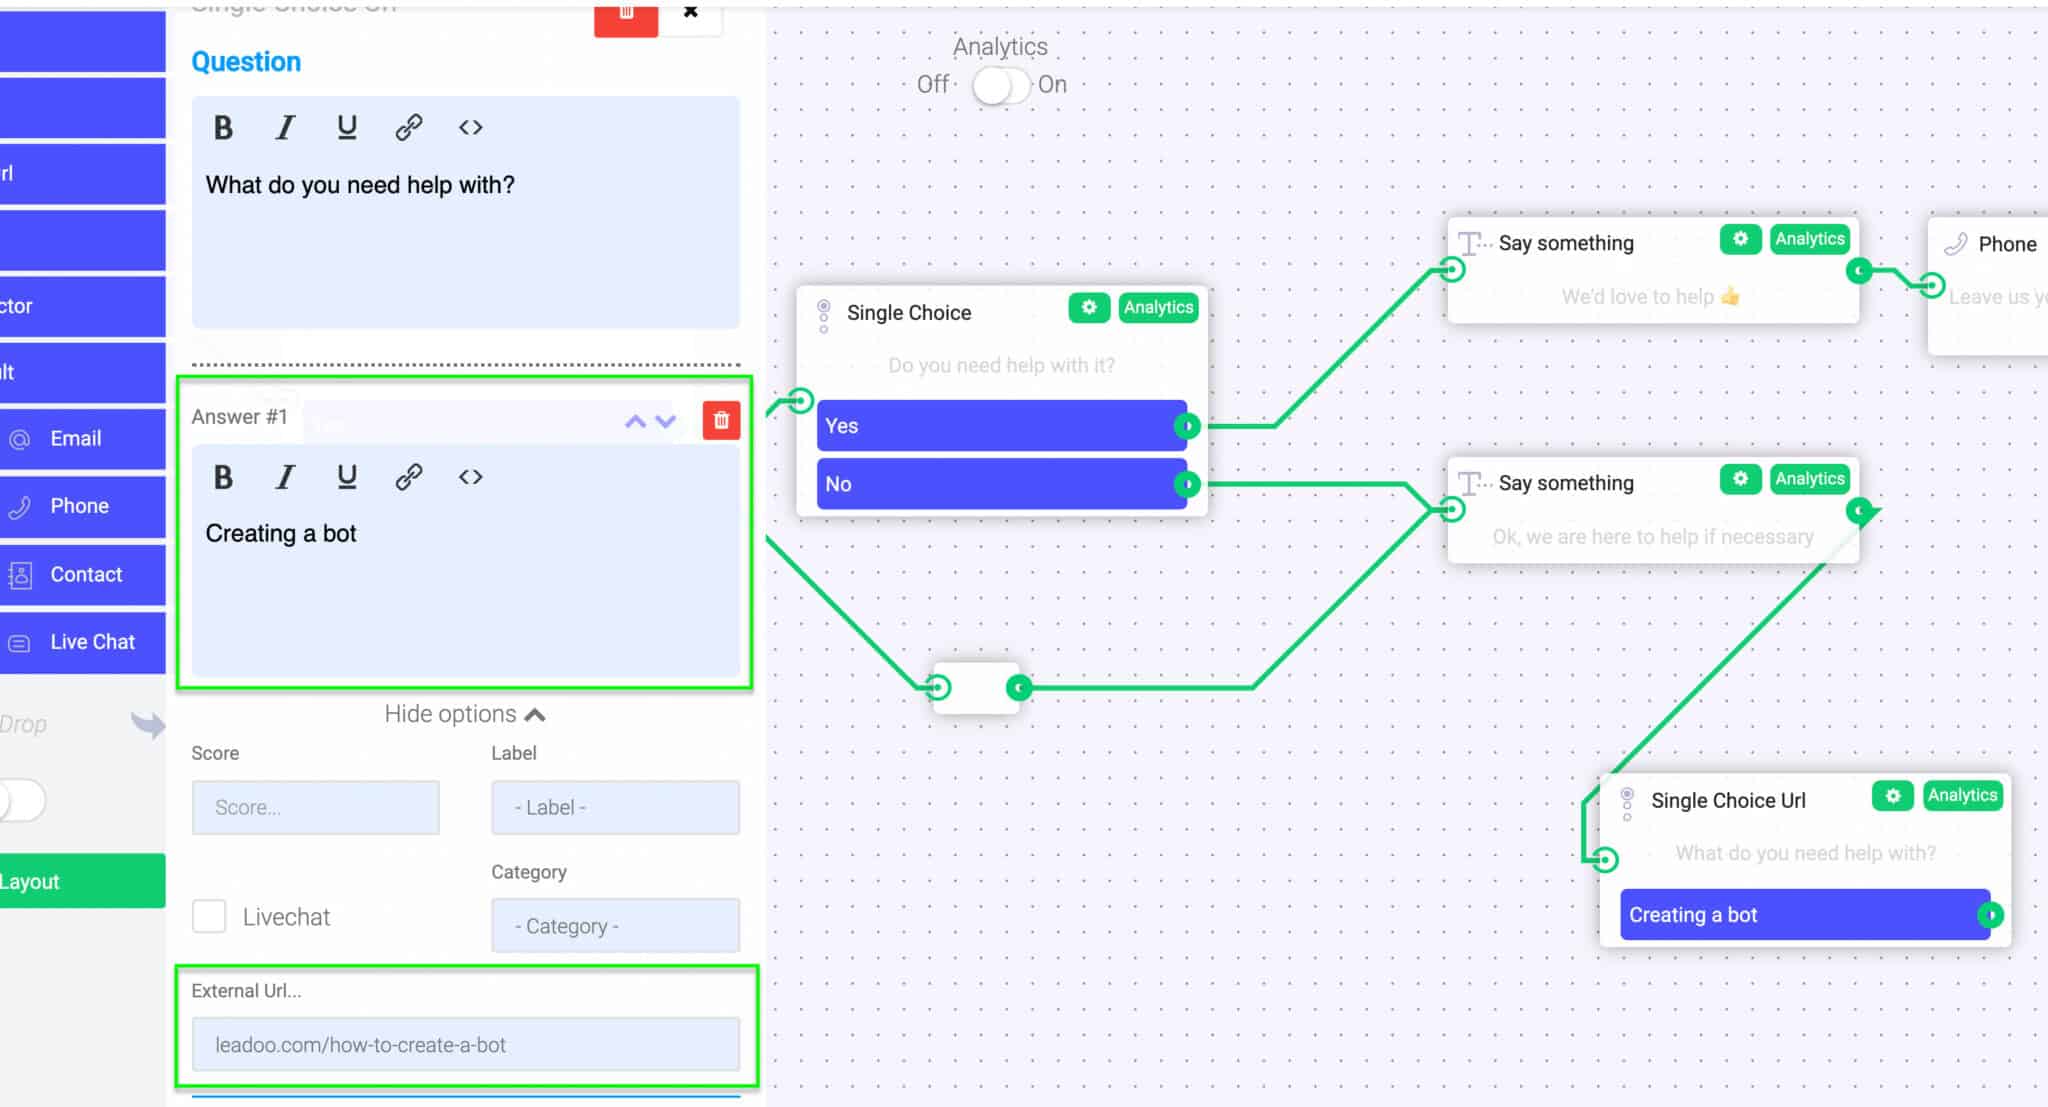
“Let’s get in touch!” -nodes (Name/Email/Phone/Company/Location/Contact):
When you want to collect contact information, you can choose between five different nodes: name, phone number, email address, company, location or a full contact form-like field. Each chosen field will give the answerer an empty field to respond. This option is usually used towards the end of the bot conversation when contact details are needed to proceed. These are the nodes that are most often used to define leads generated by the bot!
“Other/Message”-node:
This field allows you to ask an open-ended question to which the user can answer by writing freely. An open text field is usually used to ask a more specific or personal question that you can’t come up with a predefined answer choice for.
A key part of creating a usable bot is to define the exact paths that the user can take in the dialogue. You can do this easily by dragging connections between different nodes.
After you finish building your dialogue paths, you can easily preview and test the conversation yourself before publishing it by clicking the “Preview” button on the top.
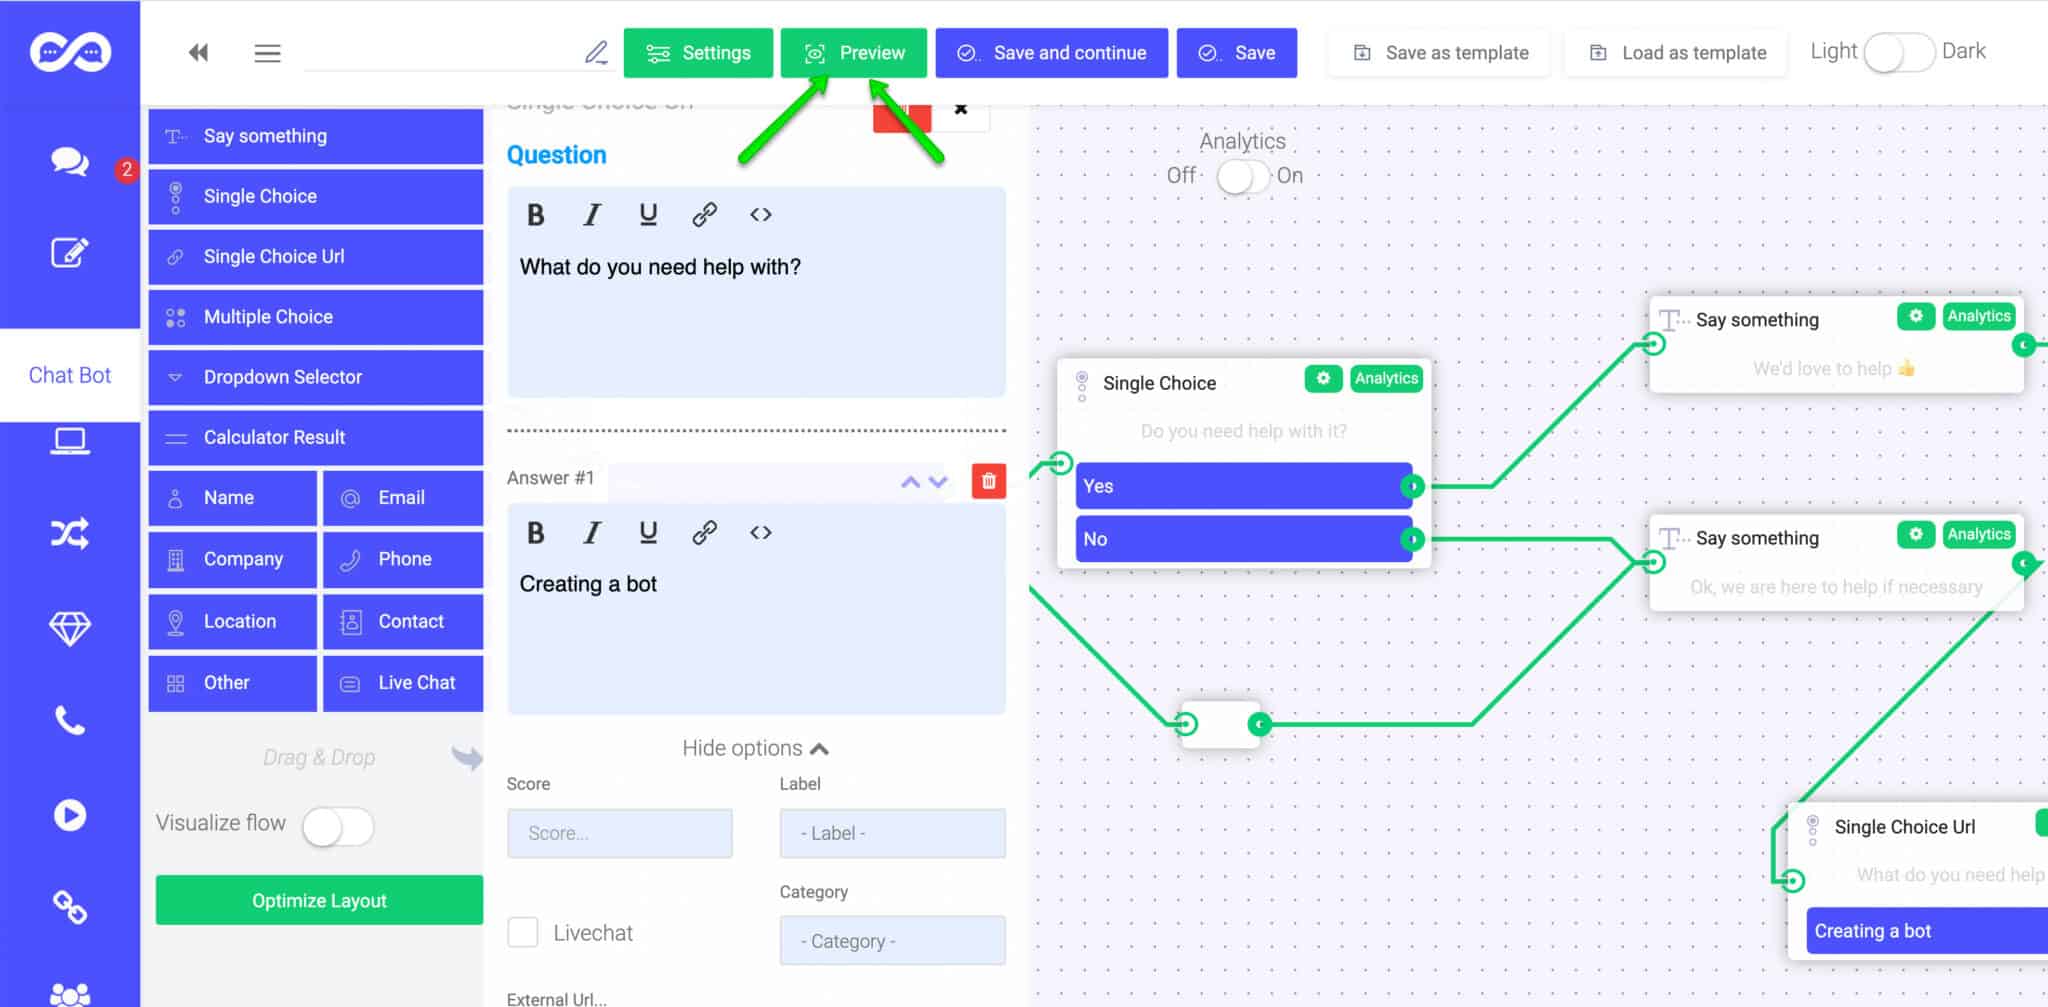
A preview window will open to the right side of your screen. By clicking the “Restart” button you can restart the discussion in the preview window to experiment different discussions flows.
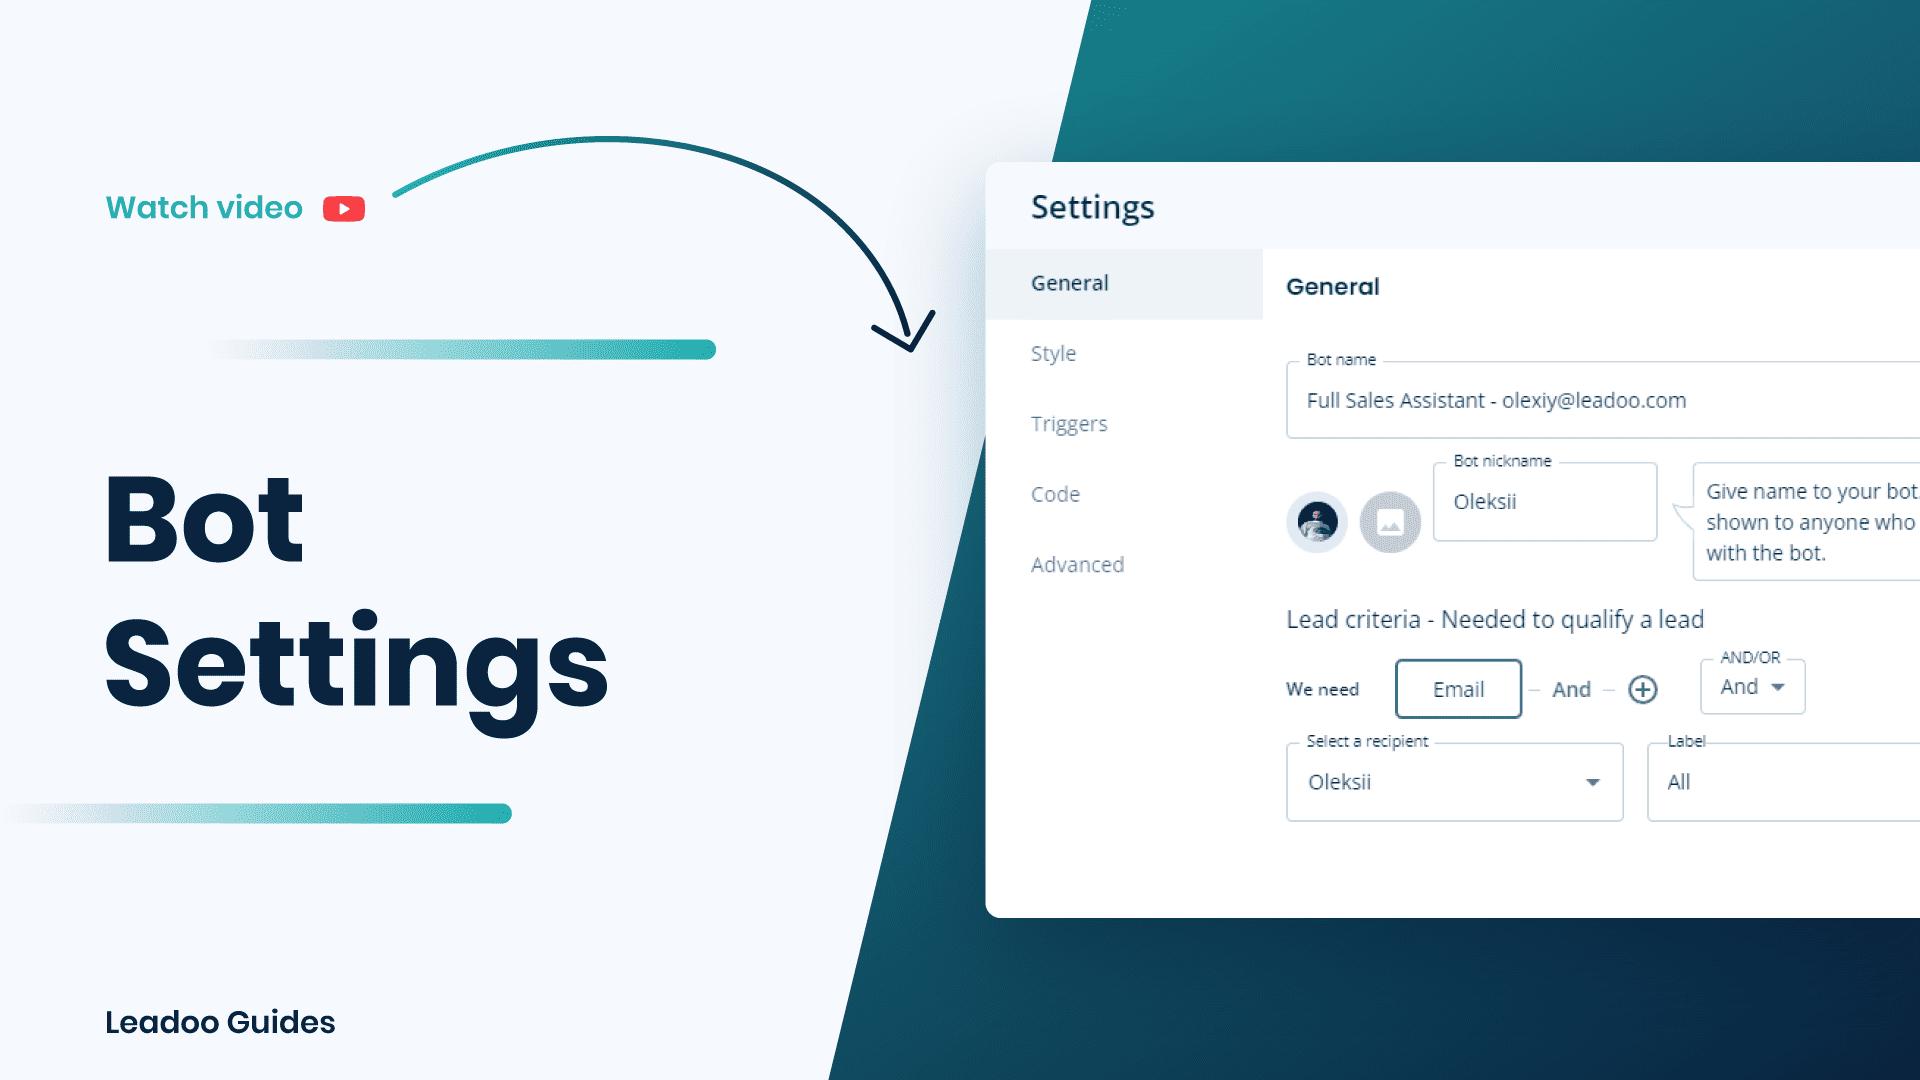
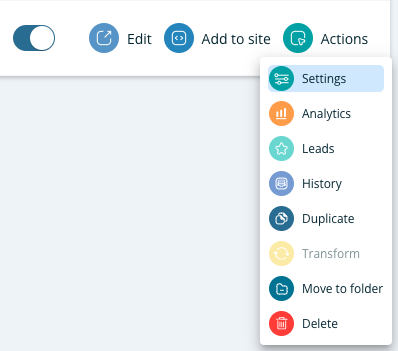
You can find the bot settings from either the bot listing or when you are in the editor.


You can update the name and picture for each bot on the general tab. ⭐️ Remember to choose square pictures to avoid squashed or stretched faces!
If you’re updating a chatbot you might need to update the trigger style too. Keep reading to find out how to do this.
We recommend using OR and ticking Email and Phone. This means that if a visitor submits either their email or phone number the bot will capture the lead.
You can define who you want to receive lead notifications in each bot. You can add as many notifiers here as you wish, just click + and select the user from the list.
⭐️ TIP – You can define who gets what leads by using labels. E.g. all quote requests go to John and all support requests go to Sue.
Find out how to add labels here.
If you need to send leads based on their type e.g. sales, marketing or recruitment but some users need to receive leads under multiple labels; this is how you do it.
Note – You’ll see all your added labels whether they have been used in the bot or not.

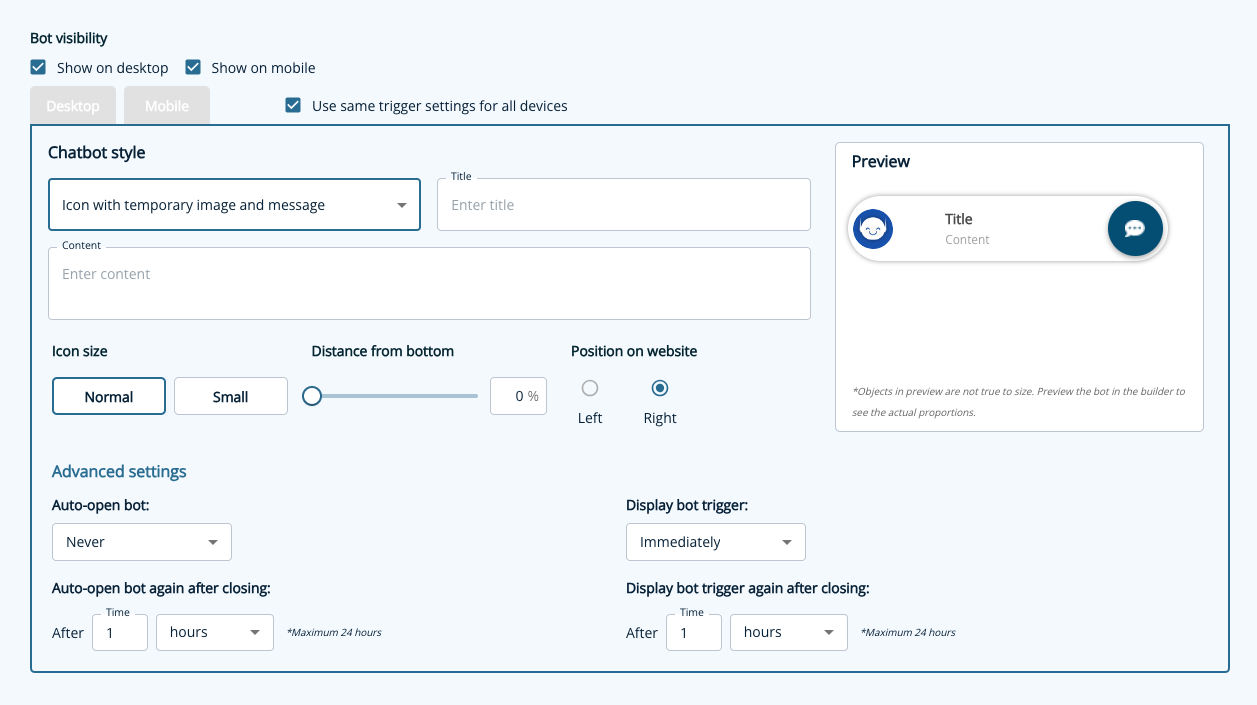
Chatbot and Inpage bots share the same styling options. You can edit different bot colours to match your company’s branding.
You can either use pre-made styling or build styling for each bot.
You can change settings such as:

Leadoo has 6 different chatbot window styles as well as the ability to customize the chat icon, image and text banners.* Find this via the triggers tab.
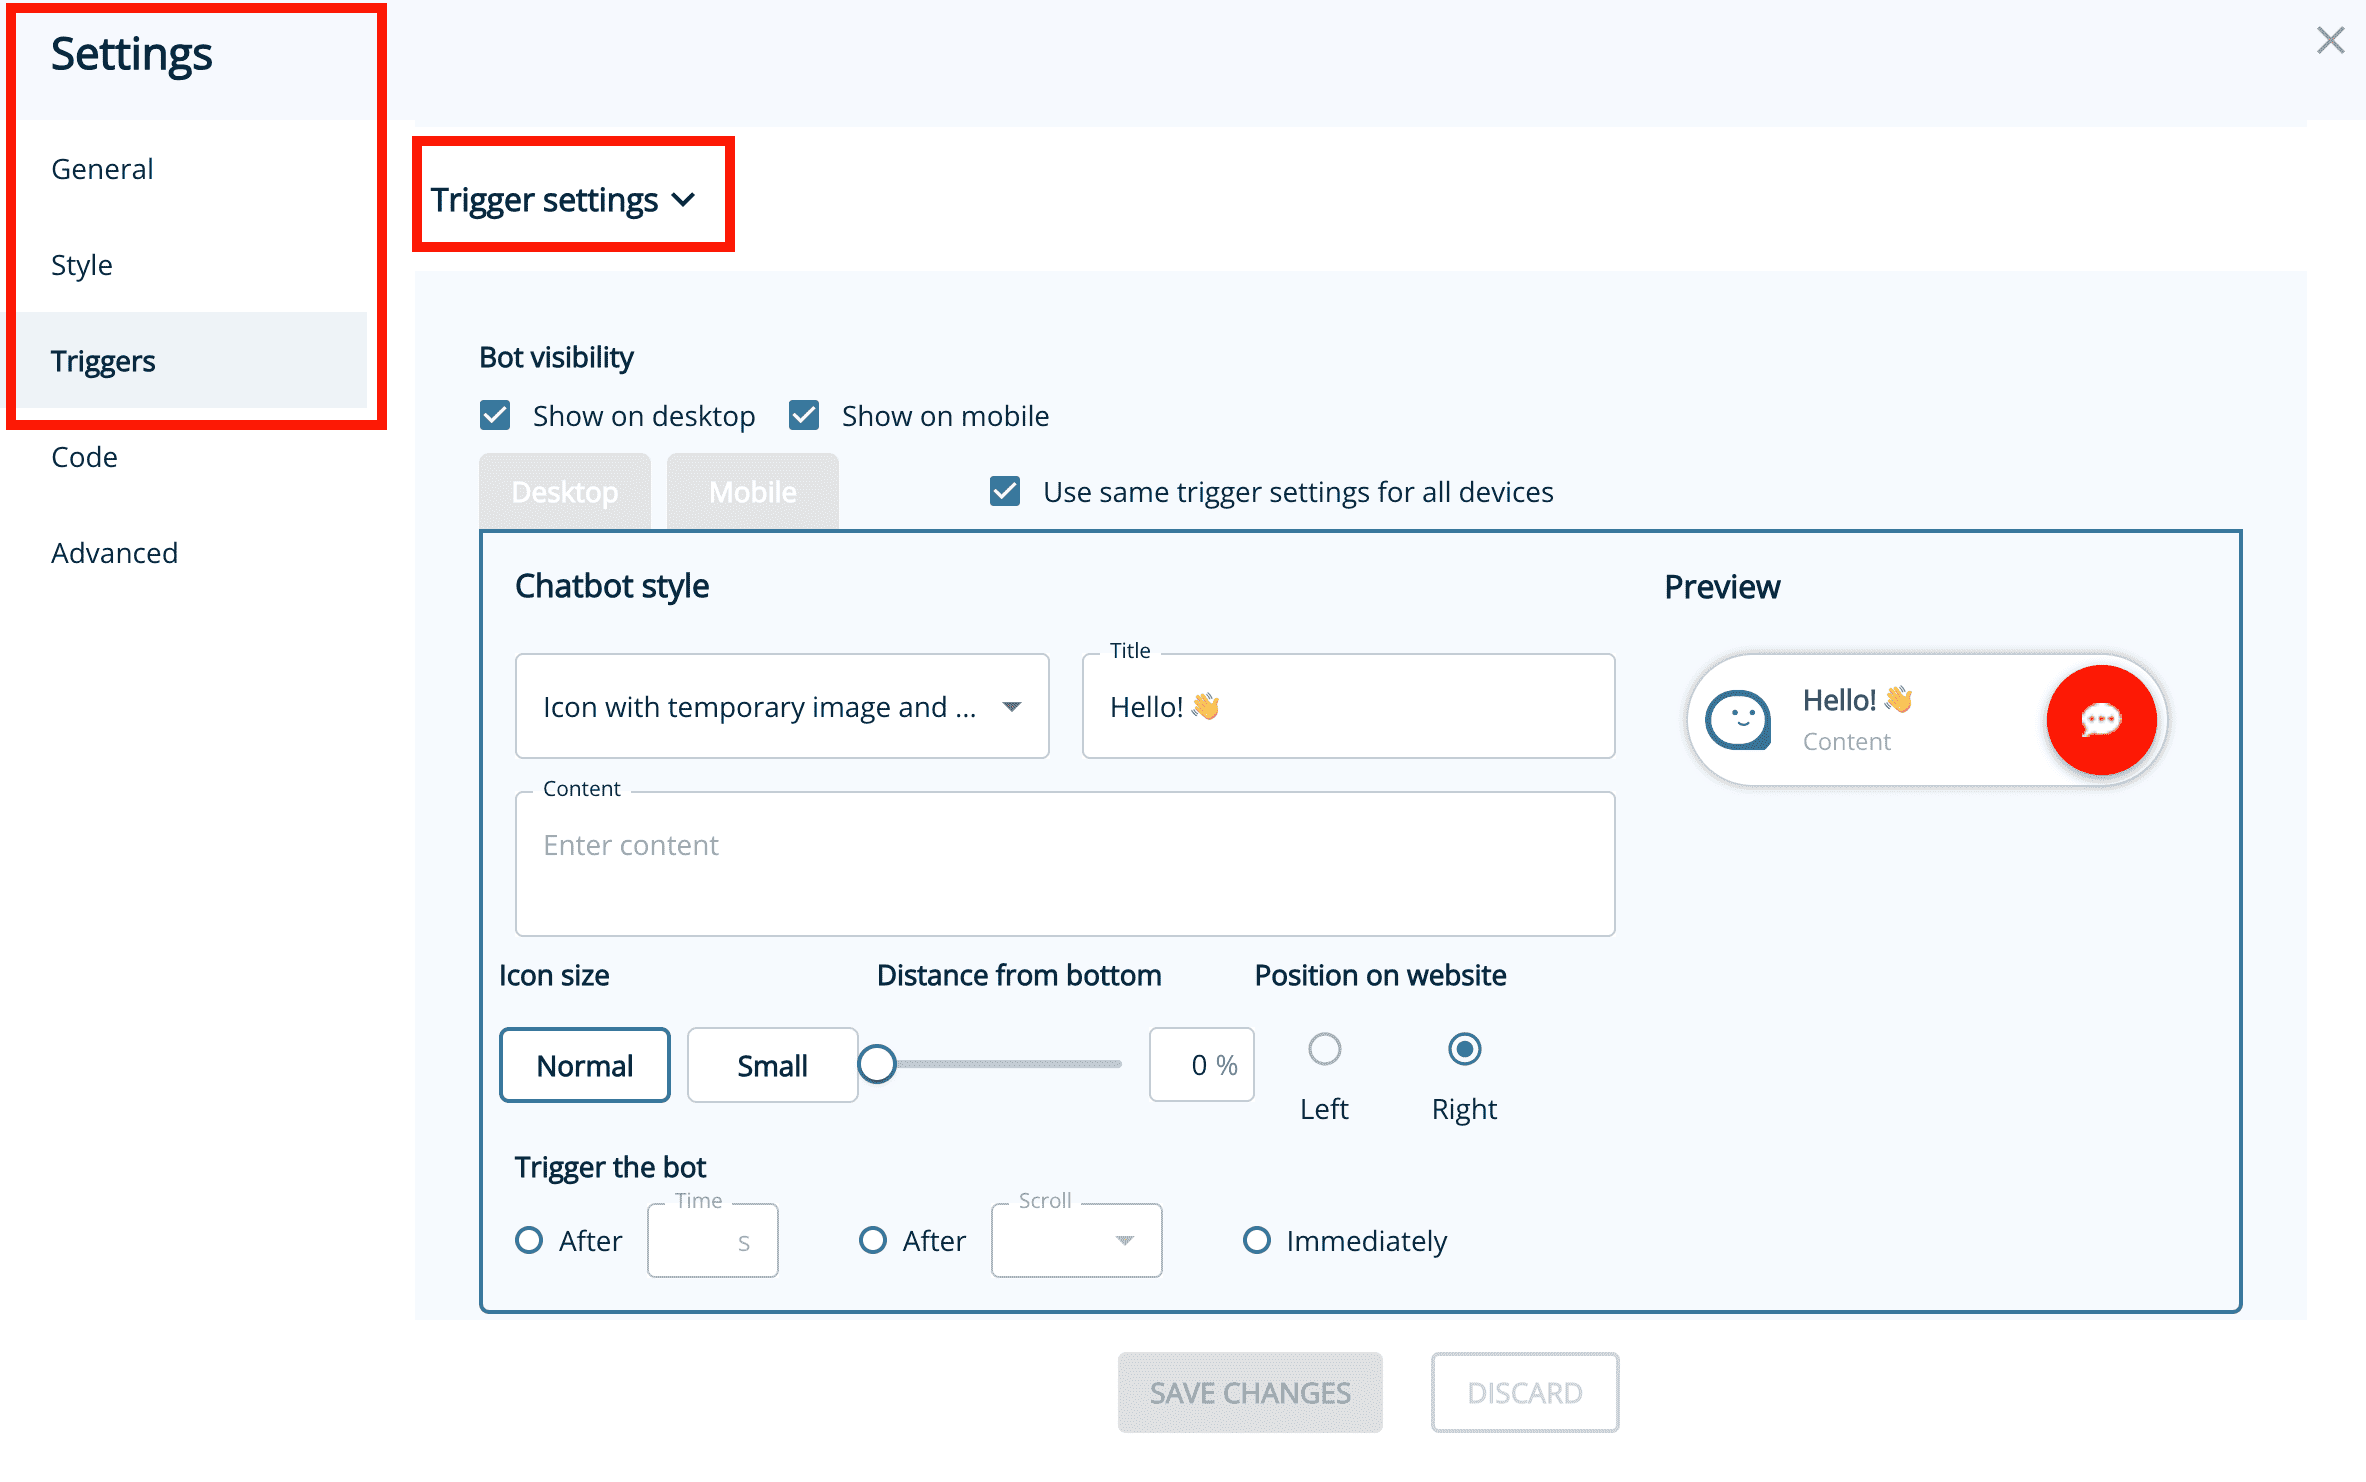

You can define the way the chatbot window opens up:
Trigger settings can be used together or, leave blank if you don’t want the chatbot to pop up.
*Note that you can have separate chat window styles and trigger rules for desktop and mobile devices.
This is where you define where a chatbot should appear on your website.
You can define which pages it should and should not appear on by adding a set of rules.
URL trigger rules
leadoo.com/ = the chat triggers only on the front page of leadoo.com
leadoo.com/* = the chat triggers globally on each page of leadoo.com domain
leadoo.com/*/* = the bot appears on every page of the website except the front page
leadoo.com/*product* = the bot appears on the subpage defined within ** as well as all pages under that subpage
*leadoo.com/* = the bot appears on every page on the website domain, as well as its each subdomain, such as app.aleadoo.com/
Always when URL includes
URL contains: blog = the chat triggers on each page of the domain where the URL contains the keyword blog (like leadoo.com/blog/increase-conversion AND leadoo.com/blog/5-chatbot-benefits, etc.)
Forbidden when URL includes
URL doesn’t contain: sign-up = the chat triggers on all leadoo.com landing pages, except any URL that contains the keyword sign-up, like leadoo.com/sign-up.
Note! There is no need to add https:// to URLs. You can add the asterisks in front of your URL definitions to make the triggering more bullet-proof (e.g. *leadoo.com/)
There are 3 default ways to trigger an Inpagebot:
Contact your Customer Success Manager at Leadoo at [email protected]
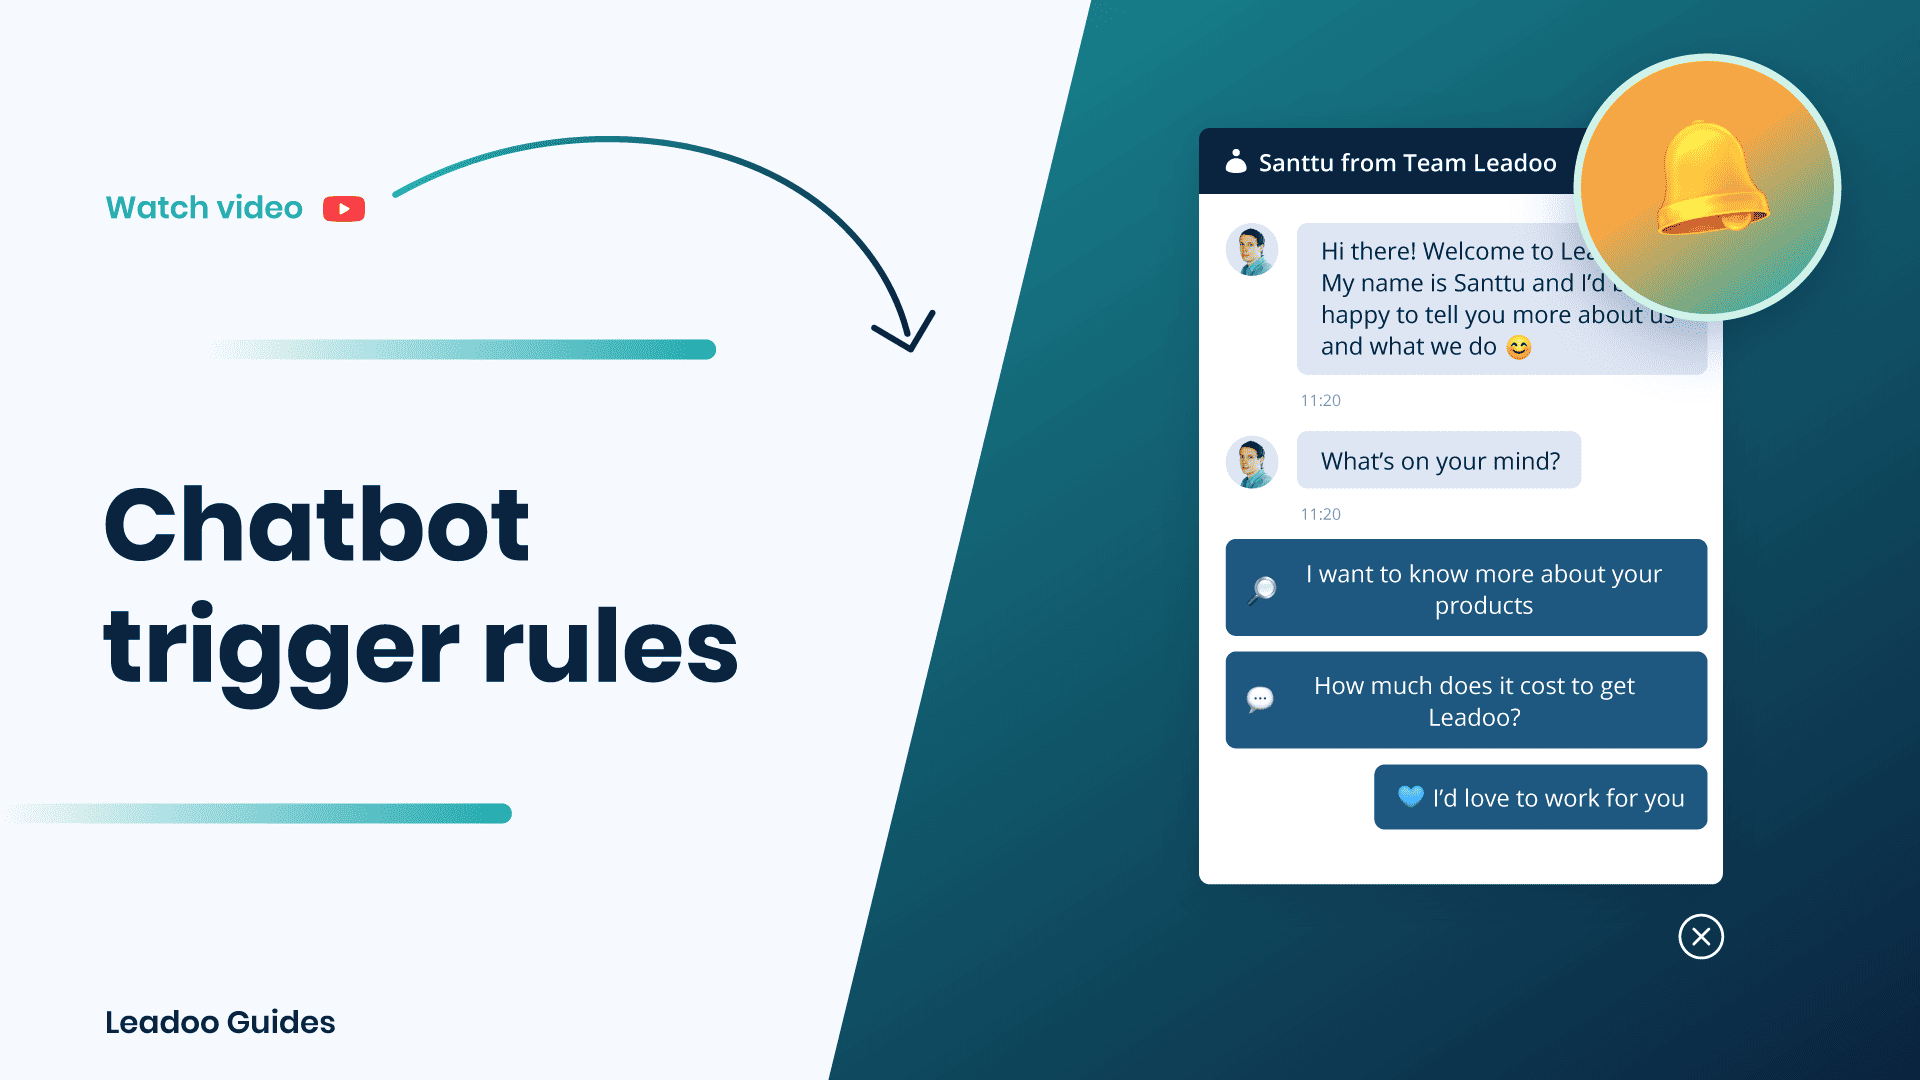
Did you know that the placement and triggering of a chatbot can often define the success or failure of a chatbot when it comes to results?
Follow these simple steps to find out how to engage your visitors with Leadoo Chatbot in the right place and time! 💪
Once you have added the Leadoo script to your website header your chatbot visibility is controlled with settings in your Leadoo platform. Leadoo allows your chats to be displayed to the visitors based on custom URL rules. This means that you can define which chatbot you want to appear on different pages to personalise the visitor’s experience on-site.
Step 1. Open up the settings for your bot. This can either be found via the bot listing or in the editor.

Step 2. Set the URL trigger rules.
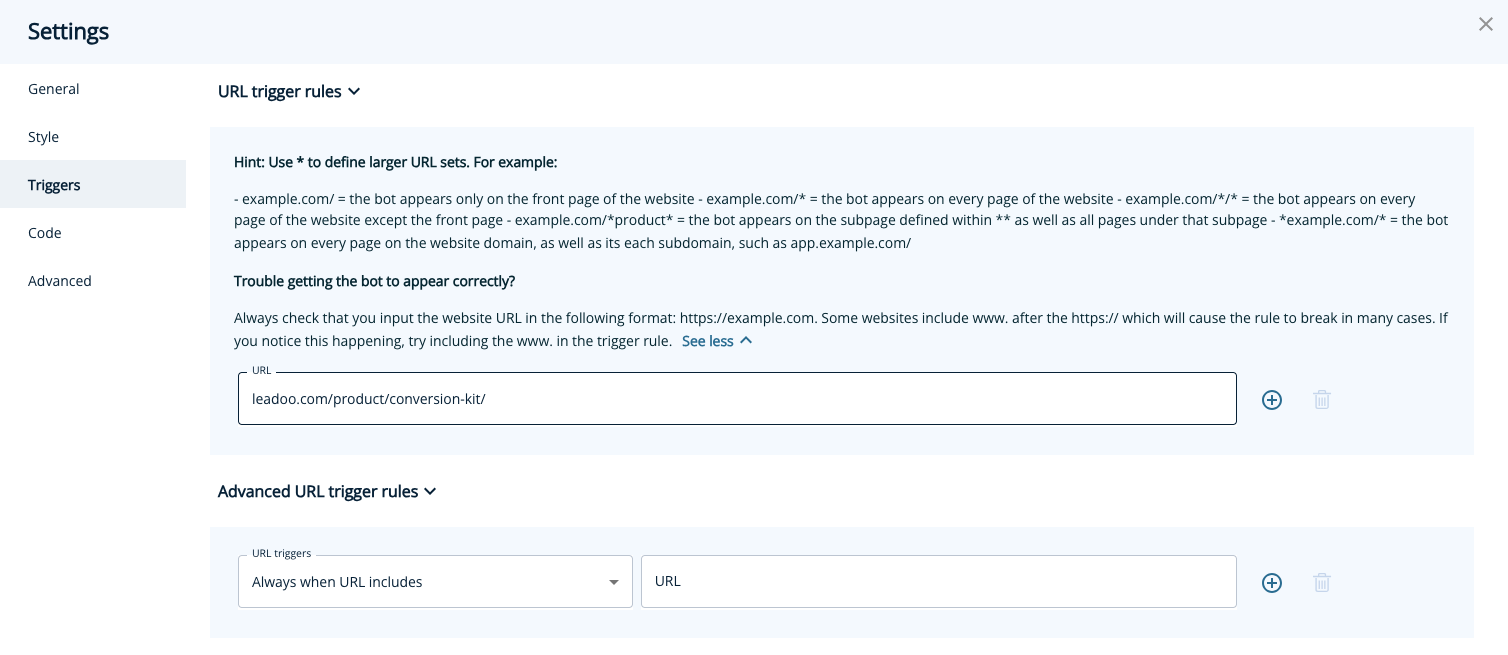 In the example above this chatbot would only appear on leadoo.com/product/conversion-kit. If you wanted your chatbot to appear on every page on your website you would change it to leadoo.com/*. The * acts as a catch-all for all other page URLs.
You can find more page-specific setting examples below or under “See more” within settings.
Page-specific (most popular choice)
= Chat triggers when a visitor enters the exact URL address you define in the given field. You can broaden the selection by using the asterisk sign *.For example:
leadoo.com/ = the chat triggers only on the front page of leadoo.com
leadoo.com/* = the chat triggers globally on each page of leadoo.com domain
*product* = the chat triggers on pages that include the path product (like leadoo.com/product/inpagebot AND leadoo.com/product/chatbot)
You may want to use multiple chatbots across your site or even hide them on certain pages, this is where our advanced URL trigger rules come into place.
Note! Do not add entire URLs in the advanced URL rules, only the keyword that appears in the URL.
We’ve given you plenty of control over what the trigger and icon look like as well as how frequently it pops up including:
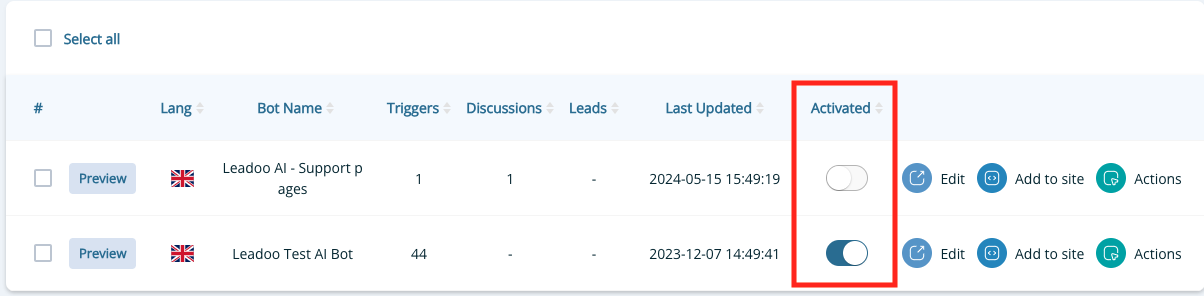
You already know how to hide your chatbot on certain pages, but what if you need to hide it everywhere temporarily? You can easily deactivate your bot within the Leadoo platform in just 1 click! Navigate to the bot type e.g. https://app.leadoo.com/conversion-kit/chat then click the toggle in the ‘Activate’ column.
Remember, no matter how awesome your dialogue is, it won’t have much effect if nobody sees it – so put some time and thought into defining your trigger settings!
If you have any technical challenges reach out to [email protected] or the team member you are currently working with.
Labels have many uses however they are most commonly used to aid lead notifications, engagement analysis and integrations as you can easily set up rules based on whether a label has been triggered or not.
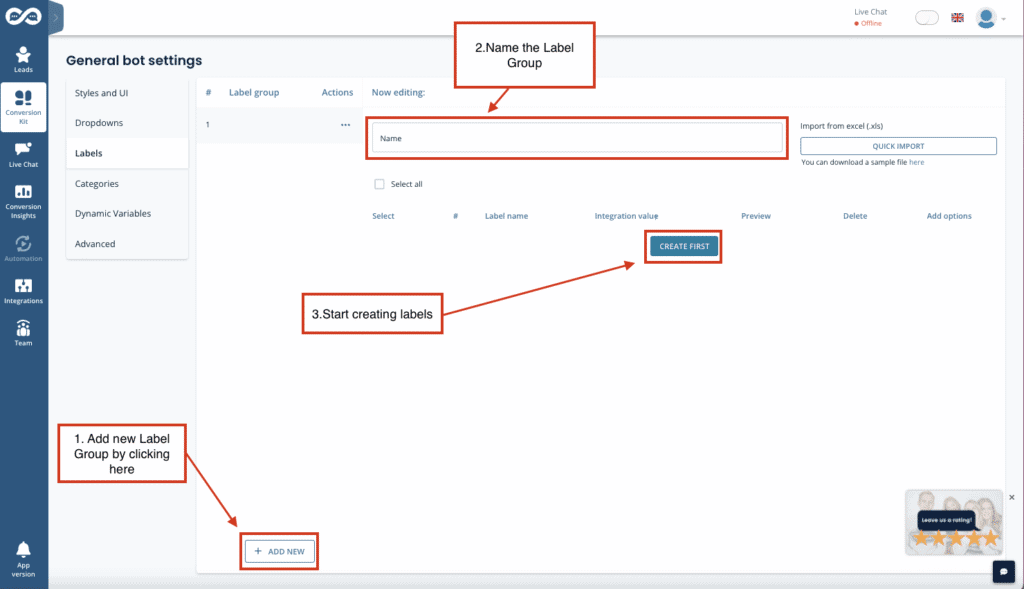
1. Hover your mouse over Conversion Kit and select General Bot settings.
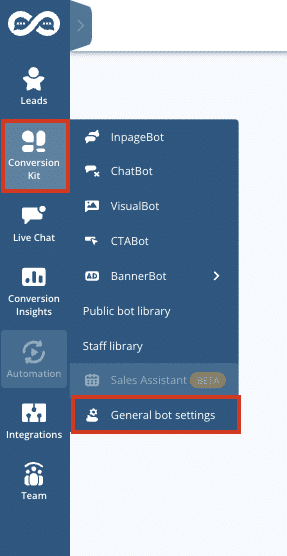
2. Click Labels from the left-hand side menu and the ”+Add New”
Then you can start creating Labels.
*You don’t need to add anything to the Integration value if the labels aren’t used for integration. If you are using labels for integration purposes, please reach out to your Customer Success Manager for help.
It’s best practice to name your label group according to what the labels are used for. e.g. Persona, Service, Department etc.
For example: If labels determine what type of lead has been left to the bot -> Label group name would be: Lead type. And, the labels would be ie. Sales, Recruitment, Customer service and Guide download.

In this example, we want to add labels to understand the purpose of visitors’ enquiries and the region they are based so we can automatically send a lead notification to the right sales team.
Now, when you are setting up lead notifications you simply select the coordinating label for example, [email protected] will only get leads if the ‘Europe’ label is triggered. Note: Labels are always an OR logic.
To send leads where a certain label has been triggered, open settings – general and scroll down to the lead notification section. Next to the email address you can select what leads that email address should receive based on the labels triggered.

You can see how often a label has been triggered across your account via bot insights. You can use this information to understand and optimise for better engagement and leads.
Watch the video below for a guided walkthrough from Gavin.
Contact your Customer Success Manager at Leadoo at [email protected].
Advanced logic router uses “if, then” -type of logic to define what a bot should do next based on what has happened earlier. Here are some common use case examples to help you understand when and how you could make use of the node in your bots.

When wondering which inputs and operations to use as the basis of your logical conditioning, start by thinking what you want to make sure has happened before this point. Maybe one of these fits your case?
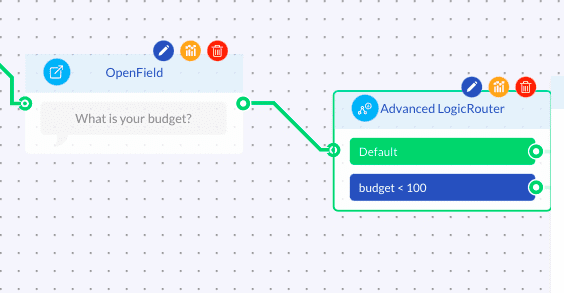
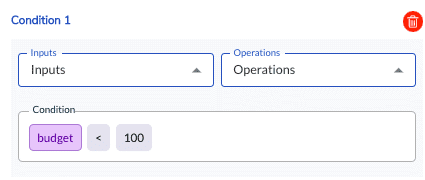
Example case: If the user’s budget is less than 1000 euros, advise them to directly contact the resellers instead.
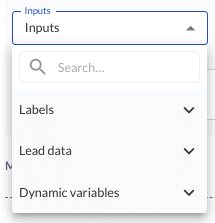
Input: Dynamic variable with type “number”.
Input collection method: Attach desired dynamic variables to any node where the user can input an answer (e.g. SingleChoice, MultiChoice or OpenField). If needed, use a Calculator node to calculate the total price from user inputs and use that new output variable as the input.
Operation: > (greater than), < (less than), >= (greater than or equal to), <= (less than or equal to) or == (equal to)
Example condition: budget < 1000
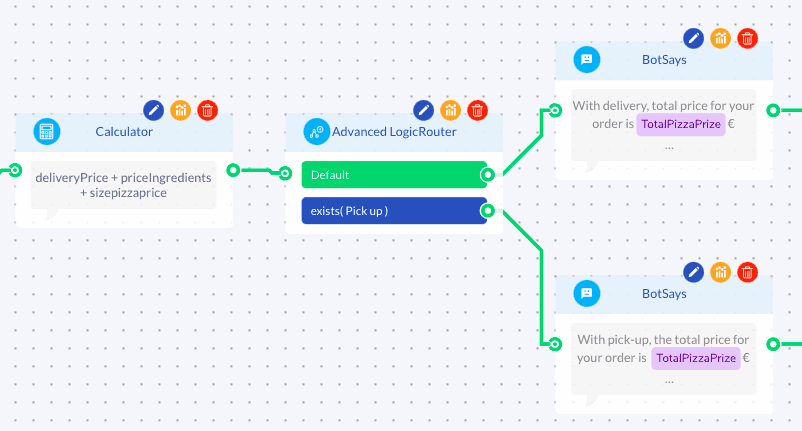
Example case: If user wants to pick-up their pizza order from the restaurant, route them to a conversation path that doesn’t mention any price for the delivery.
Input: Label
Input collection method: Attach a label into desired answer choice(s) in SingleChoice or MultiChoice node. (Show options -> Labels -> Label group (Select/Create new) -> Label (Select/Create new))
Operation: exists(x)
Example condition: exists(pick-up)
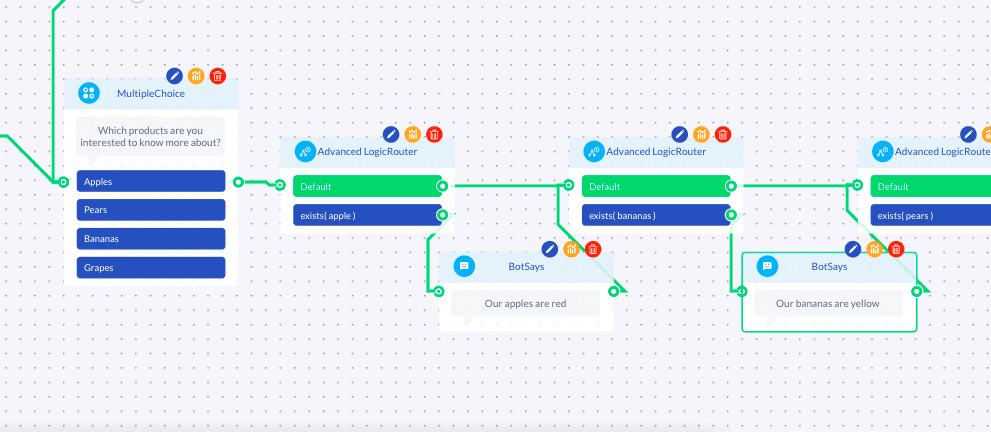
Hint: You can also connect more than one Advanced Logic Router in a row. This can be useful for example if you are using MultipleChoice question.
Repeating the exist(label) conditioning for each of the answer choices in a MultipleChoice node allows you to check which conditions from the multiselection question are fulfilled and, if you will, show the user a selection-specific messages accordingly.
Example case: If user selected product A, B and C, show product description for each selection before moving forward.
Example case:
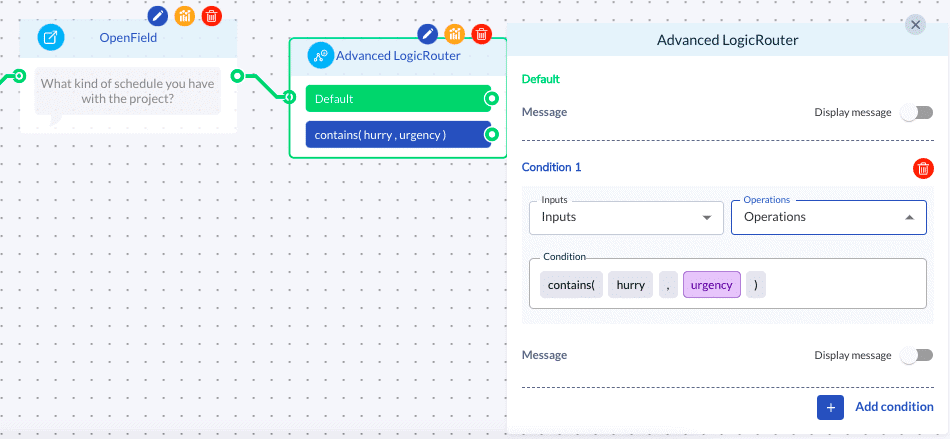
A) If the user mentioned in an OpenField answer that they are in a hurry with their matter, attach a special notion about this into the contact details of the lead.
B) If the user said that his/her country is Finland, advise them to be directly in contact with the local Finnish office.
Input:
A) Dynamic variable with type “text”
B) Lead data (e.g. Name, Email, Phone, Company, Location)
Input collection method:
A) Attach a dynamic variable into the desired open-ended question asked with OpenField. (Variables -> Select/Create new -> Read input)
B) Use a contact detail collection node (e.g. Name, Email, Phone, Company, Location)
Operation: contains (x,y)
*where x = text/keyword you want to check, y = variable attached to the question
Example condition:
A) consists (hurry, urgency)
*where hurry is a keyword and urgency is a dynamic variable
B) consists (finland, Location)
Leadoo monitors the triggers of bots automatically. Once per day, the system checks if the 7-day average number of triggers deviates from the 28-day average.
The compared observation periods are set to 7 and 28 days in order to avoid getting activity alerts for normal fluctuation in traffic & triggers. In other words, for example weekends and other campaign-based spikes in the trigger count are effectively filtered out.
If the number of triggers deviates by a certain percentage from the 28-day average, Leadoo automatically creates a task for your Customer Success Manager.
The task reports the percentage of deviation in trigger count compared to the 7-day averages from the past month. Based on the activity alert, your CSM will take action to contact you or (if possible) apply necessary fixes directly to normalize triggers.
Thanks to Leadoo’s activity alerts, you do not need to monitor changes in bot triggers. Leadoo’s activity alerts guarantee that deviations in your bot performance (triggers) are noticed quickly, and latest within 28 days.
Did you get an invite from your team to start using Leadoo as a livechat agent? Here’s everything you need to know about using Leadoo LiveChat from setting up your account to hosting your first live conversations!
In order to see and operate LiveChats you need to…
So make sure you have set the LiveChat toggle active. The toggle can be found from the right-hand corner of the screen.
You know you are active when the toggle has turned BLUE.
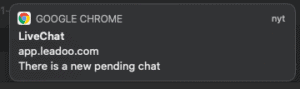
Once the toggle is activated, visitors can start a conversation and send messages to you through the livechat. Whenever a visitor has written you a message, you will see a notification popup and hear a sound.

If you wish, you can change your notification preferences in your Profile.
Make sure you’ve allowed notifications from your browser and System Preferences
How to make sure you’ve allowed notifications:
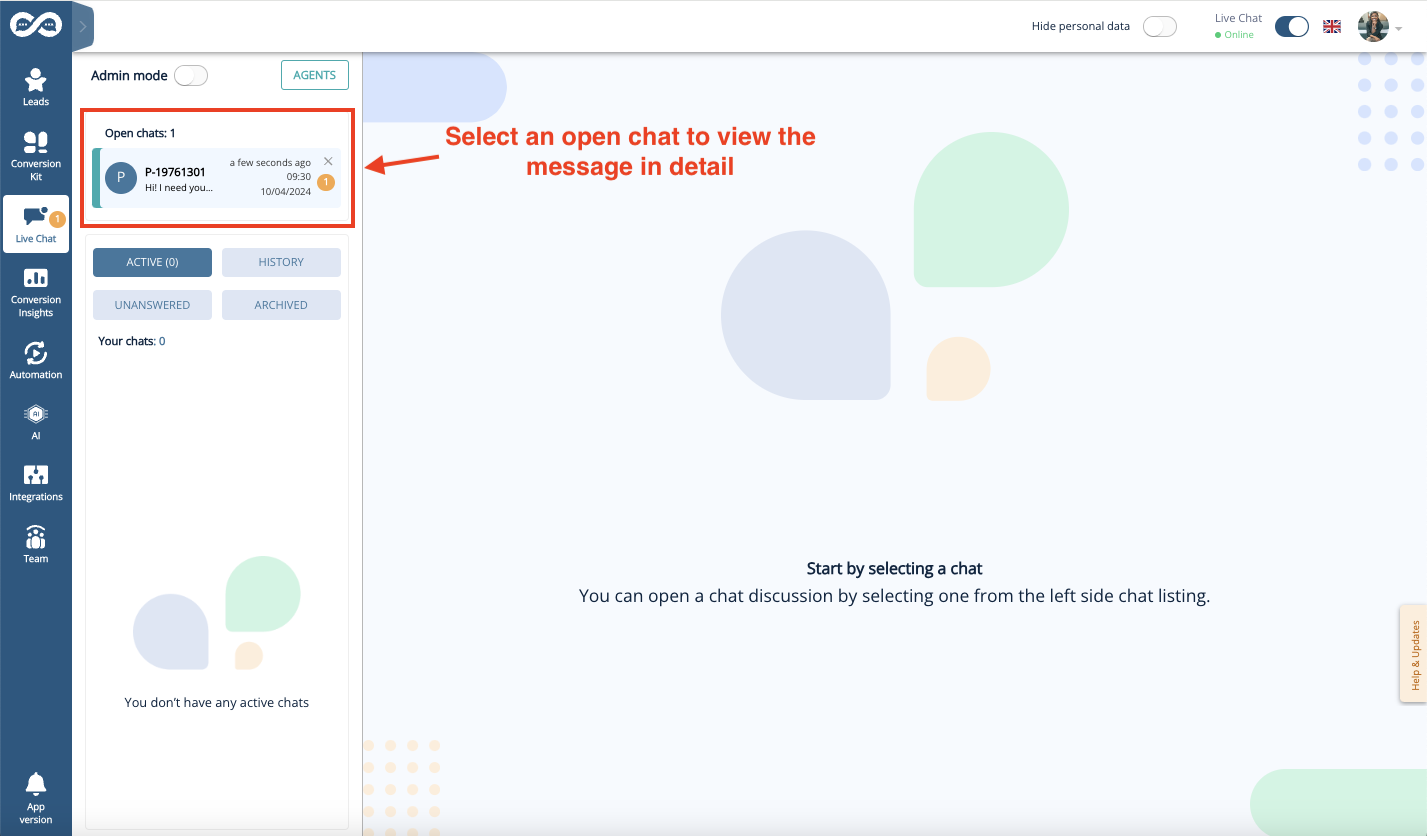
To see all active chats that are available for you, click the pending chat pop-up notification or find the Live Chat tool from the left-side menu bar inside Leadoo.
You can find the pending chats in the Open chats -section of the Live Chat page. Open chats are visible to all LiveChat agents who are online and responsible for the same LiveChat Category as you. Responsibilities for different categories can be managed by the Leadoo Admin user of your team.
Select an open chat to view the pending messages in detail.
You can start chatting with active visitors by clicking “Start Chat” in an opened conversation. This removes the chat from the open chat pool and assigns it to you.
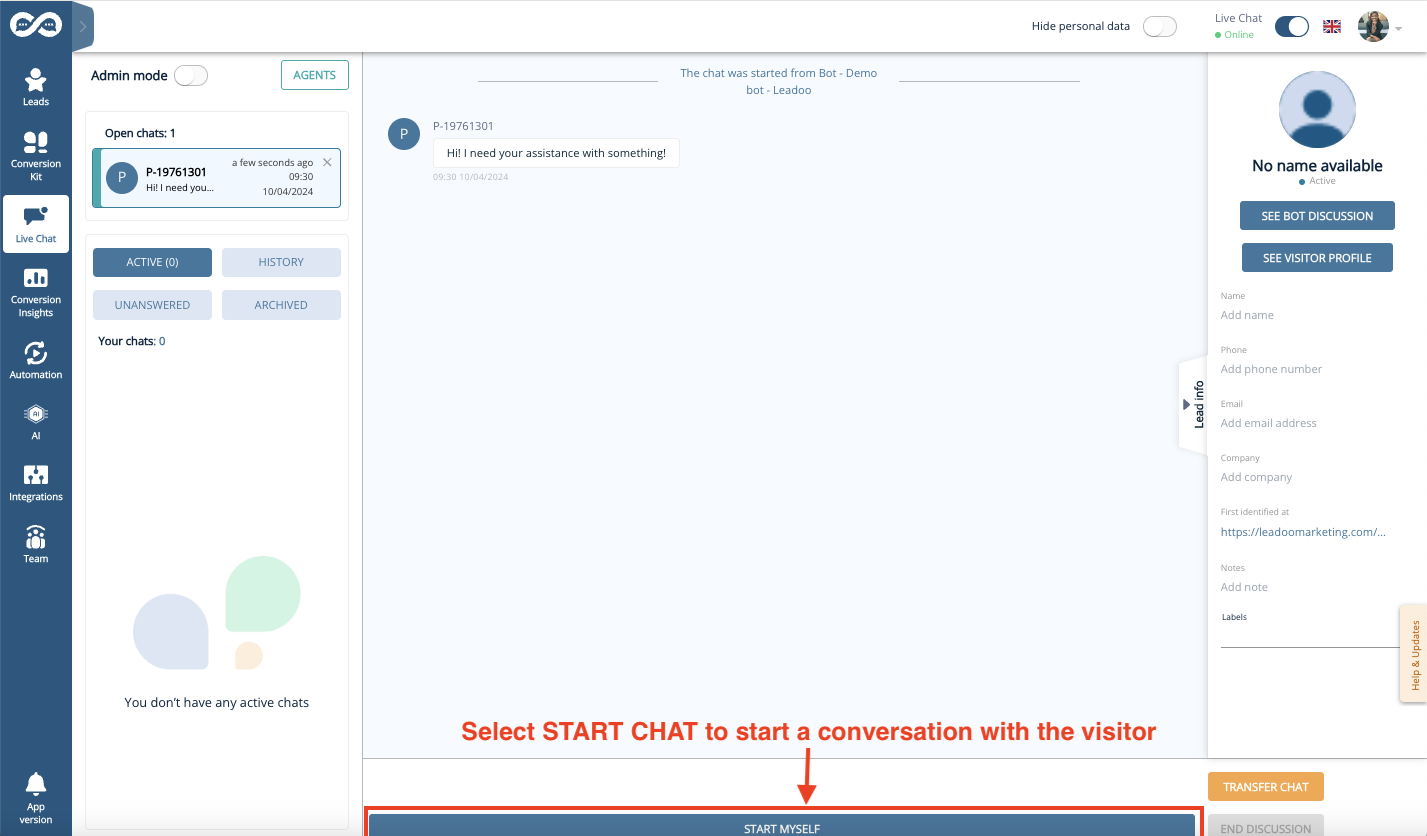
When you chat with the LiveChat users, you can choose to either write freely to the Open text field or use Predefined messages.
You can also create and manage your own personal quick answers visible only to you by clicking the “Predefines” button.
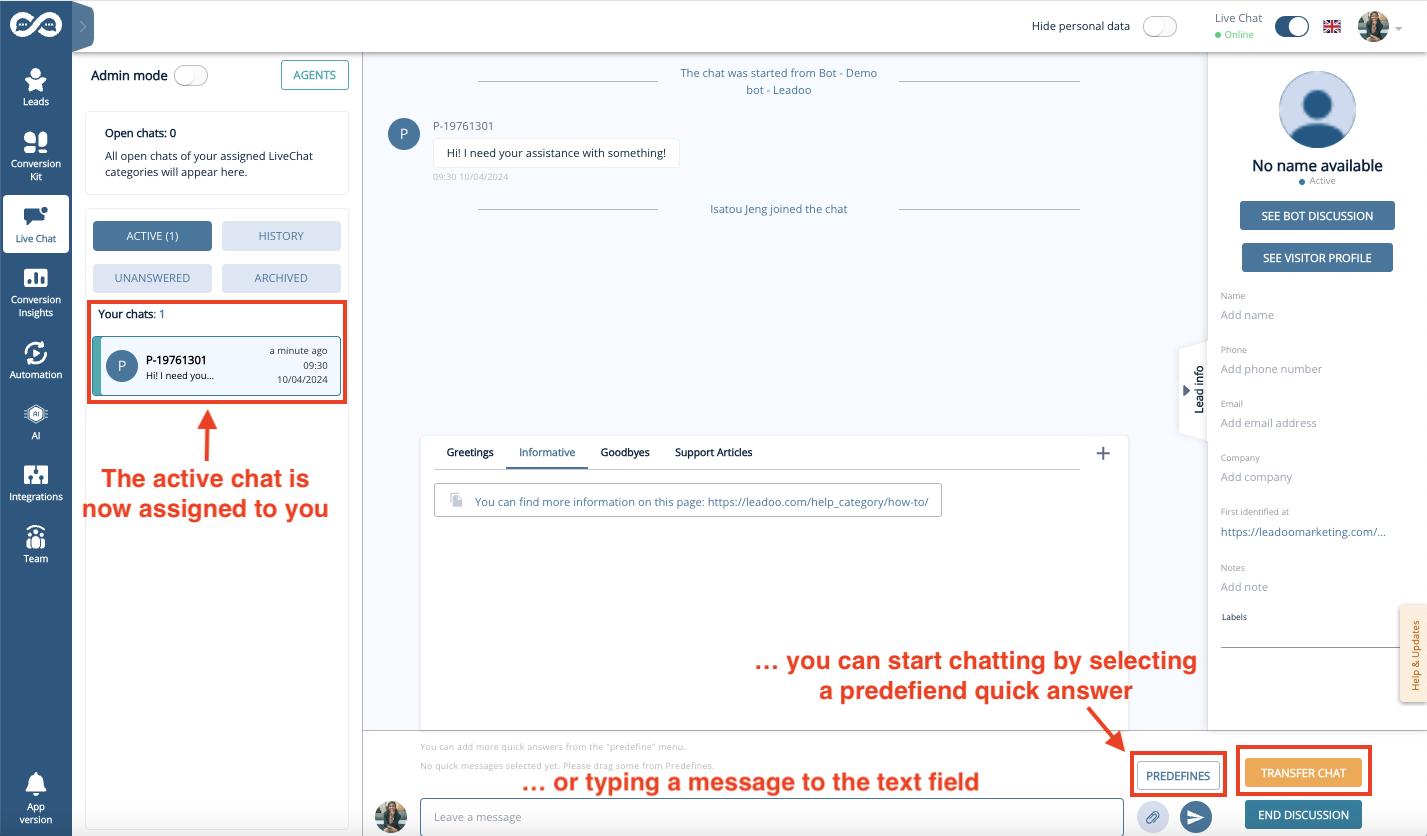
“Transfer chat” allows you to assign the chat to another agent who is online – or to return the chat back to the open chat pool where it is again visible for all agents. This can be useful e.g. if the visitor asks a question that you don’t know the answer to.
![]()
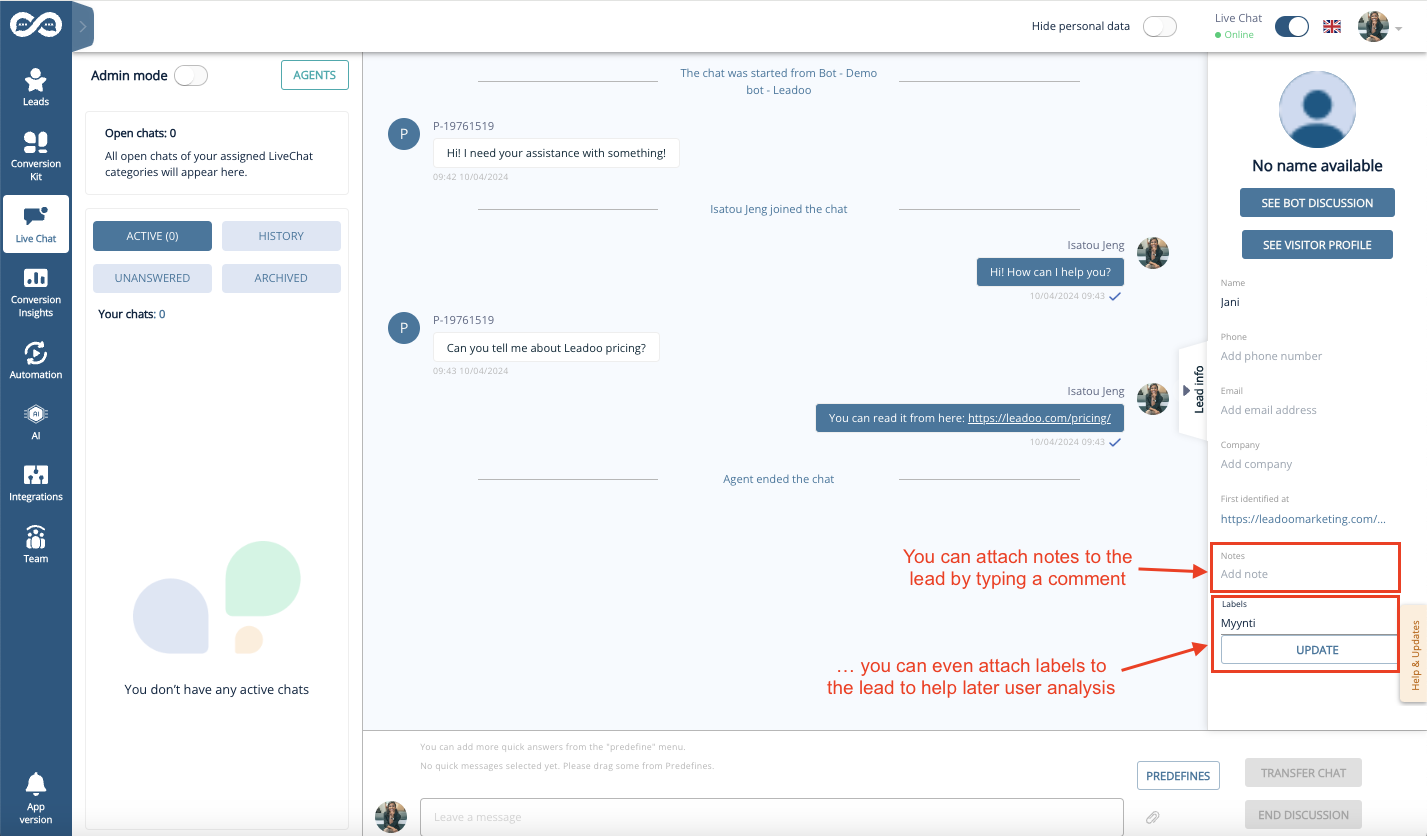
If you manage to get some contact details from the livechat user, it makes sense to save them as a lead for later use.
The visitor information can be updated by typing into the fields within the “Lead info” -section shown on the right. Remember to click the “Update” button when you are done typing the user info to the fields to save the changes!
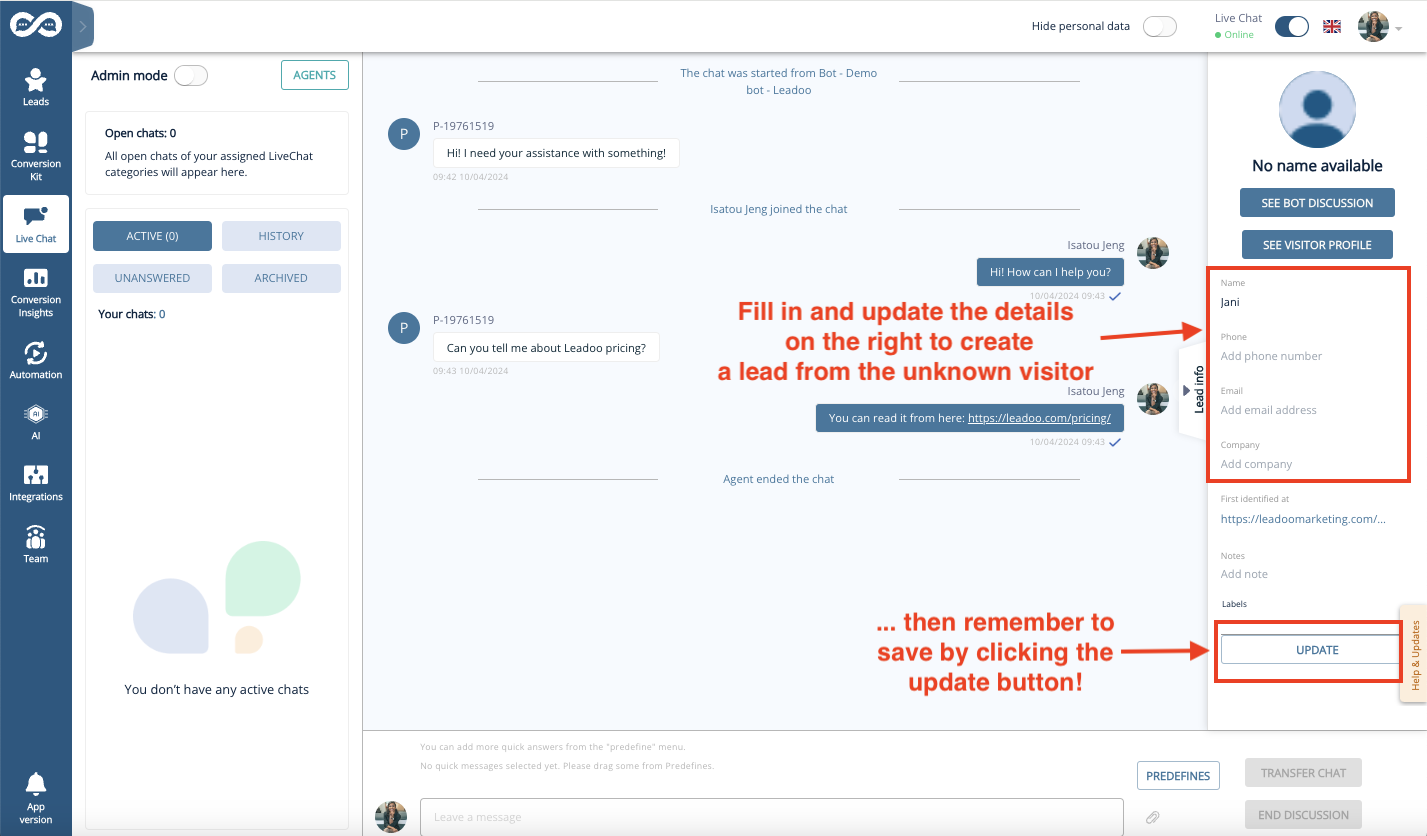
You can even attach notes and labels to the lead – for example to identify the lead type or to put down other interesting details that can be useful later when moving the lead down the funnel.
The Leads created will be sent to the Lead Notifiers indicated in the settings of the Chatbot. The chatbot settings are managed by your Leadoo Admin user.
You as an Agent will not receive a copy of the sent Lead by default, unless you ask your Admin to add you as a Lead Notifier in the bot.
Once the conversation is ended, click on the “End discussion” button to transfer the conversation from your active livechats to history.

Note! When you have clicked on End discussion neither you nor the visitor on the other end can longer write to the chat window.
Not a Leadoo user yet? Request a demo
To ensure Safari does not block the audio for the Leadoo application please configure your sound settings using the below steps.
To update your Leadoo application Safari sound settings first Log into your Leadoo account using your Safari Browser.
Next, select the lock icon in the URL address bar. Then click Setting for This Website”.
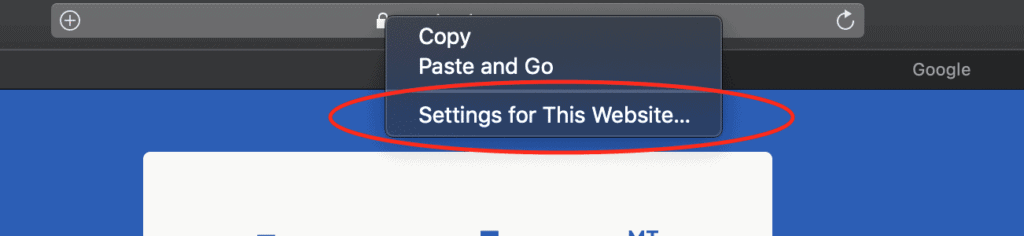
Next, click on “Auto-Play” on the permission screen.
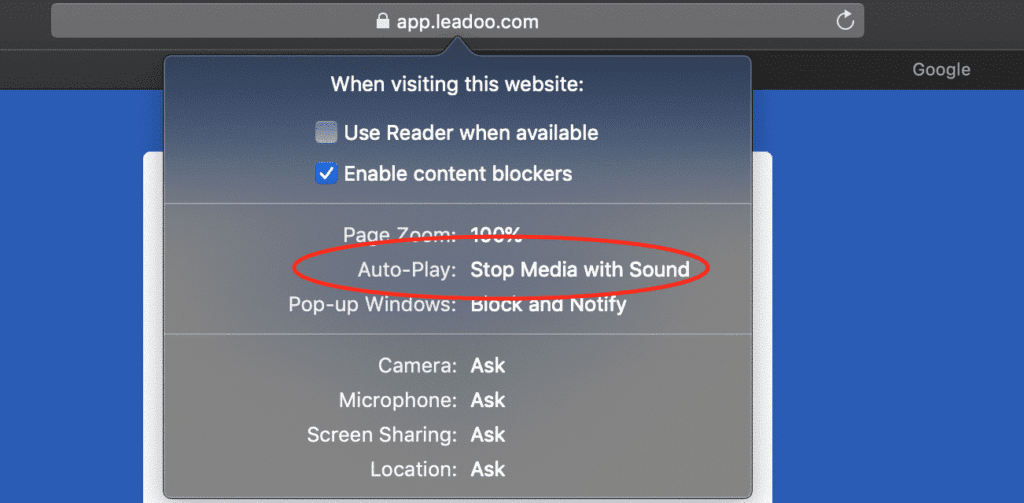
Now adjust settings by selecting “Allow All Auto-Play”.

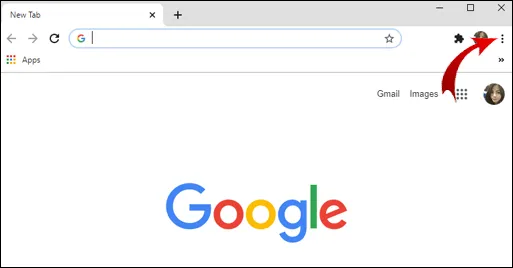
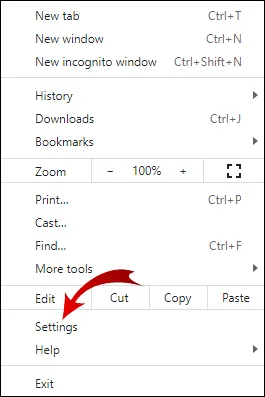
To ensure Chrome does not block the audio for the Leadoo application please configure your sound settings using the below steps.
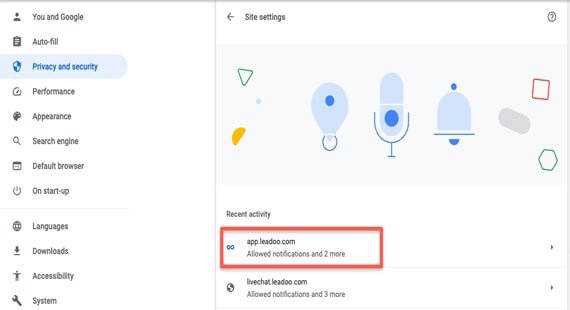
To update your Leadoo Google Chrome sound settings first Log into your Leadoo account using your Google Chrome Browser
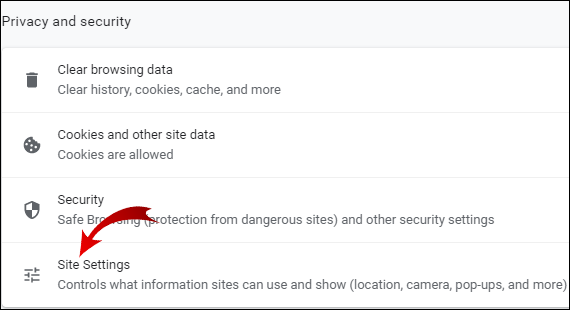
Select the lock icon in the URL address bar.
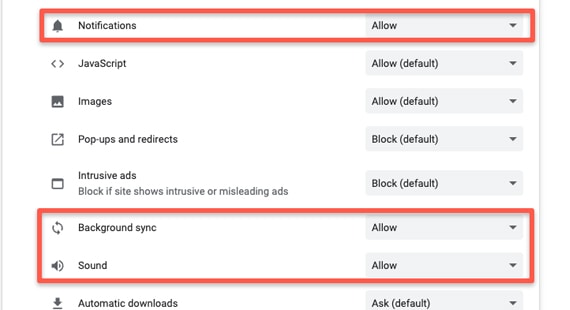
Make sure Notification is set to allow.
Then click the Site settings located on the bottom of the drop-down.

Next, scroll down to your Sound setting and select the drop-down and adjust the setting to Allow.

To ensure Firefox does not block the audio for your Leadoo application please configure your sound settings using the below steps.
To update your Leadoo application sound settings first Log into your Leadoo account using the Firefox Browser.
Next, select the lock icon in the URL address bar. Then click the “Connection Secure” extension.

Click the “More Information” located at the bottom of the window.

Select the “Permissions” tab located on the top of the settings screen. You can now untick the Autoplay default setting and click “Allow Audio and Video”.
Make sure that Send Notifications is set to Allow.

To ensure Edge does not block the audio for the Leadoo application please configure your sound settings using the below steps.
To update your Leadoo application Edge sound settings first Log into your Leadoo account using your Edge Browser.
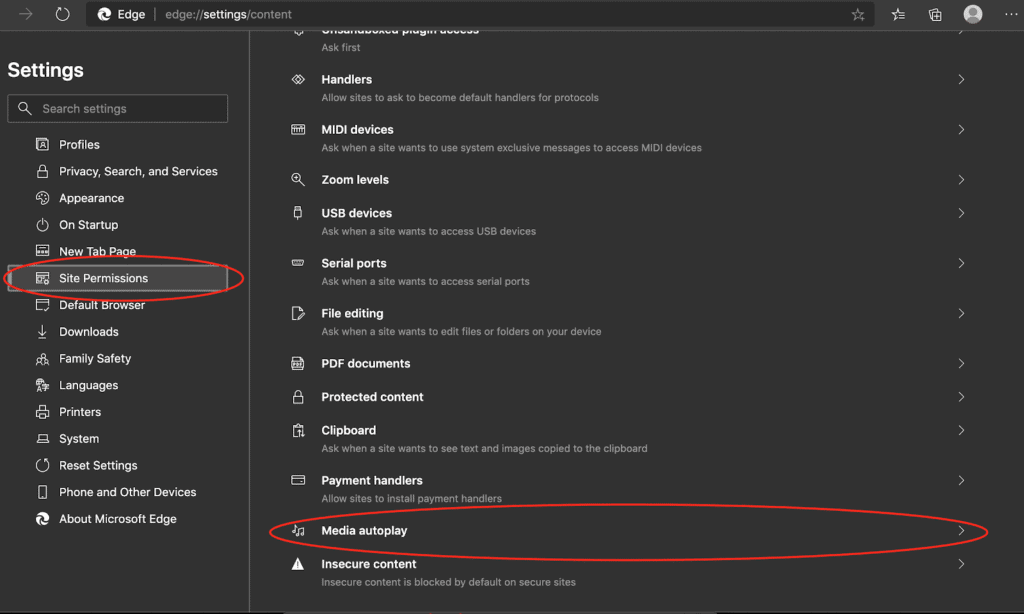
Next, select the lock icon in the URL address bar. Then click Site Permissions.
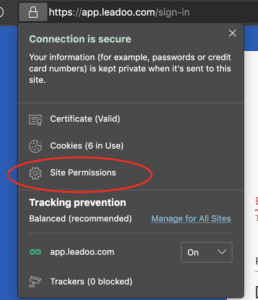
Switch to the Site Permissions from the sidebar menu.
Scroll down and choose the Media autoplay option within Site permissions.
Select the drop-down and adjust the setting to Allow.


