KNOWLEDGE
Case StudiesBlogsEventsSupport & Starting
Support Articles & HubSupport Videos (Youtube)Try Leadoo Free (Leadoo Lite)Partners & Careers
PartnershipsCareersSecurity & Privacy
Security at Leadoo AIGeneral Terms & ConditionsData & GDPRKNOWLEDGE
Case StudiesBlogsEventsSupport & Starting
Support Articles & HubSupport Videos (Youtube)Try Leadoo Free (Leadoo Lite)Partners & Careers
PartnershipsCareersSecurity & Privacy
Security at Leadoo AIGeneral Terms & ConditionsData & GDPRThe Leadoo calendar node is a great way to create a sense of urgency within your visitors, leading to higher conversion rates and a better user experience. But how does it work?
The calendar node has two functions, first is a live calendar booking that syncs directly with your own calendar (Google, Outlook and Office365) so that prospects or customers can book in with directly. The second is a way for visitors to indicate a date and time that they would prefer, but it can also be great for asking about project start dates etc.
Let’s start with the live booking feature but before you add the calendar node make sure that you have connected your calendar in the platform, you can do this from the My Account area. Here’s an article to help you get connected. Now you’ve got your calendar linked, you’re ready to go!
To use the live booking function, simply add a calendar node to the canva and click on calendar booking, you’ll notice that this changes the settings. From here you’ll need to select which calendar you’d like to connect (you can choose multiple) and update the meeting title and details if you wish. The title, description, duration and location will all be pulled in from the settings in the My Account area so you normally don’t need to change these!
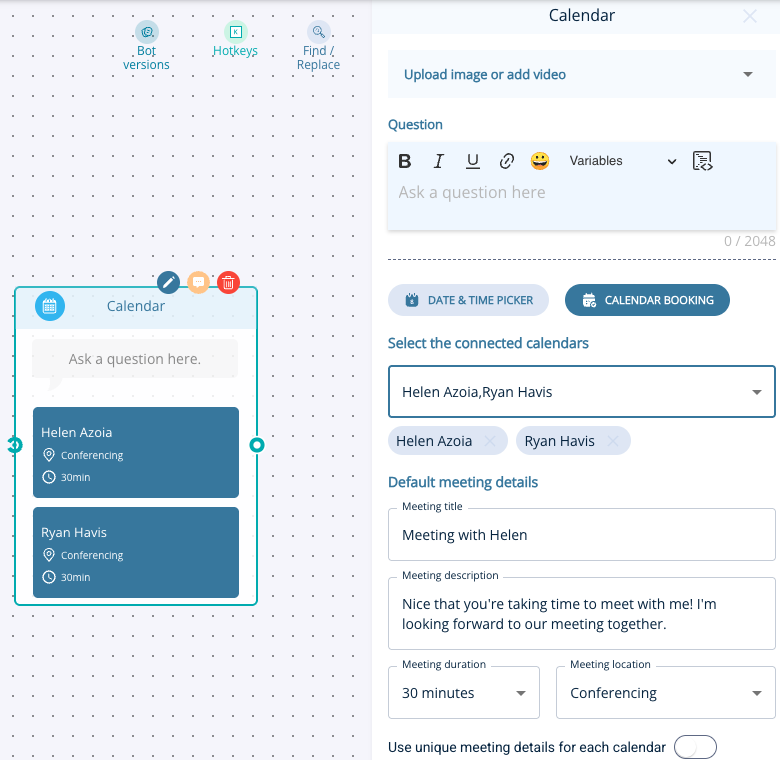
If you’re adding multiple calendars the default meeting details will use the first calendar you added but you can easily change this by toggling on the option to use unique meeting details for each calendar. This will allow you add another level of customisation for the meetings, you’ll be able to use variables to include personalisation options like name and company name etc.

Once you’ve done this you can preview the flow to make sure you’re happy! Here’s a few screenshots of what it will look it. You’ll see that the visitor is prompted to add their email to confirm the booking, but you can also ask for contact details before sending them to the calendar node and it won’t ask for their email again.
The other option when adding a calendar node is to use the offline scheduler which is essentially a date and time picker for the visitor to select. This is great when asking for times they prefer to the contacted, when their project is starting or when they could start a new job.
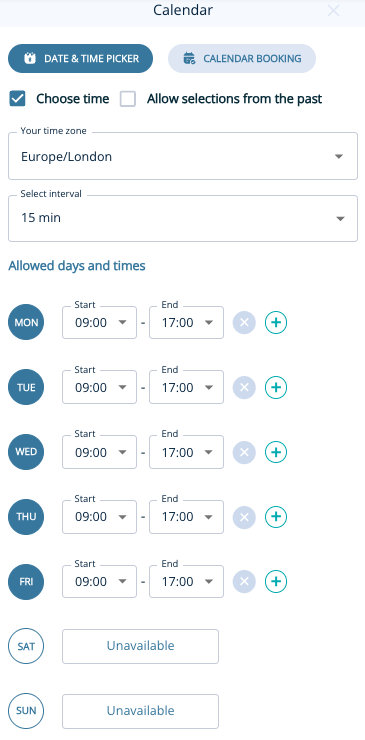
To get started you’ll need to decide on whether or not they can pick a time as well as a date. If you allow a time to be select you can customise the availablity to create set windows. For example you can allow 9am – 5pm everyday or create certain windows of availability on set days, check out the screenshots below for some inspiration.
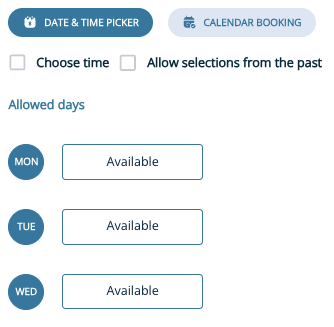
If you’ve chosen to not allow a time to be selected, you’ll simply need to decide on which days you wish to be available.
Leadoo won’t track any users by default, only after cookie consent has been given by the end-user.
You’ll notice that with this option the visitor won’t need to give their email address to confirm because they are not booking directly into you calendar, so it’s generally a good idea to ask for their details before the calendar node!
And that’s all there is to it!
Leadoo isn’t just about creating super engaging bots to activate your website visitors! Oh no, it’s much more than that. Did you know that we help you identify anonymous website visitors? Using our unique tracking script we can identify visitors to your website and which company they belong to!
“The ability to reconnect with the majority of people who weren’t ready to convert upon their first interaction with your brand is what makes retargeting the most powerful piece of your digital marketing campaign.” – Forbes
Using the data you’ll get from Leadoo’s Company Identification tool is a great way to improve your campaigns and specifically digital ads, which can be a risky and expensive investment! By retargeting an already engaged audience you’ll see:
It couldn’t be easier, the hard work is all done in the background by having the Leadoo tracking script on your website. This will start tracking your anonymous website visitors and identify the companies they belong too! Now all you have to do is create a target list for your campaigns.
By creating persona-specific filters, such as company size, industry, which pages they’ve visited, etc., you can create a targeted list of potential prospects. Not only have these prospects visited your website, but you now have a clearer picture of who they are and what they are interested in.
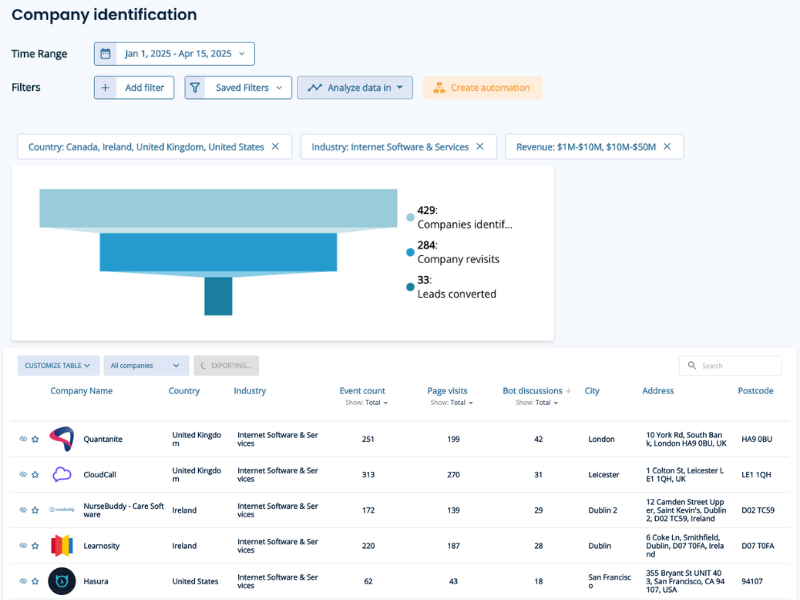
Once you’ve created your filters, it’s time to export the data. By clicking on the export button it will automatically select all companies within your chosen filter. You can also choose either a CSV or XLSX format.
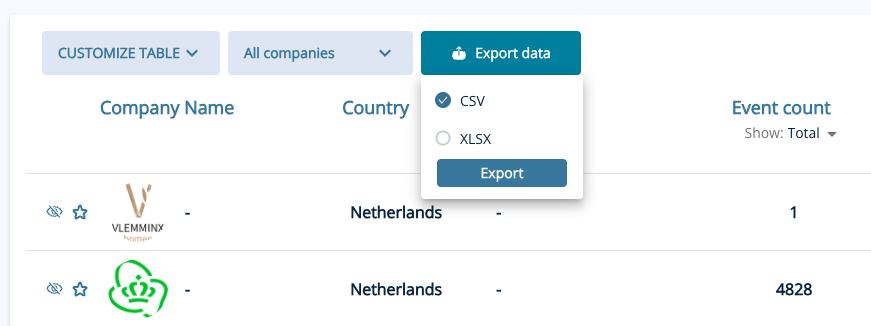
Once it’s ready to download you’ll be prompted to download now, the time for the file to be processed will vary depending on how many companies are in your filters.
To add a customer list in LinkedIn, you’ll be using the LinkedIn Ads Campaign Manager for uploading and creating Matched Audiences. This involves creating a new audience, selecting “Matched Audience” and then “Company” and finally uploading your list after downloading the appropriate template. Here’s a step-by-step breakdown:
Exit intent is a way of triggering the Visual Bot to capture visitors who are just about to leave your site/page which creates great opportunities for lead capture. We tend to see success with this type of trigger when you’re offering something of real value to your visitors, e.g. brochure or case study download, event registration or everyone’s favourite, a discount!
With exit intent triggering you can:
First things first, you’ll need a visual bot to use this feature. You can either build one from scratch or use an existing one. In fact, if you’ve already got a product finder or event registration page but it’s static on the page then duplicating that and deploying it as a visual bot has the potential to generate some quick wins!
If you need help building a visual bot you can check this guide. For now, I’m going to assume you’ve got one ready to go.
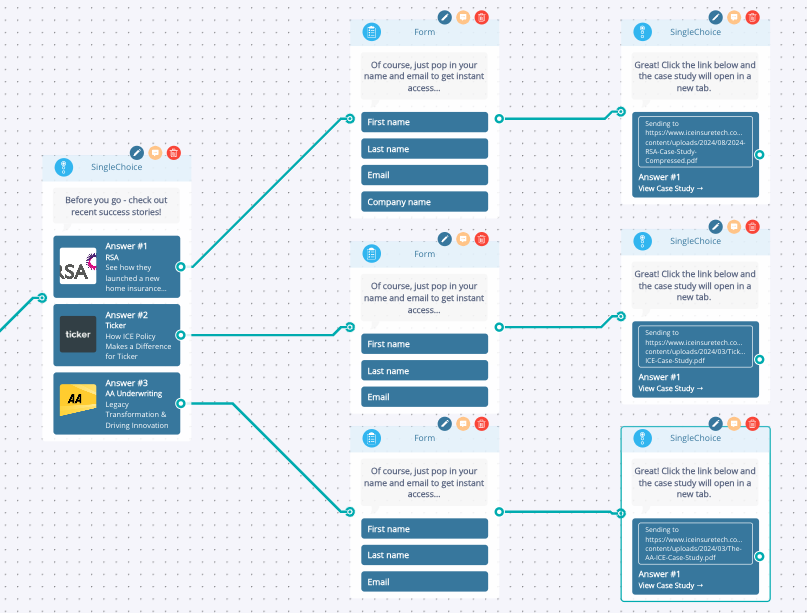
Here we have a simple lead capture visual bot that’s offering visitors the chance to download the latest case studies before they leave. This is a good strategy if your visitors are still in the decision making phase.
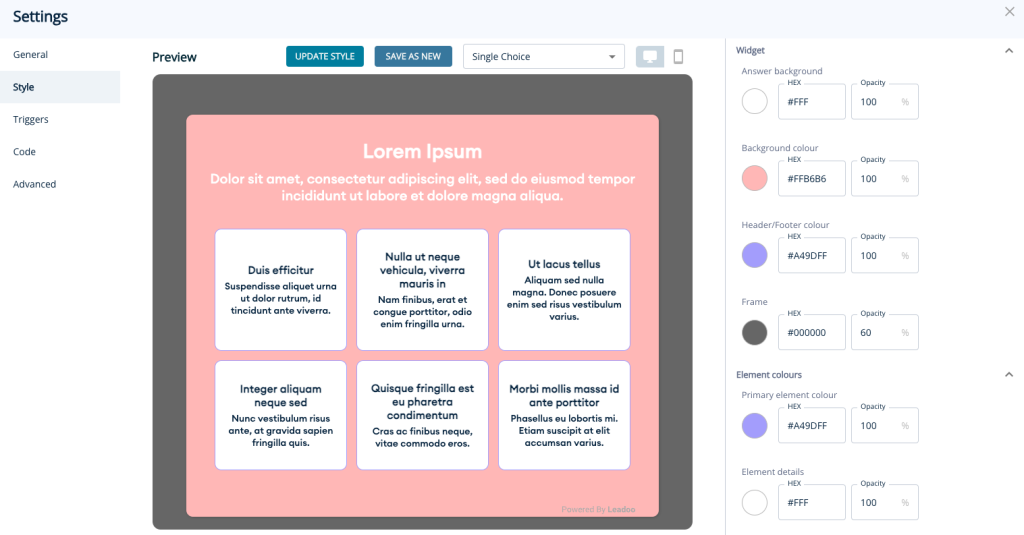
Before we look at the exit intent trigger settings we need to make sure we’ve got the frame colour setup correctly. With exit intent’s the frame basically acts as an overlay on your website which helps the bot to stand out. We recommend using one of your brand colours and setting the opacity to around 60%
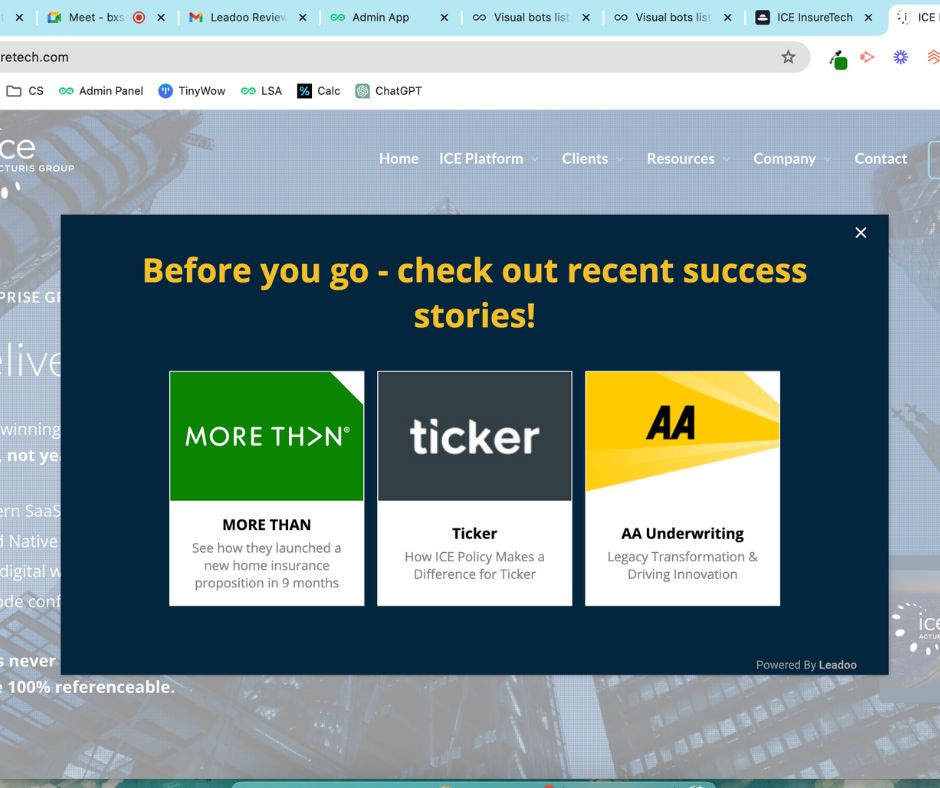
Here’s a nice client example to show you how this will look when it’s live!
Now it’s time to set the exit intent live! Assuming you have the Leadoo tracking script on your site then this will be very quick and easy because the exit intent is triggered by the same logic as the chatbot. If you don’t have the tracking script on your site yet (why not?!) then you can follow this video example of adding it to a WordPress site.
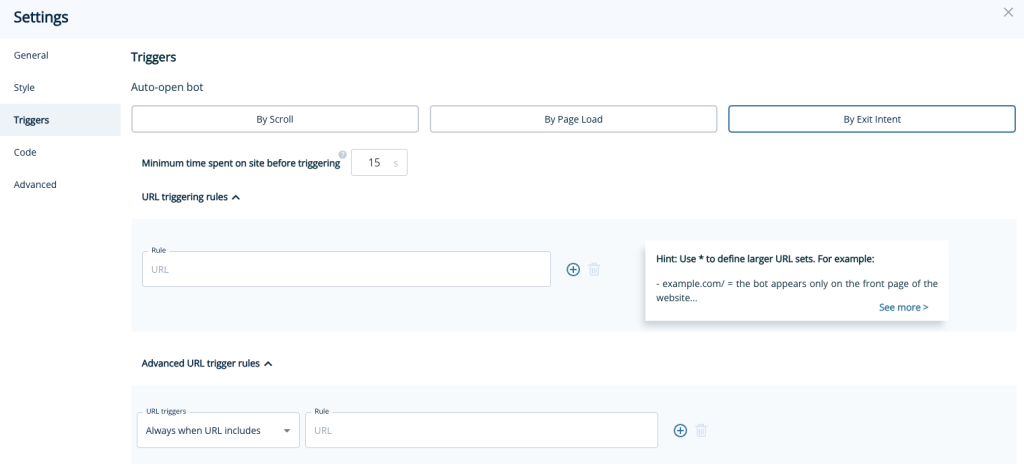
Once you’re in the triggers menu select the By Exit Intent option to get started. From here you’ll need to decide on how long to wait before triggering the exit intent, for some insight into this you should check out the Website Analytics area of the platform to see how long visitors stay on certain pages. We would recommend about half of the average time spent, e.g; if visitors tend to stay on your site for 4 minutes it would be a good idea to trigger the exit intent bot after 2 minutes.
Next up is where you want the exit intent to be shown, simply copy and paste in the URL of the page(s) that you would like it to appear on. This section works in the same way as our chatbot triggers, which you can learn more about here.
Let’s run through a few examples.
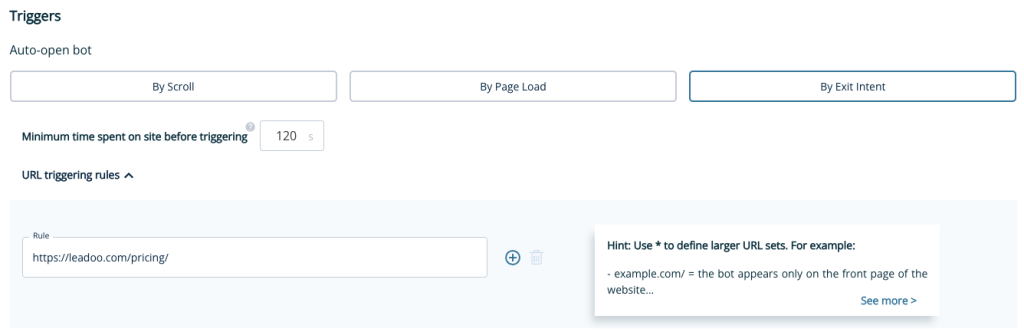
1. Adding the exit intent to your pricing page after 2 minutes. This is great for offering discounts and or showcasing ROI calculators. Simply add in the pricing URL and set the minimum time spent to 120s.
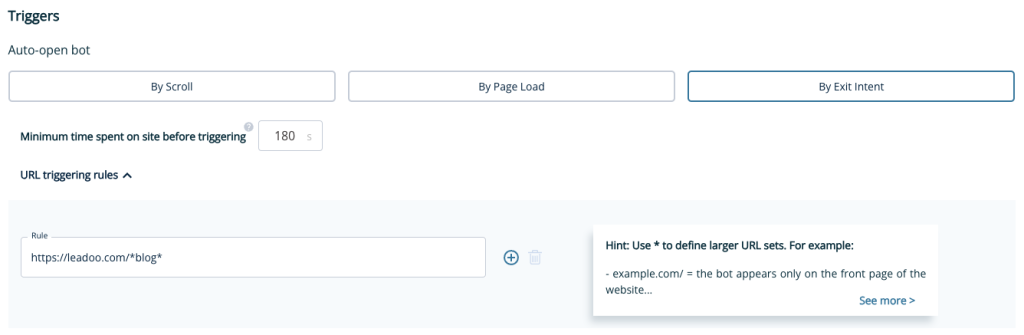
2. Adding the exit intent to all blog pages – this is great for capturing brochure download leads as the visitor will be in the research phase. In this example you’ll notice we’ve used some asterixis when adding a URL, using them allows you to add the exit intent to multiple pages without having to manually add them all. By adding /*blog* the exit intent will show on all our blog pages!
Hope you found this useful, why not get stuck in and try it yourself! Don’t forget if you need any advice or help just reach out to your Account Manager.
Using the dropdown node is a great way to offer your visitors a wide selection of options to choose from in a very user friendly way. This node is great for when the single choice option is getting a little cluttered, generally we would recommend for options of 6 or more.
Let’s start by building the dropdown list, which you can either do directly in the bot builder or in the general bot settings area.
General Bot Settings
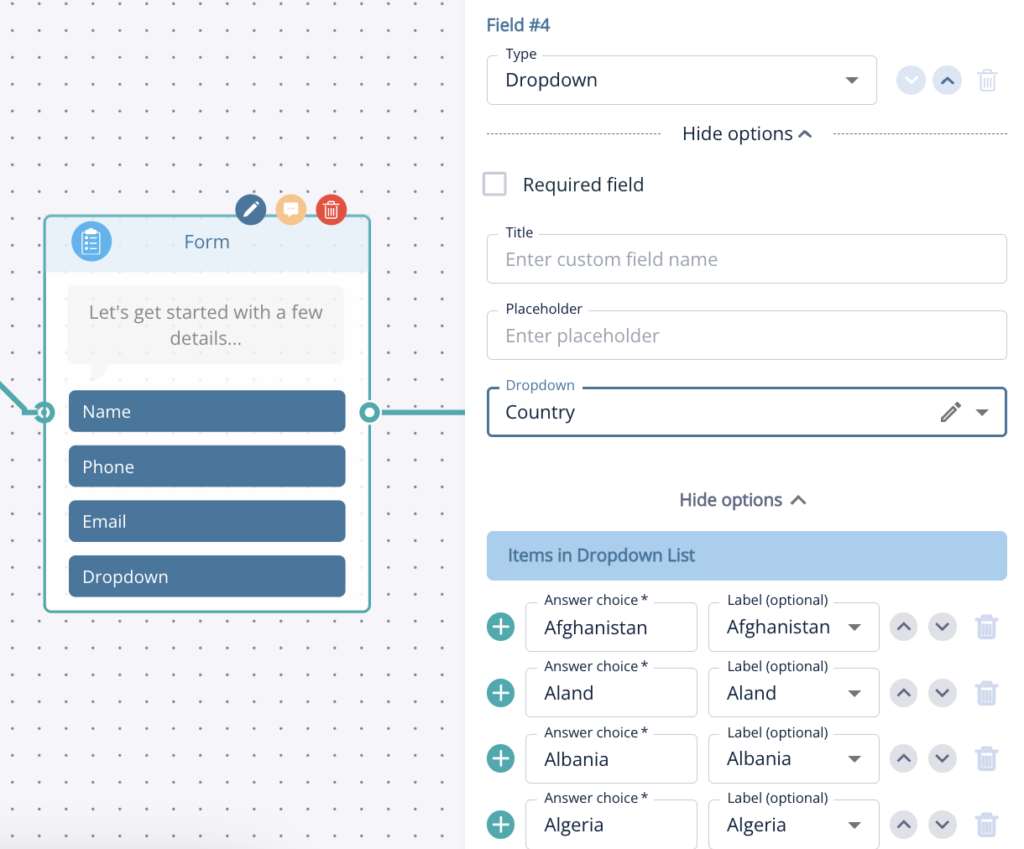
Under the Conversion Kit menu you’ll find general bot settings and dropdowns is the first option. From here you can manually add your dropdown list, in the example below I’ve chosen a country list, or if you already have a list you can upload it using the quick import button. To make sure you’ve got your list set up properly, you can use the sample file to get started!
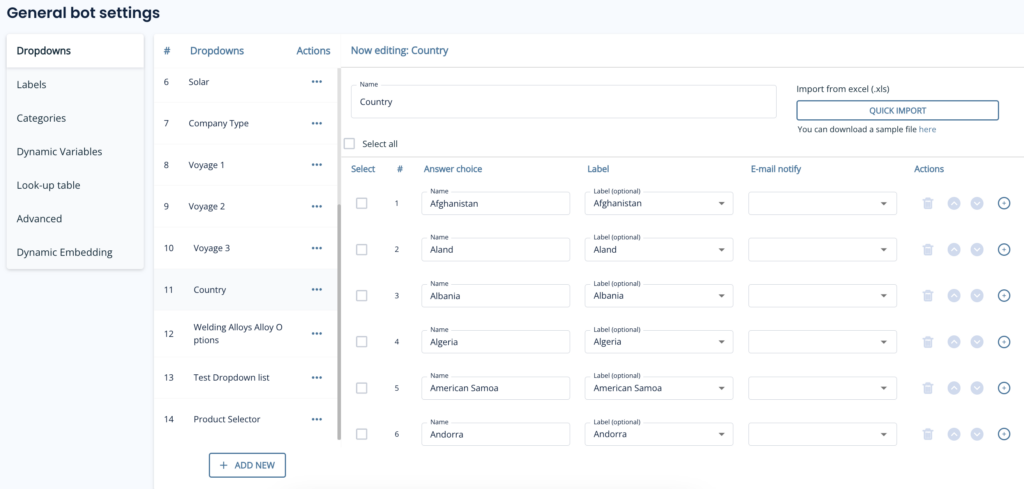
You’ll notice a few headers here, so let’s explain those:
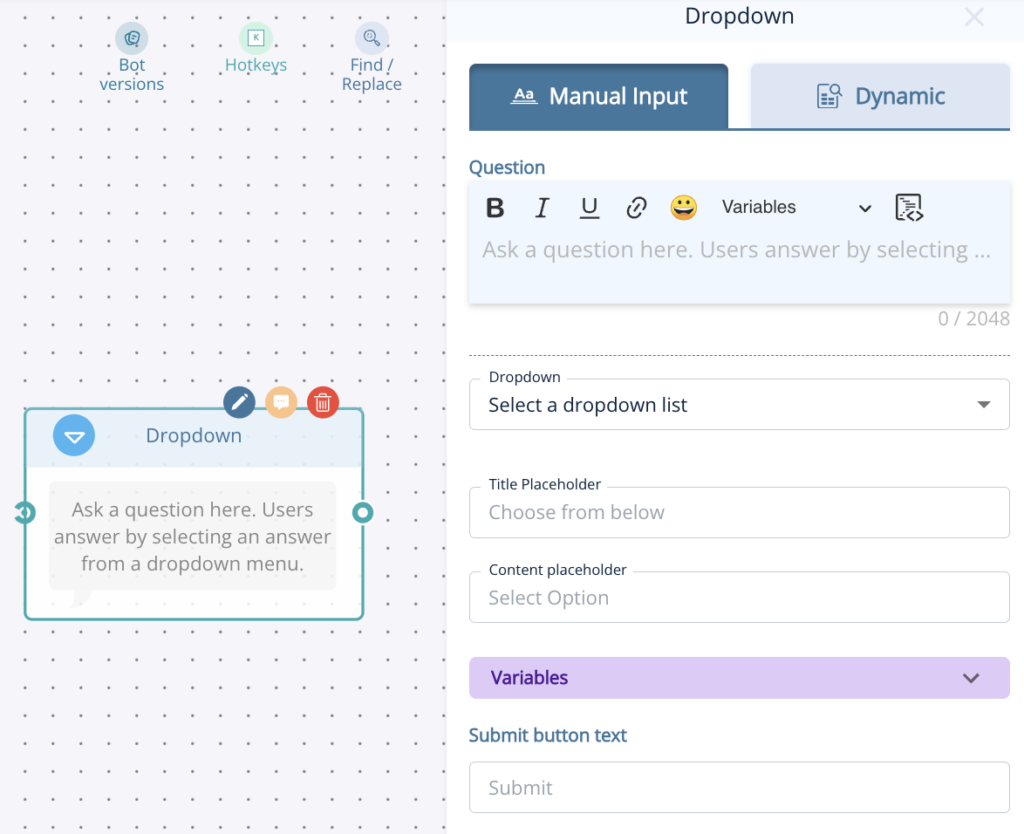
If you prefer to build your dropdowns on the fly then that’s great! Simply add the dropdown node to the canvas and instead of selecting a dropdown list, click ‘create new’.
From here you’ll give your dropdown a name and then add the options one by one and add any relevant labels.

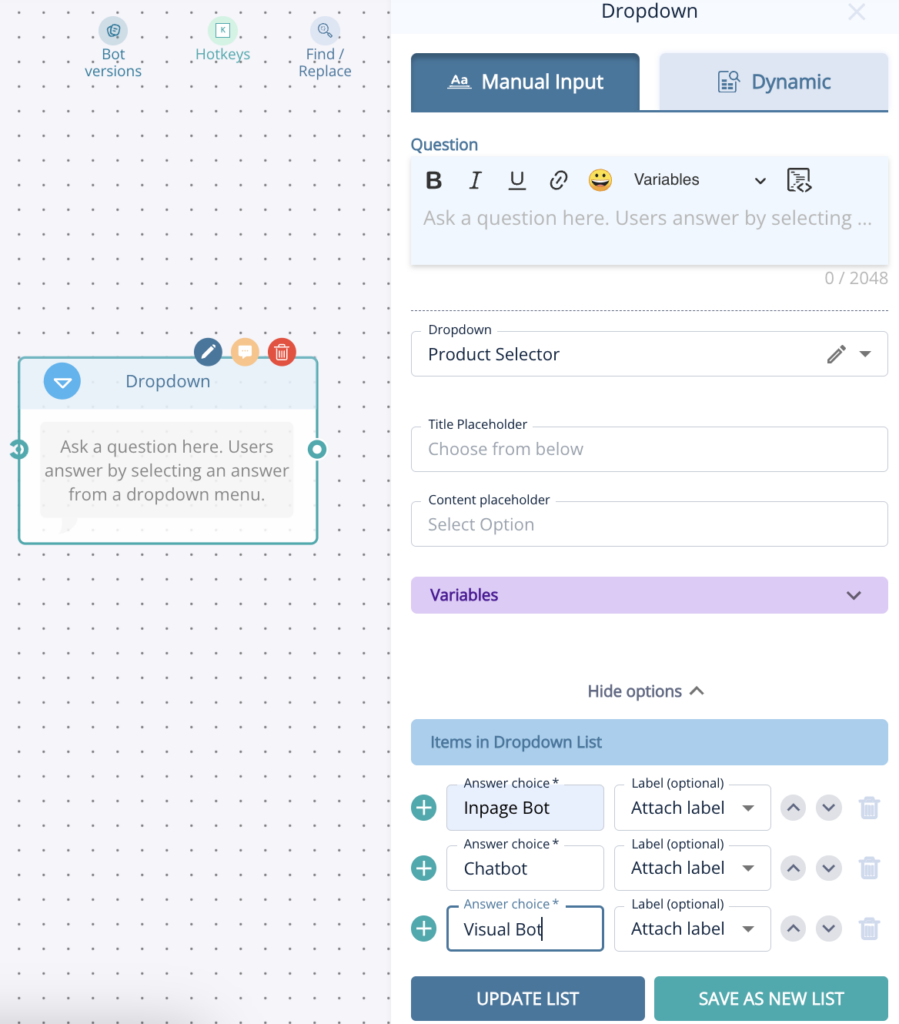
Don’t forget to click either update list or save as new list when adding items this way!
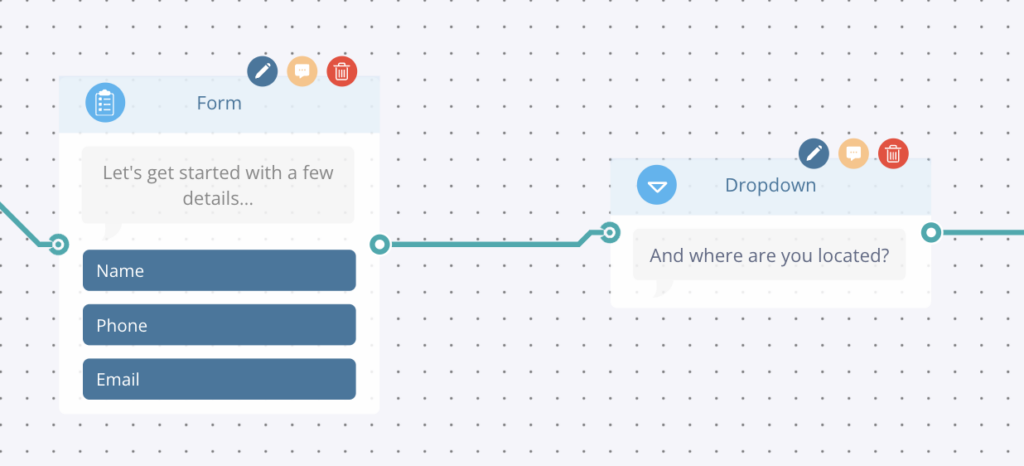
Now it’s time to think about when to use the dropdown option. First of all you can either have it as a standalone node or as part of the form node.
We would suggest using it as a separate node if you’d like to create a more conversational lead capture journey but adding it to the form is always good, just keep in mind that too many questions at once can be off putting!
Enable dynamic suggestions by toggling them on in the AI node. Once activated, the AI will present them after each response. There’s an additional prompt field where you can guide the AI on how to handle these dynamic suggestions.
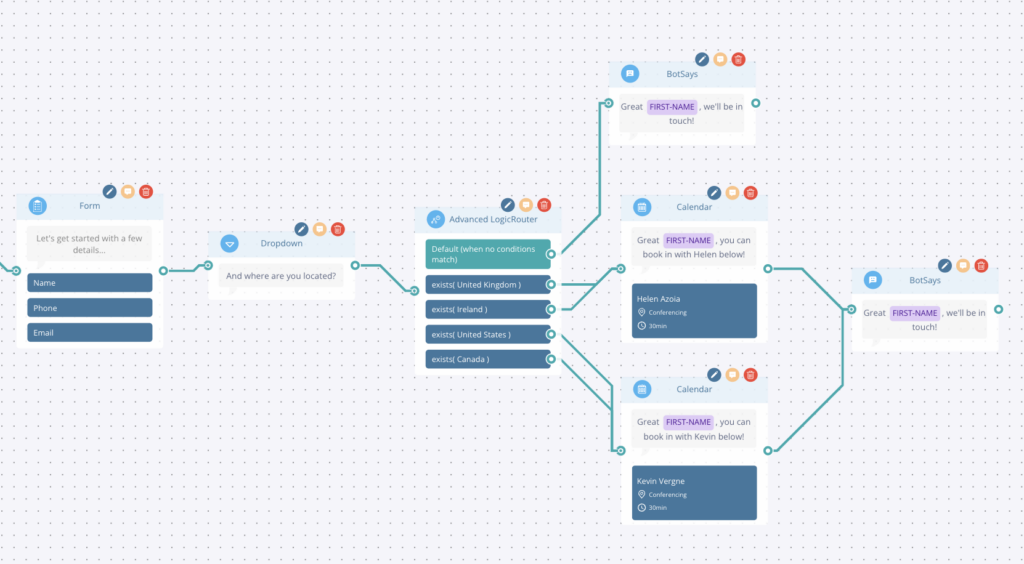
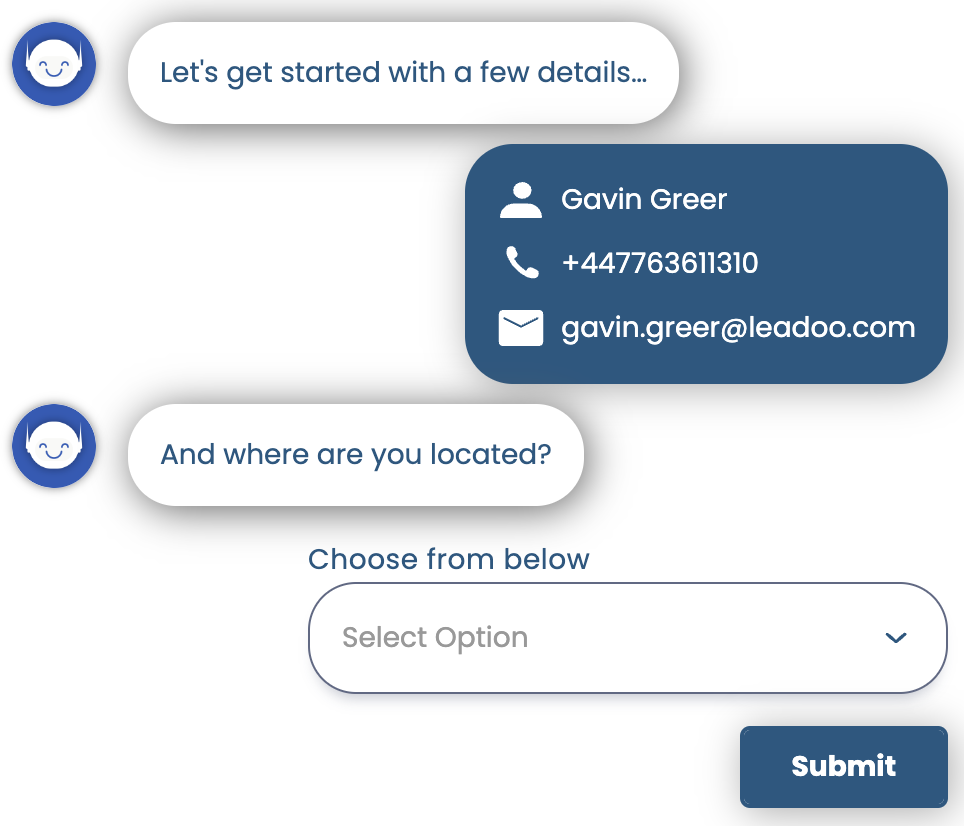
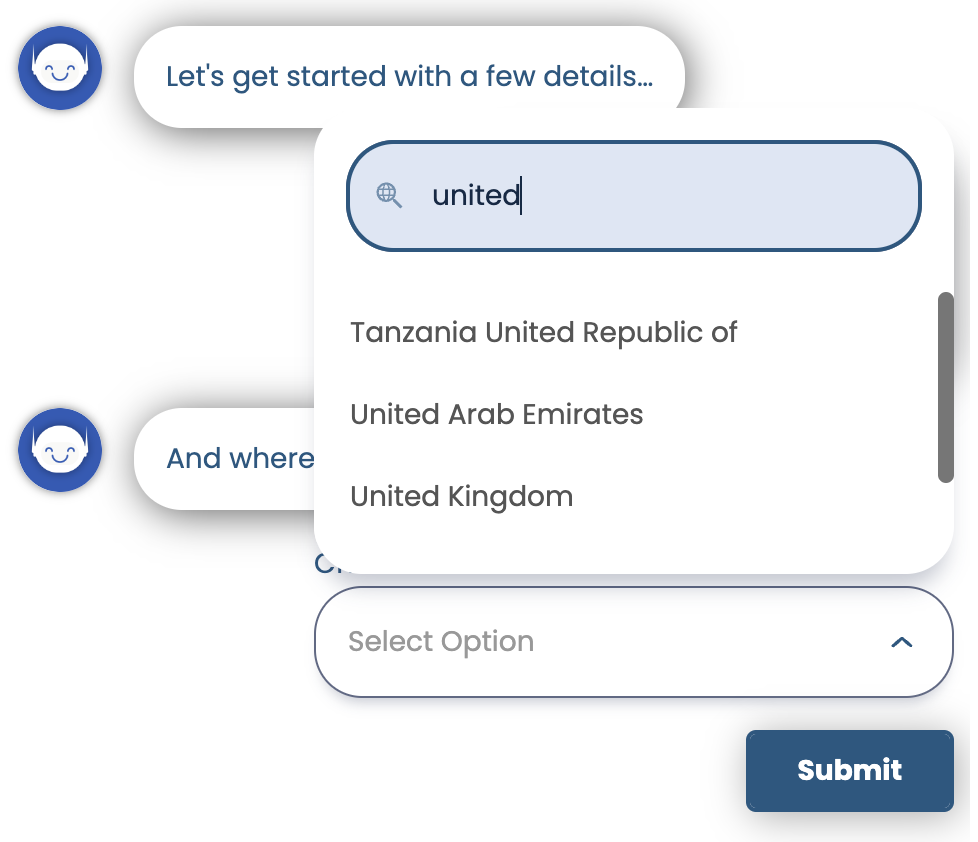
In the example above, we’ve created a conversational pathway to gather some contact details and the visitors location, which we will then use to generate calendar booking for the relevant Business Development Representative.
This is a simple and effective way to use a dropdown list and labels to create a personalised flow which helps filter leads to your team.
As you can see we ask “And where are you located” as a dropdown, once they answer this it goes into an advanced logic router. This router is checking which label has been applied based on the country of residence that the visitor selected and from there it will send them to a calendar booking with the BDR for that region!
Hope you found this useful, why not get stuck in and try it yourself! Don’t forget if you need any advice or help just reach out to your Account Manager.

