KNOWLEDGE
Case StudiesBlogsEventsSupport & Starting
Support Articles & HubSupport Videos (Youtube)Try Leadoo Free (Leadoo Lite)Partners & Careers
PartnershipsCareersSecurity & Privacy
Security at Leadoo AIGeneral Terms & ConditionsData & GDPRKNOWLEDGE
Case StudiesBlogsEventsSupport & Starting
Support Articles & HubSupport Videos (Youtube)Try Leadoo Free (Leadoo Lite)Partners & Careers
PartnershipsCareersSecurity & Privacy
Security at Leadoo AIGeneral Terms & ConditionsData & GDPRLeadoo’s bot conversations are build with different nodes. With these nodes you can use to personalize your conversations. In this article we explain what are the different node types and how you can use them.
There are 18 different node types which you can use to personalize your conversations.
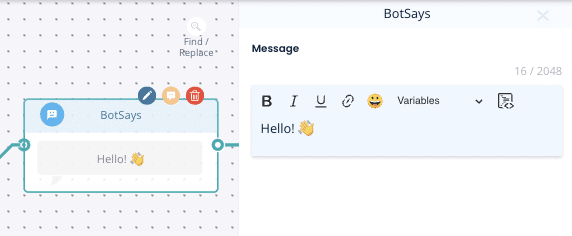
Bot Says – For when you want to ‘say something’ without offering an option and will load the next part of the conversation straight afterwards.
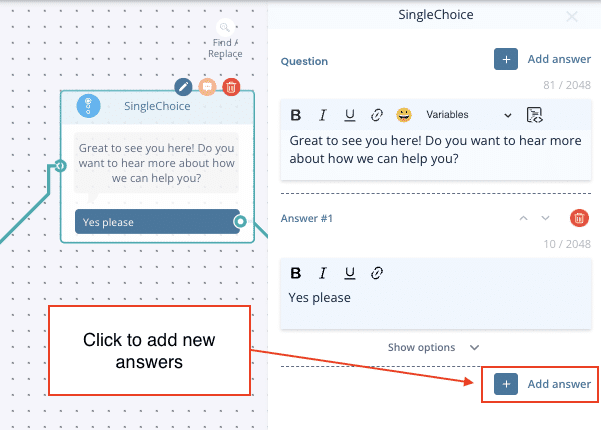
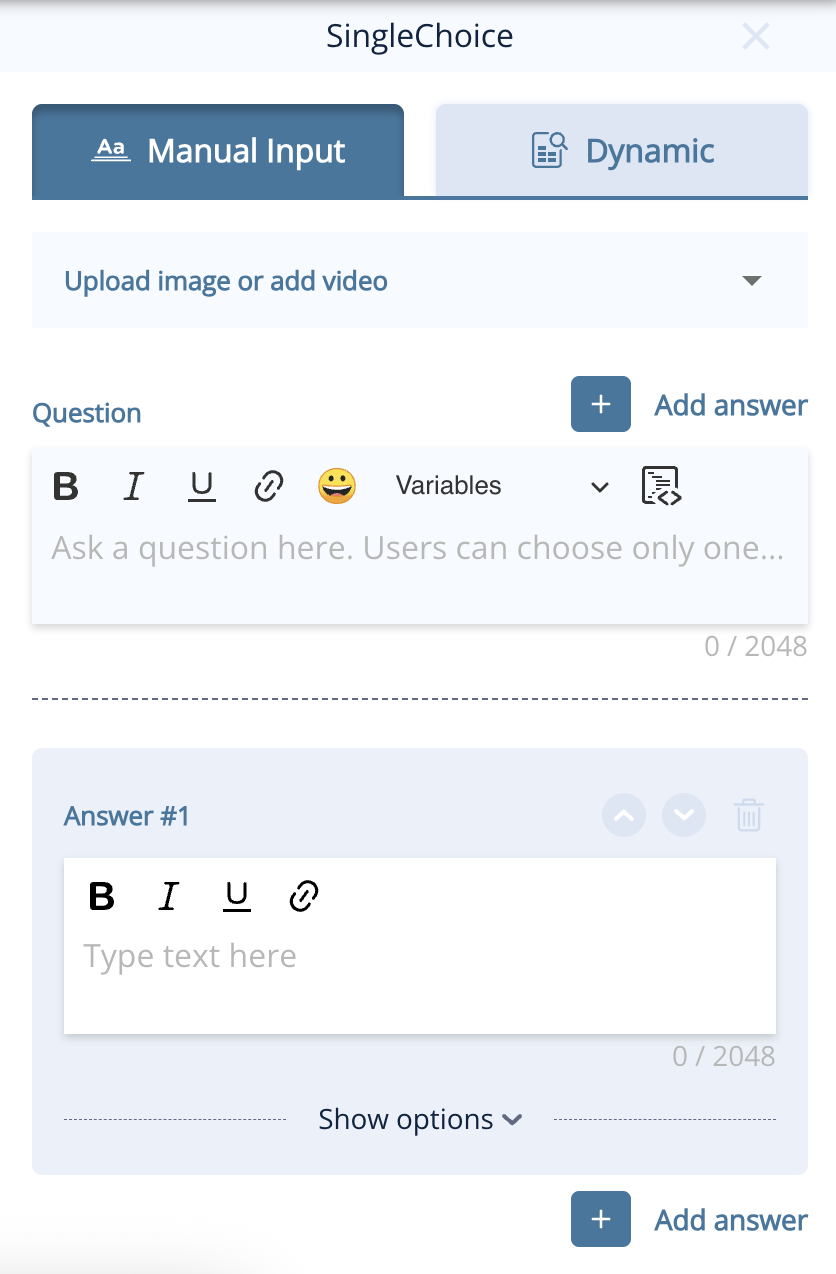
Single Choice – When you want the visitor to select only one choice which can then branch off to different pathways or the same.
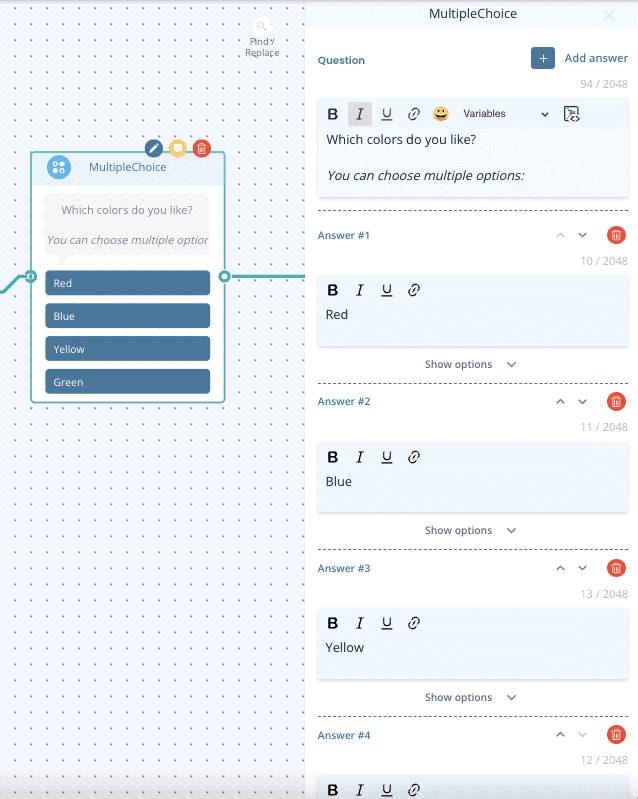
Multiple Choice – When you want the visitor to select multiple options and continue down one path afterwards.
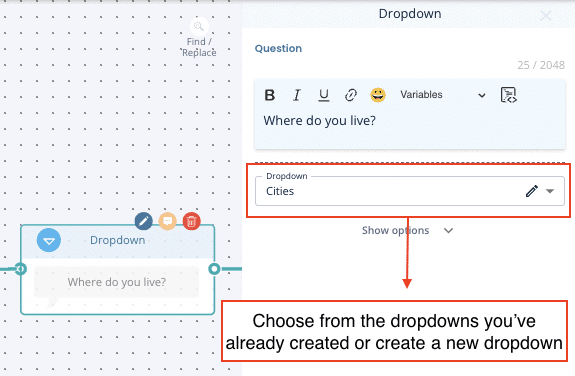
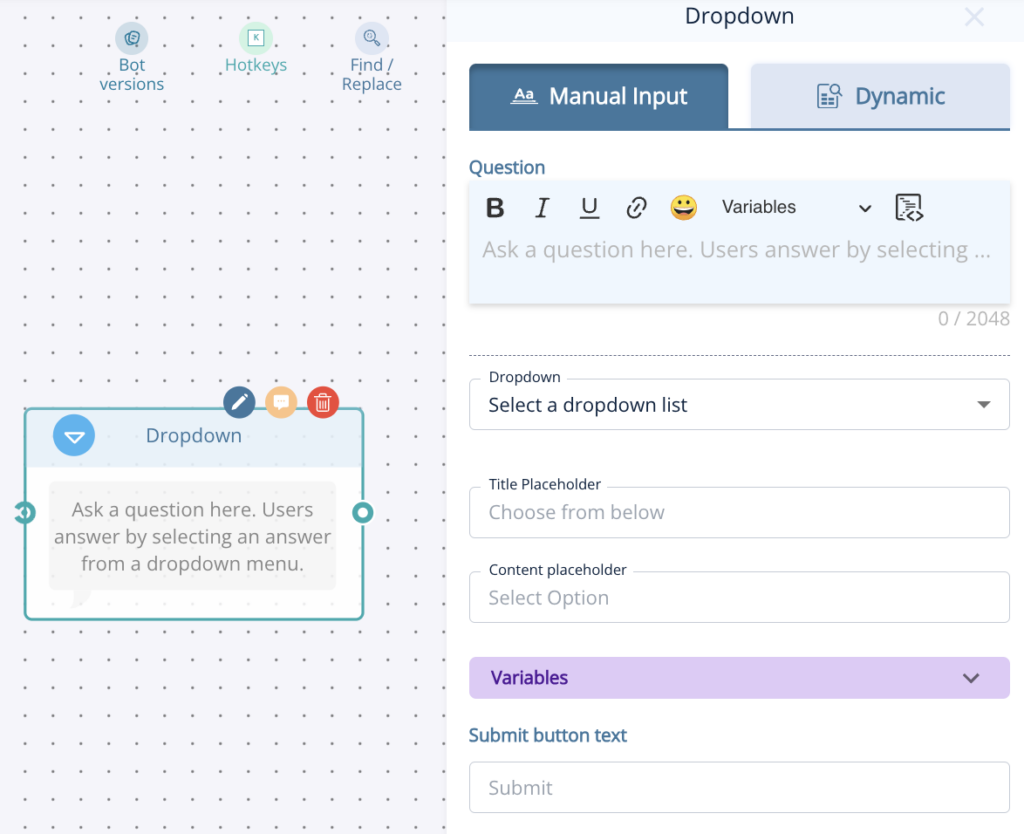
Dropdown – This is useful when you have a long list of options for the visitor to choose from such as location. To use this you must have already created and saved a dropdown list.
Find out how to add dropdown lists here.
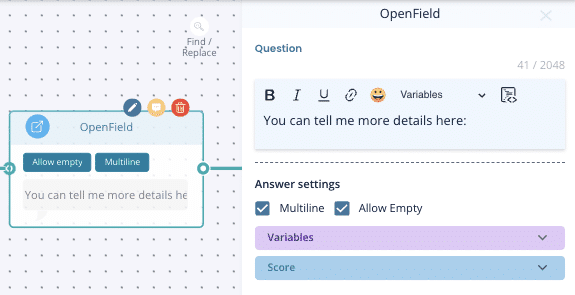
Open field – Adds a box with an open text field for the visitor to complete
Calendar (Date & time picker) – Visitor can choose the date and time freely from the calendar. The time slot they picked won’t be synchronized to any calendar, so this node is just for picking a time.

Calendar (Calendar booking) – Visitor can book a meeting straight from your calendar that has been integrated and synchronized with Leadoo. Calendar Booking makes sure to check you calendar and only shows time slots that are available.
You can read more from here: How to sync your calendar with Leadoo
Logic Router – Use this to determine what option the visitor gets based on their previous responses. This could be via a scoring method or by label.
Using scoring – You will need to add a score to each answer from previous single choice nodes to determine the result here, then set the score you want to determine which result.
e.g. If visitor scored 1-10 they get answer #1, if the score 11-20 they get answer #2.
You can use this to decide if a candidate gets through to the end of an application, or if you want to give a suggestion based on a visitors preferences.
Using labelling – You can also determine a result depending on what labels were most chosen on the single choice options beforehand.
e.g. Visitor selects 3 answers from previous questions, 2/3 of those had the label ‘red’ so they will then see the calculator result for red.
Learn how to set-up labelling here.

Advanced Logic Router – More info here: Cheat sheet: Advanced Logic Router Operations
Calculator – More info here: Creating Dynamic Variables for Calculator and Advanced Logic Router Nodes
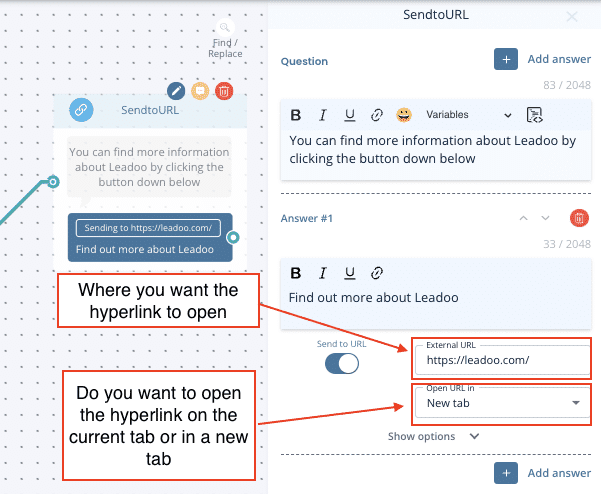
Send To URL – The same as Single Choice but allows you to hyperlink a button to another URL
External URL – is where you want the hyperlink to open
New tab = open in new tab
Current tab = open in the same tab
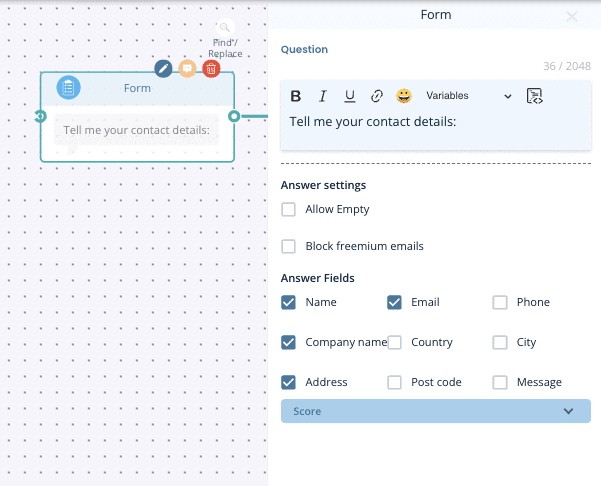
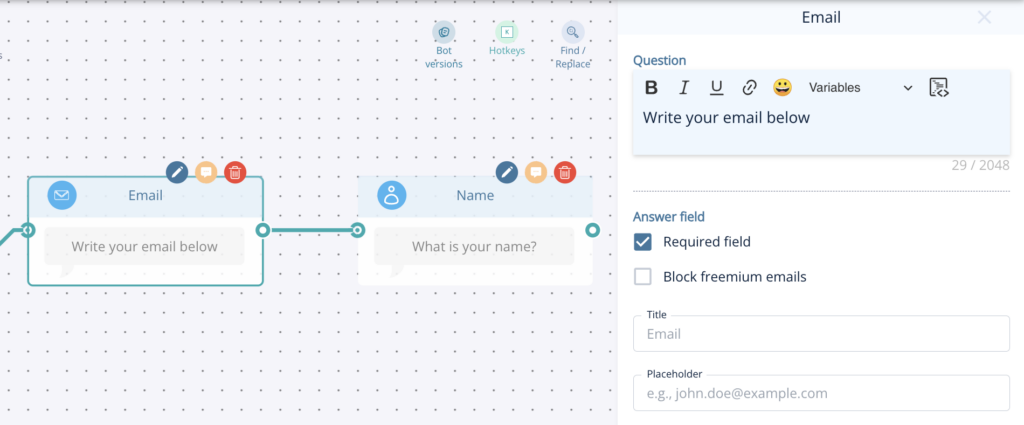
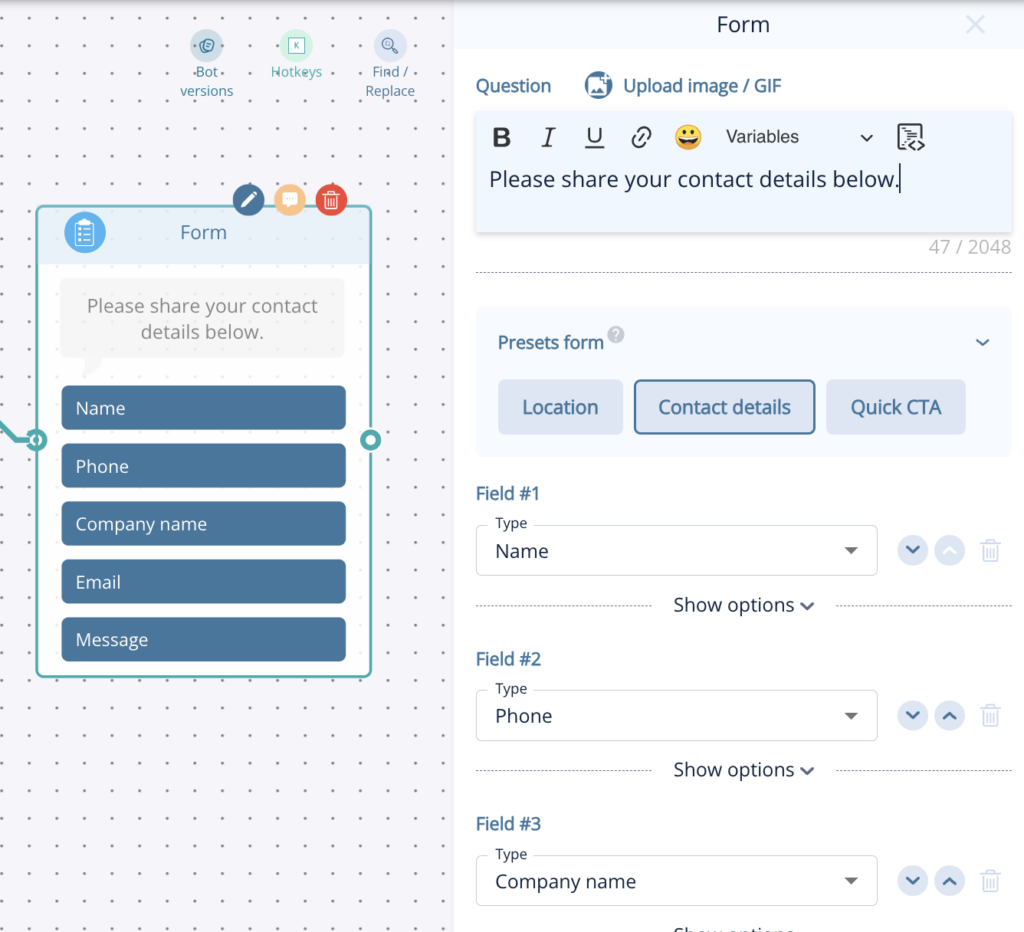
Standard contact nodes include: Name, Email, Company name & Phone number
Grouped contact nodes
Contact – You can collect all your visitors details in one go and select from: name, email address, phone number, company name, country, city, street address, zip code and an additional message.
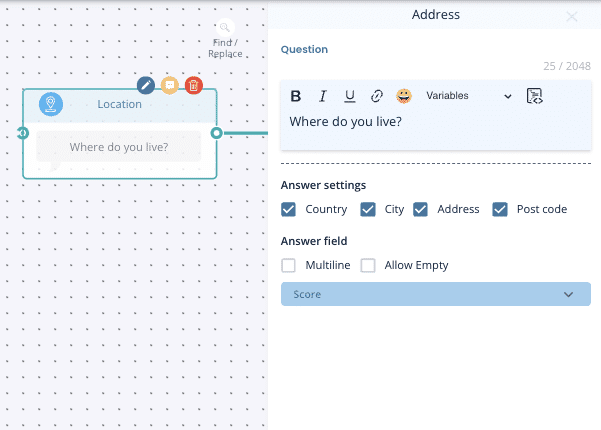
Location– Select which options you want including: country, city, street address & zip code
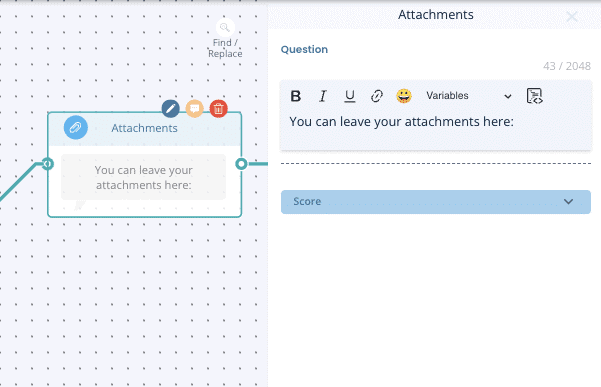
Attachments – Use this to allow visitors to upload documents or images. E.g. a CV or supporting information for IT support.
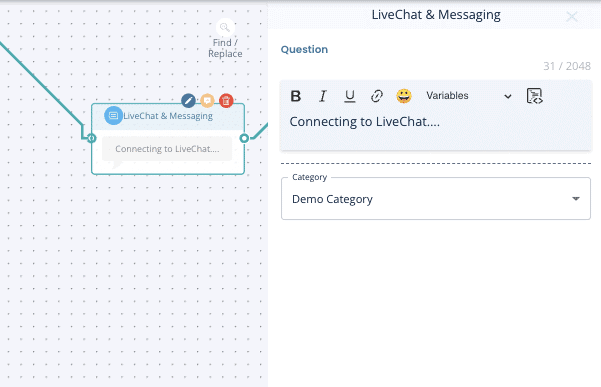
Live Chat – Leadoo live chat can be initiated through single choice options but if you want to add other messaging options too (WhatsApp & Facebook Messenger), you can use the live chat node instead.
TIP – Make sure you still have automated dialogue too so that if there are no agents online your visitor can still get in touch.
Find out how to set-up and use live chat here
The Visual Bot Builder is your all-in-one workspace for building Chatbots, InpageBots, and VisualBots. Using drag-and-drop features, along with convenient keyboard shortcuts and quick tools, you can effortlessly create and customise decision trees to guide user interactions.
In this article, we’ll walk you through the essentials of building your first bot, so you’ll have a solid foundation to get started. For a breakdown of each node type, check out our guide here.
Watch Senior Technical Account Manager Gavin and Onboarding Development Manager Helen share expert insights in the on-demand webinar below, or continue reading for a step-by-step guide.
For quick tips and time-saving shortcuts in bot editing, simply watch the video below:
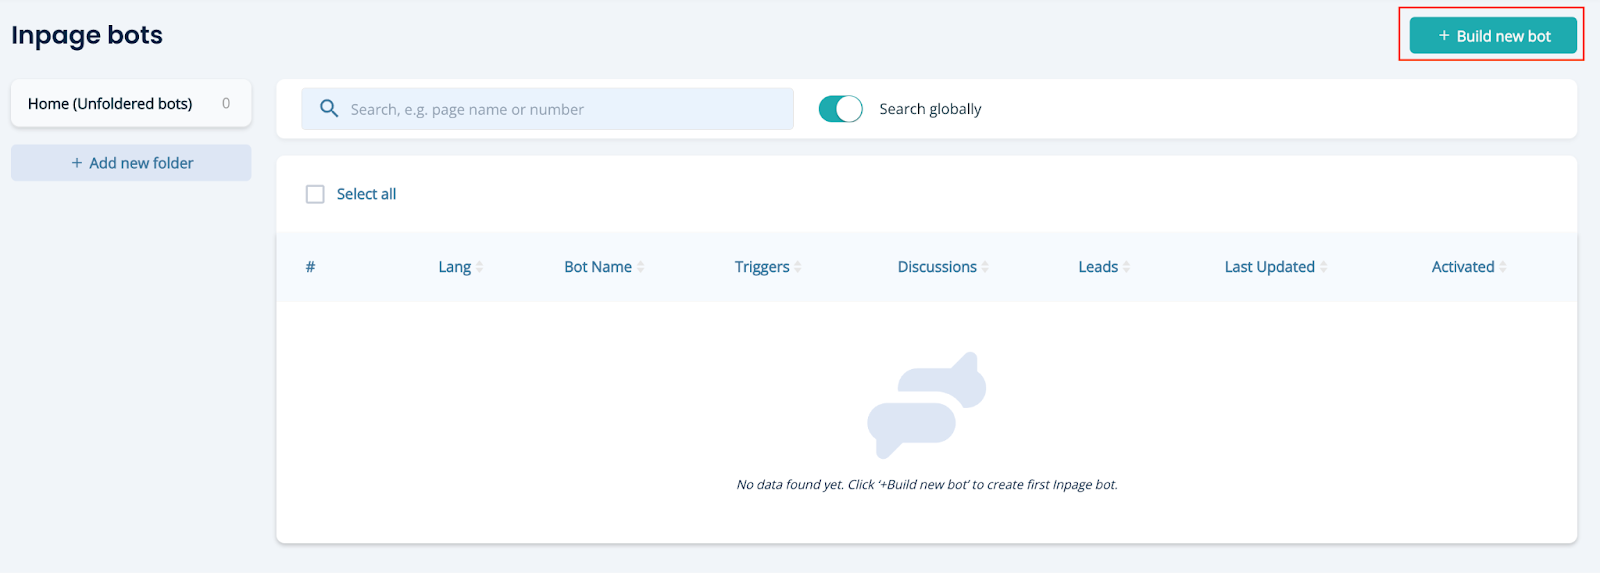
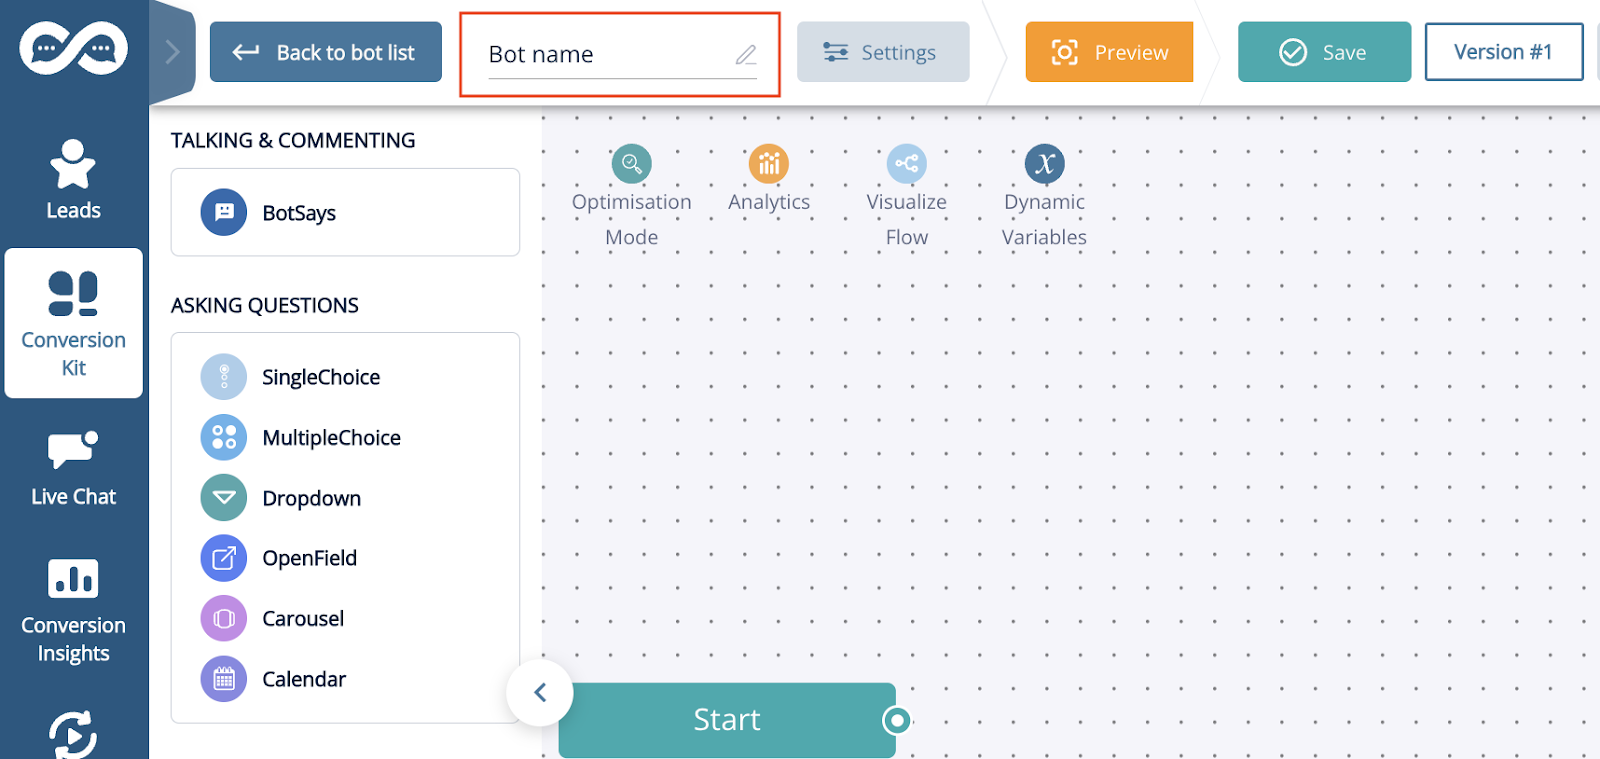
Select Your Bot Type
Decide if you want to build a Chatbot, InpageBot, or VisualBot. Navigate to Conversion Kit > InpageBot/Chatbot or VisualBot on the left-hand menu.
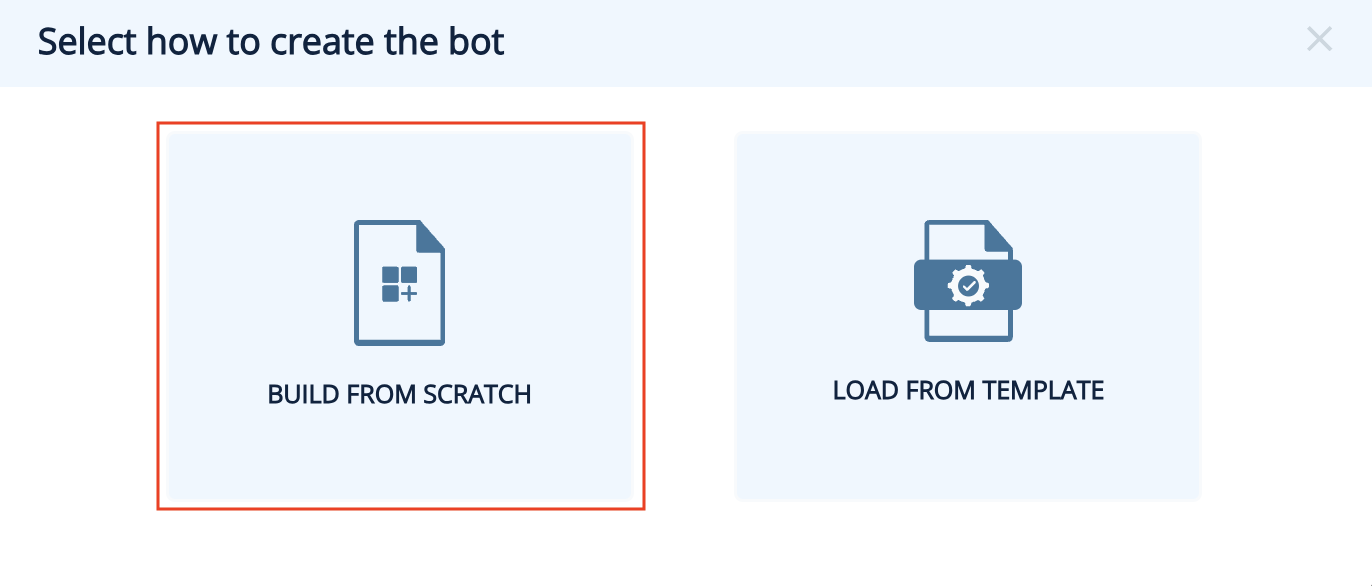
Build Your Bot
Click + Build new bot > Build from scratch to access a blank workspace. Start by naming your bot.
If you’re using a laptop you can use your usual trackpad gestures to move around and zoom in and out. If you are using a keyboard & mouse here are two essential shortcuts you need to know about.
There are a few methods to add nodes:
1. Drag & Drop
Simply drag a node from the menu on the left into your workspace.
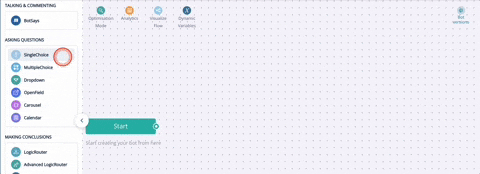
2. Quick-Add
Click and hold the circle on the right of any node, drag it to an open space, and release to open a node menu. Choose the desired node type, which will connect automatically to the starting node.

1. Get Inspiration
Start by exploring pre-built bots for ideas. Check out the Tips & Tricks video above to learn how to copy+paste nodes from one bot to another or even duplicate entire bots.
2. Plan Your Conversation Flow
Use the Bot Says node for introductions, and connect it to a Single Choice node to guide users. Offer varied options to serve different user needs. For example:
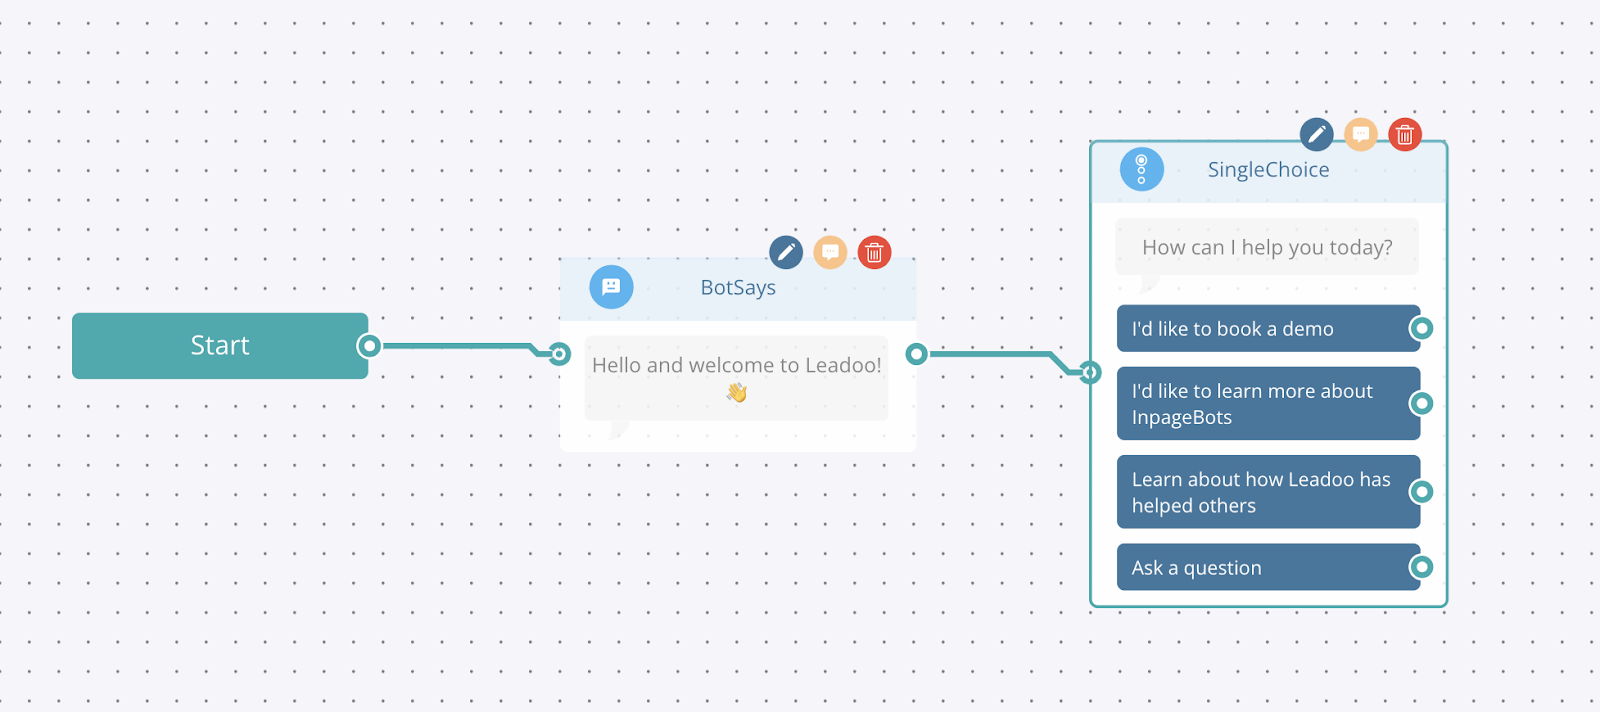
3. Avoid Dead Ends
Always provide multiple choices and avoid abrupt stops. If asking, “Are you ready to book a demo?” provide options like “Yes, I’d like to book a demo” and “Not yet, tell me more about Leadoo Insights.” Including an Ask a question option also encourages customers to reach out.
4. Add Value
Design conversations that go beyond your website’s content. Make information easier to find or offer downloadable resources in exchange for contact details.
Leadoo offers flexible options for capturing visitor details. Start with essential fields, like Name and Email, to secure key information without overwhelming visitors. For more qualified leads, gradually collect additional data by splitting questions across nodes. This keeps the experience smooth and prevents form fatigue, helping you gather necessary information while maintaining visitor engagement.
Consider collecting only what’s essential to follow up, creating a frictionless path for conversions and improving the overall lead experience.
Leadoo bots don’t autosave, so remember to save manually by clicking Save at the top of the page. Exiting without saving will trigger a reminder pop-up.

For further settings and embedding instructions, check out Bot Settings, Bot Styles and Embedding Bots.
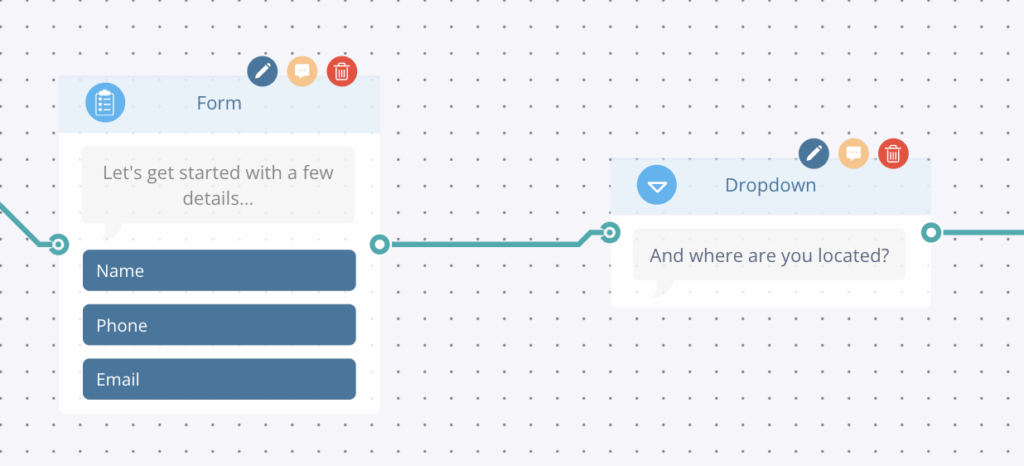
Using the dropdown node is a great way to offer your visitors a wide selection of options to choose from in a very user friendly way. This node is great for when the single choice option is getting a little cluttered, generally we would recommend for options of 6 or more.
Let’s start by building the dropdown list, which you can either do directly in the bot builder or in the general bot settings area.
General Bot Settings
Under the Conversion Kit menu you’ll find general bot settings and dropdowns is the first option. From here you can manually add your dropdown list, in the example below I’ve chosen a country list, or if you already have a list you can upload it using the quick import button. To make sure you’ve got your list set up properly, you can use the sample file to get started!

You’ll notice a few headers here, so let’s explain those:
Creating Dropdowns in the bot builder
If you prefer to build your dropdowns on the fly then that’s great! Simply add the dropdown node to the canva and instead of selecting a dropdown list, click ‘create new’.
From here you’ll give your dropdown a name and then add the options one by one and add any relevant labels.
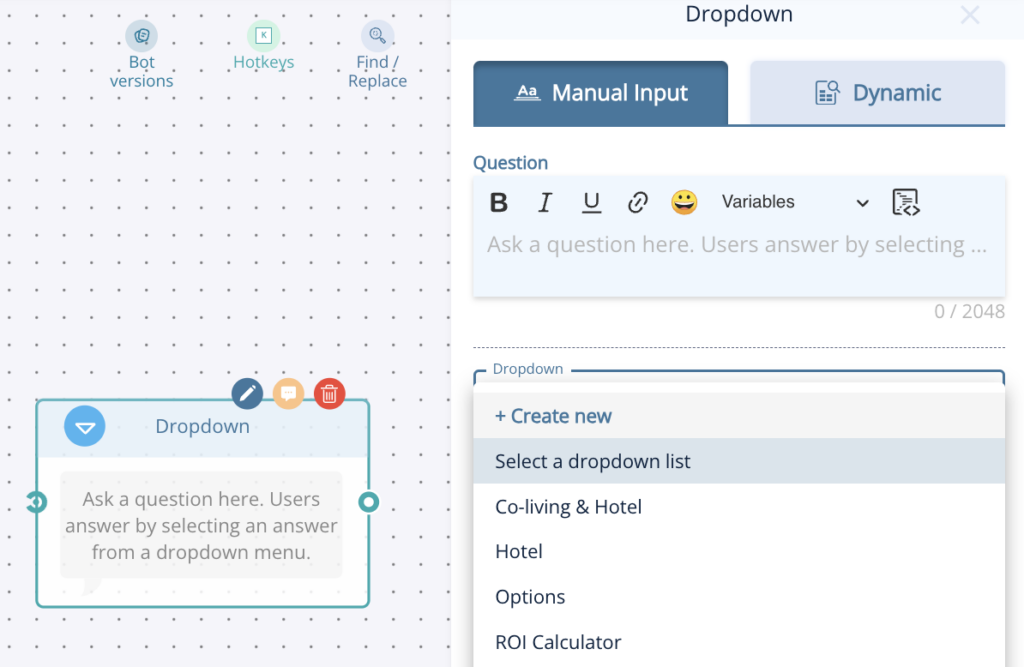
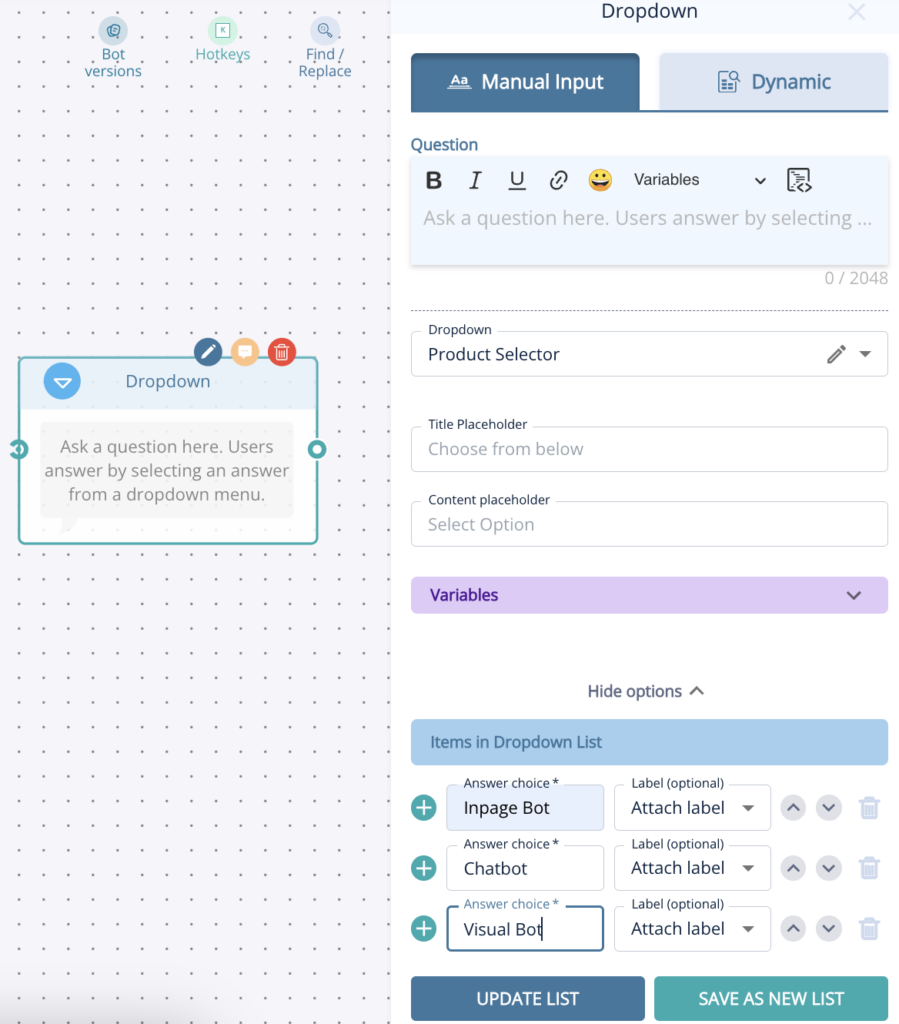
Don’t forget to click either update list or save as new list when adding items this way!
Now it’s time to think about when to use the dropdown option. First of all you can either have it as a standalone node or as part of the form node.
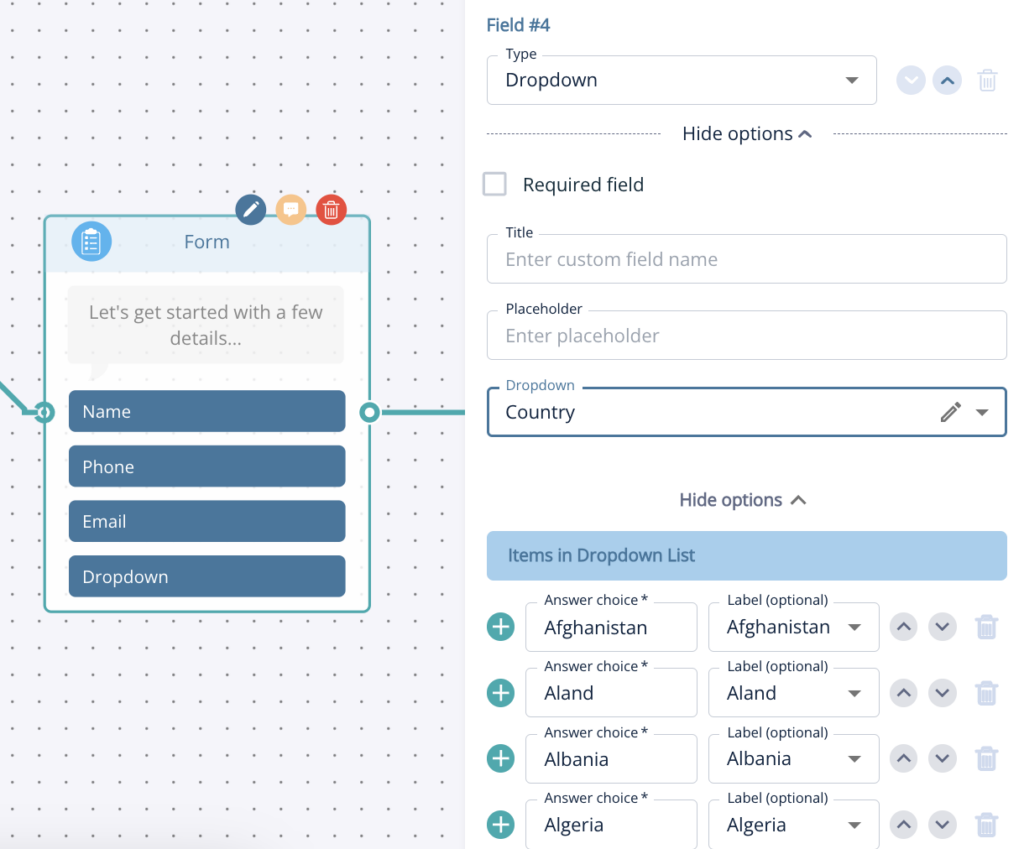
We would suggest using it as a separate node if you’d like to create a more conversational lead capture journey but adding it to the form is always good, just keep in mind that too many questions at once can be off putting!
Enable dynamic suggestions by toggling them on in the AI node. Once activated, the AI will present them after each response. There’s an additional prompt field where you can guide the AI on how to handle these dynamic suggestions.
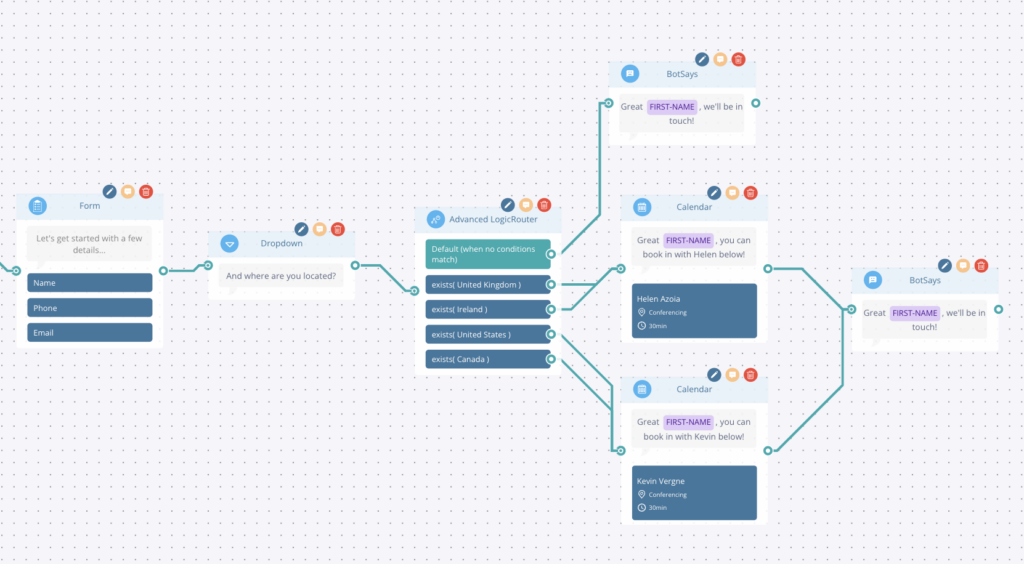
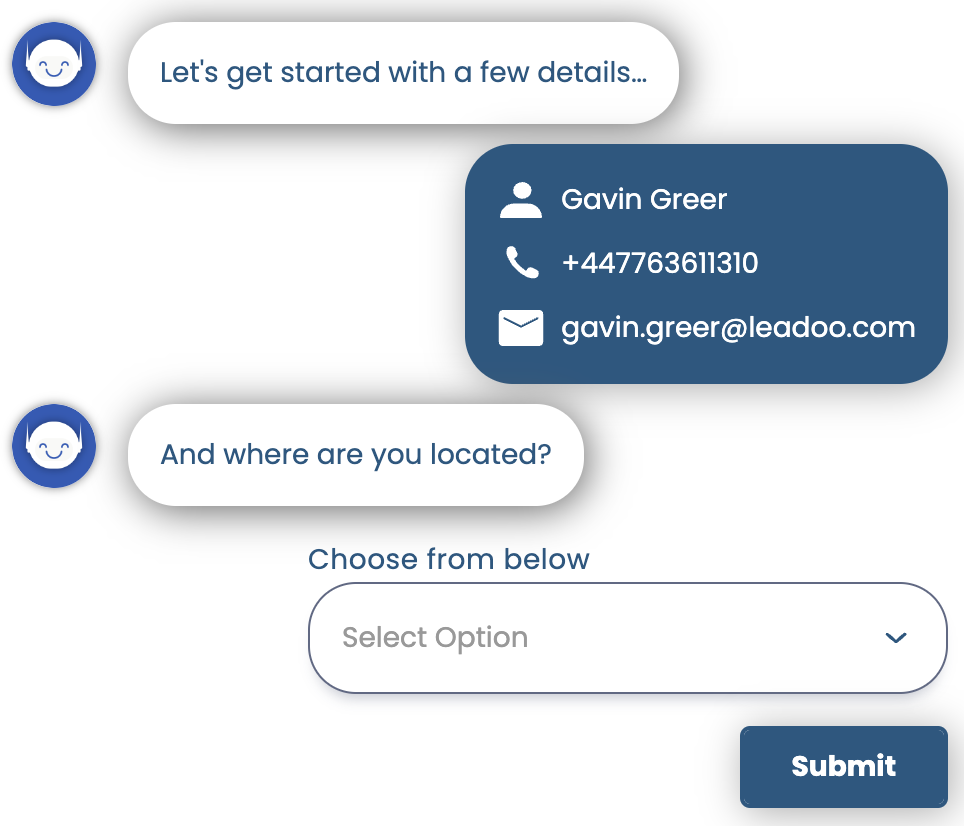
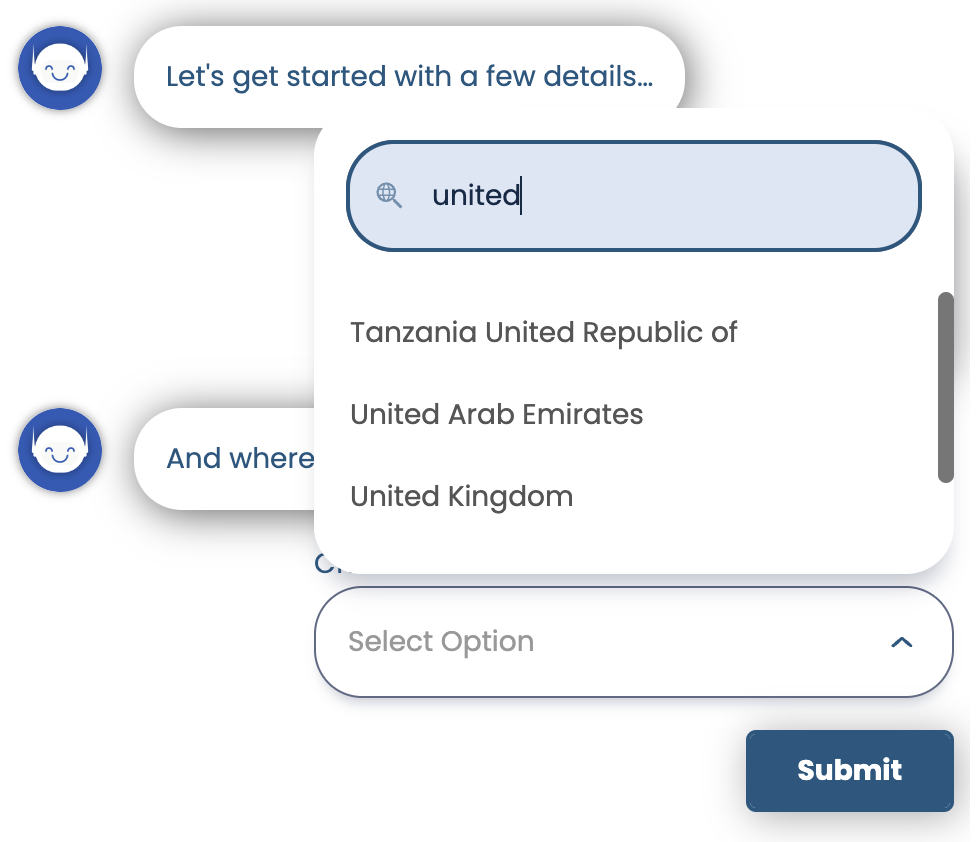
In the example above, we’ve created a conversational pathway to gather some contact details and the visitors location, which we will then use to generate calendar booking for the relevant Business Development Representative.
This is a simple and effective way to use a dropdown list and labels to create a personalised flow which helps filter leads to your team.
As you can see we ask “And where are you located” as a dropdown, once they answer this it goes into an advanced logic router (you can read more about this node here). This router is checking which label has been applied based on the country of residence that the visitor selected and from there it will send them to a calendar booking with the BDR for that region!
Hope you found this useful, why not get stuck in and try it yourself! Don’t forget if you need any advice or help just reach out to your Account Manager.
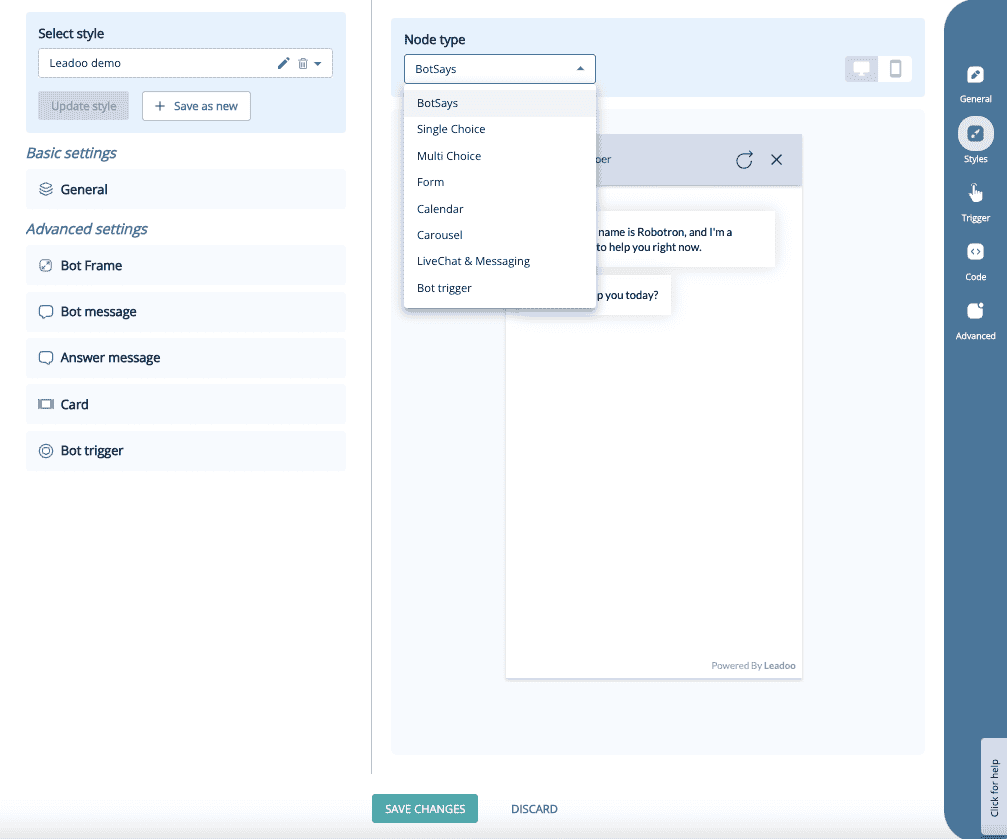
With 3.0 bots we’ve updated our bots UI. Here’s how you can edit the new style settings and what you can edit!
Navigate to the bot whose style you want to change. Click either “edit” or “actions” next to the bot, and then select “settings.” After that, go to the “Style” section.
Under style settings, you can choose an existing style or modify the current one. If you modify the current style, you can either update the changes or save it as a new style. The new style will appear in the dropdown menu, and you can apply it.

You can compare the changes node by node and preview them on mobile or desktop.
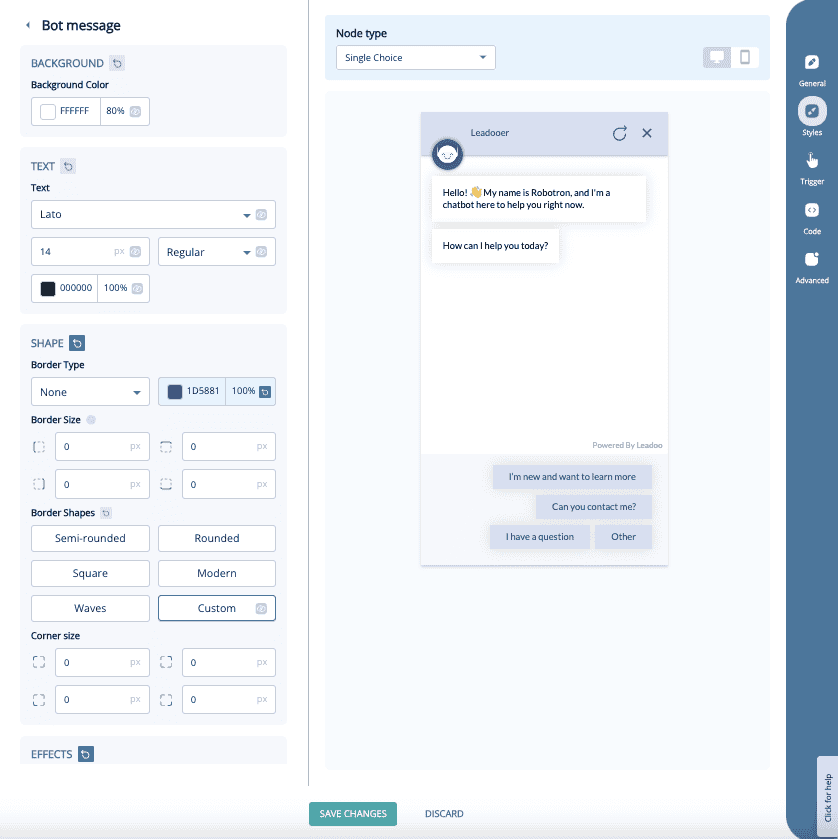
Style customization:
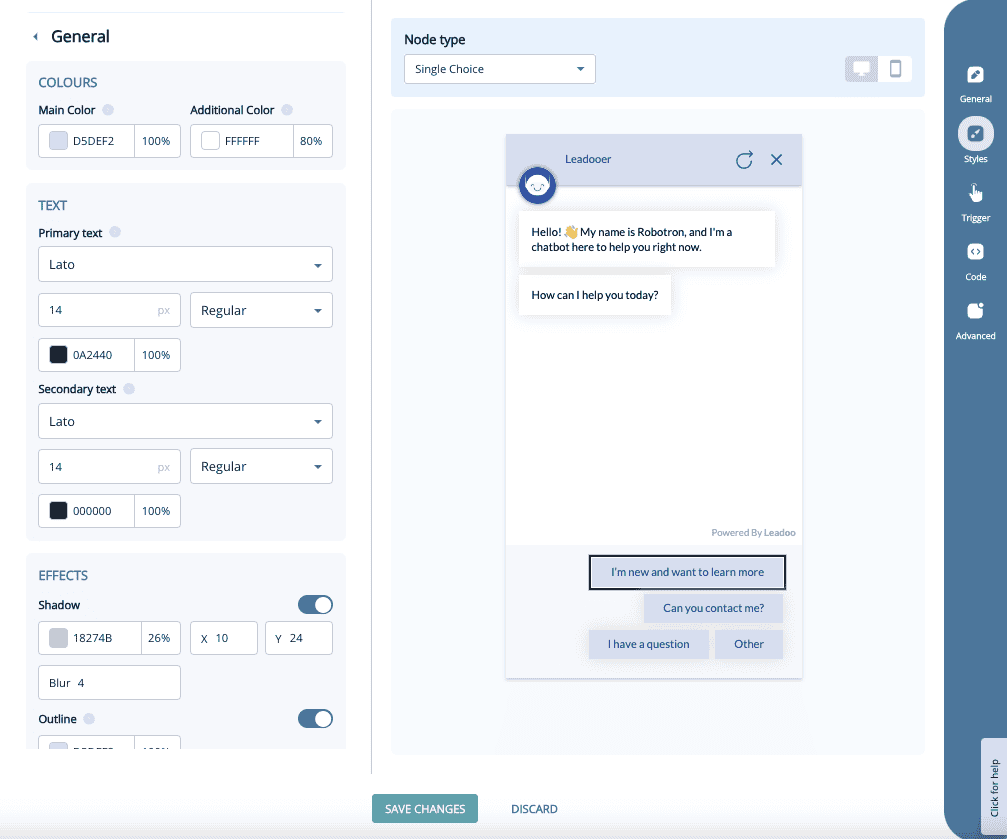
Advanced settings:
Under Advanced settings, you’ll find more detailed options. These allow you to fine-tune specific elements not covered in the general settings.
The Advanced settings are divided into five different categories:
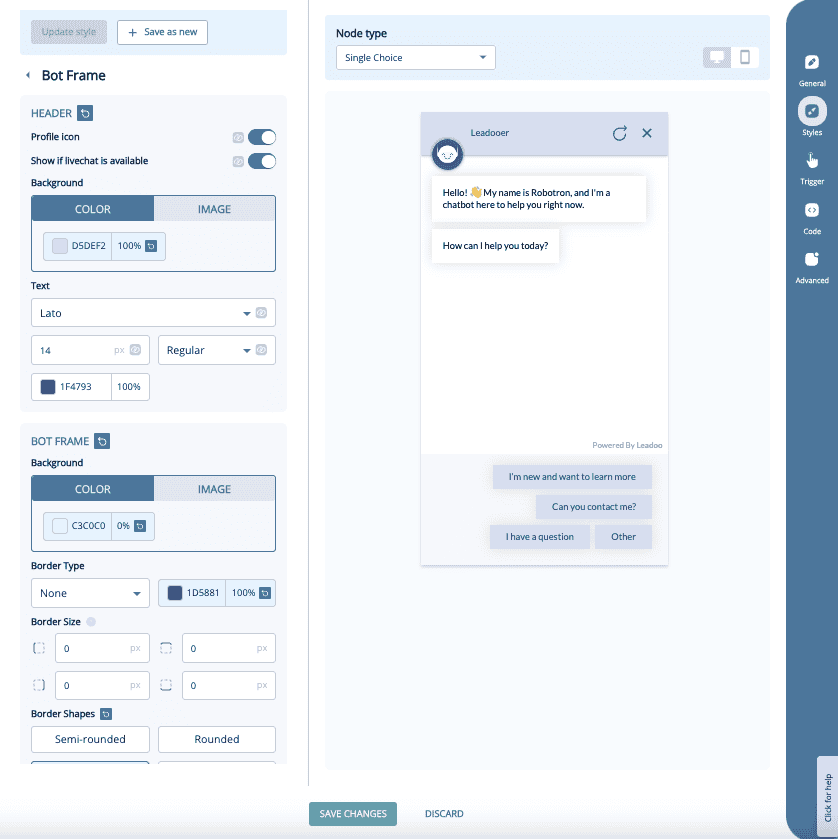


If you have any issues with your style settings you can contact your Leadoo contact person or [email protected]
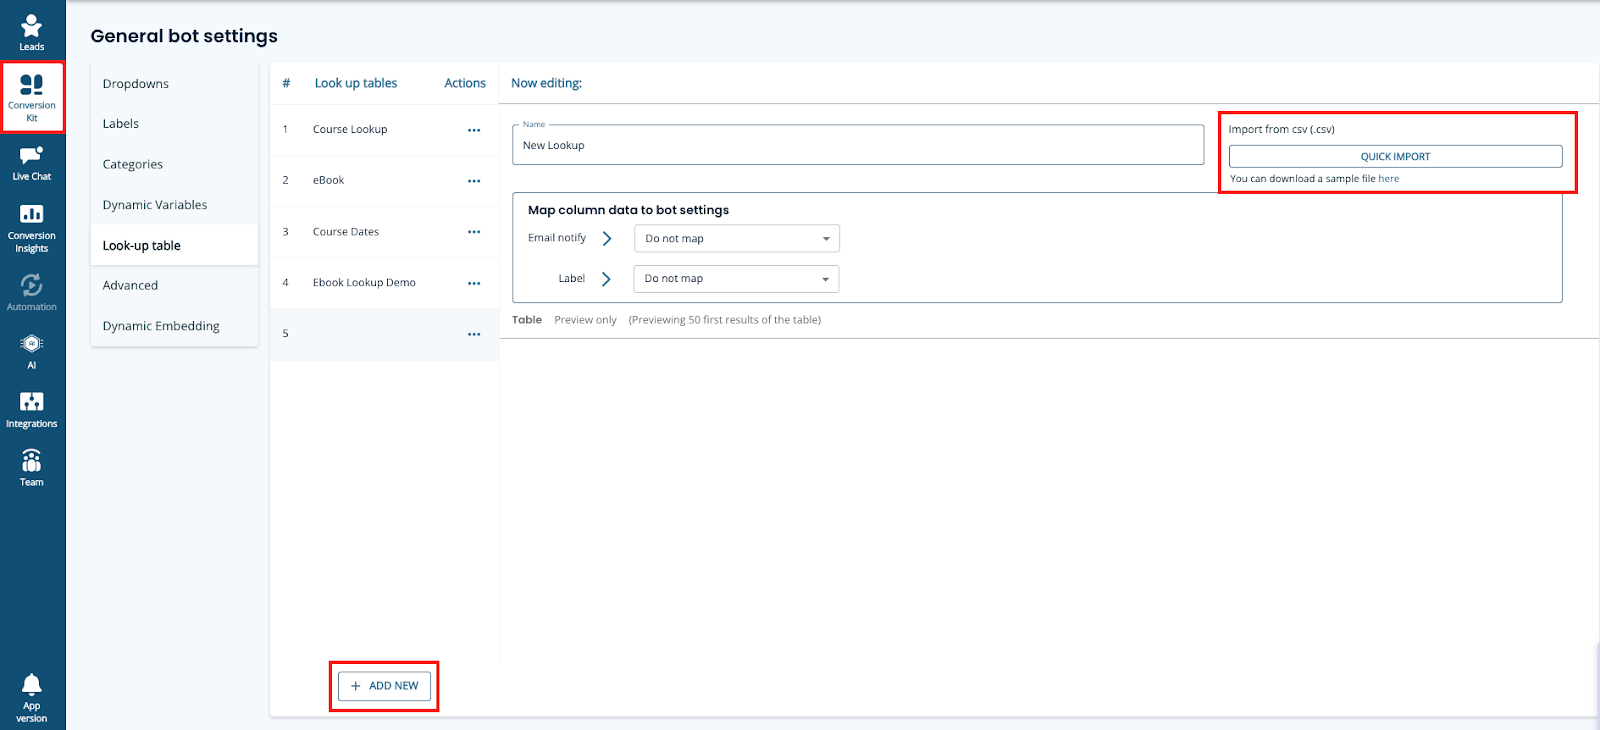
The Lookup tool is one of Leadoo’s advanced bot-building features, allowing you to create more dynamic and interactive conversations in your Inpage, Chat or Visual bot.
By using the Lookup tool, you can integrate logic into your bot conversations to pull results from a table stored in your account. This can be useful for suggesting products, providing articles, offering downloadable content, or displaying course dates.
Note: If you don’t see the Lookup options in your platform, contact your Customer Success Manager to activate them.
Read on for two examples of how to use the Lookup tool in either a Chatbot or Inpage bot.
In this example, we have a selection of eBooks localised for different markets. For instance, a visitor on the Australian page will receive the Australia eBook, while a visitor on the German page will receive the German eBook, and so on.
We aim to use just one bot across all pages, making it easier to implement, build, and update.
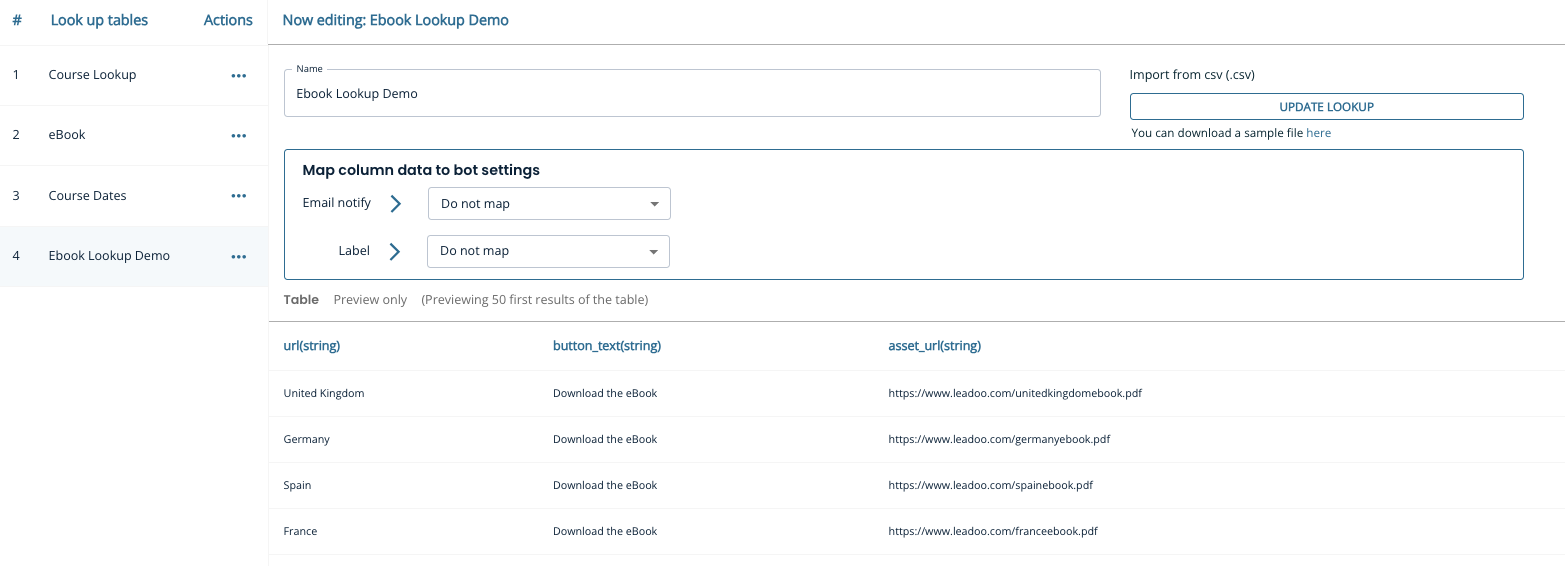
First, create a table with column headers and save it as a CSV file. The table should look like this:
| URL | Button text | Asset URL |
| United Kingdom | Download the eBook | https://www.leadoo.com/unitedkingdomebook.pdf |
| Germany | Download the eBook | https://www.leadoo.com/germanyebook.pdf |
| Spain | Download the eBook | https://www.leadoo.com/spainebook.pdf |
| France | Download the eBook | https://www.leadoo.com/franceebook.pdf |
Note: The button text is duplicated for each row to ensure it always displays correctly.
Navigate to Conversion Kit in the left-hand menu, select General Bot Settings, and then choose Look-up Table, or visit this link: Look-up Table.
Click + Add New at the bottom of the screen. Name your table, then click Quick Import in the top-right corner to upload your CSV file.
Your table will now appear below. Note: Only the first 50 rows are visible for preview.
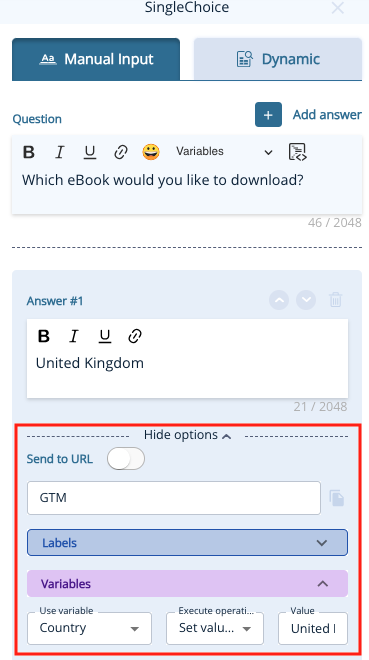
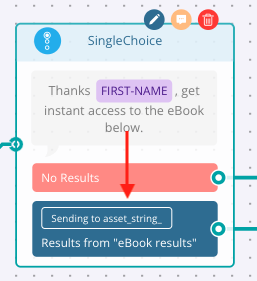
Next, we’ll add a simple SingleChoice node with country options as an example of how the Lookup node works. This will serve as a starting point for more complex implementations. (You can automate this step based on the webpage URL—more on that below.)
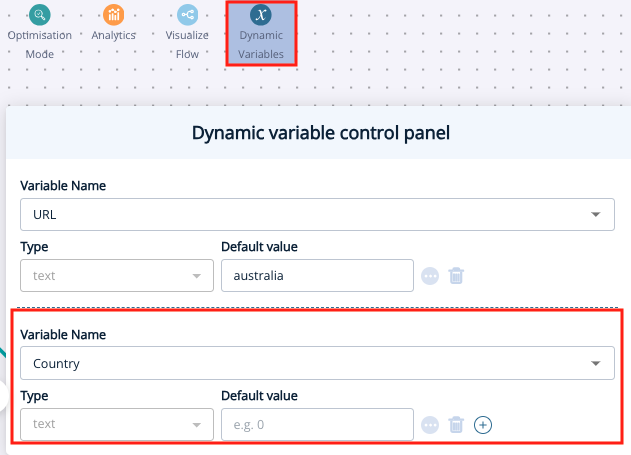
Open the Variables Panel and create a text variable called Country.
Add a SingleChoice node to your decision tree and apply your variable to each option.
Click Show Options > Variables, and select your variable from the dropdown.
Set the operation to Set Value to, and type the country name in the Value box.
When the visitor selects a country, the bot will set the value of the Country variable accordingly.
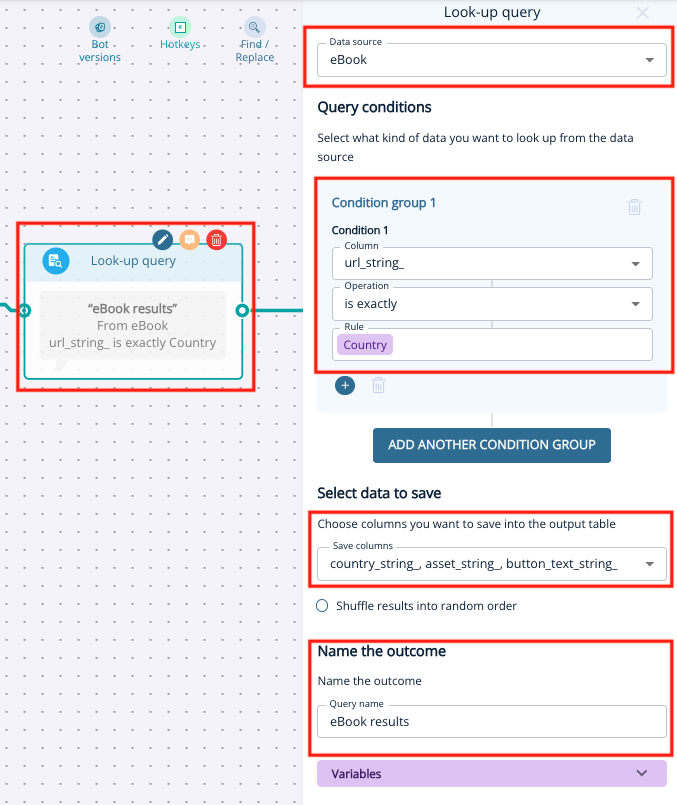
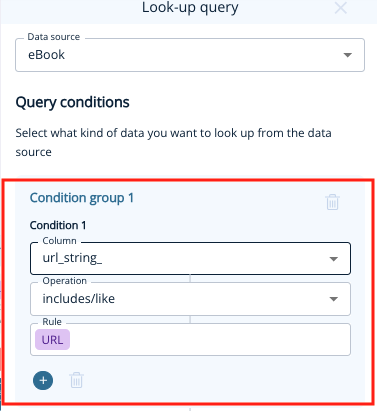
Next, add a Look-up Query node from the node menu.
Choose your table under Data Source, then configure the following:
Under Save Columns, choose Button Text and Asset URL. This is the information the bot will remember for later use.
Finally, give your query a name (e.g., “eBook Results”) for easy selection in the next step.
Now, add a SingleChoice node and click the Dynamic tab.
Enter your question as usual, then configure the dynamic content:
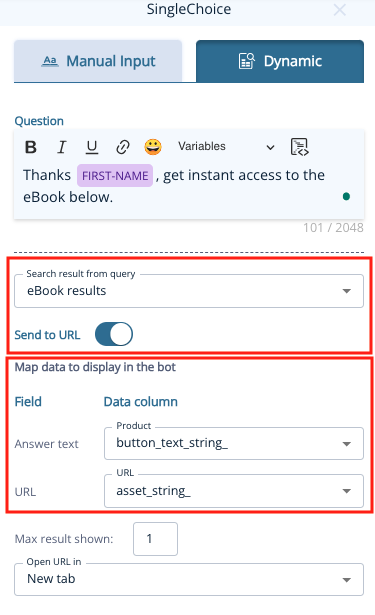
Create a node for a successful download and one to handle cases where the Lookup fails.
Tip: If the button text doesn’t appear correctly, save your bot, reopen the node, and select Asset URL again in the URL field.
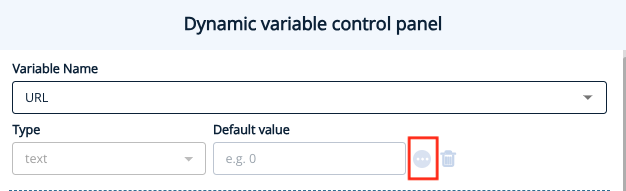
Before adding your bot to a webpage, you can test it by adding a default value (e.g., “United Kingdom”) in the Dynamic Variables Panel.
If you have multiple assets across many pages, manually setting this up for each one isn’t scalable. You can automate this step by adding a variable that reads the webpage URL.
Note: For this automation to work, the visitor must have interacted with the bot (e.g., by selecting an option).
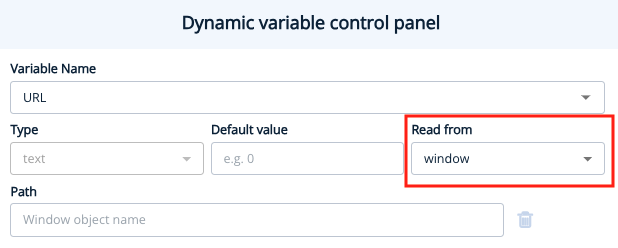
Change the operation to Includes/Like and select the URL variable under Rule.
⚠️ Testing the bot with the Read from Window/URL option active is not possible in preview mode, as it will look at the builder’s URL. To test within the platform, set a default value (e.g., “United Kingdom”), and temporarily remove the window object or RegEx.
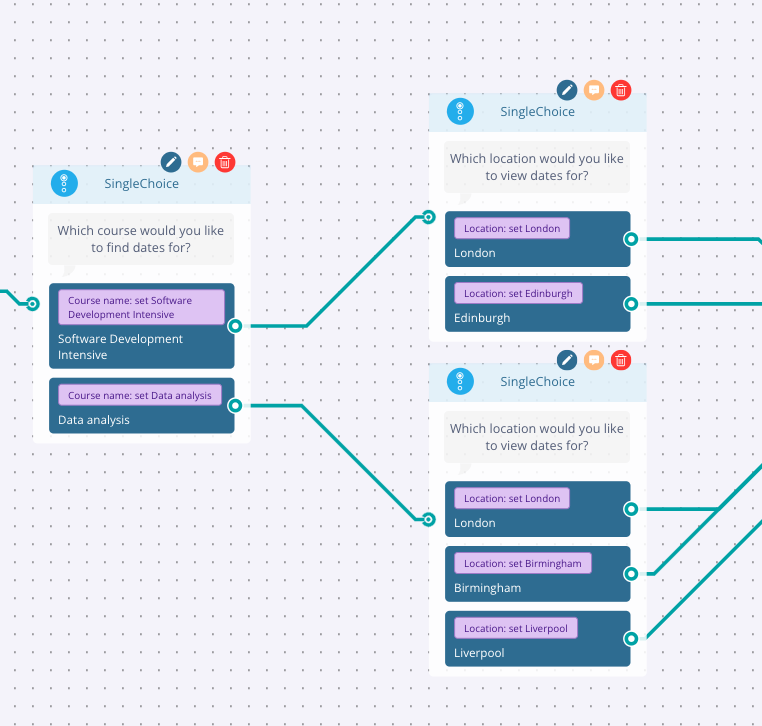
In this example, we’ll help visitors find the date and location of their desired course more quickly, without them needing to search multiple pages.
Create a CSV file containing the relevant course data. It should look something like this:
| Course name | Location | Date | Course URL |
| Software Development Intensive | London | 12th May 2024 | https://www.learntocode.com/softwareintesive-london |
| Software Development Intensive | London | 15th June 2024 | https://www.learntocode.com/softwareintesive-london |
| Software Development Intensive | Edinburgh | 1st July 2024 | https://www.learntocode.com/softwareintesive-edinburgh |
| Software Development Intensive | Edinburgh | 1st January 2025 | https://www.learntocode.com/softwareintesive-edinburgh |
| Data Analysis | London | 15th May 2024 | https://www.learntocode.com/data-london |
| Data Analysis | London | 2nd June 2024 | https://www.learntocode.com/data-london |
| Data Analysis | Birmingham | 3rd September 2024 | https://www.learntocode.com/data-birmingham |
| Data Analysis | Liverpool | 3rd September 2024 | https://www.learntocode.com/data-liverpool |
| Data Analysis | Liverpool | 6th February 2025 | https://www.learntocode.com/data-liverpool |
Follow the same steps as outlined above to upload your table.
Now, we’ll gather two pieces of information from the visitor: the course name and the location. To simplify the build, add a Dynamic Variable for each option.
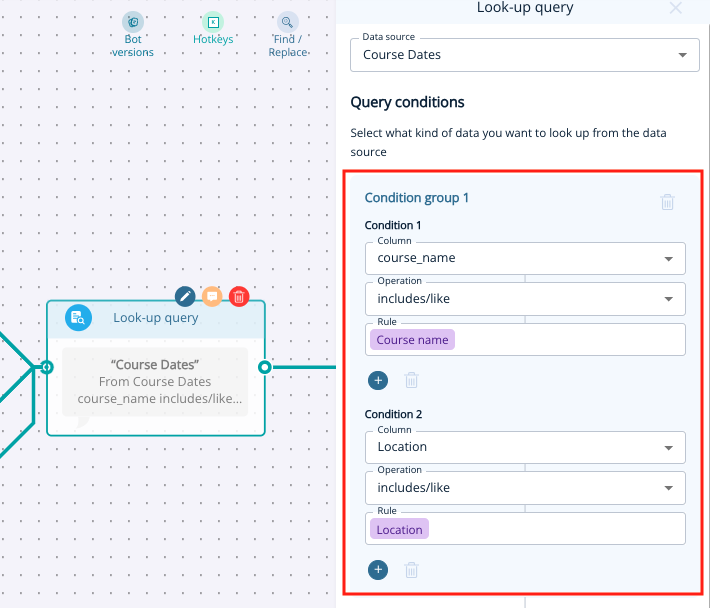
Add a Look-up Query node, selecting your course table as the data source. Set two conditions:
Save all columns and name the query (e.g., “Course Dates”).
Add a SingleChoice node with the following settings:
Also, enable an “Other” option, such as “Enquire About This Course,” to create a potential conversion.
Test the bot to ensure it displays the correct course dates and functions as expected.
To update your Lookup tables, first modify your original CSV file with the new information. Ensure that existing column titles remain unchanged, and if you need to add columns, insert them on the right.
Manually update your tables in General Bot Settings > Look-up Table, by selecting the table and clicking Update Lookup to upload the new CSV file. Your table will update automatically (only the first 50 rows will be visible).

For further assistance with the Lookup tool, contact your Customer Success Manager or our support team at [email protected].
Leadoo’s calendar integration feature allows you to schedule meetings directly into your calendar using Leadoo tools, which can help speed up the sales process. You can find more details about this feature here.
To provide this functionality to our customers, we have partnered with a calendar integration provider called Cronofy. You can review Cronofy’s privacy policy and our data processing and subcontractors by visiting the following links: https://www.cronofy.com/privacy
https://leadoo.com/data-protection-and-gdpr/
One of the reasons we chose to collaborate with Cronofy is because of their strong compliance reporting, which is publicly available on their website here: https://www.cronofy.com/compliance-center. Cronofy holds ISO 27001, ISO 27018, and ISO 27701 certificates and undergoes SOC 2 Type 2 audits annually. For more detailed compliance information or reports, please contact Cronofy directly.
Cronofy obtains its own set of tokens to access the individual’s synced calendar, which is stored in the Cronofy database. At Leadoo, we do not access these tokens. Instead, we call Cronofy to make requests to the calendar using free/busy read/write permissions. This allows us to create new events and view busy times without accessing or seeing any data in the calendar itself. For more detailed information about our method, please visit https://docs.cronofy.com/developers/authorization/individual-connect/.
If you have any questions about Leadoo’s calendar integration please contact your Customer Success Manager or our support team at [email protected].
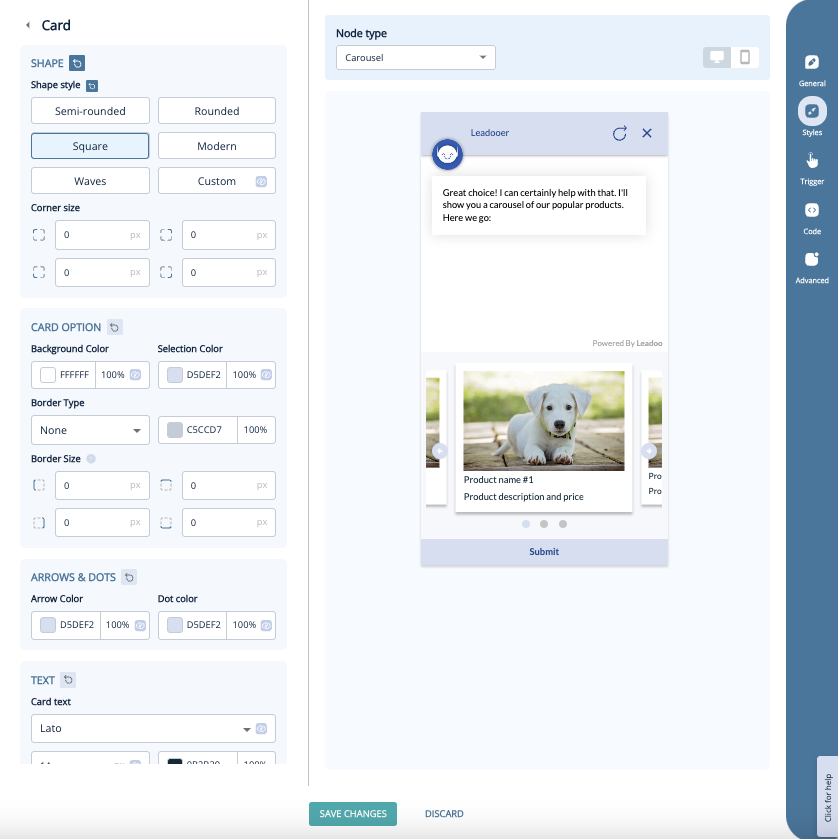
We’ve added a new node for Inpage and Chatbots to help highlight your products and services and also engage visitors better by using all the lovely imagery you’ll have at hand!
Don’t worry if you don’t have the images or even if you would prefer a text based slider type node, there’s a few different variations to choose from:
Text card – This allows you to use a carousel style picker with only text. It’s great for listing services and giving a little more detail about them.
Visual card – The visual excels when you’re trying to convey a product/service with a stunning image. But that’s not all, it can also be used for selecting locations and product selectors where you don’t need as much text.
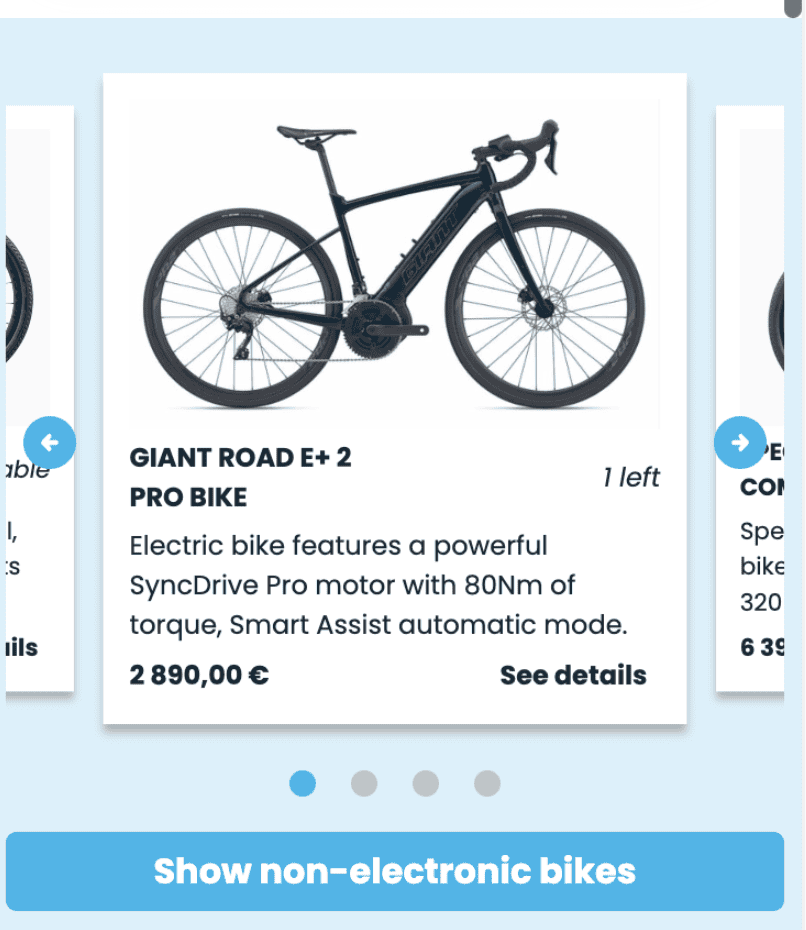
Product card – With the product card you can add images and lots of product information. Great for listing product features and pricing.
Let’s get building!
Now you know what each type can do, let’s look at how to create your own carousel node. There are a few common options across all nodes, so let’s cover them first.
Question: Similar to a single or multiple choice node, you’ll need to start off with a question.
Single vs multiple choice: Allow users to select more than one option before continuing.
Card template: Choose between text, visual and product cards. You can swap this at any time, however it will remove all your current cards and start with a blank slate.
Number of cards: Choose the number of cards you’d like to display to your visitors.
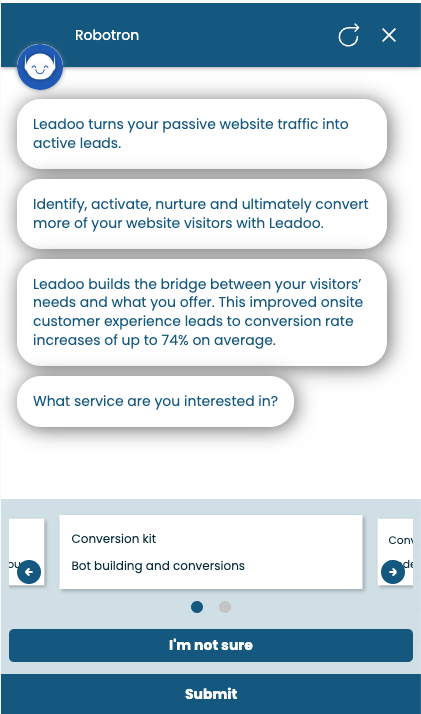
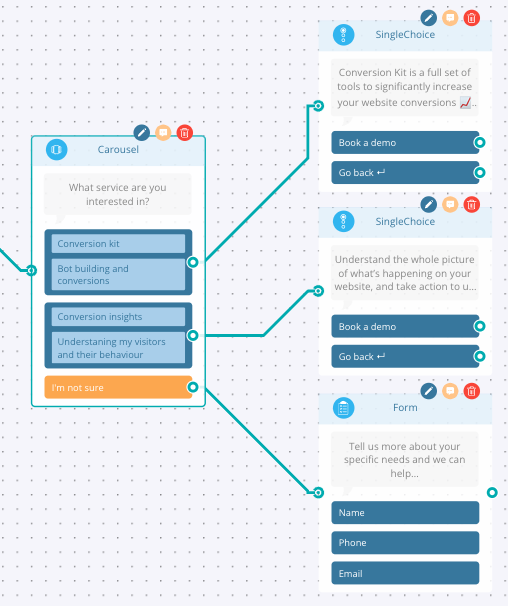
Exit action: This is an option for users to not select any of the answers and move on. It’s great for adding an ‘I’m not sure’, or ‘Speak to a specialist’ call to action here.
Each textbox will perform in a similar way to the other nodes you’re used to in Leadoo, so you can add a send to URL option, labels and variables etc. Now we’ve covered the basics, we can move on to each card type. Starting with the text card
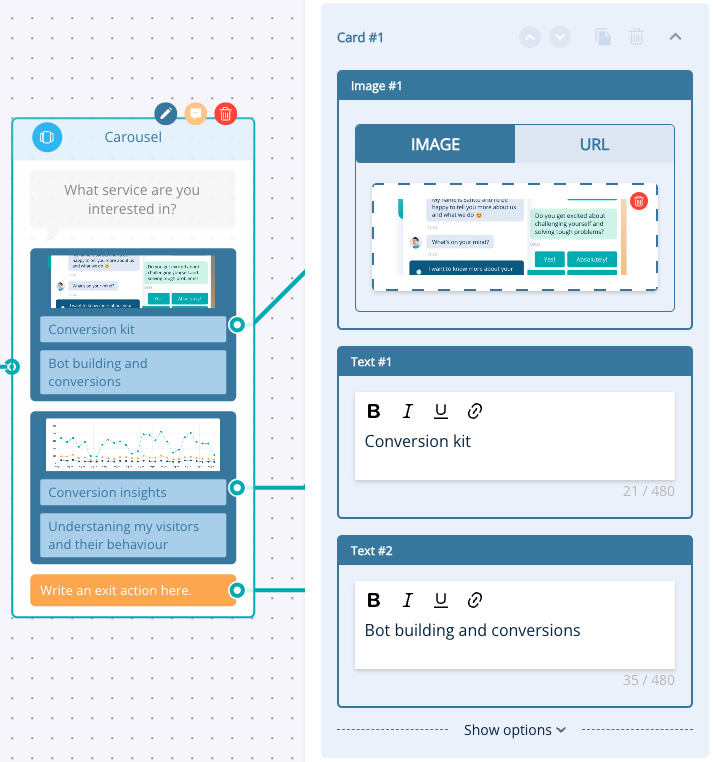
Building a Text Card Carousel Node
Once you’ve decided on the text card and how many cards you’d like to use, it’s time to add your content.
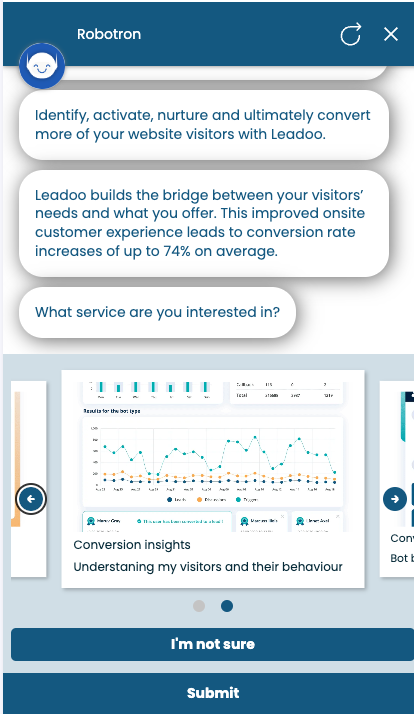
You’ll have two text boxes to use. Text #1 would be used as a header and Text #2 would be the subheader. In the example below we’re asking the visitor to choose which service they would like and we’ve used the text boxes to give the name of the feature and a brief description of what it does.
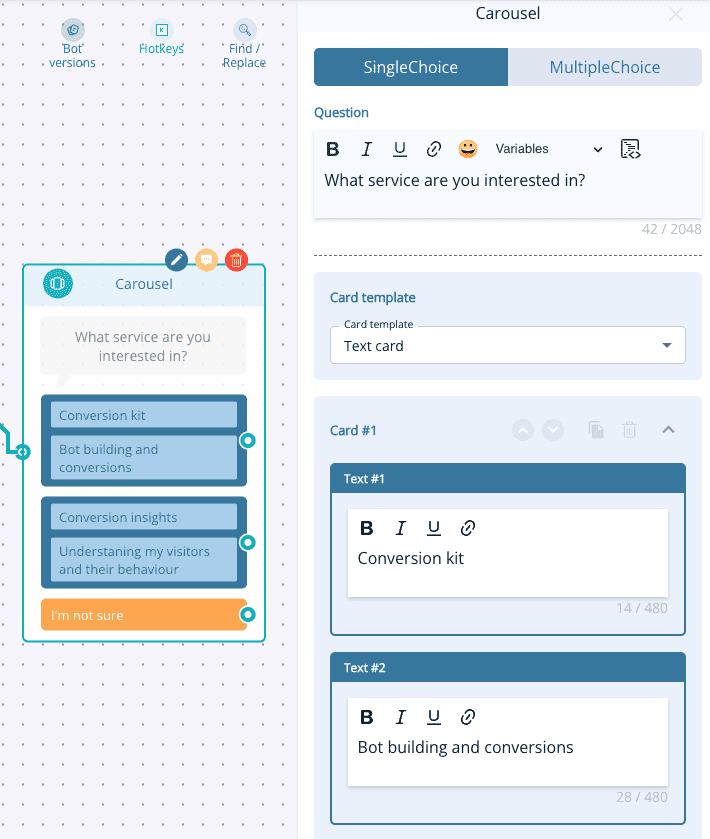
Once you’re happy with the cards you can then choose the next step in the customer’s journey.
Building a Visual Card Carousel Node
The visual card is very similar to the text card but now we can add some lovely imagery to help support the text. You’ll still have the header and subheader text boxes but you can either upload an image (recommend dimensions are 482x300px) or you can add a URL and it will pull in the image from there, this is a great option if your image is hosted online rather than as a file.
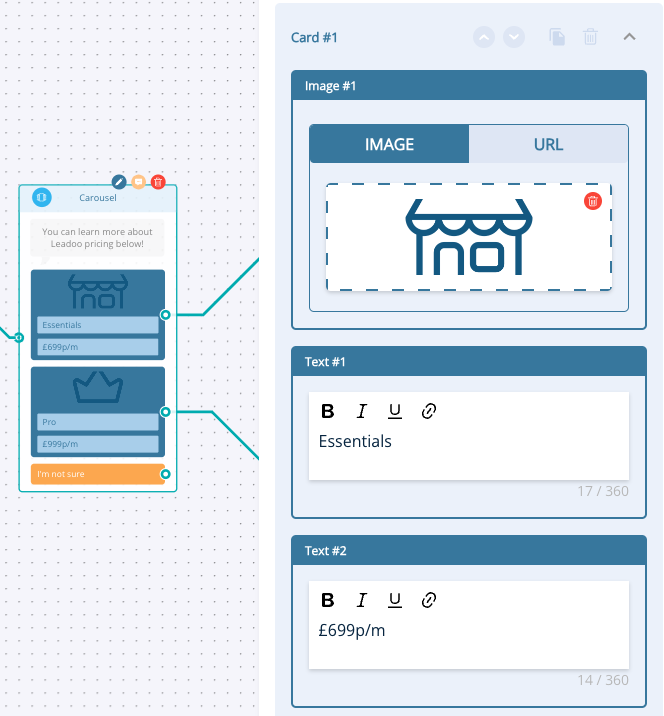
Building a Product Card Carousel Node
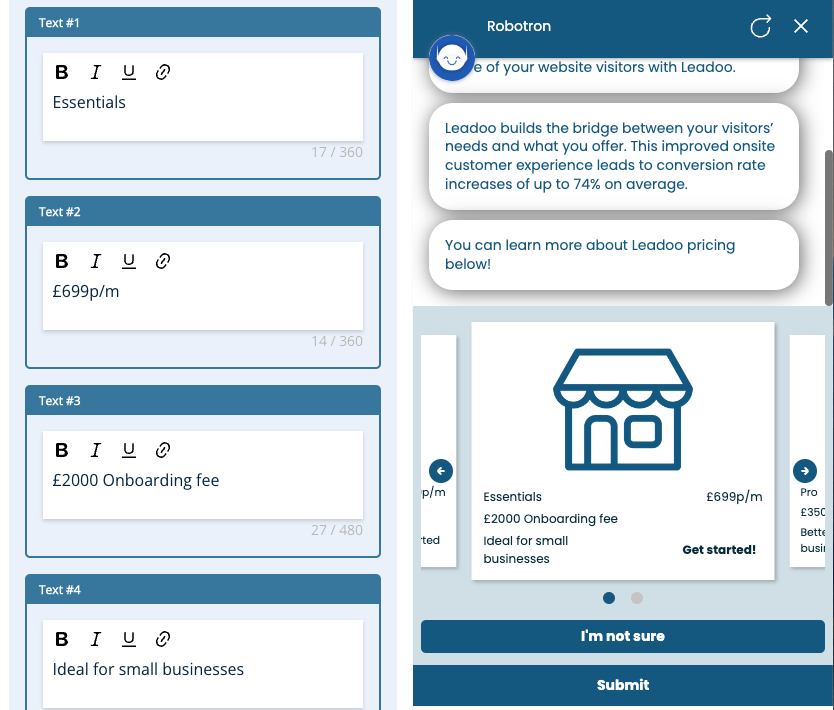
Moving on the product card is where things can get a bit more advanced because you have more text options to choose from to help give visitors more information about your product or service. In the example below we’re using the Leadoo pricing options to show you how it works.
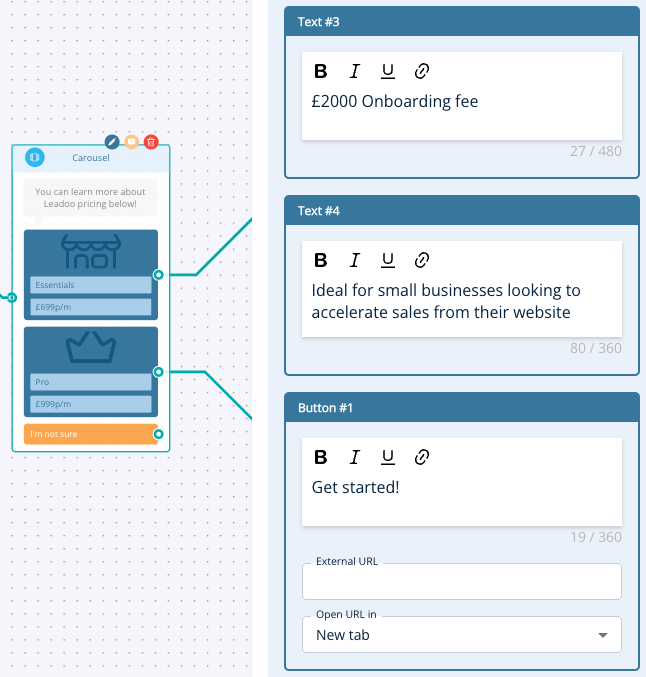
Text #1: Great for displaying the product name.
Text #2: This could be used for listing the price or creating urgency by listing the amount left in stock.
Text #3: Can be used for additional information about the product, similar to a subheader
Text #4: Another area to add more product information.
Button: The main call to action, make this clear and compelling!
Not all of these fields are required, you only need Text #1 to create your product card.
Customising the look of your Carousel Node
You’ll have access to a robust style editor when creating your carousel node. Simply open up the style settings and click on the Card option to get started. From here you can edit every aspect of the card, including:

Hope you found this useful and are now ready to start building your own carousel nodes! If you need any assistance please get in touch with your Account Manager!
If you wish to request the deletion of your account, please use the bot below to request account deletion. This will begin the formal procedure for account and data deletion.
Please note that once your request is processed, all associated data will be permanently deleted and cannot be recovered.
Should you have any questions or require further assistance, please do not hesitate to contact our support team at [email protected]
You can make the most of your video content and create dynamic conversation by inserting videos directly into your bots. As the videos are not hosted natively, this won’t negatively impact any page load speeds.
We support embedded videos from YouTube, Vimeo. If you need to embed videos from any other source, contact your Customer Success Manager for support.
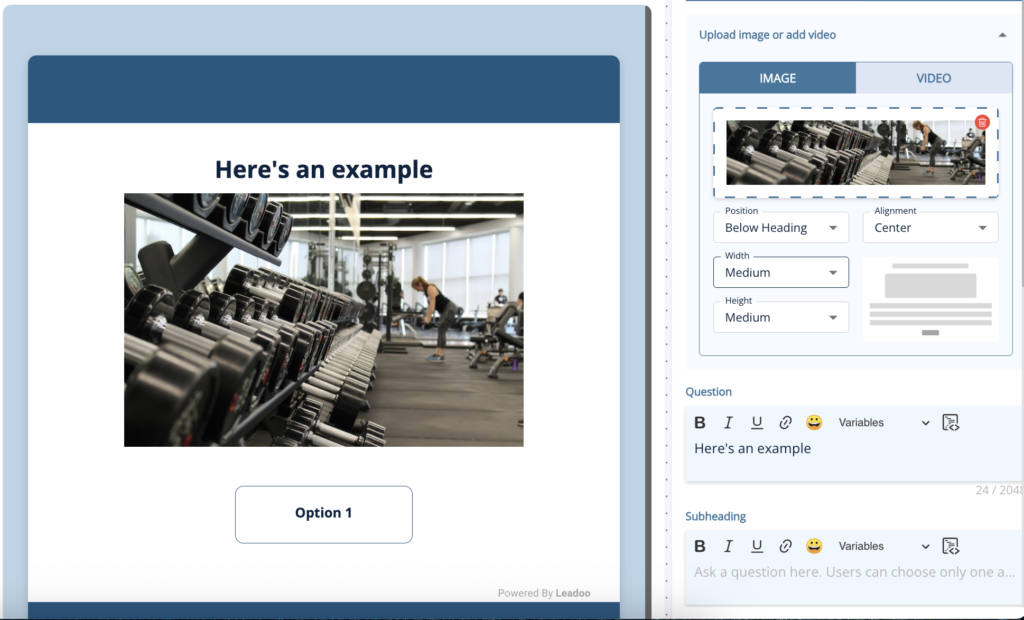
How to add an image
1. Open up your bot in the editor
2. Choose the node you want to add it to and open it to edit
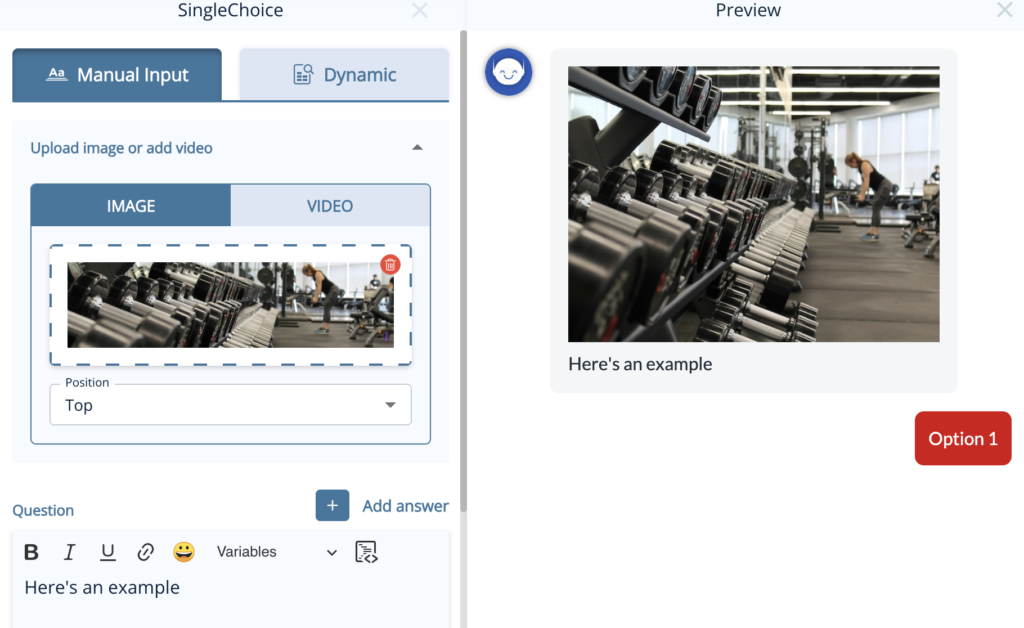
3. At the top of the node, you’ll see the option to add an image or video. Click to expand.
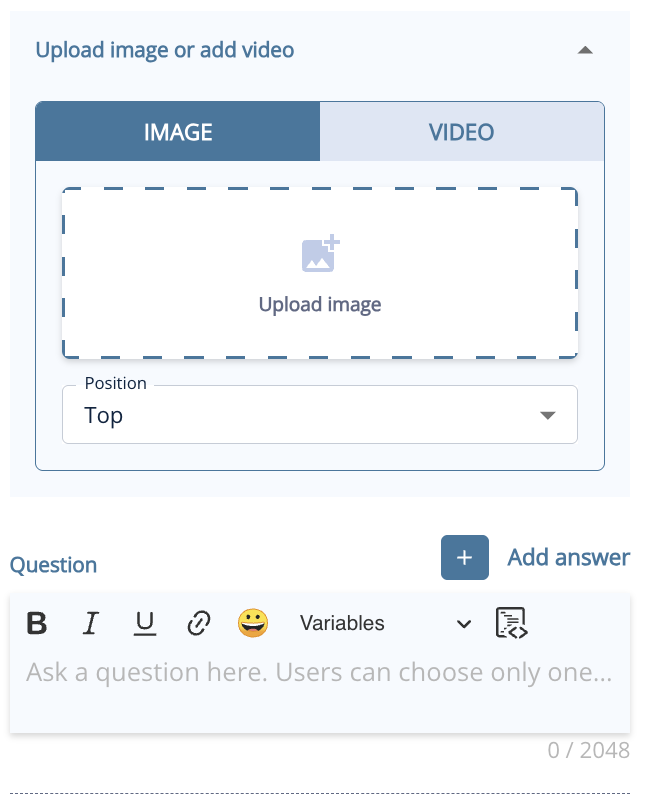
3. To add an image, click to open your image library and add the image you wish to use and change the settings as you wish for the location and size.
In VisualBots, you can already easily add images to answers, but you can use the same method above to add images above the answers with a few more options for location and size.
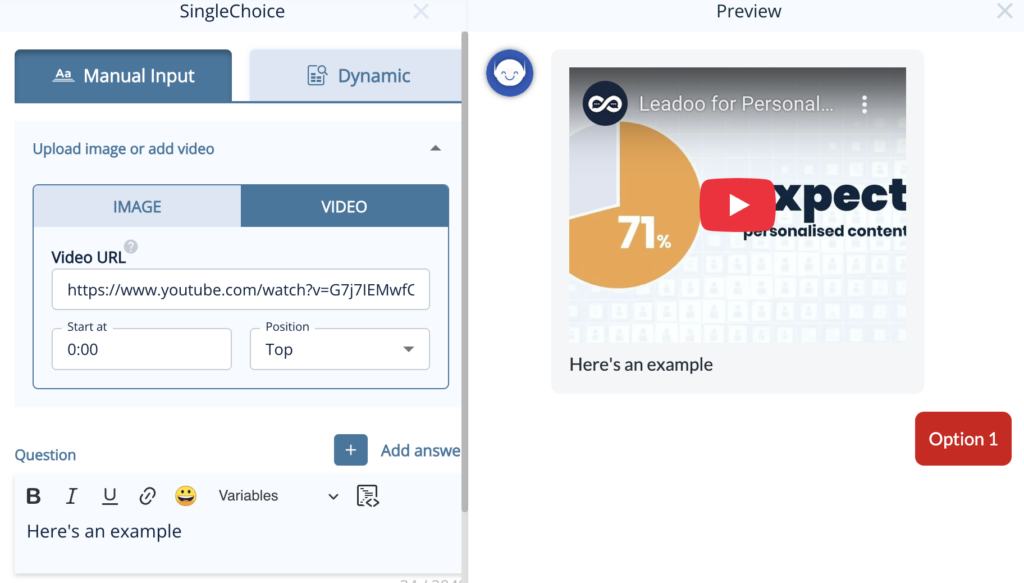
How to add a video
1. Select the video tab
2. Copy and paste the URL of the video from YouTube or Vimeo
3. Select the size, location and start point settings you wish to use
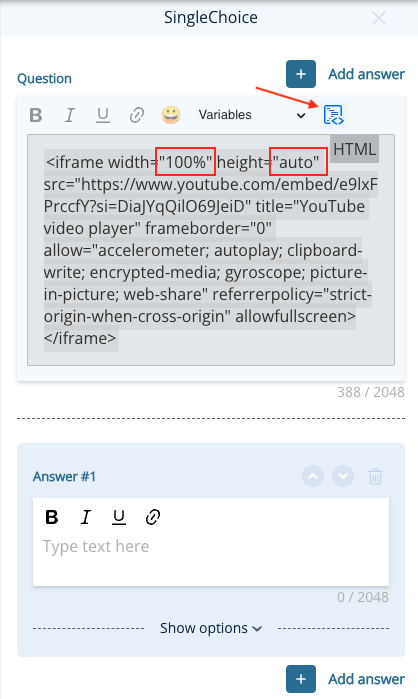
1. Click the share button below the YouTube video you want to use

2. Select the embed option, copy this code and paste it into the Question area of a BotSays, SingleChoice or MultipleChoice node.
3. Highlight your text and convert it to a code block by clicking the icon in the top-right corner of the box. You’ll notice that the text will now be in a grey box with an HTML tag in the corner.
4. Change the width to 100% and the height to auto. This will ensure your video resizes dynamically.
1. Either click “Copy embed code” from the pop-up menu under the 3 dots in your library or, click the embed button at the top of the page.
2. Follow steps 2-4 from the YouTube instructions.
Embedding videos from Wistia is a little trickier than YouTube and Vimeo as you can’t use the embed code produced from the platform but an iframe code as mentioned in their article here – https://support.wistia.com/en/articles/8233354-embedding-and-sharing-media.
1. Find the code for your video from the link URL which will look something like this: https://wistia.com?wvideo=pj1mryf8bi or https://acmeinc.wistia.com/medias/pj1mryf8bi
2. Use this code and replace the highlighted video ID with yours:
<iframe src="https://acmeinc.wistia.com/medias/pj1mryf8bi?seo=true&videoFoam=false" allow="autoplay; fullscreen" allowtransparency="true" frameborder="0" scrolling="no" class="wistia_embed" name="wistia_embed" msallowfullscreen="" width="100%" height="auto"></iframe>3. Follow steps 2-4 from the YouTube instructions.
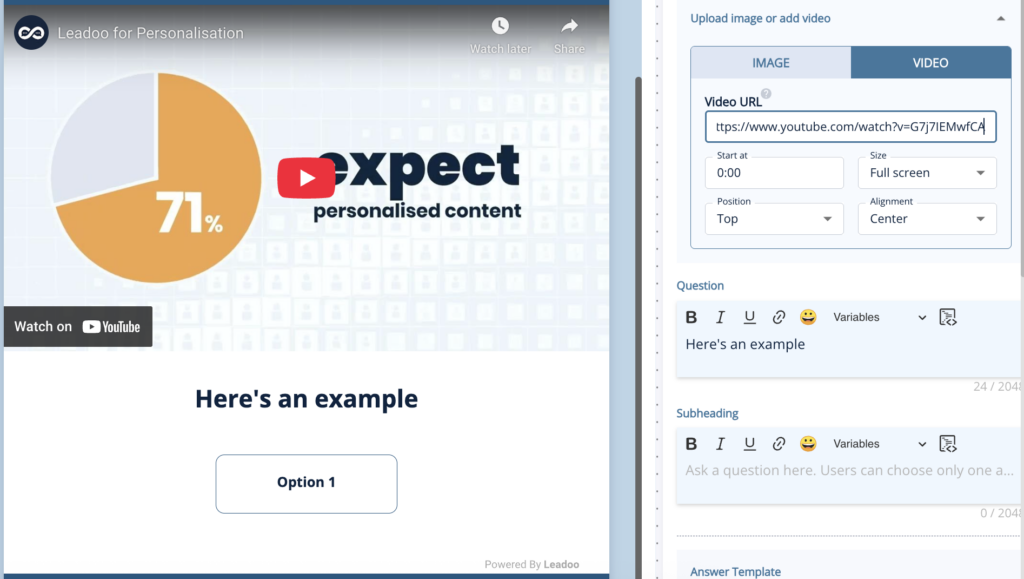
Embedding a video in a visualbot is much the same as adding them to an InpageBot or ChatBot but to ensure the video always scales correctly you need to add some extra information to the code you are using.
1. Copy the URL or video ID of your video from YouTube, Vimeo or Wistia as above so that would be:
– YouTube: https://www.youtube.com/embed/e9lxFPrccfY?si=qW4IYfZPwp4UrQQX
– Vimeo: https://player.vimeo.com/video/812054001?badge=0&autopause=0&player_id=0&app_id=58479
– Wistia: https://acmeinc.wistia.com/medias/pj1mryf8bi?seo=true&videoFoam=false
2. Replace the Video URL in the code below and follow steps 2-4 from the YouTube instructions.
<div class="embed-container" style=" position: relative; padding-bottom: 56.25%; height: 0; overflow: hidden; max-width: 100%; width: 800px;"><iframe src="https://www.youtube.com/embed/e9lxFPrccfY?si=qW4IYfZPwp4UrQQX" frameborder="0" allowfullscreen="" style="position: absolute; top: 0; left: 0; width: 100%; height: 100%; "></iframe></div>
If you need help, please reach out to your Customer Success Manager.
Dynamic Variables allow you to capture both text and numerical values. You can use this in the bot logic and dialogue either from user input or in setting values in the background. Learn how to use Dynamic Variables to build a quote calculator for your own business.
Watch the explainer below from one of our Technical Account Managers, Gavin or, read on for a step-by-step guide.
Let’s say you want to create a bot that calculates and displays the breakdown of the total price of a pizza order. The equation for the total price could be
base + toppings + delivery = total price
If you’re unsure how to apply this example to your use case, contact your Customer Success Manager for personal guidance.
To use Dynamic Variables you need to add them to each bot you want to use them in and set the values you want them to have.
Open the Dynamic Variable Management panel by activating the toggle in the upper left corner of the bot builder.
Add your first variable by clicking the blue button in the Dynamic variable control panel.
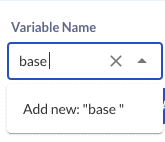
Type the name of the first variable in the Variable Name field. Confirm the name by clicking it on the dropdown that appears.
Switch the Type to number, since price is a numeric variable.
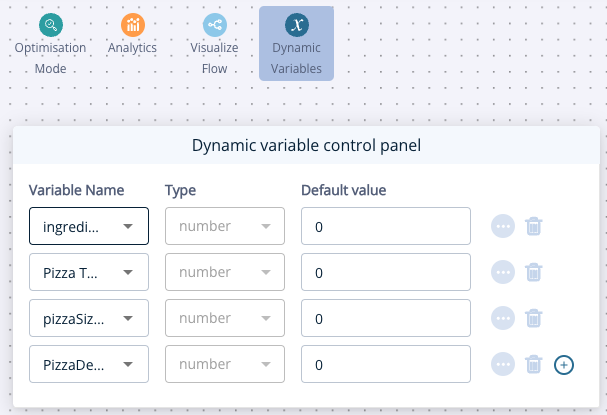
As we are calculating the price through selections set the default value field to 0. Repeat this to add the other variables below.
PizzaSizePrice – number – 0
IngredientsPrice – number – 0
PizzaDelivery – number – 0
Pizza Total – number – 0
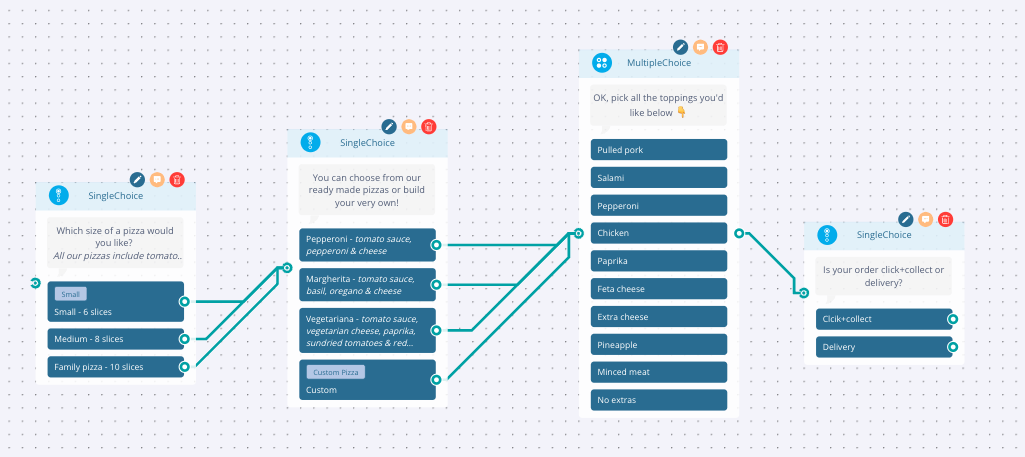
Using a combination of single and multiple choice nodes add all the options you need the user to select to build their pizza.
Double-click to edit the node, click show options -> Variables and then select the variable name you want to assign to the selection along with the value in numbers only
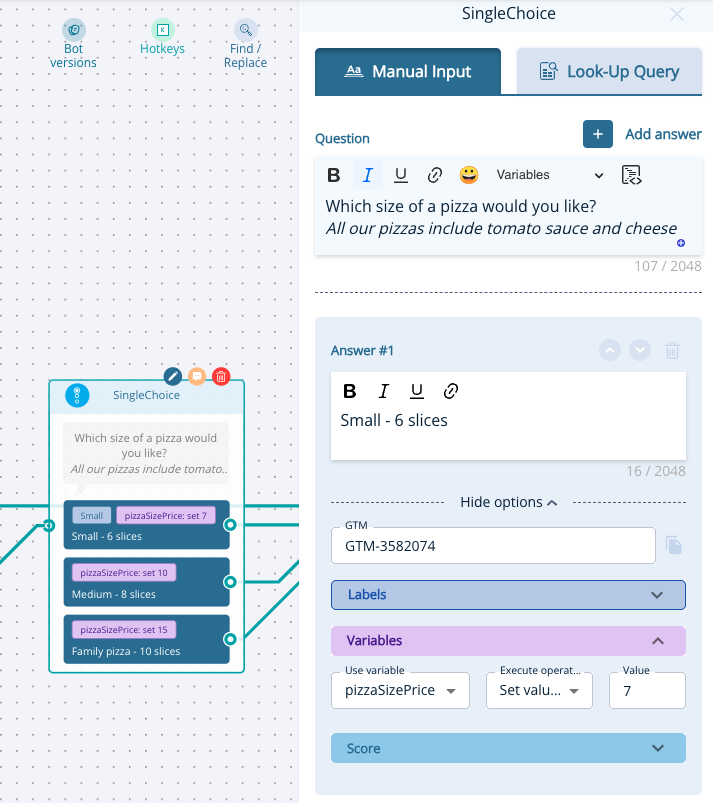
Do this for all the options that have a cost using these prices:
Pizza base price:
– Small (7€)
– Medium (10€)
– Large (15€)
Pizza price
– Pepperoni (2€)
-Margherita (2€)
-Vegetariana (2€)
Toppings price:
– Pulled Pork (1€)
– Salami (1€)
– Pepperoni (1€)
– Chicken (1€)
– Paprika (0€)
– Feta cheese (1€)
– Extra cheese (1€)
– Pineapple (1€)
– Minced meat (1€)
Delivery cost:
– Pick up from the restaurant (free)
– Delivery (5€)
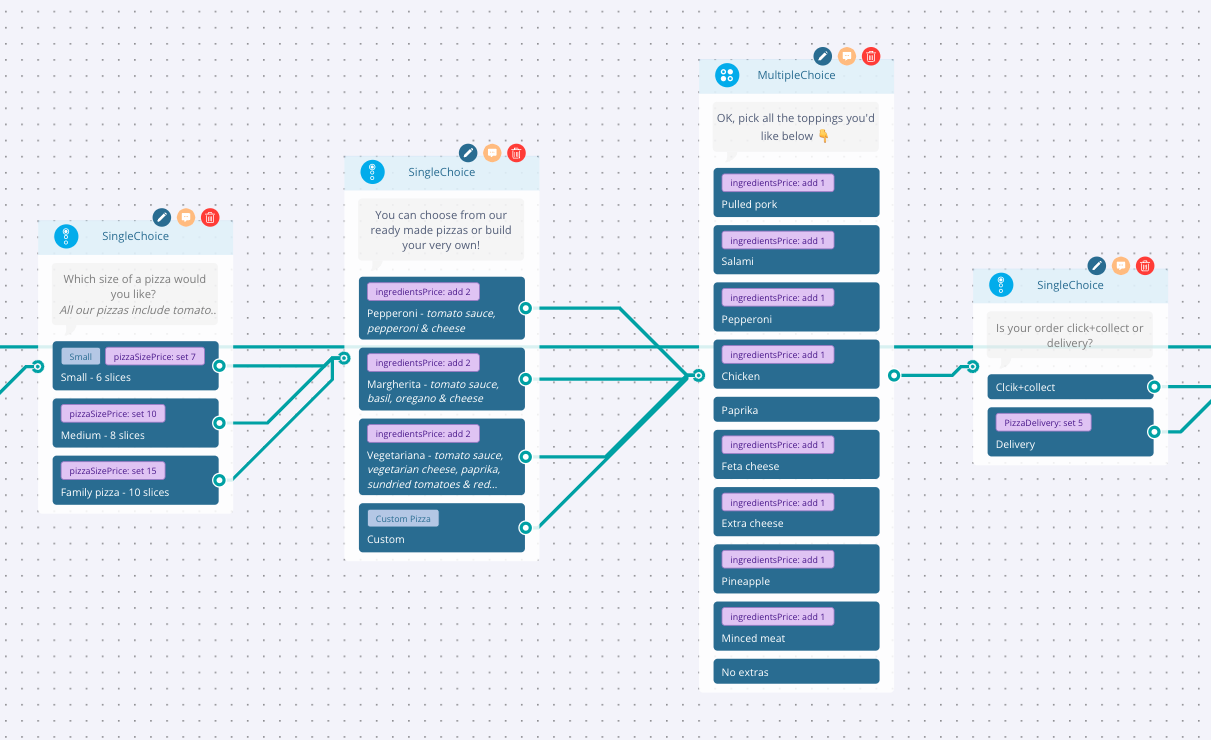
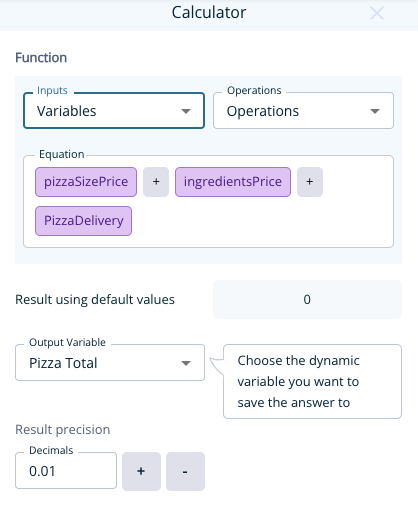
Now that all the prices are added and the user has selected the pizza they want – we need the calculator node to total it all together. Add the node from the menu and add the equation pizzaSizePrice + ingredentsPrice + PizzaDelivery with the Output value of Pizza Total.
You can either select these options from the inputs dropdown or by typing them in. Any Dynamic Variables will be highlighted in pink so if yours are in grey – try again.
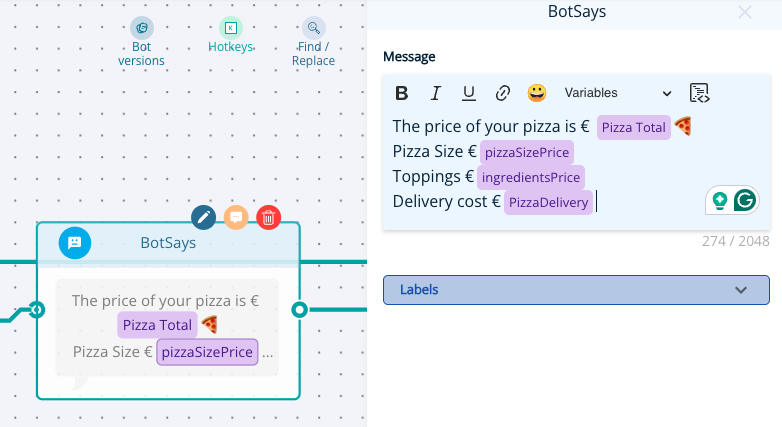
If you want, you can display the breakdown of the total price to the user using the Variables dropdown in a node.
Add a bot says node to present the total price along with the breakdown by selecting the variable in place of where the price should be. Remember to add the currency and any text you want to appear with the price.
Click the preview button at the top of the page to see how your pizza calculator works.

