KNOWLEDGE
Case StudiesBlogsEventsSupport & Starting
Support Articles & HubSupport Videos (Youtube)Try Leadoo Free (Leadoo Lite)Partners & Careers
PartnershipsCareersSecurity & Privacy
Security at Leadoo AIGeneral Terms & ConditionsData & GDPRKNOWLEDGE
Case StudiesBlogsEventsSupport & Starting
Support Articles & HubSupport Videos (Youtube)Try Leadoo Free (Leadoo Lite)Partners & Careers
PartnershipsCareersSecurity & Privacy
Security at Leadoo AIGeneral Terms & ConditionsData & GDPRWe’ve added a new node for Inpage and Chatbots to help highlight your products and services and also engage visitors better by using all the lovely imagery you’ll have at hand!
Don’t worry if you don’t have the images or even if you would prefer a text based slider type node, there’s a few different variations to choose from:
Text card – This allows you to use a carousel style picker with only text. It’s great for listing services and giving a little more detail about them.
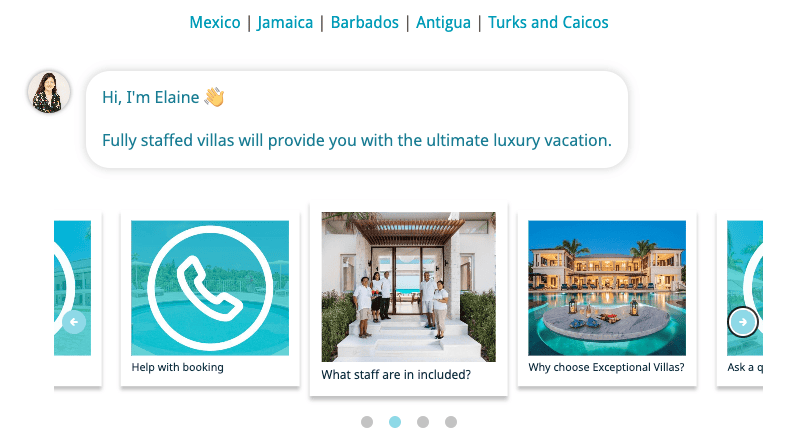
Visual card – The visual excels when you’re trying to convey a product/service with a stunning image. But that’s not all, it can also be used for selecting locations and product selectors where you don’t need as much text.
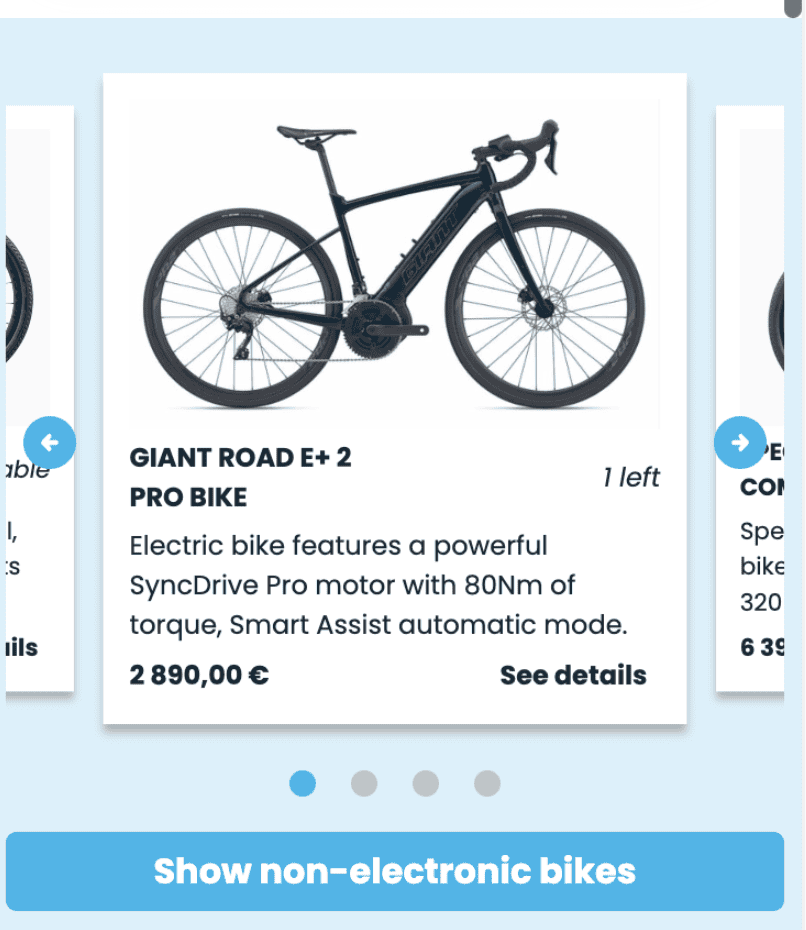
Product card – With the product card you can add images and lots of product information. Great for listing product features and pricing.
Let’s get building!
Now you know what each type can do, let’s look at how to create your own carousel node. There are a few common options across all nodes, so let’s cover them first.
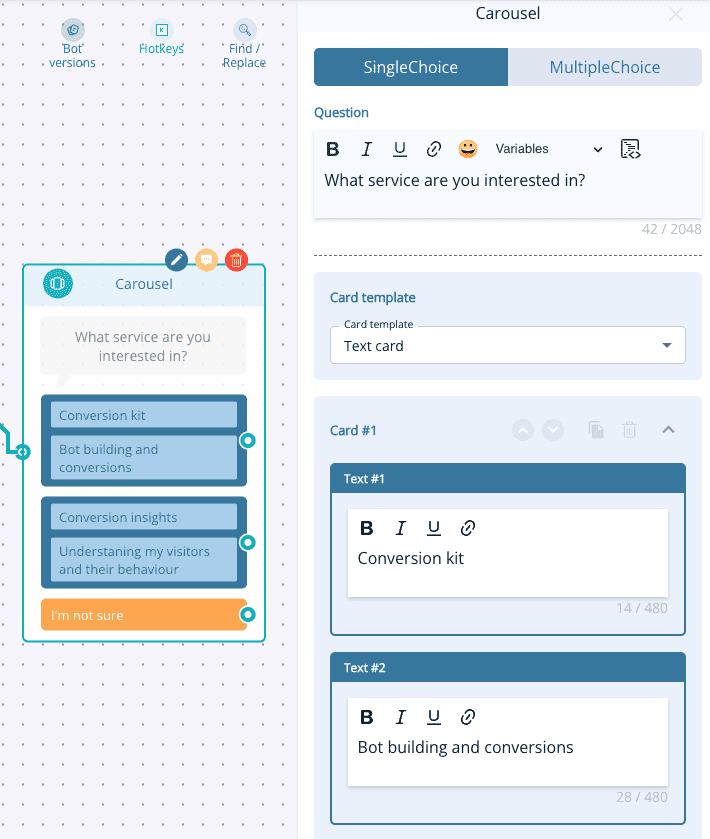
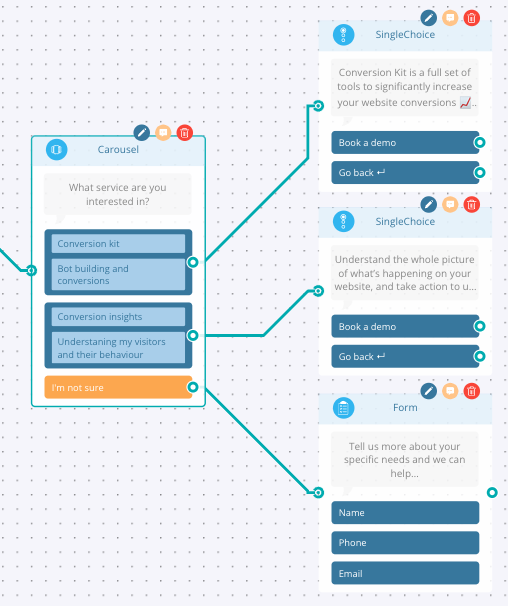
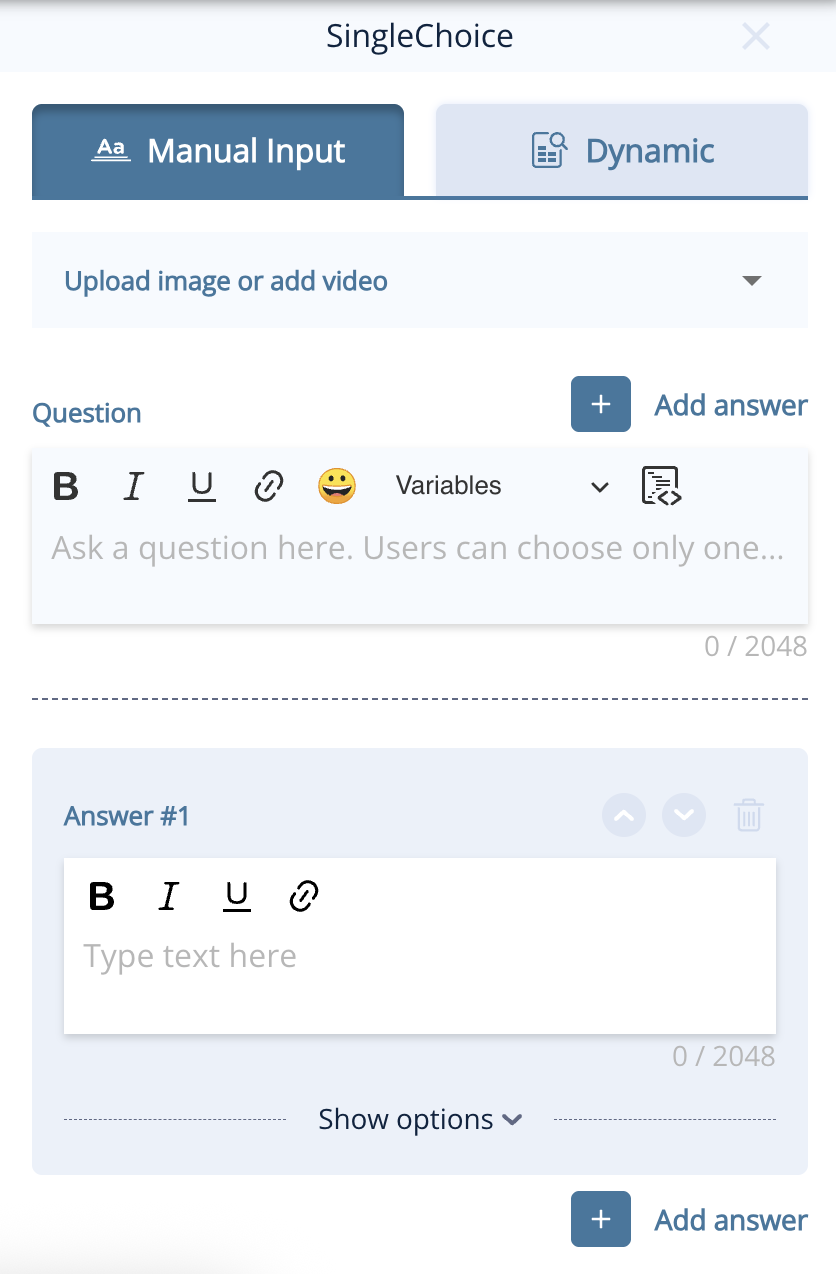
Question: Similar to a single or multiple choice node, you’ll need to start off with a question.
Single vs multiple choice: Allow users to select more than one option before continuing.
Card template: Choose between text, visual and product cards. You can swap this at any time, however it will remove all your current cards and start with a blank slate.
Number of cards: Choose the number of cards you’d like to display to your visitors.
Exit action: This is an option for users to not select any of the answers and move on. It’s great for adding an ‘I’m not sure’, or ‘Speak to a specialist’ call to action here.
Each textbox will perform in a similar way to the other nodes you’re used to in Leadoo, so you can add a send to URL option, labels and variables etc. Now we’ve covered the basics, we can move on to each card type. Starting with the text card
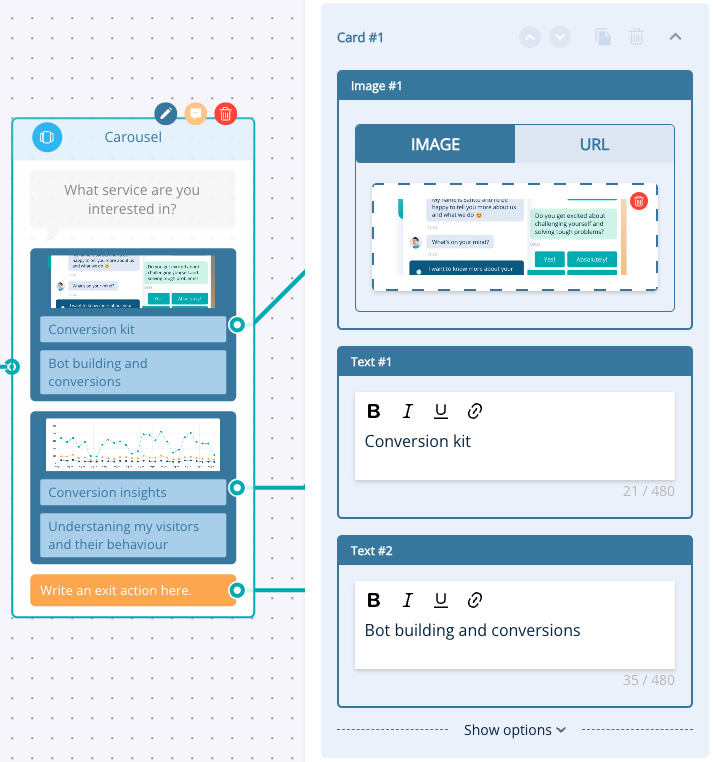
Building a Text Card Carousel Node
Once you’ve decided on the text card and how many cards you’d like to use, it’s time to add your content.
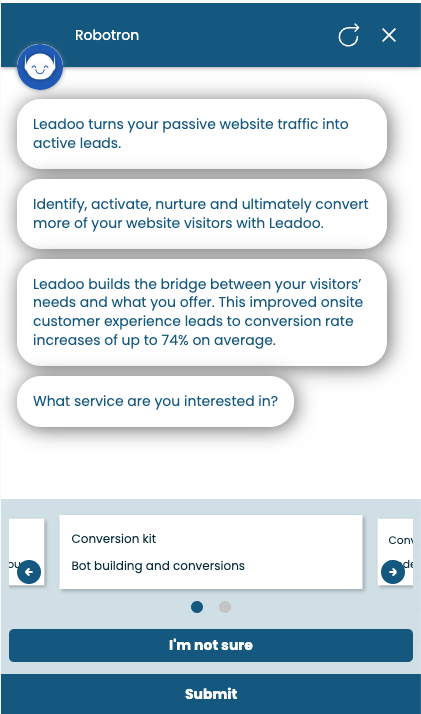
You’ll have two text boxes to use. Text #1 would be used as a header and Text #2 would be the subheader. In the example below we’re asking the visitor to choose which service they would like and we’ve used the text boxes to give the name of the feature and a brief description of what it does.
Once you’re happy with the cards you can then choose the next step in the customer’s journey.
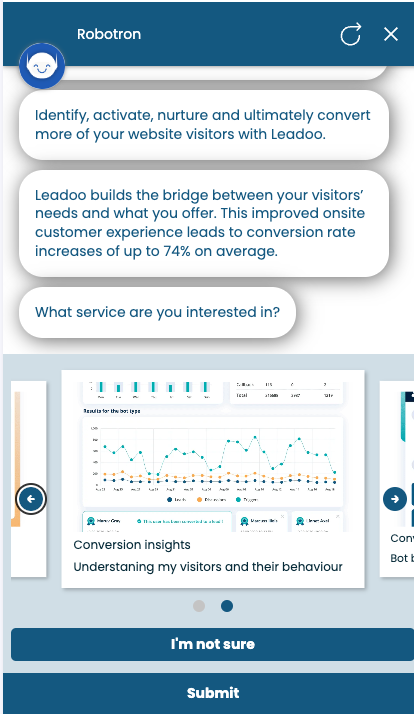
Building a Visual Card Carousel Node
The visual card is very similar to the text card but now we can add some lovely imagery to help support the text. You’ll still have the header and subheader text boxes but you can either upload an image (recommend dimensions are 482x300px) or you can add a URL and it will pull in the image from there, this is a great option if your image is hosted online rather than as a file.
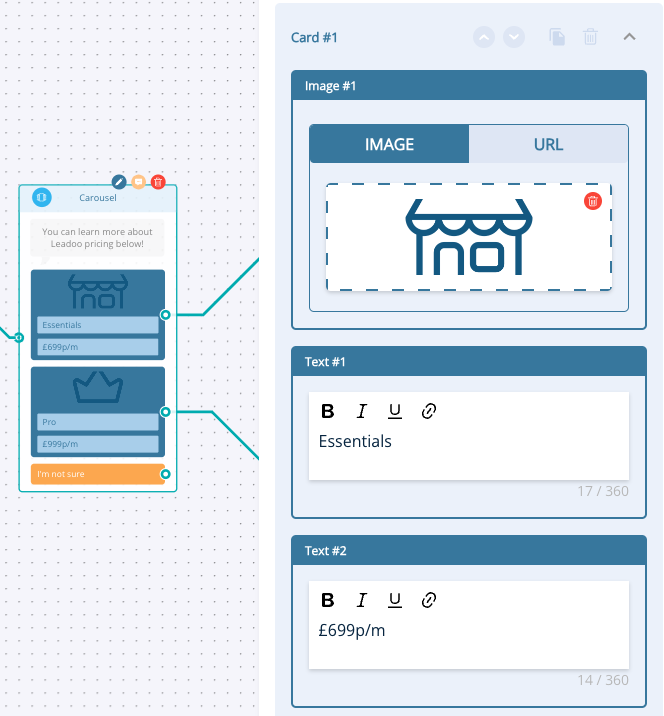
Building a Product Card Carousel Node
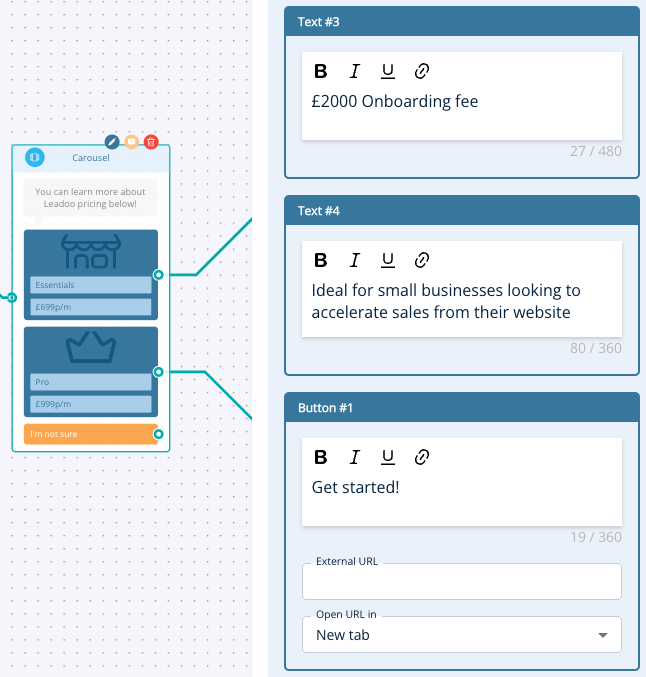
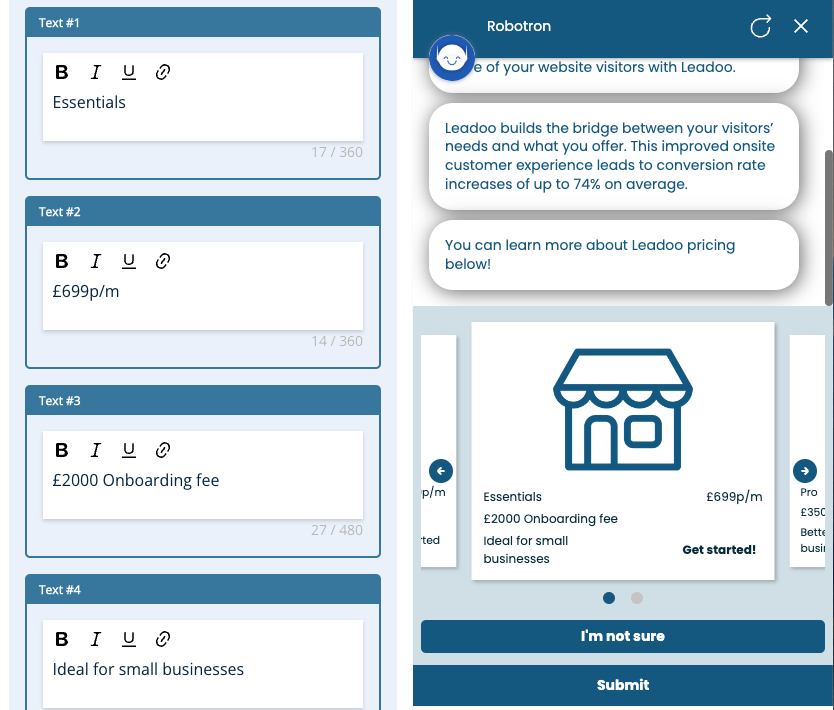
Moving on the product card is where things can get a bit more advanced because you have more text options to choose from to help give visitors more information about your product or service. In the example below we’re using the Leadoo pricing options to show you how it works.
Text #1: Great for displaying the product name.
Text #2: This could be used for listing the price or creating urgency by listing the amount left in stock.
Text #3: Can be used for additional information about the product, similar to a subheader
Text #4: Another area to add more product information.
Button: The main call to action, make this clear and compelling!
Not all of these fields are required, you only need Text #1 to create your product card.
Customising the look of your Carousel Node
You’ll have access to a robust style editor when creating your carousel node. Simply open up the style settings and click on the Card option to get started. From here you can edit every aspect of the card, including:

Hope you found this useful and are now ready to start building your own carousel nodes! If you need any assistance please get in touch with your Account Manager!
You can make the most of your video content and create dynamic conversation by inserting videos directly into your bots. As the videos are not hosted natively, this won’t negatively impact any page load speeds.
We support embedded videos from YouTube, Vimeo. If you need to embed videos from any other source, contact your Customer Success Manager for support.
How to add an image:
1. Open up your bot in the editor
2. Choose the node you want to add it to and open it to edit
3. At the top of the node, you’ll see the option to add an image or video. Click to expand.
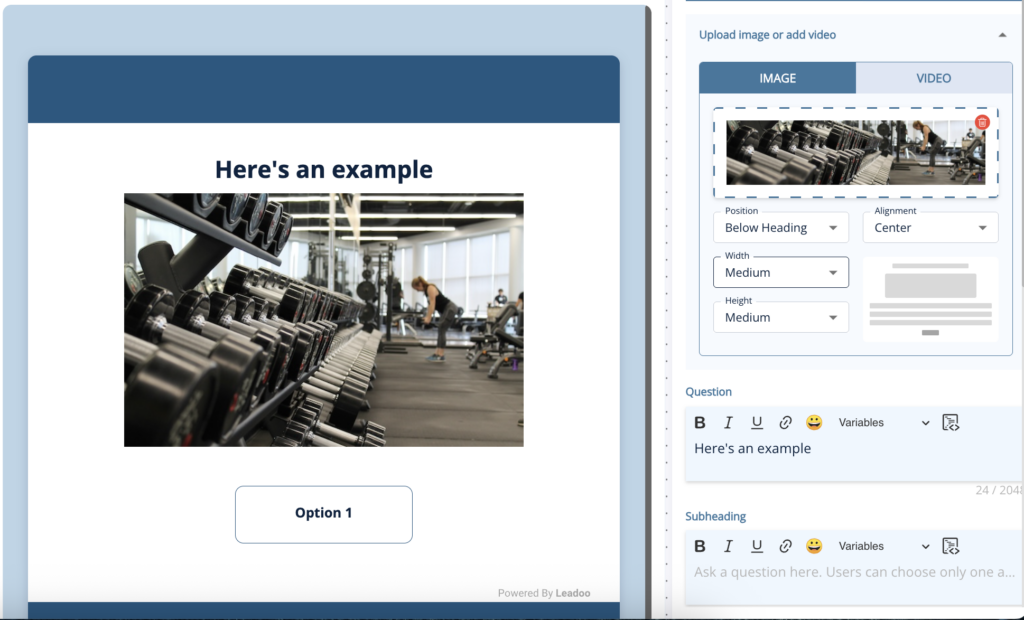
4. To add an image, click to open your image library and add the image you wish to use and change the settings as you wish for the location and size.
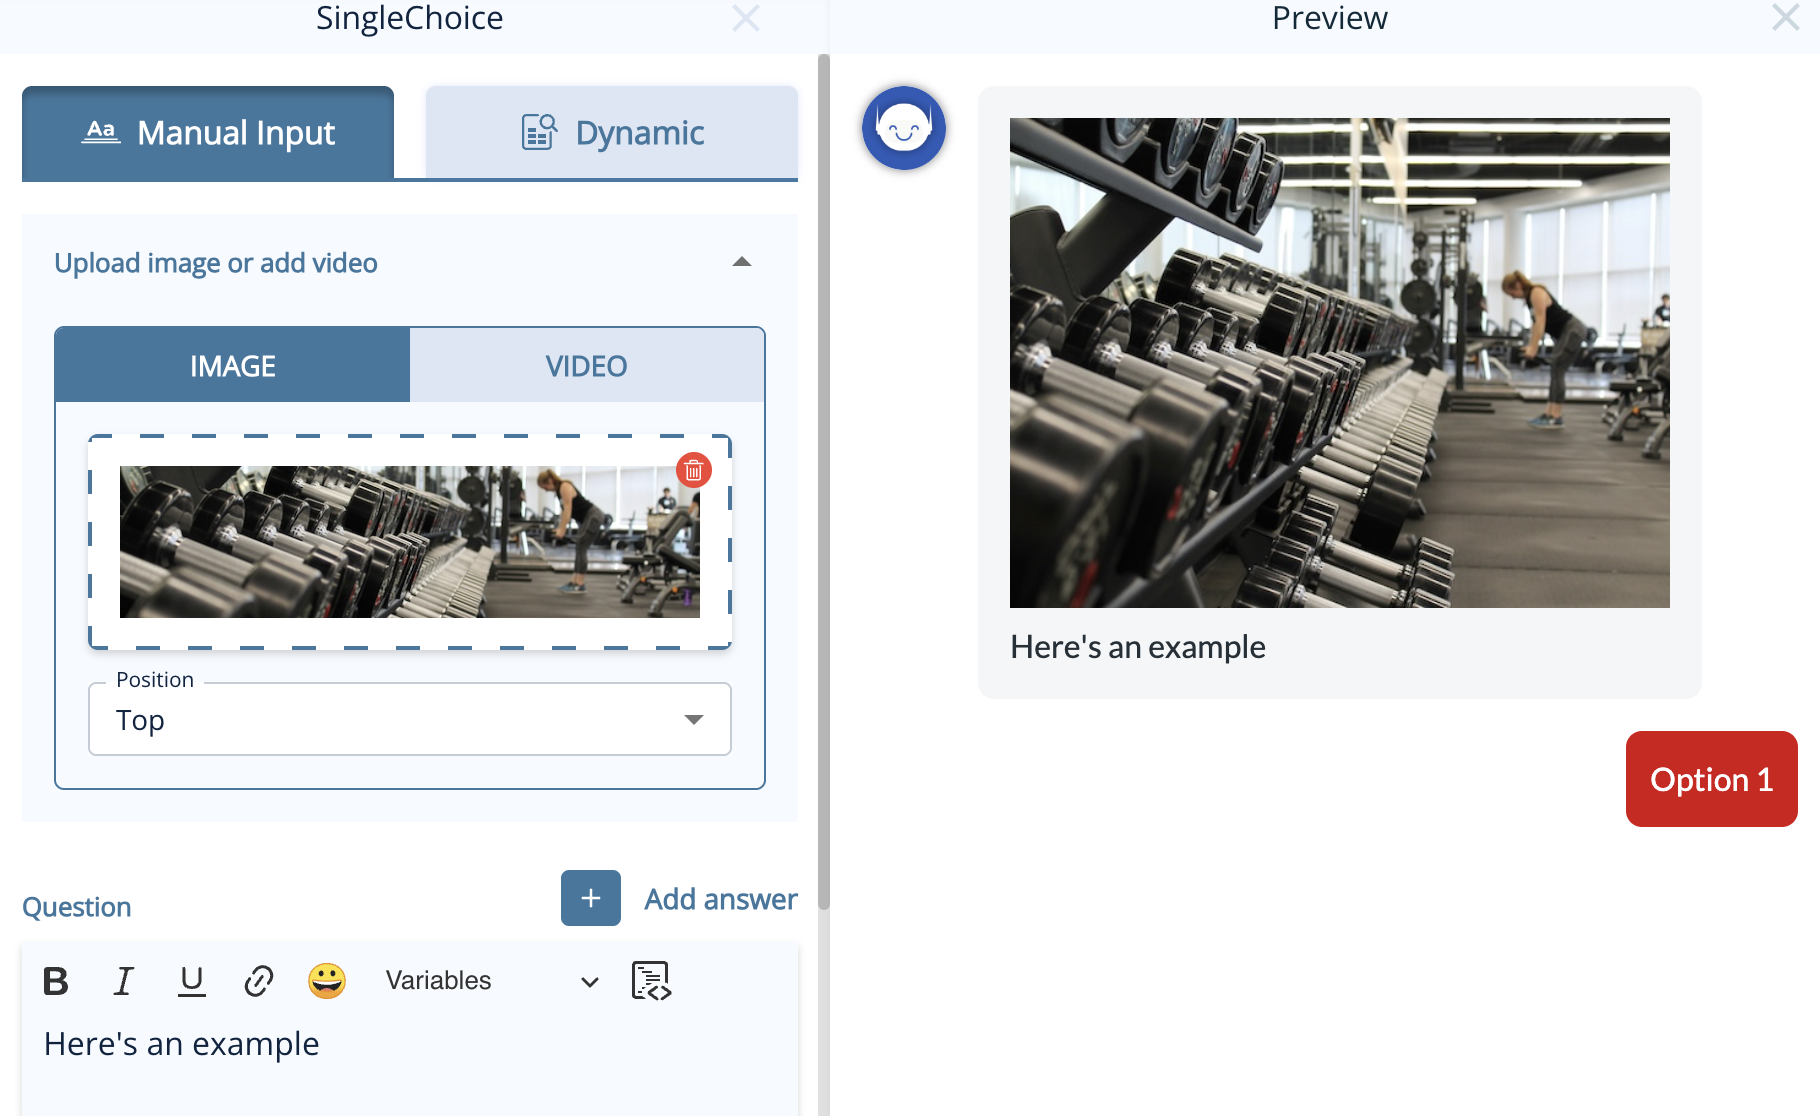
In VisualBots, you can already easily add images to answers, but you can use the same method above to add images above the answers with a few more options for location and size.
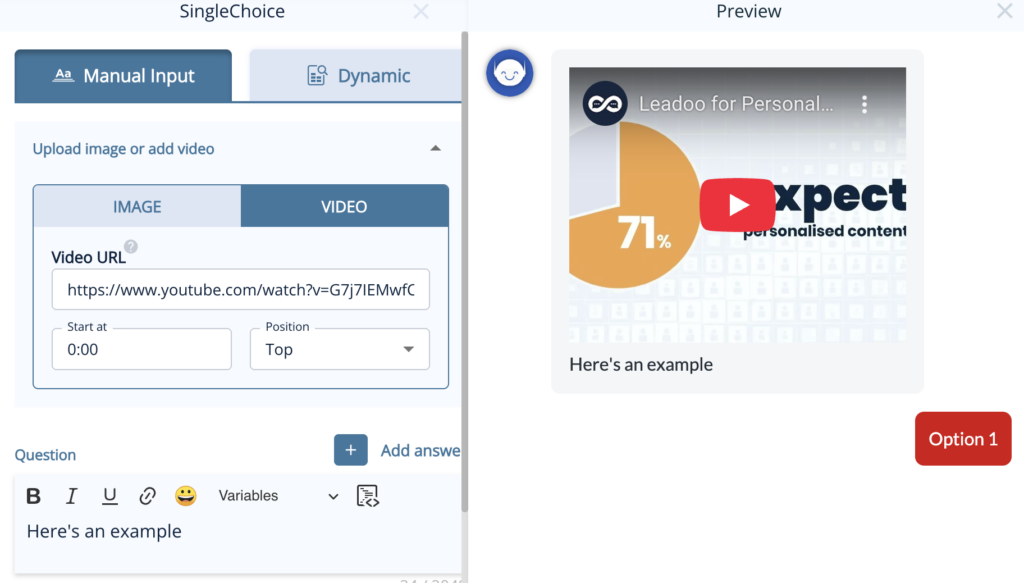
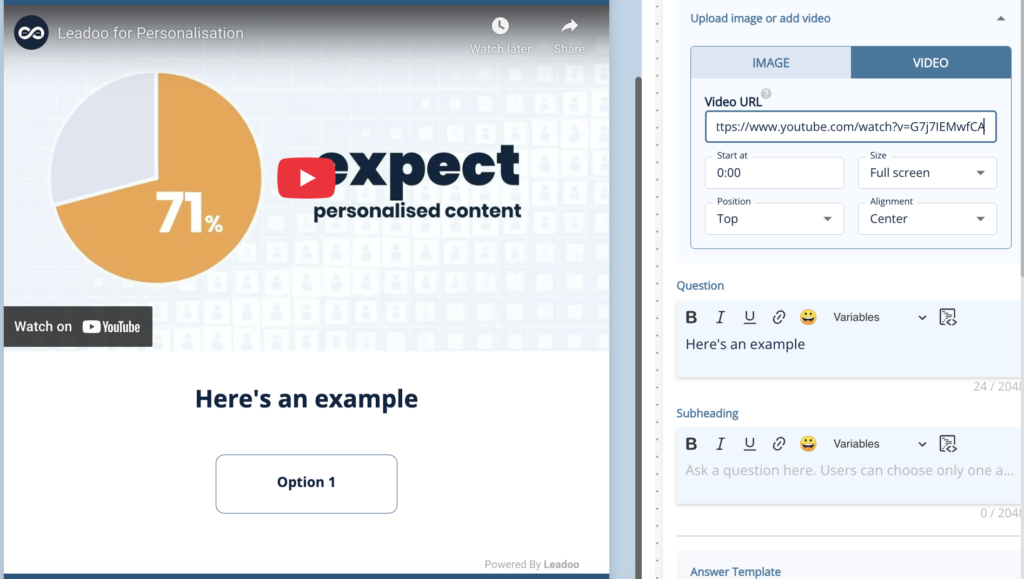
How to add a video:
1. Select the video tab
2. Copy and paste the URL of the video from YouTube or Vimeo
3. Select the size, location and start point settings you wish to use
1. Click the share button below the YouTube video you want to use
2. Select the embed option, copy this code and paste it into the Question area of a BotSays, SingleChoice or MultipleChoice node.
3. Highlight your text and convert it to a code block by clicking the icon in the top-right corner of the box. You’ll notice that the text will now be in a grey box with an HTML tag in the corner.
4. Change the width to 100% and the height to auto. This will ensure your video resizes dynamically.
1. Either click “Copy embed code” from the pop-up menu under the 3 dots in your library or, click the embed button at the top of the page.
2. Follow steps 2-4 from the YouTube instructions.
Embedding videos from Wistia is a little trickier than YouTube and Vimeo as you can’t use the embed code produced from the platform but an iframe code as mentioned in their article here – https://support.wistia.com/en/articles/8233354-embedding-and-sharing-media.
1. Find the code for your video from the link URL which will look something like this: https://wistia.com?wvideo=pj1mryf8bi or https://acmeinc.wistia.com/medias/pj1mryf8bi
2. Use this code and replace the highlighted video ID with yours:
3. Follow steps 2-4 from the YouTube instructions.
Embedding a video in a VisualBot is much the same as adding them to an InpageBot or ChatBot but to ensure the video always scales correctly you need to add some extra information to the code you are using.
1. Copy the URL or video ID of your video from YouTube, Vimeo or Wistia as above so that would be:
– YouTube: https://www.youtube.com/embed/e9lxFPrccfY?si=qW4IYfZPwp4UrQQX
– Vimeo: https://player.vimeo.com/video/812054001?badge=0&autopause=0&player_id=0&app_id=58479
– Wistia: https://acmeinc.wistia.com/medias/pj1mryf8bi?seo=true&videoFoam=false
2. Replace the Video URL in the code below and follow steps 2-4 from the YouTube instructions.
If you need help, please reach out to your Customer Success Manager.
Dynamic Variables allow you to capture both text and numerical values. You can use this in the bot logic and dialogue either from user input or in setting values in the background. Learn how to use Dynamic Variables to build a quote calculator for your own business.
Watch the explainer below from one of our Technical Account Managers, Gavin or, read on for a step-by-step guide.
Let’s say you want to create a bot that calculates and displays the breakdown of the total price of a pizza order. The equation for the total price could be
base + toppings + delivery = total price
If you’re unsure how to apply this example to your use case, contact your Customer Success Manager for personal guidance.
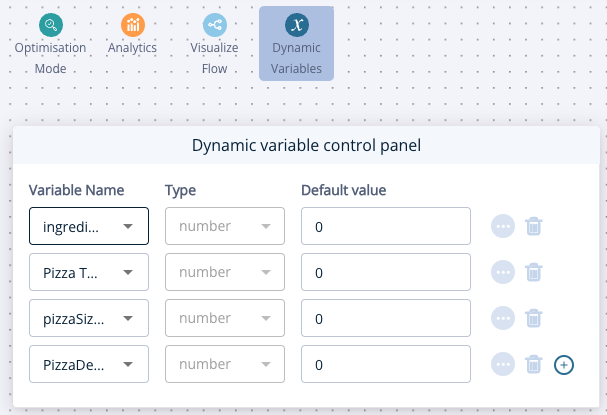
To use Dynamic Variables you need to add them to each bot you want to use them in and set the values you want them to have.
Open the Dynamic Variable Management panel by activating the toggle in the upper left corner of the bot builder.
Add your first variable by clicking the blue button in the Dynamic variable control panel.
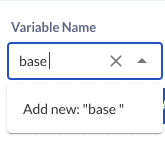
Type the name of the first variable in the Variable Name field. Confirm the name by clicking it on the dropdown that appears.
Switch the Type to number, since price is a numeric variable.
As we are calculating the price through selections set the default value field to 0. Repeat this to add the other variables below.
PizzaSizePrice – number – 0
IngredientsPrice – number – 0
PizzaDelivery – number – 0
Pizza Total – number – 0
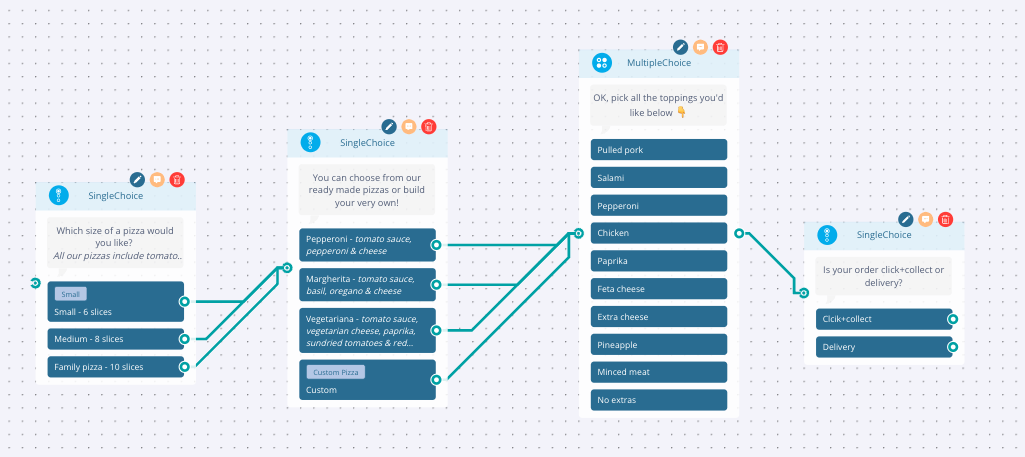
Using a combination of single and multiple choice nodes add all the options you need the user to select to build their pizza.
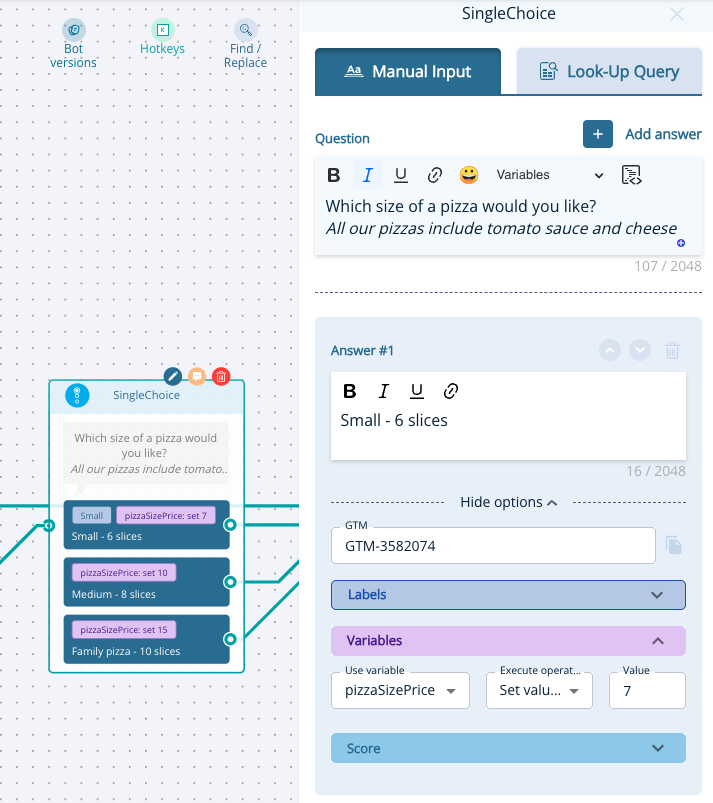
Double-click to edit the node, click show options -> Variables and then select the variable name you want to assign to the selection along with the value in numbers only.
Do this for all the options that have a cost using these prices:
Pizza base price:
– Small (7€)
– Medium (10€)
– Large (15€)
Pizza price
– Pepperoni (2€)
-Margherita (2€)
-Vegetariana (2€)
Toppings price:
– Pulled Pork (1€)
– Salami (1€)
– Pepperoni (1€)
– Chicken (1€)
– Paprika (0€)
– Feta cheese (1€)
– Extra cheese (1€)
– Pineapple (1€)
– Minced meat (1€)
Delivery cost:
– Pick up from the restaurant (free)
– Delivery (5€)
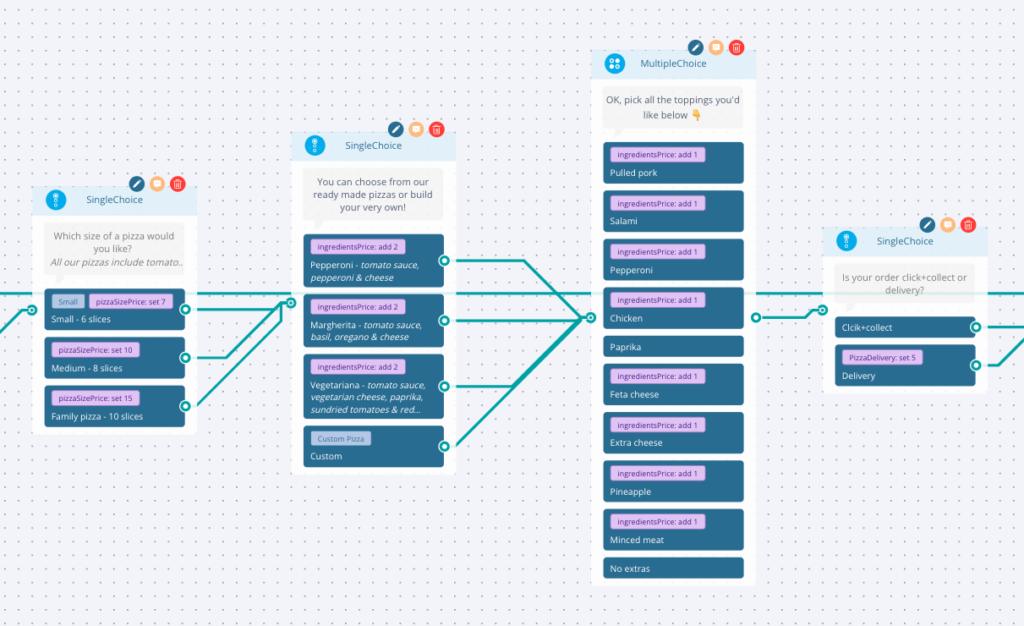
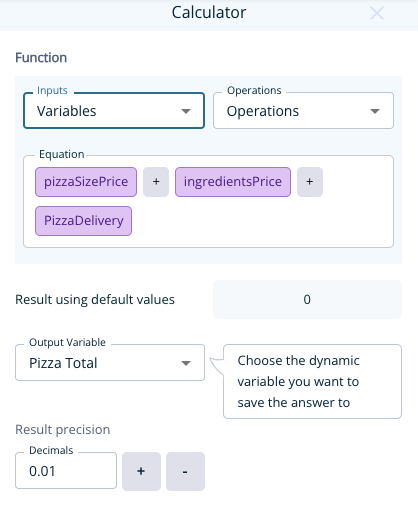
Now that all the prices are added and the user has selected the pizza they want – we need the calculator node to total it all together. Add the node from the menu and add the equation pizzaSizePrice + ingredentsPrice + PizzaDelivery with the Output value of Pizza Total.
You can either select these options from the inputs dropdown or by typing them in. Any Dynamic Variables will be highlighted in pink so if yours are in grey – try again.

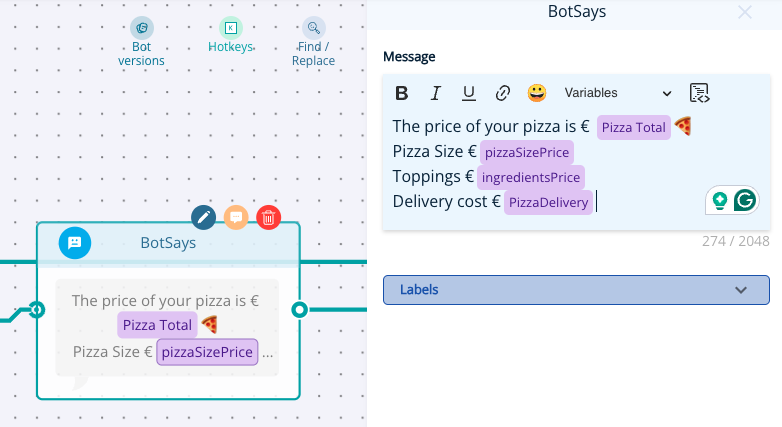
If you want, you can display the breakdown of the total price to the user using the Variables dropdown in a node.
Add a bot says node to present the total price along with the breakdown by selecting the variable in place of where the price should be. Remember to add the currency and any text you want to appear with the price.
Click the preview button at the top of the page to see how your pizza calculator works.
You can change your Bot Icon and Bot nickname from individual bots settings.
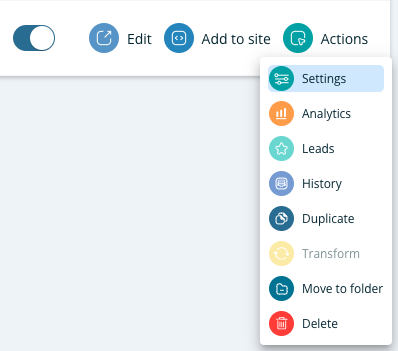
Navigate to the bot you want to change the icon.
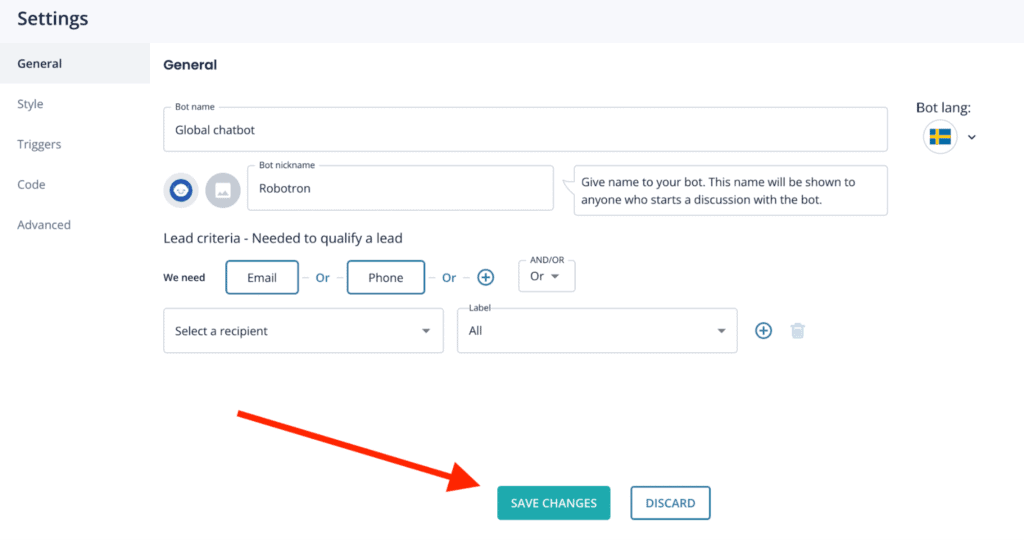
When you’re in the Conversion Kit and have found the bot you want to edit click Actions and select Settings
*You can use the search field to find specific bot by searching either the bot name or the bot id found on the embedding code

On the General tab you can see Bot Icon and Bot nickname next to each other.

You can use predefined bot icons or upload a photo from your files to use as your bot icon. Make sure that the photo you upload is a square (ie. 200px x 200px) and that the photo is .png .jpg. or .jpeg
You can also give the bot a nickname that will be visible on chatbots header. This name will be shown to anyone who starts a discussion with the bot.
Make sure to save any changes you make.
If you have any issues or need help you can contact [email protected]
Learn more about Leadoo Visual Bot Builder here!
When building a Leadoo bot, you can choose from a variety of nodes to create engaging and highly tailored user experiences. Most bots share the same node functionality, though Live Chat is exclusive to Chatbot, while Range Selector is unique to VisualBot. VisualBot nodes also offer enhanced design options, including fields for headings, subheadings, descriptions, and easy image integration for richer answer displays.
This guide details each node type, illustrating how to use them effectively to personalise interactions and optimise visitor engagement.
There are 14 different node types which you can use to personalise your conversations.
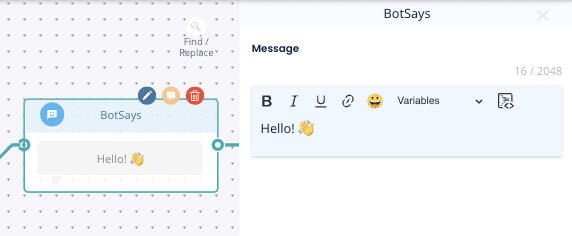
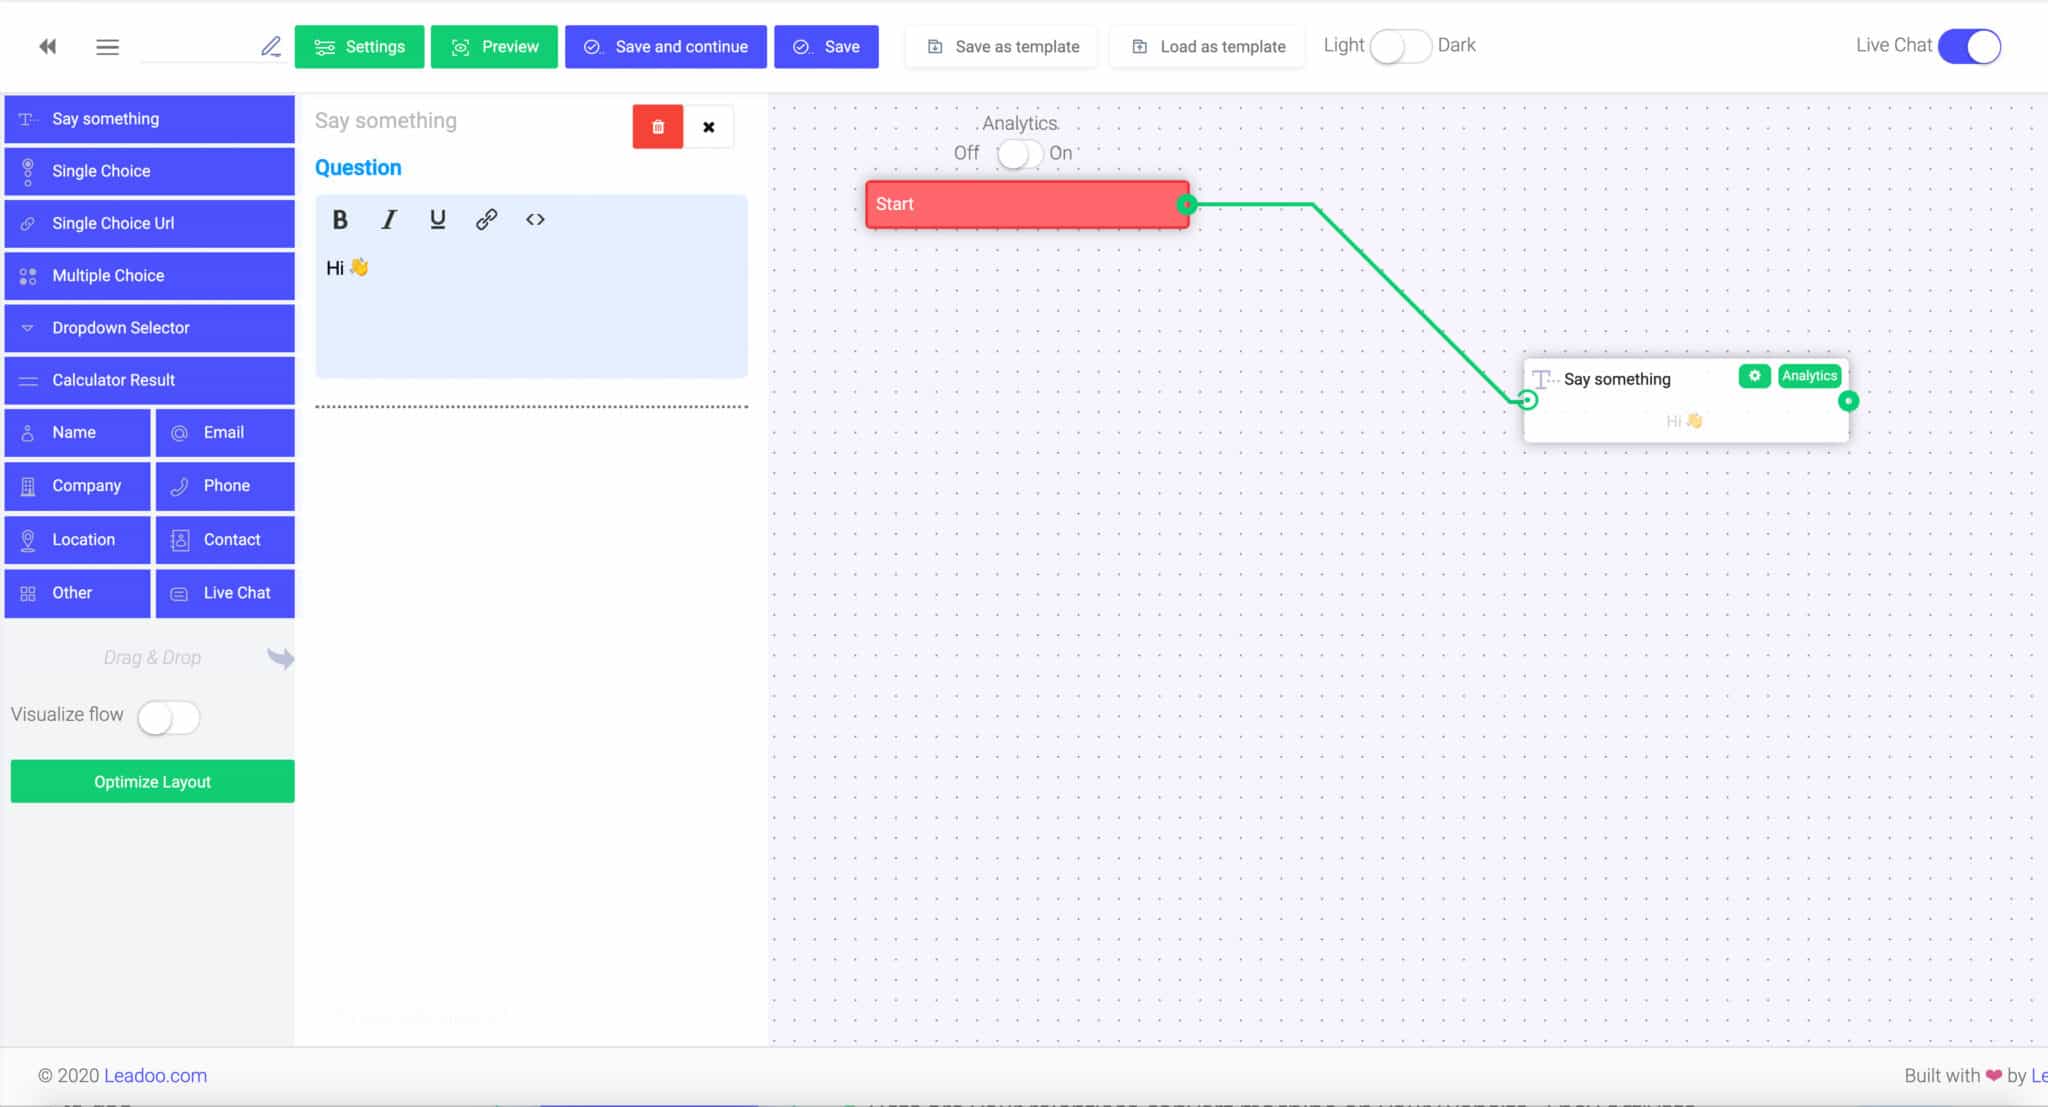
1. Bot Says – Displays a message to the visitor without offering options and then continues the conversation.
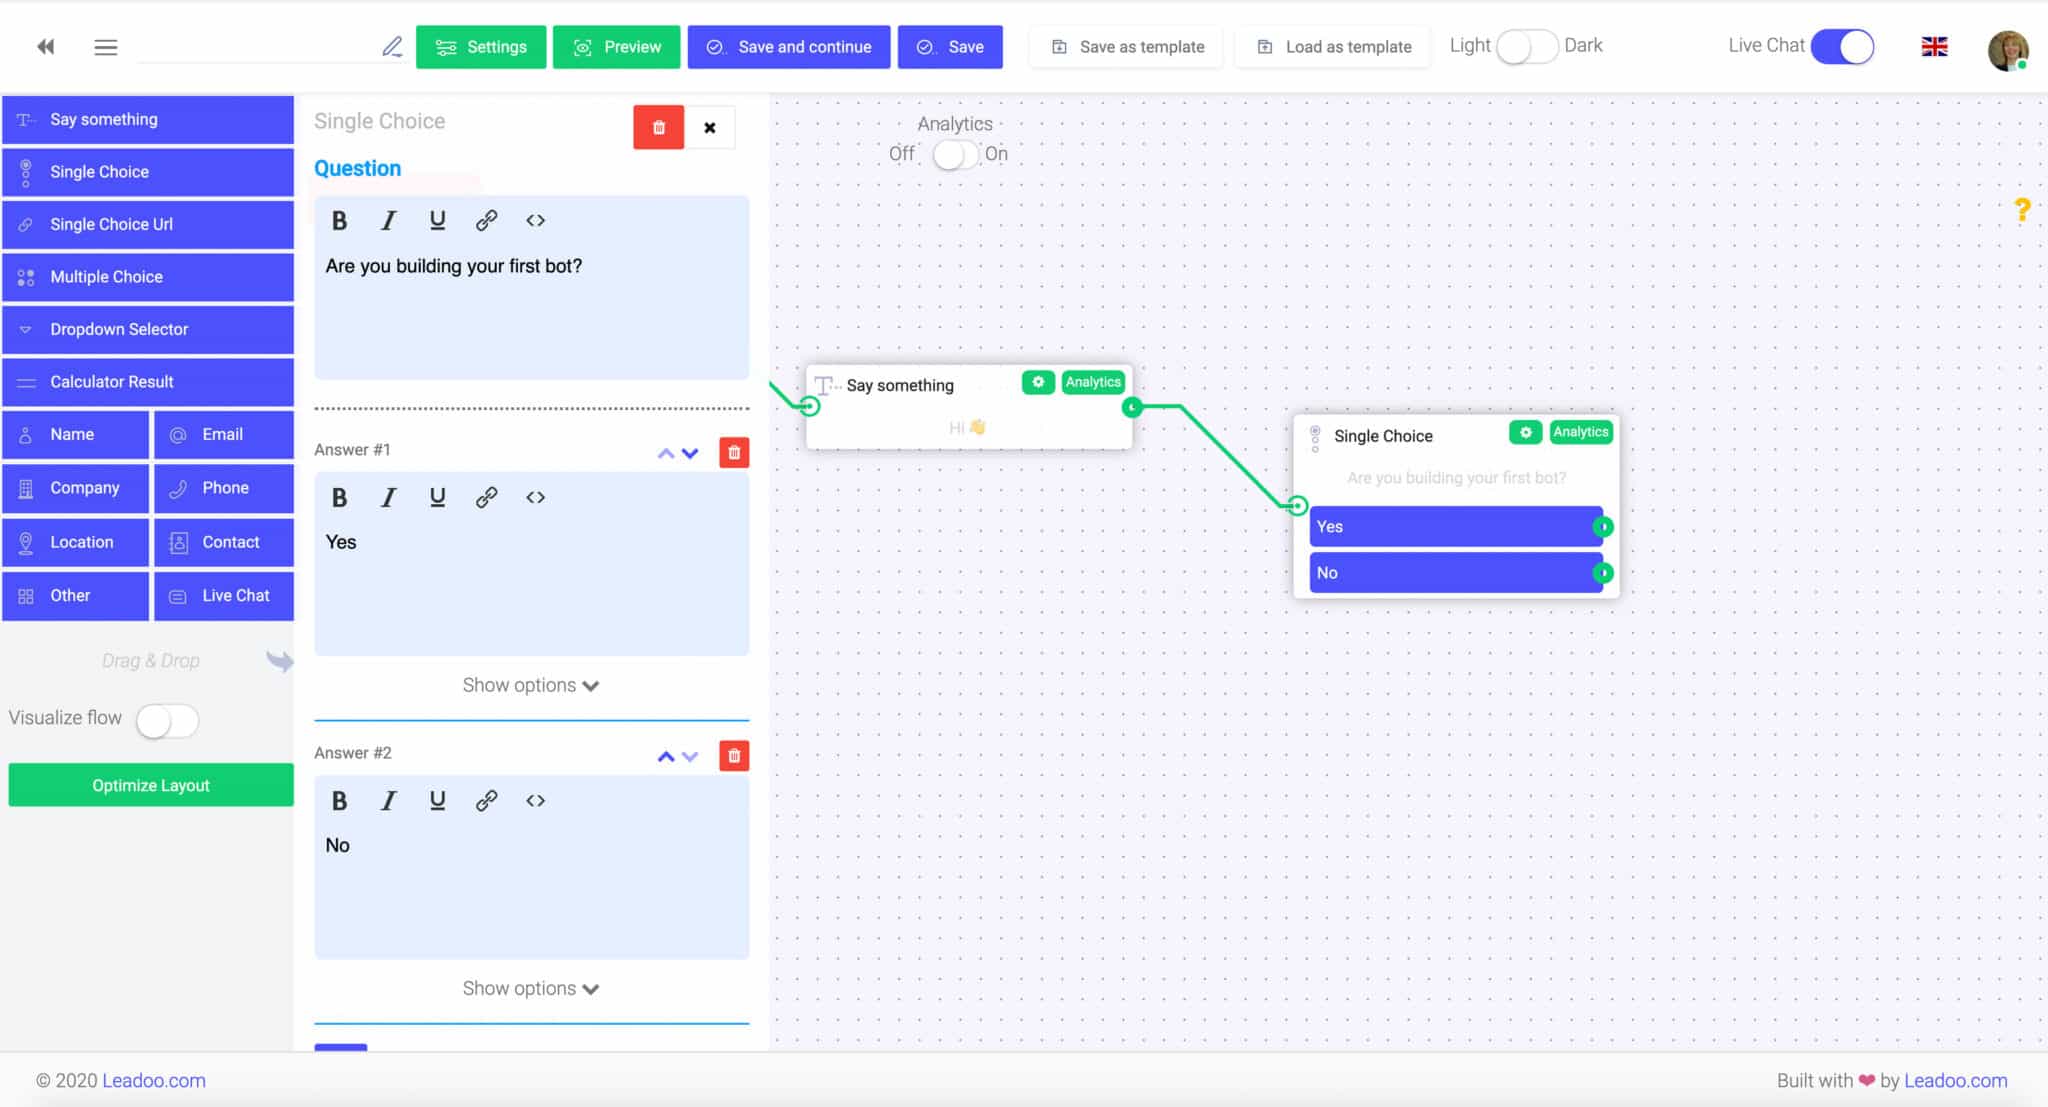
2. Single Choice – Allows the visitor to select one option, which can direct them down specific paths. You can also turn these options into hyperlinks by expanding Show options.
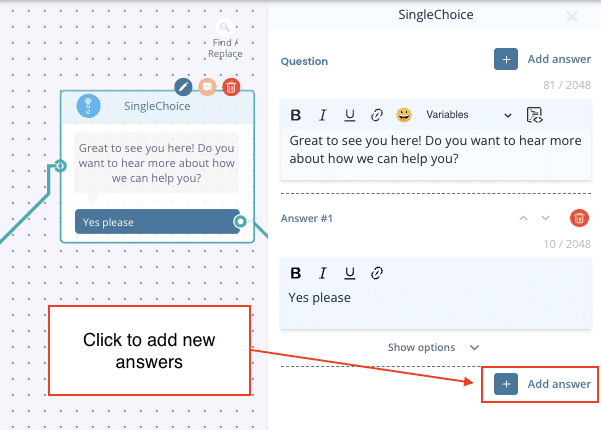

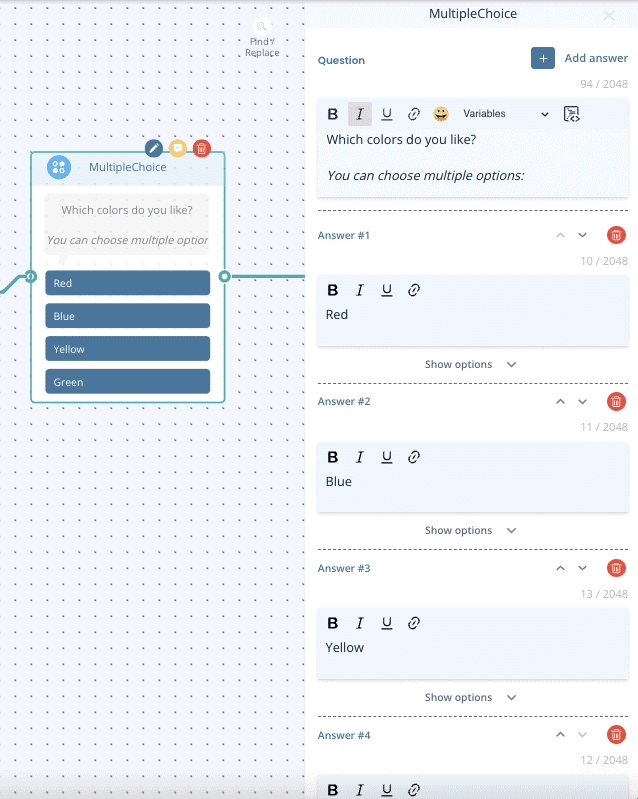
3. Multiple Choice – Allows multiple selections before moving to the next step.
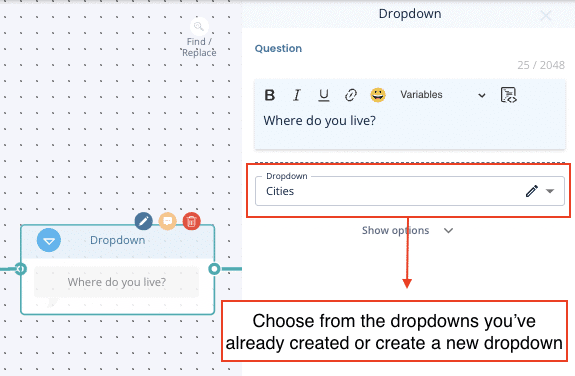
4. Dropdown – Ideal for long lists (e.g., locations), with a built-in search function. Learn to set up dropdowns here.
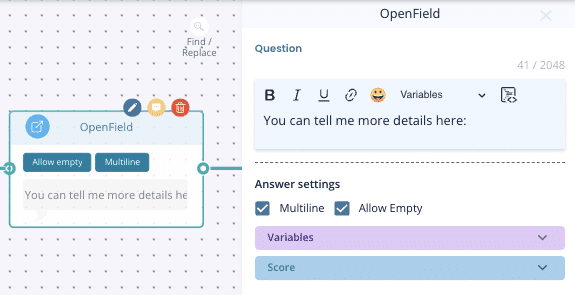
5. Open field -A free text field for open-ended responses.
6. Carousel – Create visually engaging carousels to showcase content interactively. Ideal for product finders and features that benefit from a dynamic, scrollable format to boost user engagement.
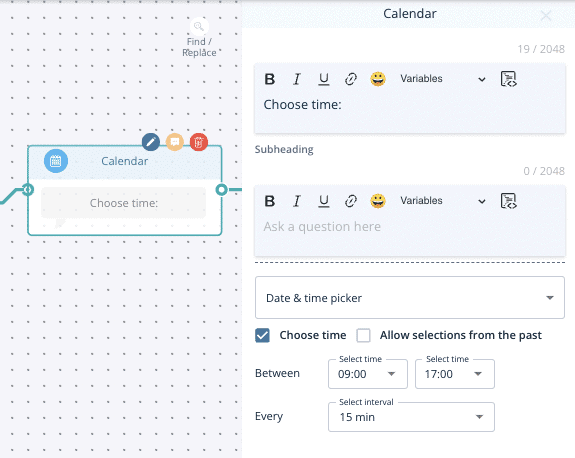
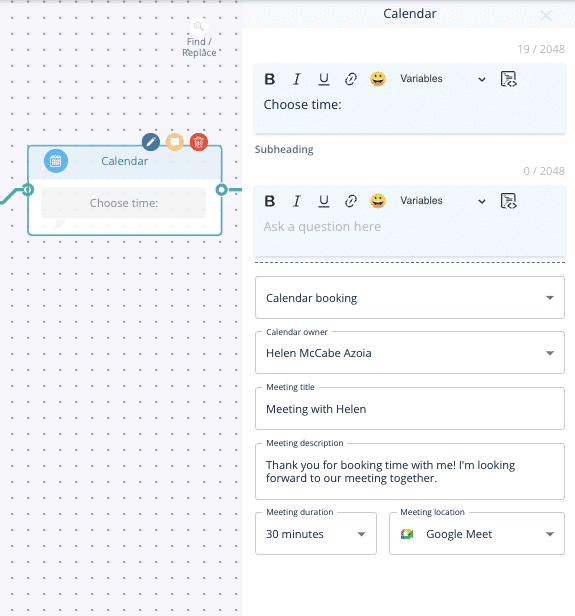
7. Calendar
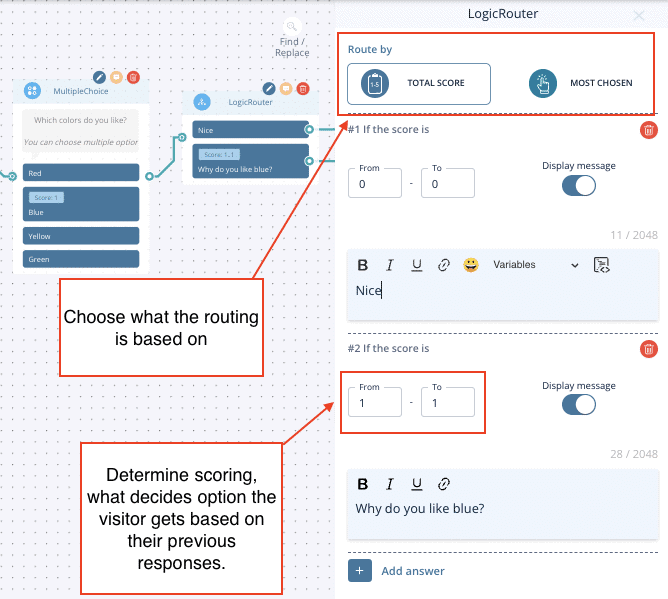
8. Logic Router
Routes visitors based on scoring or labels from previous answers.
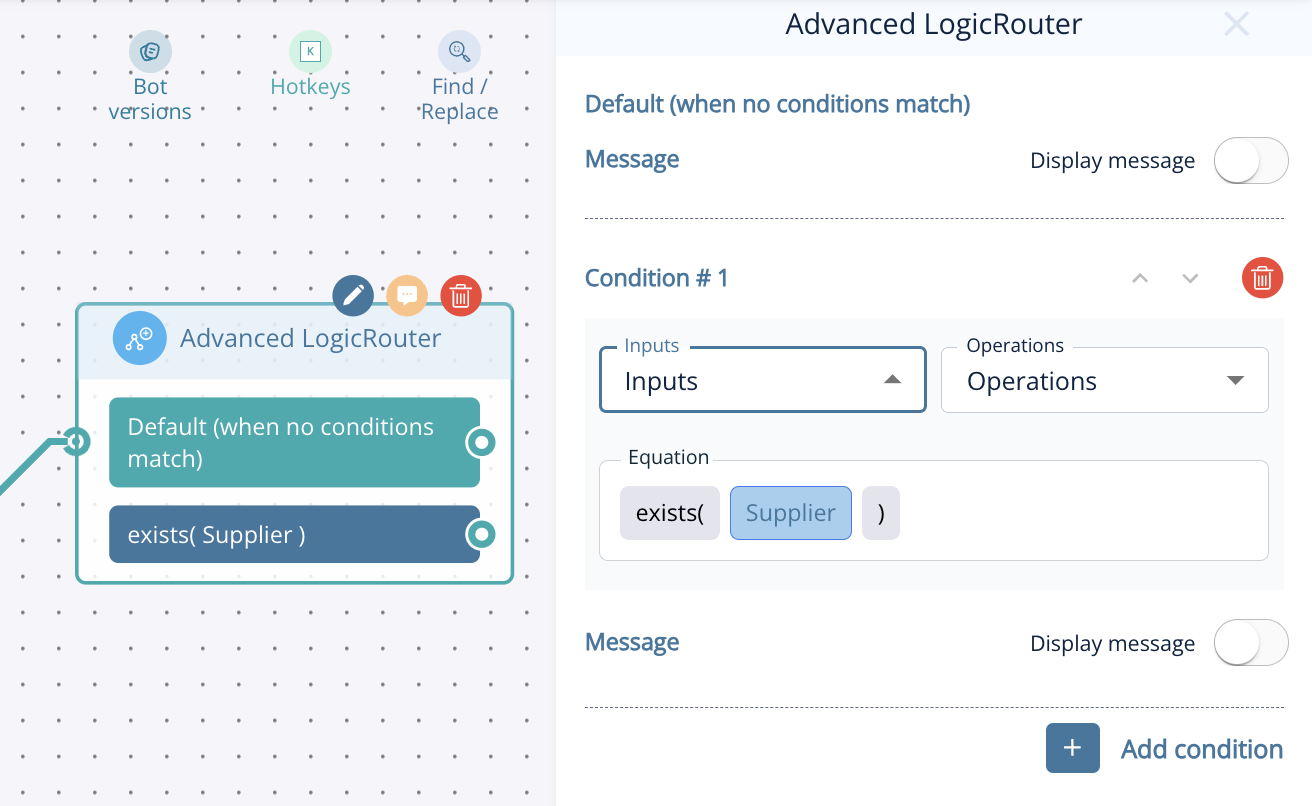
9. Advanced Logic Router – Provides more complex routing. You can set up IF/AND/OR conditions based on things like previously selected labels or dynamic variable data. Learn about Advanced Logic Router Operations here.
10. Calculator – Generates dynamic values based on visitor input. Learn to set up dynamic calculators here.
11. AI Chat – For those with AI in their subscription, this node adds Leadoo AI functionality to conversations, enabling responsive, AI-driven interactions tailored to your visitors’ questions.
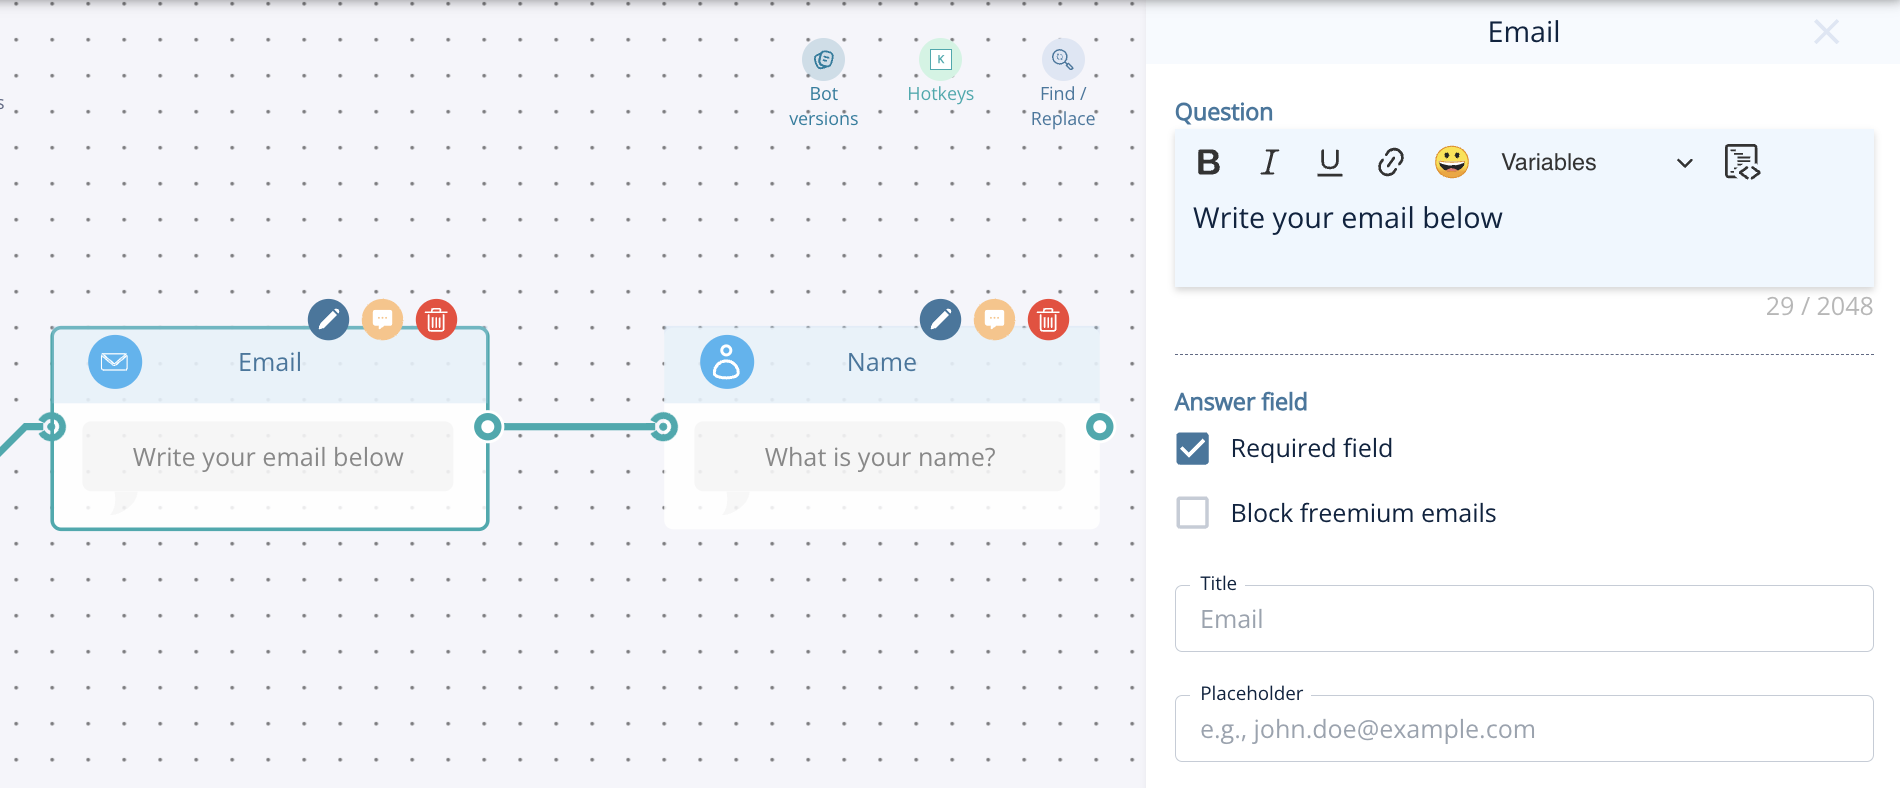
12. Standard contact nodes – Collect contact information in individual nodes.
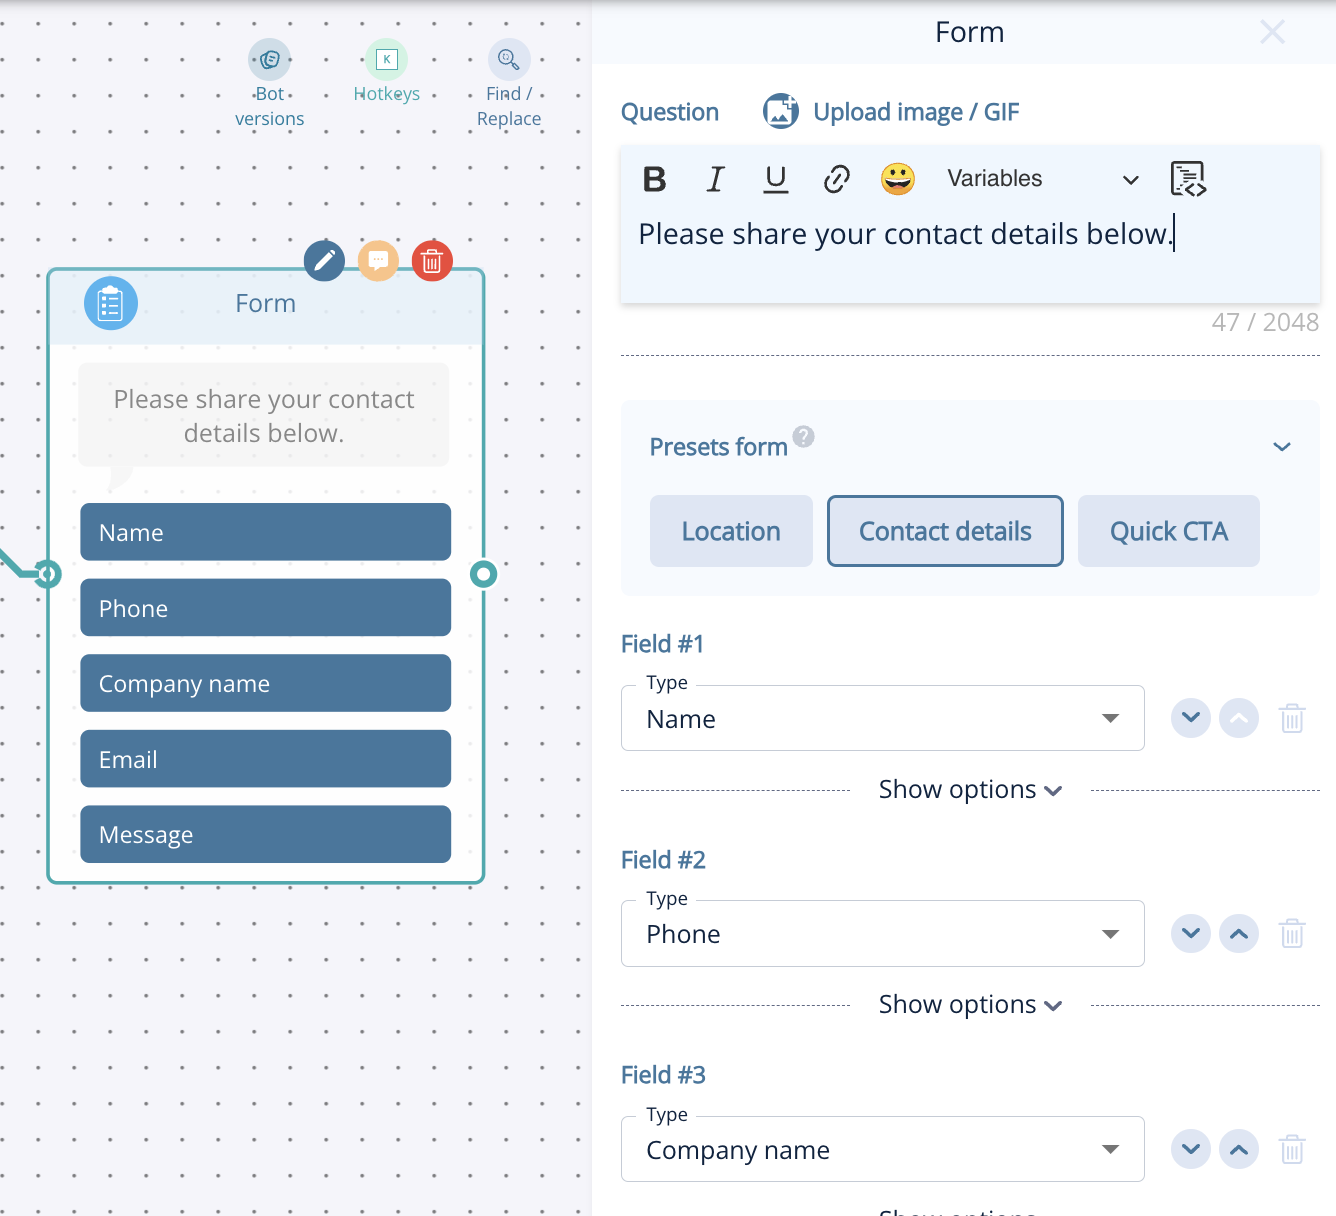
13. Form node – Collect multiple details (name, email, phone, company, address, etc.) in one node.
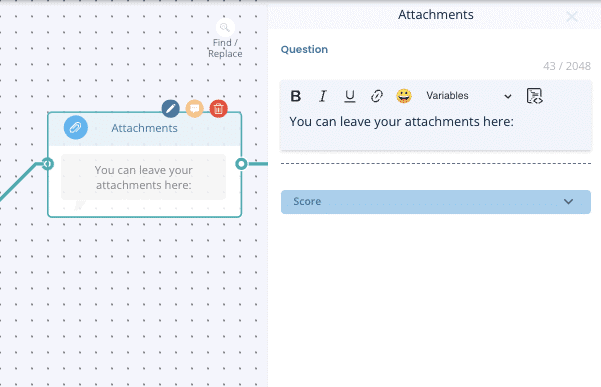
14. Attachments – Enables visitors to upload files, such as CVs or documents.
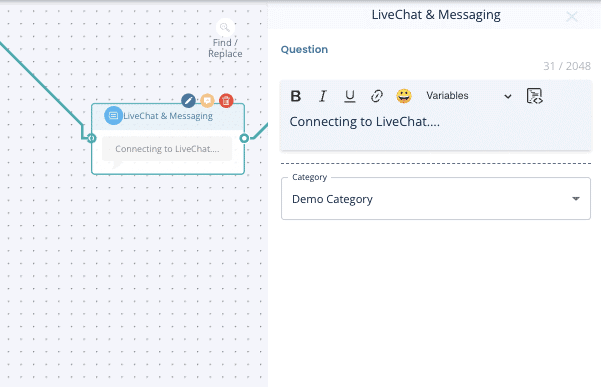
13. Live Chat (Chatbot only) – This will trigger Leadoo live chat if your agents are online. Make sure you always have a fallback automated flow for when agents are not online. Learn how to set up and use live chat here.
14. Range Selector (VisualBot only) – Allows users to select a value within a specified range, ideal for gauging preferences or budget limits.
Steps – Guides users through a sequence of steps, perfect for structured flows like quizzes or onboarding.
Agree/Disagree (Likert scale) – Collects user opinions on a scale, commonly ranging from “Strongly Agree” to “Strongly Disagree.”
Budget Range – Lets users specify their budget range, useful for customising recommendations.
Scale – Measures user sentiment or satisfaction on a numeric scale.
NPS-Scale – Gathers Net Promoter Score data by asking users to rate their likelihood of recommending.
Get in touch with your Customer Success Manager or reach out to our support team at [email protected].
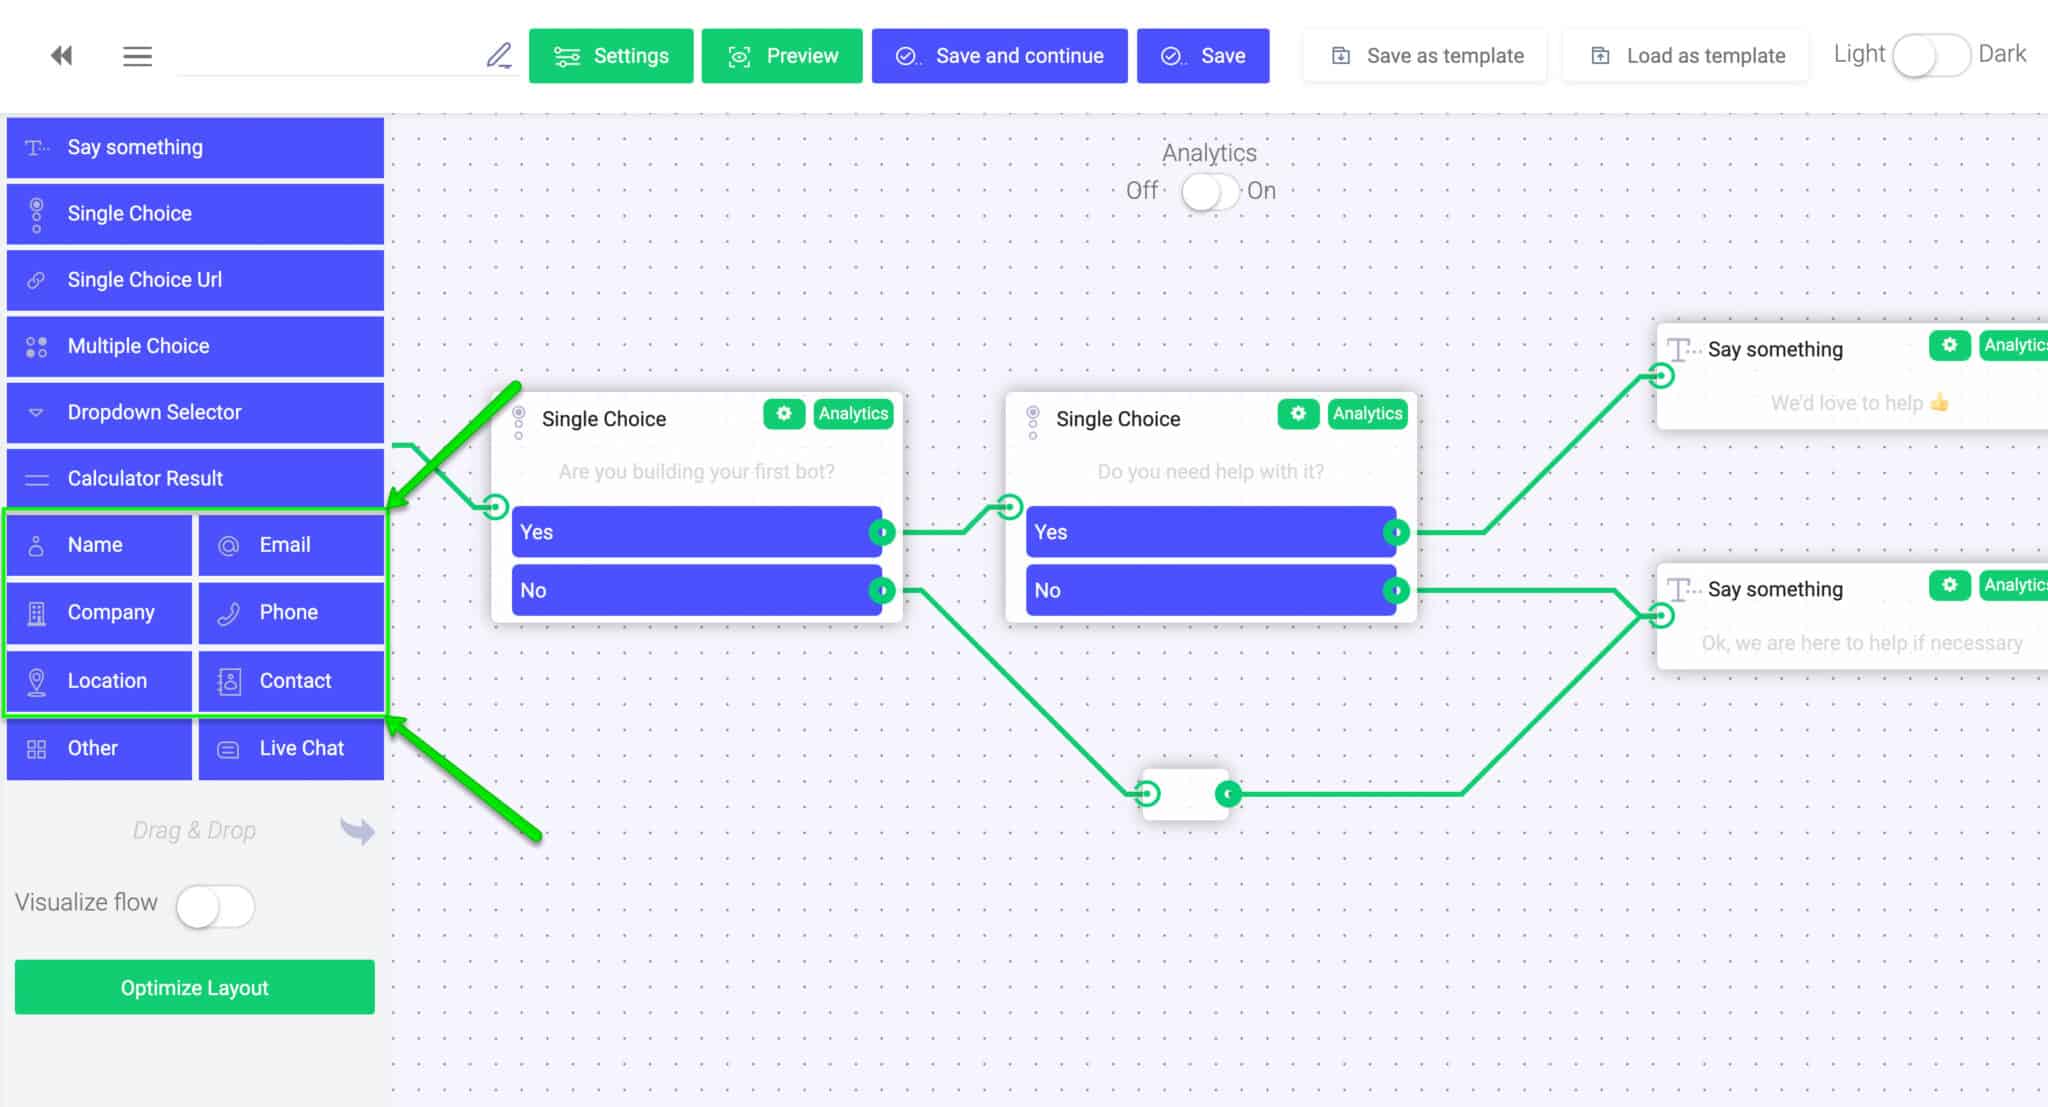
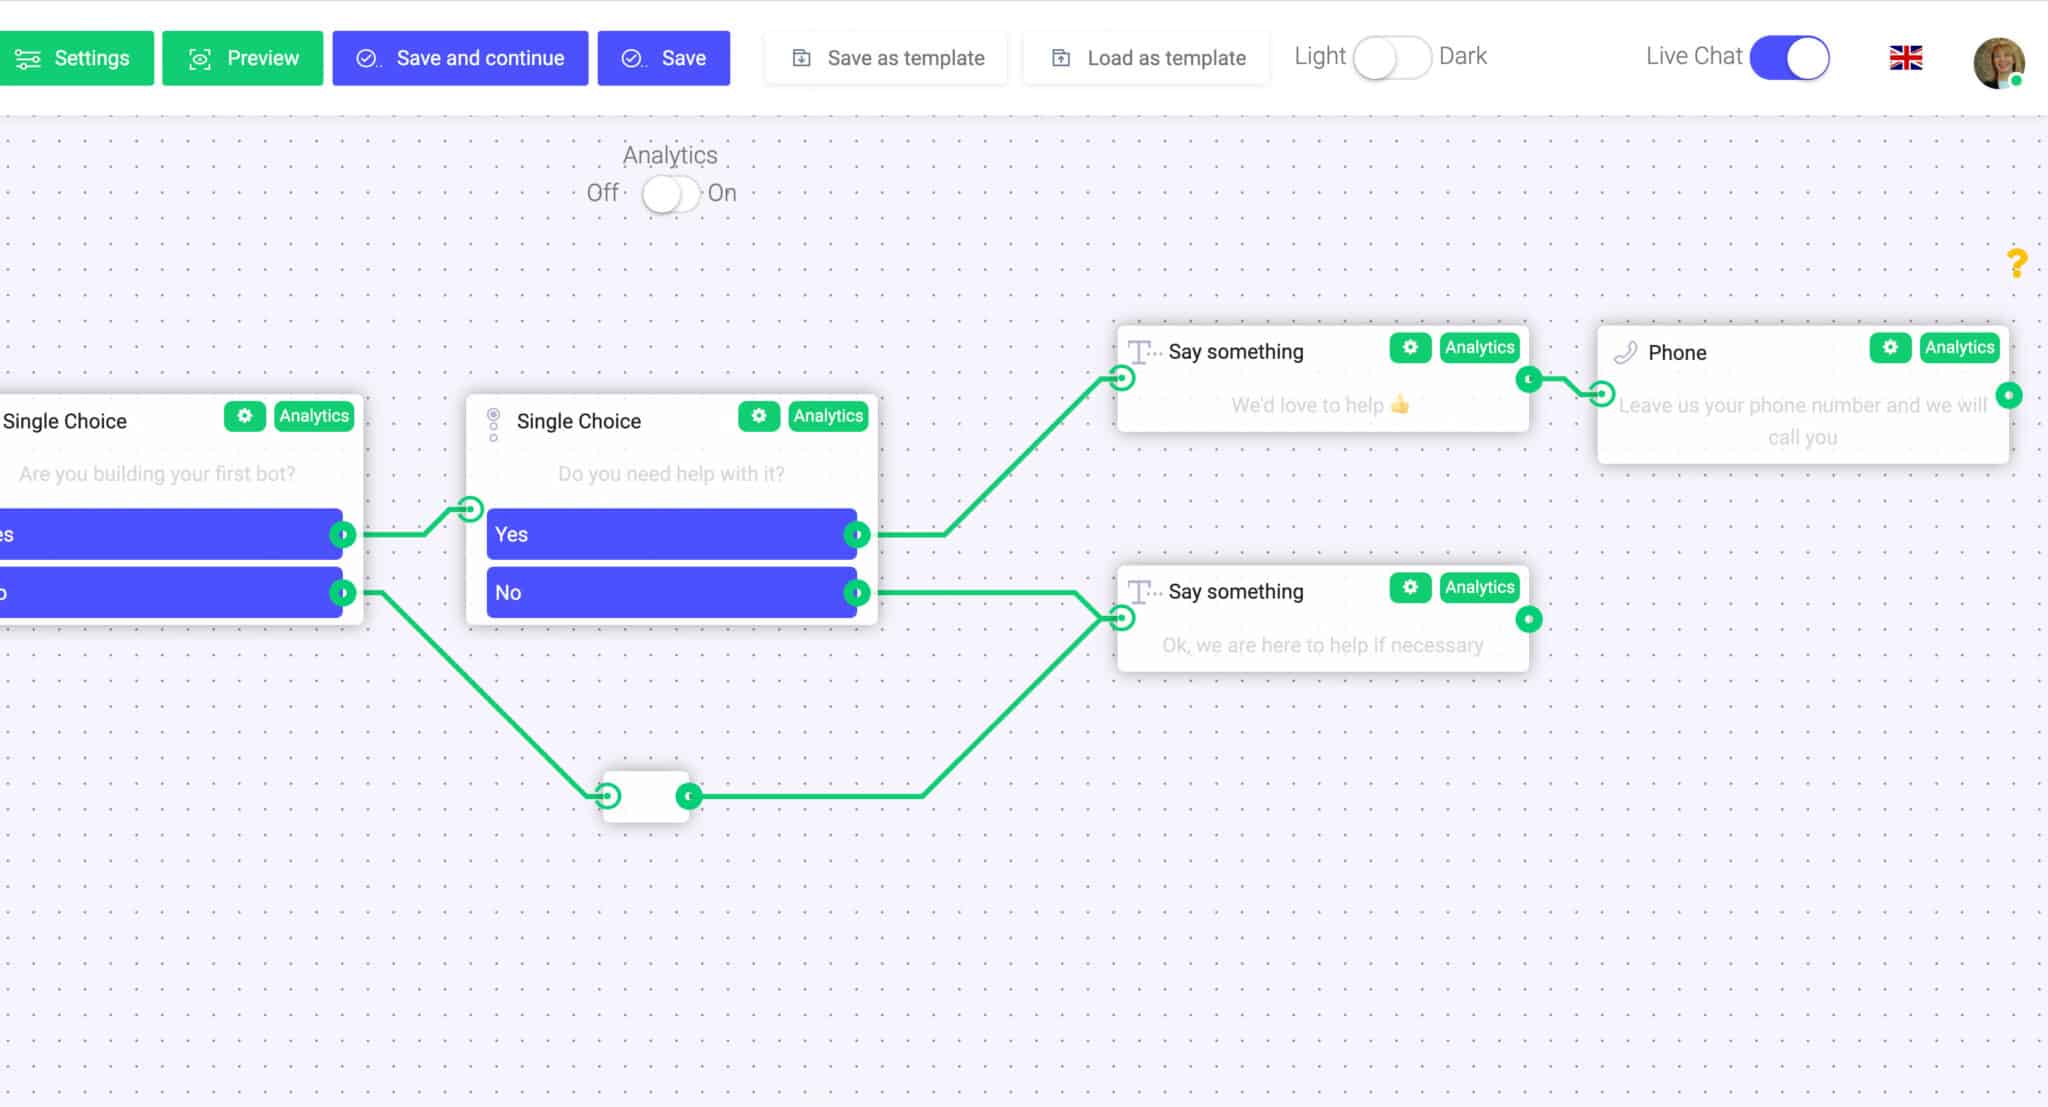
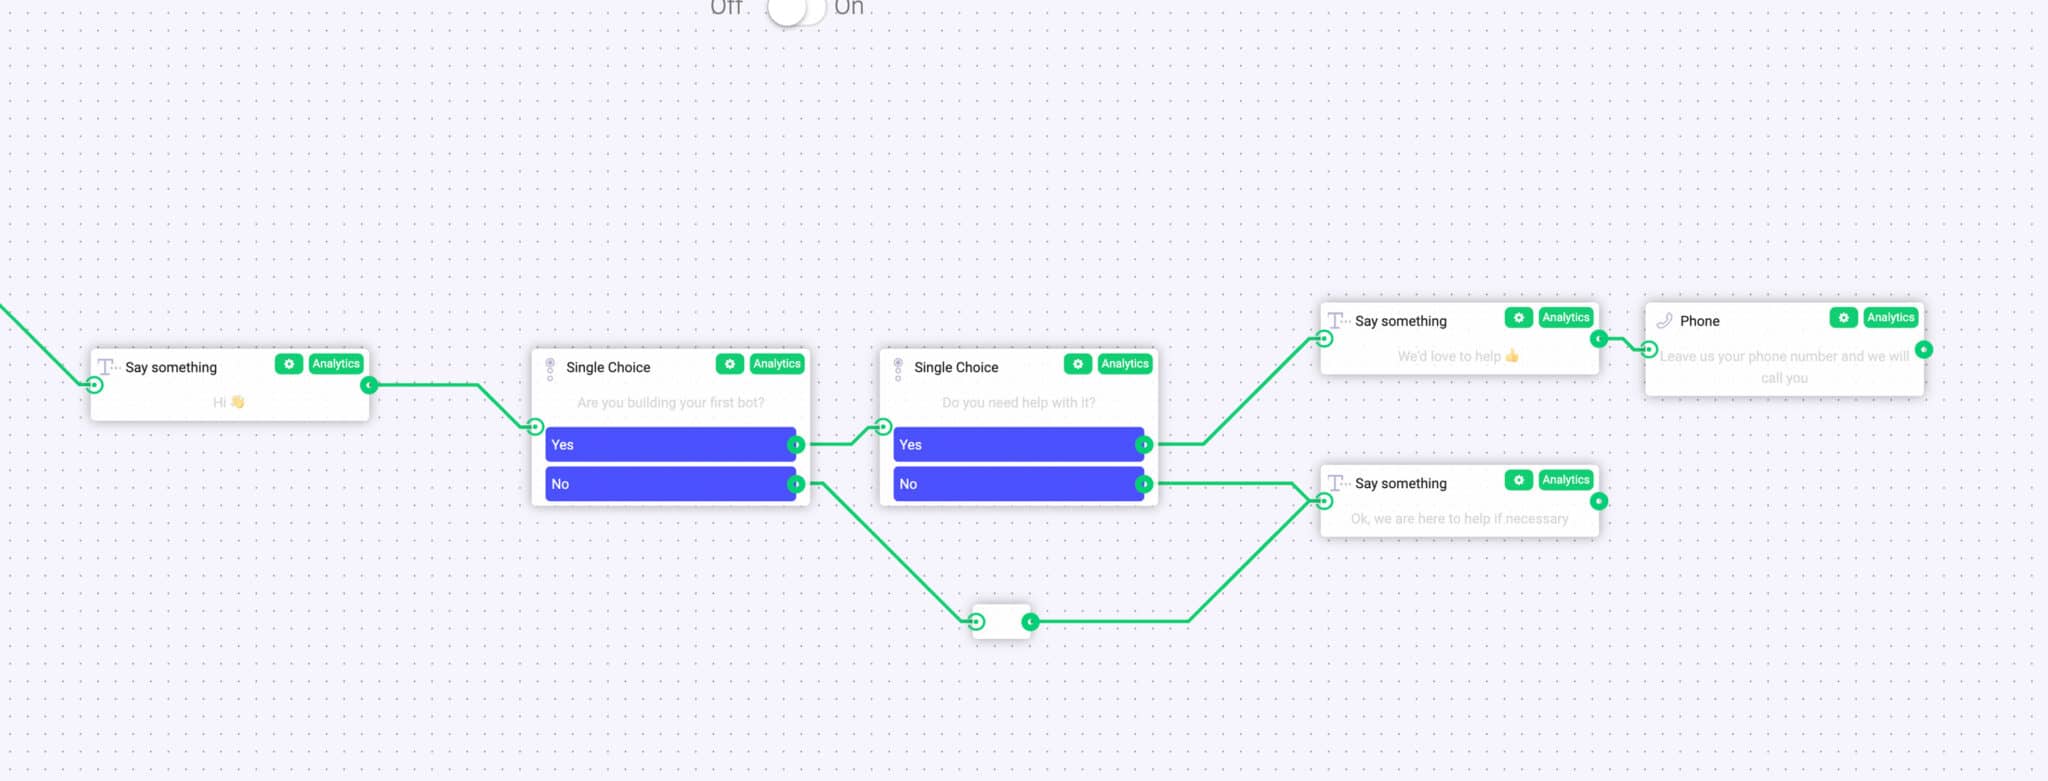
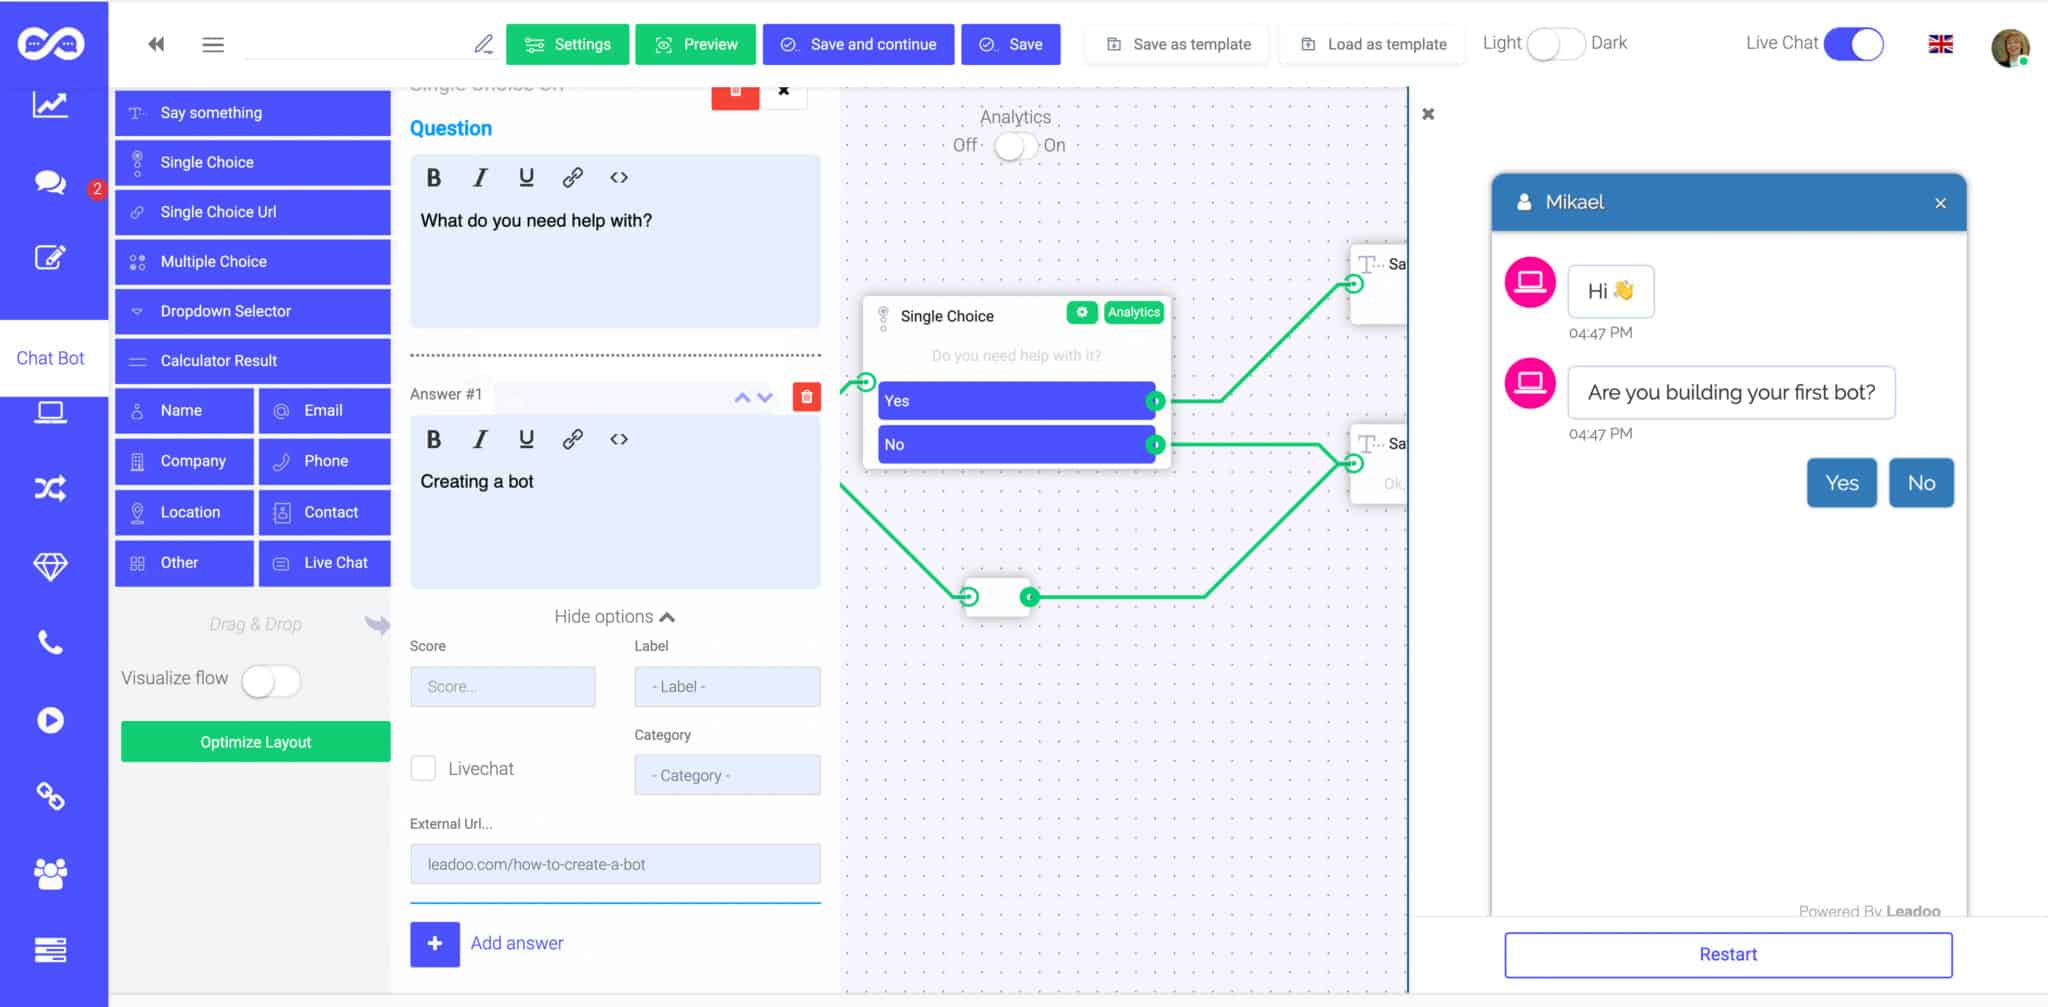
Building chatbots with Leadoo visual bot builder is easy. In the following article, you’ll learn how to build a simple chatbot that asks the user about their needs and then converts them into a lead.
Outline of the example
1. Greeting users and reacting to their answers with “Say Something” node.
2. Asking qualifying questions from the user with the “Single choice” node.
3. Providing solution in exchange for contact information with a contact node, such as the “Phone”.
“Say Something”-node:
This one-way interaction field is used for a salutation, a statement, reaction or for a simple intro on your product or service. With this field, you cannot create a question or an enquiry that includes two-way interaction, such as a direct answer from the user. Rather, it is just a great way to make the conversation more lively and human-like!
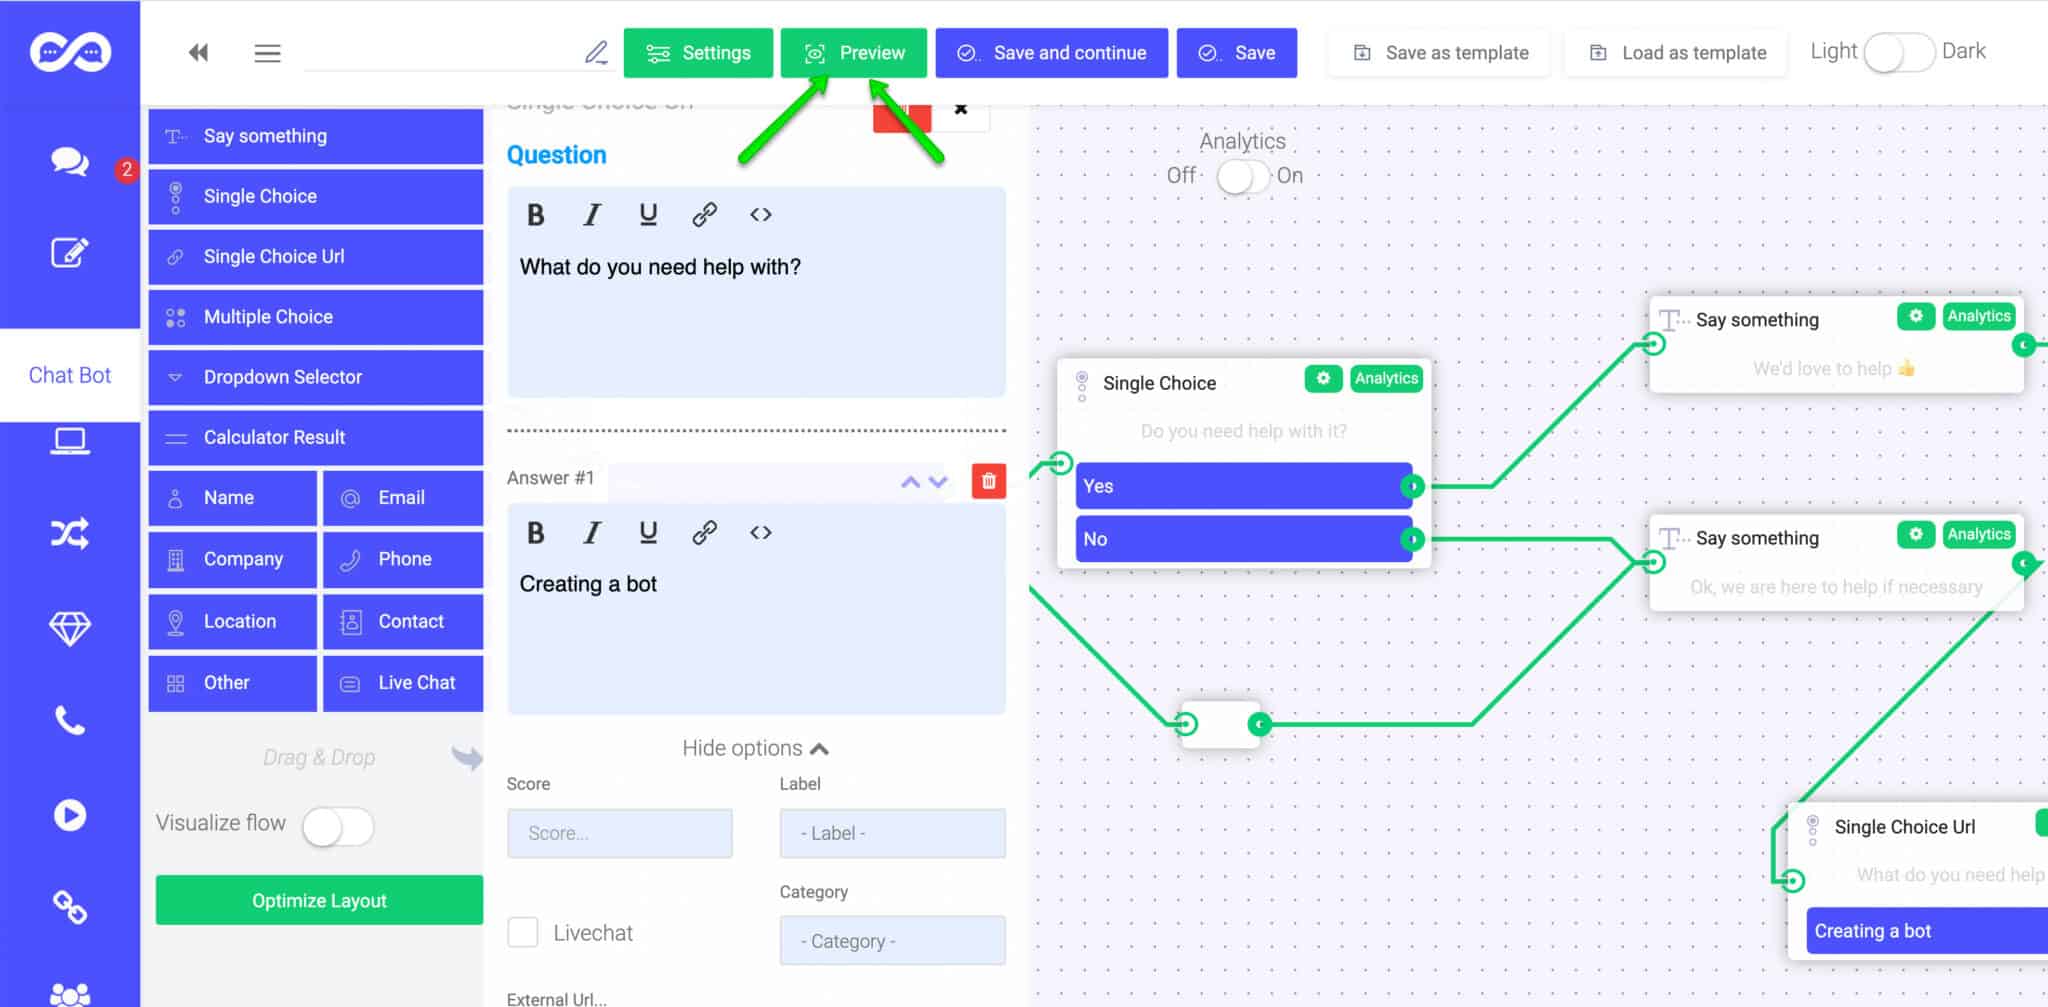
“Single Choice”-node:
With a “Single choice” node you can to create questions with answer choices such as “yes” or “no”, which require an answer from the user. For each answer choice, you can choose to guide the user to a different dialogue path/conversation flow. This can be done easily by dragging a line from the green dot to the next node you want to use.
“Single Choice URL”:
“Single choice with url” is just like Single Choice, except that you can choose to connect an URL to each answer choice. This node is perfect when you want to guide user to a specific landing page straight from their answer choice. For example, asking an e-commerce visitor what kind of product he/she is looking for, you can easily direct them straight to the appropriate landing page from a single interaction with the chatbot.
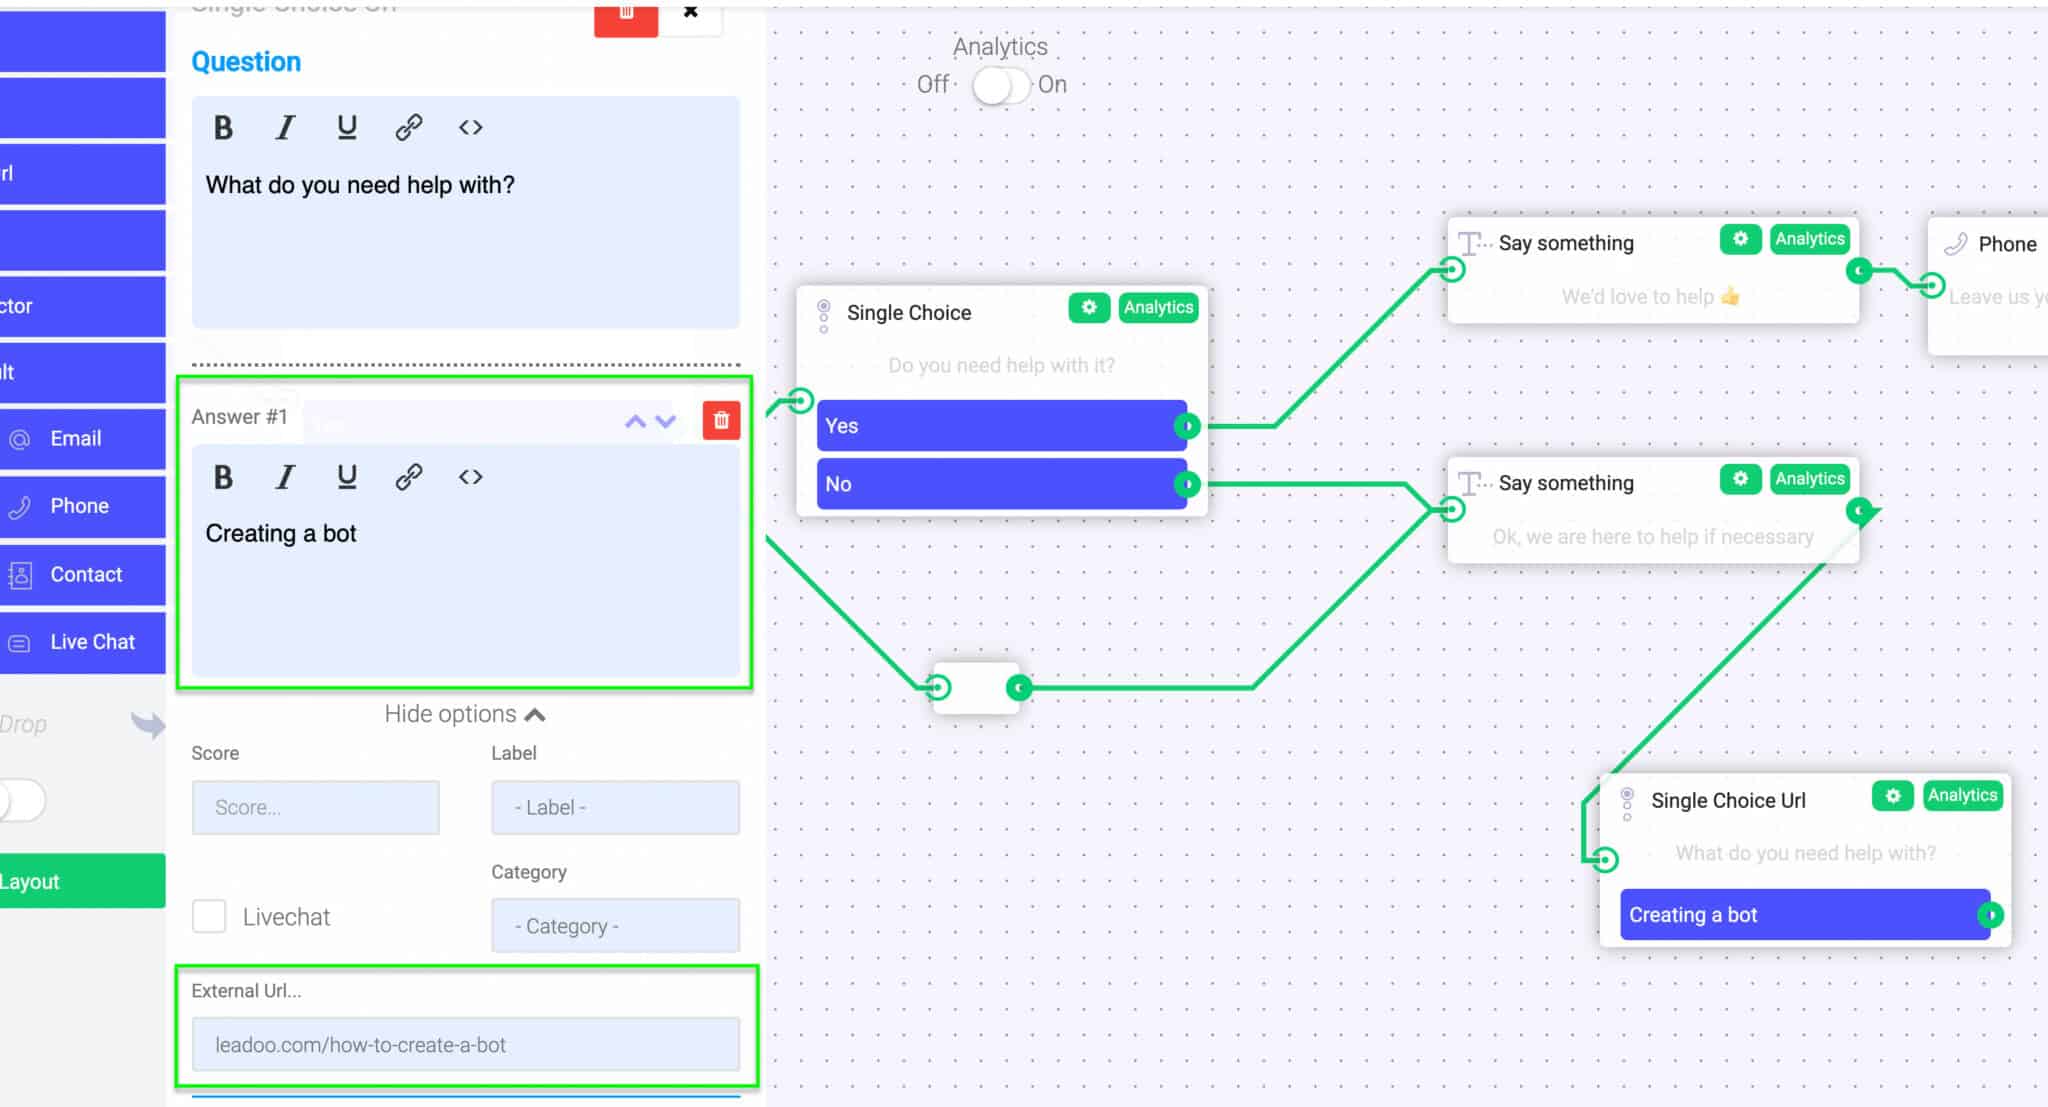
“Let’s get in touch!” -nodes (Name/Email/Phone/Company/Location/Contact):
When you want to collect contact information, you can choose between five different nodes: name, phone number, email address, company, location or a full contact form-like field. Each chosen field will give the answerer an empty field to respond. This option is usually used towards the end of the bot conversation when contact details are needed to proceed. These are the nodes that are most often used to define leads generated by the bot!
“Other/Message”-node:
This field allows you to ask an open-ended question to which the user can answer by writing freely. An open text field is usually used to ask a more specific or personal question that you can’t come up with a predefined answer choice for.
A key part of creating a usable bot is to define the exact paths that the user can take in the dialogue. You can do this easily by dragging connections between different nodes.
After you finish building your dialogue paths, you can easily preview and test the conversation yourself before publishing it by clicking the “Preview” button on the top.
A preview window will open to the right side of your screen. By clicking the “Restart” button you can restart the discussion in the preview window to experiment different discussions flows.
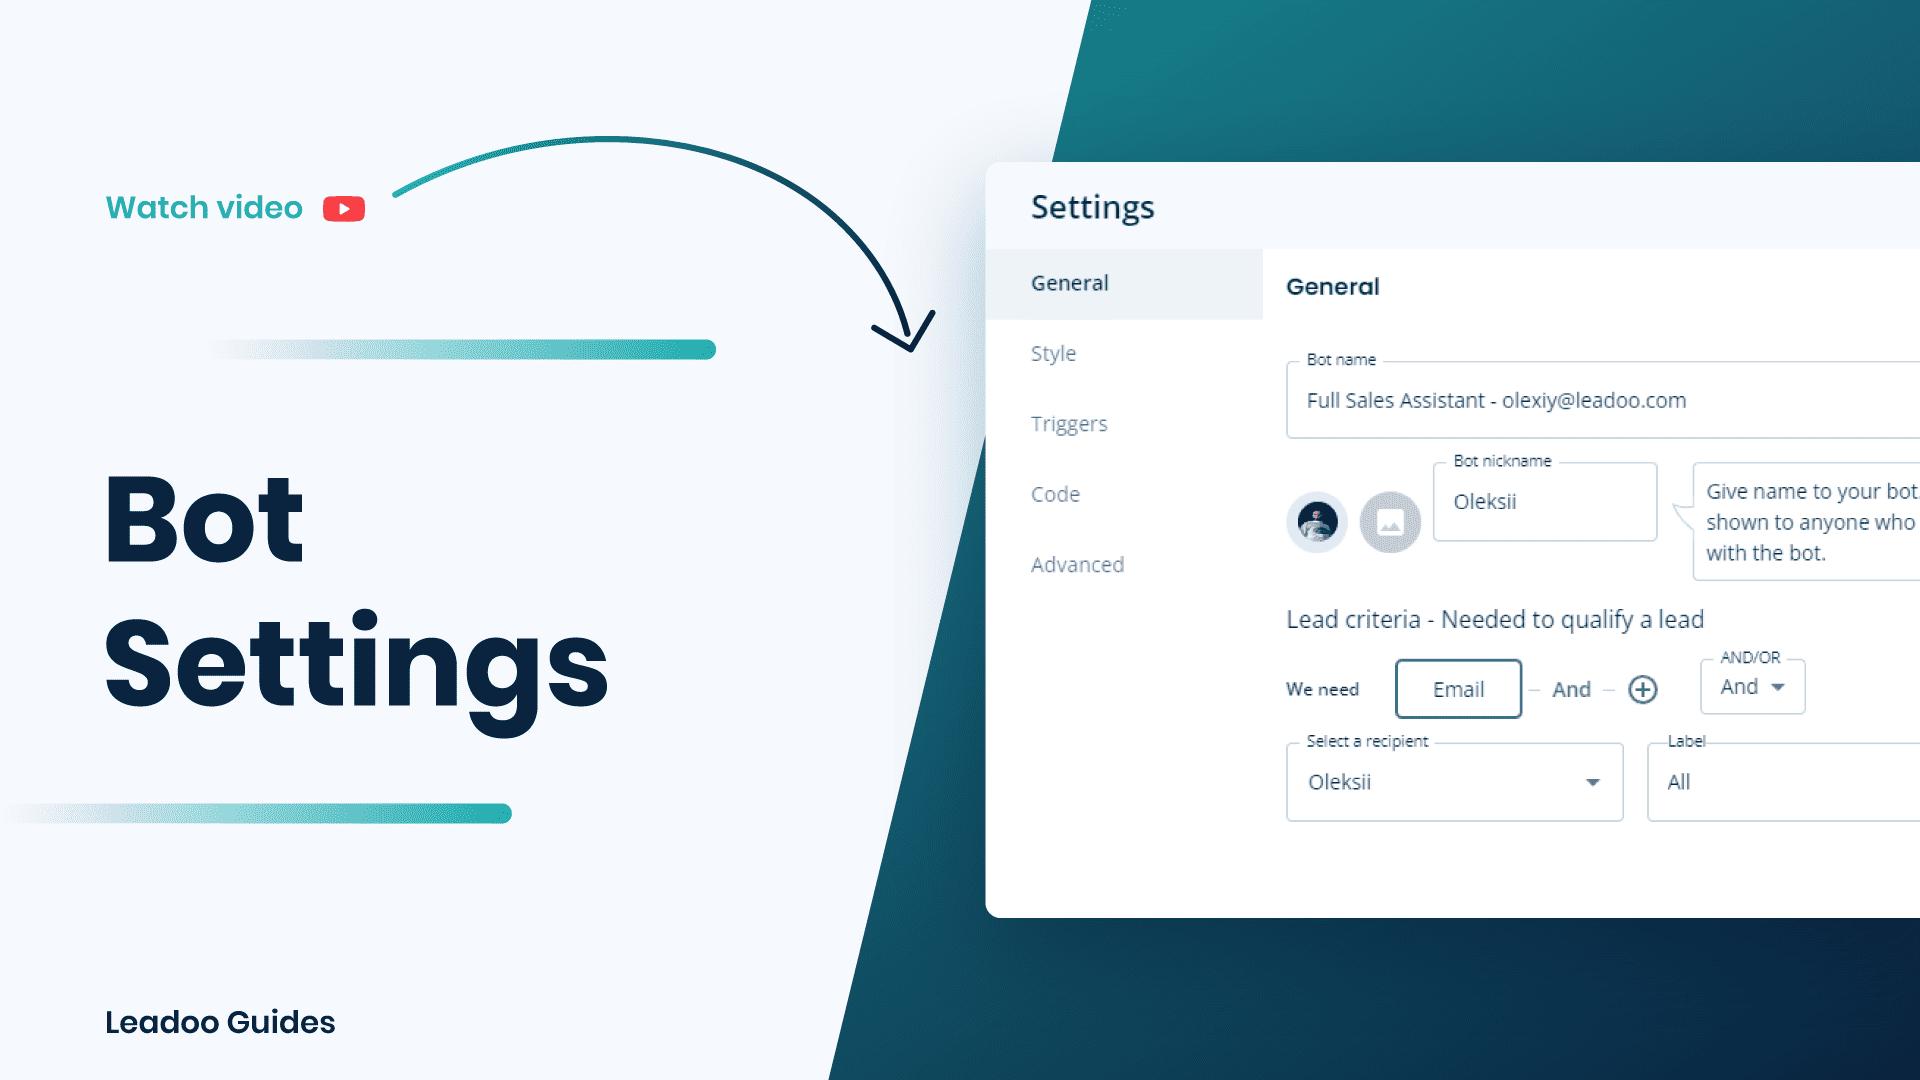
You can find the bot settings from either the bot listing or when you are in the editor.


You can update the name and picture for each bot on the general tab. ⭐️ Remember to choose square pictures to avoid squashed or stretched faces!
If you’re updating a chatbot you might need to update the trigger style too. Keep reading to find out how to do this.
We recommend using OR and ticking Email and Phone. This means that if a visitor submits either their email or phone number the bot will capture the lead.
You can define who you want to receive lead notifications in each bot. You can add as many notifiers here as you wish, just click + and select the user from the list.
⭐️ TIP – You can define who gets what leads by using labels. E.g. all quote requests go to John and all support requests go to Sue.
Find out how to add labels here.
If you need to send leads based on their type e.g. sales, marketing or recruitment but some users need to receive leads under multiple labels; this is how you do it.
Note – You’ll see all your added labels whether they have been used in the bot or not.

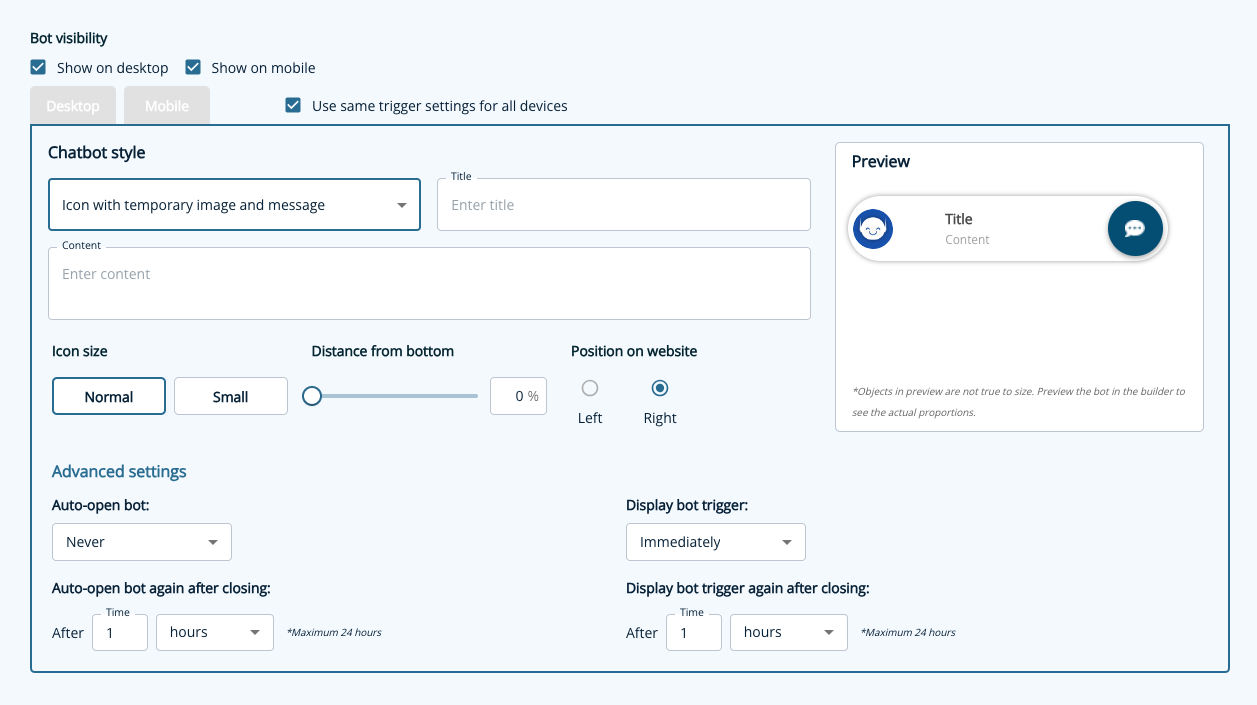
Chatbot and Inpage bots share the same styling options. You can edit different bot colours to match your company’s branding.
You can either use pre-made styling or build styling for each bot.
You can change settings such as:

Leadoo has 6 different chatbot window styles as well as the ability to customize the chat icon, image and text banners.* Find this via the triggers tab.
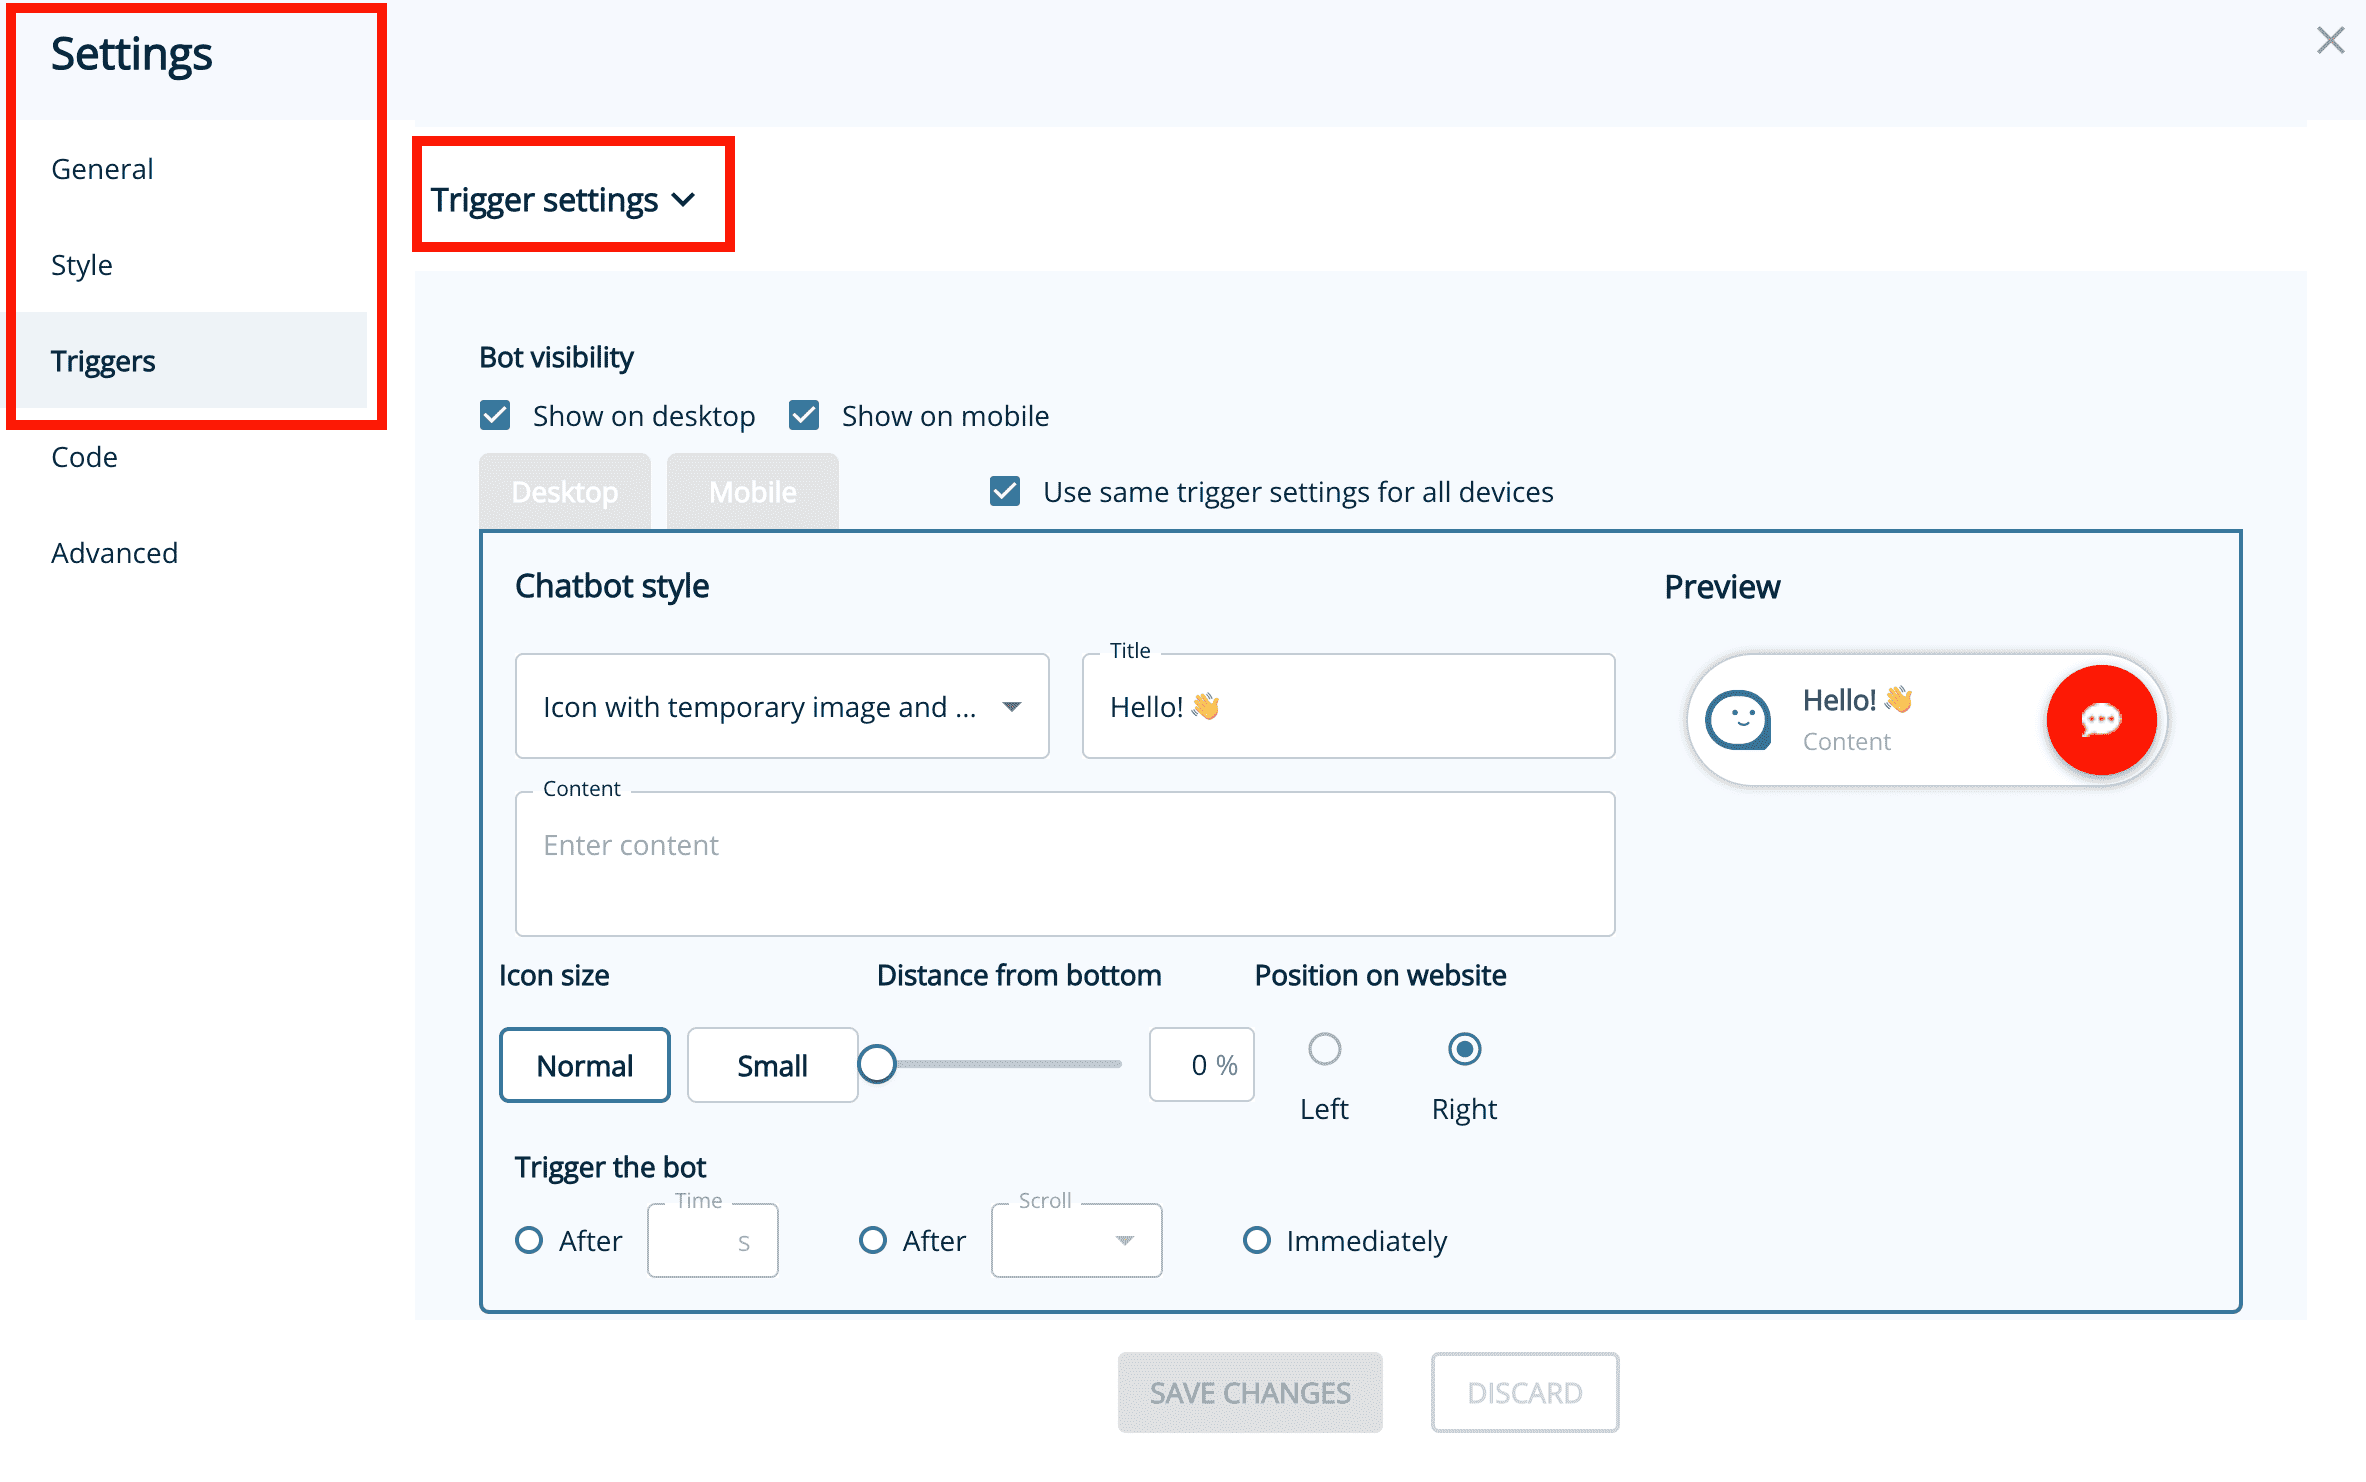

You can define the way the chatbot window opens up:
Trigger settings can be used together or, leave blank if you don’t want the chatbot to pop up.
*Note that you can have separate chat window styles and trigger rules for desktop and mobile devices.
This is where you define where a chatbot should appear on your website.
You can define which pages it should and should not appear on by adding a set of rules.
URL trigger rules
leadoo.com/ = the chat triggers only on the front page of leadoo.com
leadoo.com/* = the chat triggers globally on each page of leadoo.com domain
leadoo.com/*/* = the bot appears on every page of the website except the front page
leadoo.com/*product* = the bot appears on the subpage defined within ** as well as all pages under that subpage
*leadoo.com/* = the bot appears on every page on the website domain, as well as its each subdomain, such as app.aleadoo.com/
Always when URL includes
URL contains: blog = the chat triggers on each page of the domain where the URL contains the keyword blog (like leadoo.com/blog/increase-conversion AND leadoo.com/blog/5-chatbot-benefits, etc.)
Forbidden when URL includes
URL doesn’t contain: sign-up = the chat triggers on all leadoo.com landing pages, except any URL that contains the keyword sign-up, like leadoo.com/sign-up.
Note! There is no need to add https:// to URLs. You can add the asterisks in front of your URL definitions to make the triggering more bullet-proof (e.g. *leadoo.com/)
There are 3 default ways to trigger an Inpagebot:
Contact your Customer Success Manager at Leadoo at [email protected]
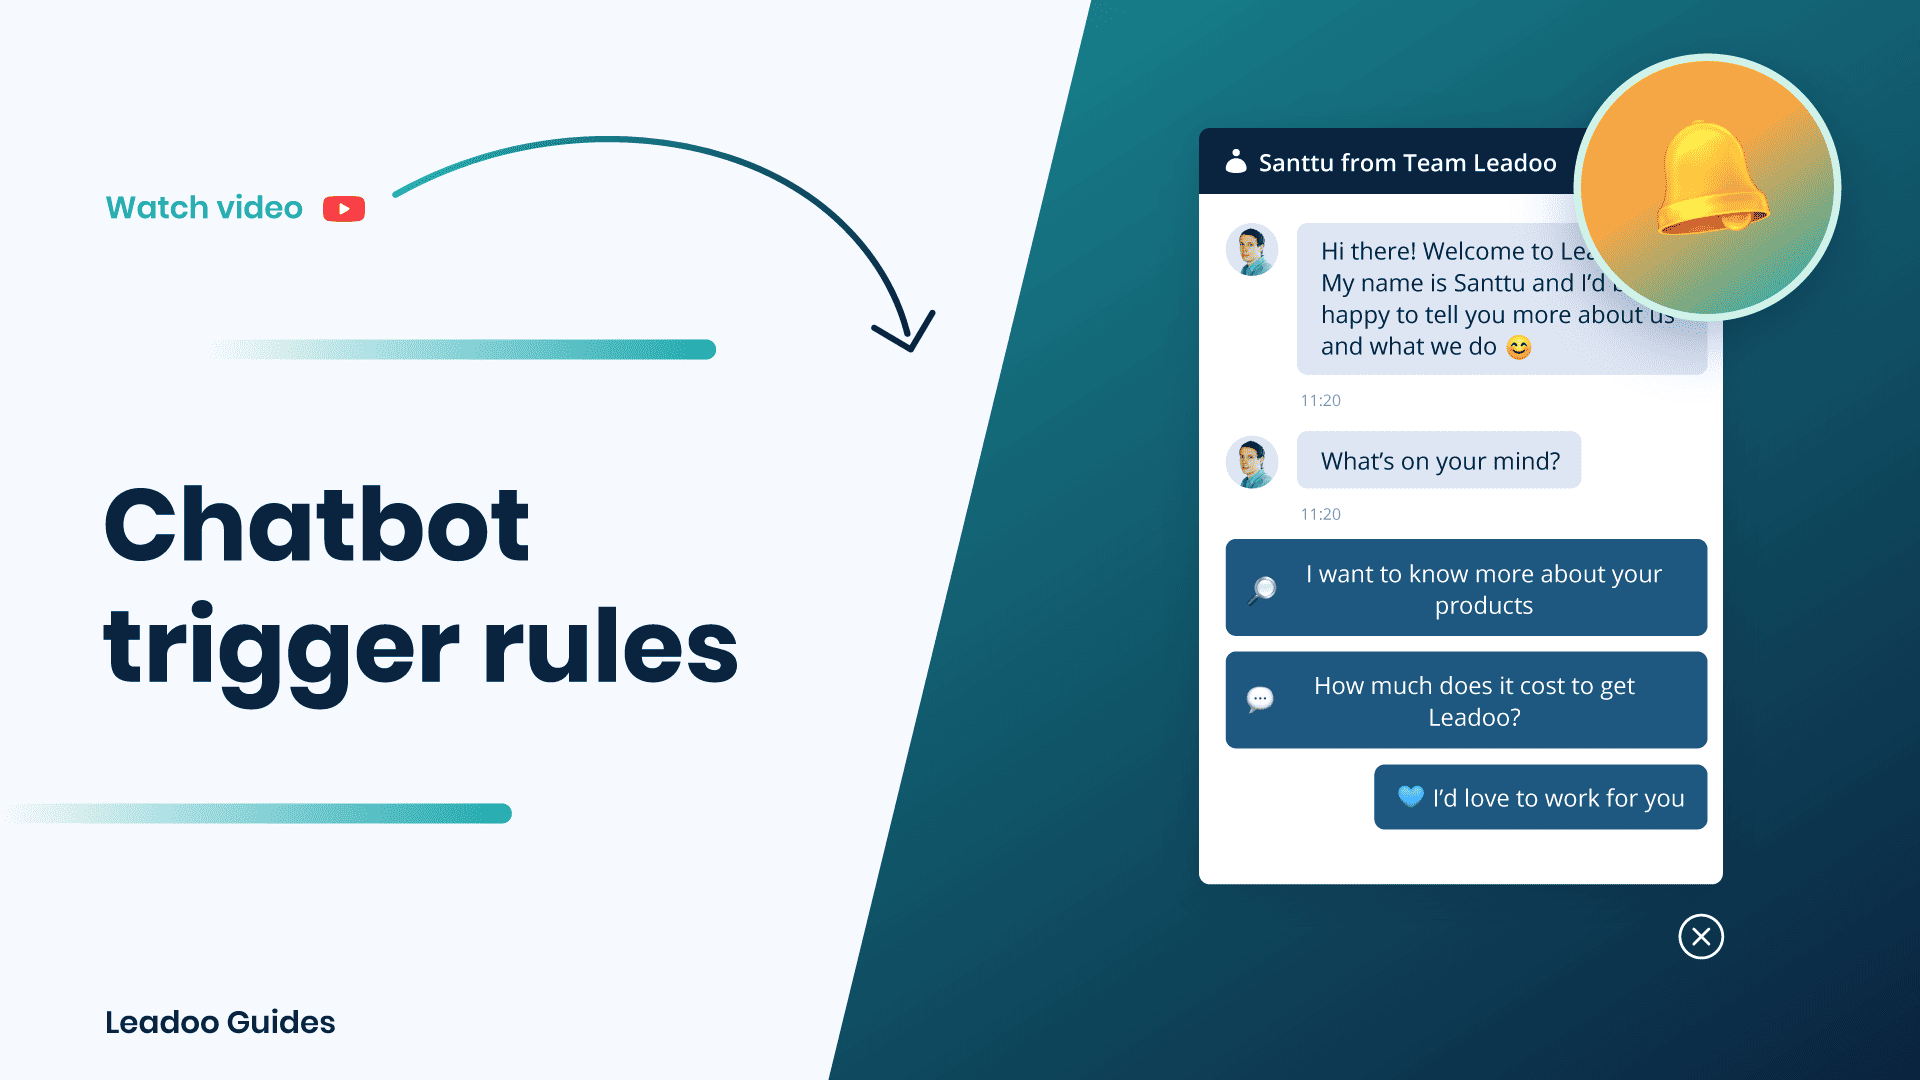
Did you know that the placement and triggering of a chatbot can often define the success or failure of a chatbot when it comes to results?
Follow these simple steps to find out how to engage your visitors with Leadoo Chatbot in the right place and time! 💪
Once you have added the Leadoo script to your website header your chatbot visibility is controlled with settings in your Leadoo platform. Leadoo allows your chats to be displayed to the visitors based on custom URL rules. This means that you can define which chatbot you want to appear on different pages to personalise the visitor’s experience on-site.
Step 1. Open up the settings for your bot. This can either be found via the bot listing or in the editor.

Step 2. Set the URL trigger rules.
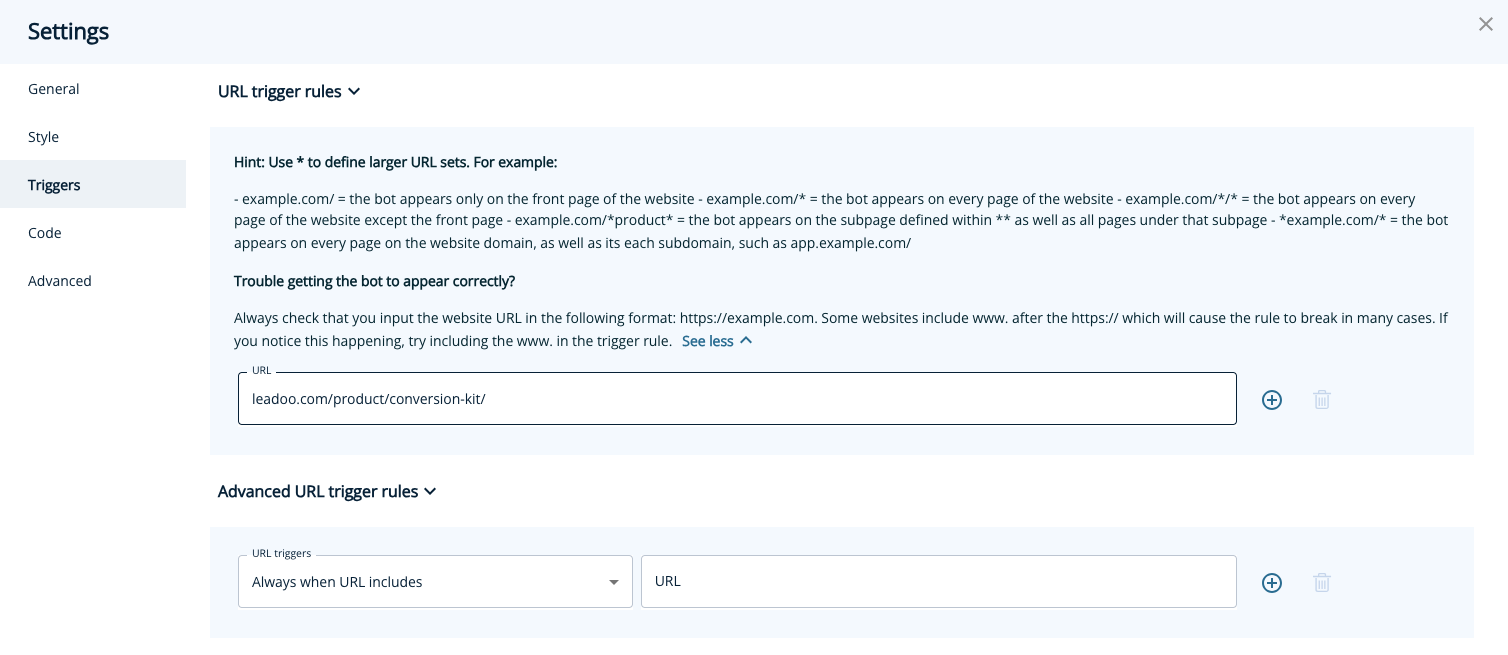 In the example above this chatbot would only appear on leadoo.com/product/conversion-kit. If you wanted your chatbot to appear on every page on your website you would change it to leadoo.com/*. The * acts as a catch-all for all other page URLs.
You can find more page-specific setting examples below or under “See more” within settings.
Page-specific (most popular choice)
= Chat triggers when a visitor enters the exact URL address you define in the given field. You can broaden the selection by using the asterisk sign *.For example:
leadoo.com/ = the chat triggers only on the front page of leadoo.com
leadoo.com/* = the chat triggers globally on each page of leadoo.com domain
*product* = the chat triggers on pages that include the path product (like leadoo.com/product/inpagebot AND leadoo.com/product/chatbot)
You may want to use multiple chatbots across your site or even hide them on certain pages, this is where our advanced URL trigger rules come into place.
Note! Do not add entire URLs in the advanced URL rules, only the keyword that appears in the URL.
We’ve given you plenty of control over what the trigger and icon look like as well as how frequently it pops up including:
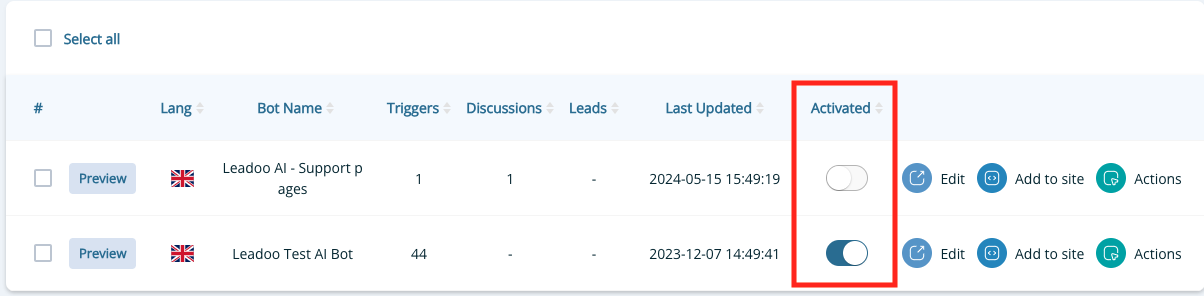
You already know how to hide your chatbot on certain pages, but what if you need to hide it everywhere temporarily? You can easily deactivate your bot within the Leadoo platform in just 1 click! Navigate to the bot type e.g. https://app.leadoo.com/conversion-kit/chat then click the toggle in the ‘Activate’ column.
Remember, no matter how awesome your dialogue is, it won’t have much effect if nobody sees it – so put some time and thought into defining your trigger settings!
If you have any technical challenges reach out to [email protected] or the team member you are currently working with.

