KNOWLEDGE
Case StudiesBlogsEventsSupport & Starting
Support Articles & HubSupport Videos (Youtube)Try Leadoo Free (Leadoo Lite)Partners & Careers
PartnershipsCareersSecurity & Privacy
Security at Leadoo AIGeneral Terms & ConditionsData & GDPRKNOWLEDGE
Case StudiesBlogsEventsSupport & Starting
Support Articles & HubSupport Videos (Youtube)Try Leadoo Free (Leadoo Lite)Partners & Careers
PartnershipsCareersSecurity & Privacy
Security at Leadoo AIGeneral Terms & ConditionsData & GDPRExit intent is a way of triggering the Visual Bot to capture visitors who are just about to leave your site/page which creates great opportunities for lead capture. We tend to see success with this type of trigger when you’re offering something of real value to your visitors, e.g. brochure or case study download, event registration or everyone’s favourite, a discount!
With exit intent triggering you can:
First things first, you’ll need a visual bot to use this feature. You can either build one from scratch or use an existing one. In fact, if you’ve already got a product finder or event registration page but it’s static on the page then duplicating that and deploying it as a visual bot has the potential to generate some quick wins!
If you need help building a visual bot you can check this guide. For now, I’m going to assume you’ve got one ready to go.
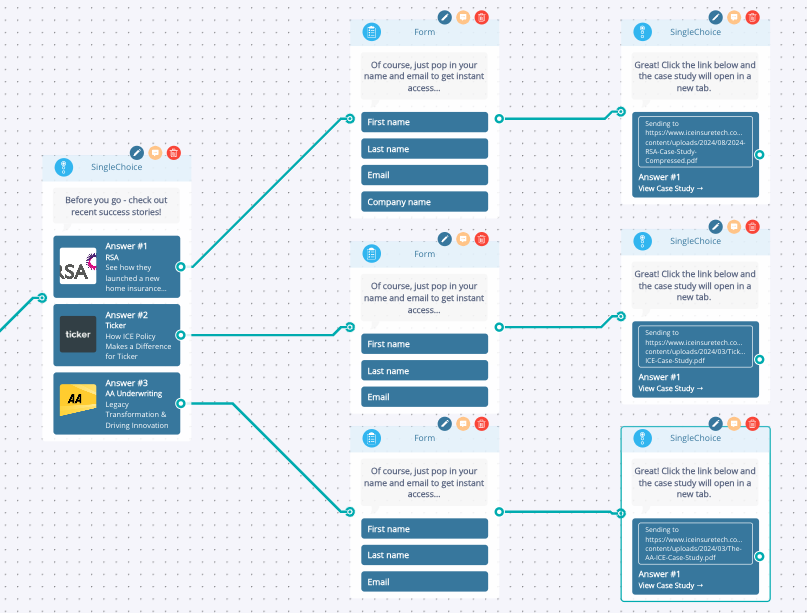
Here we have a simple lead capture visual bot that’s offering visitors the chance to download the latest case studies before they leave. This is a good strategy if your visitors are still in the decision making phase.
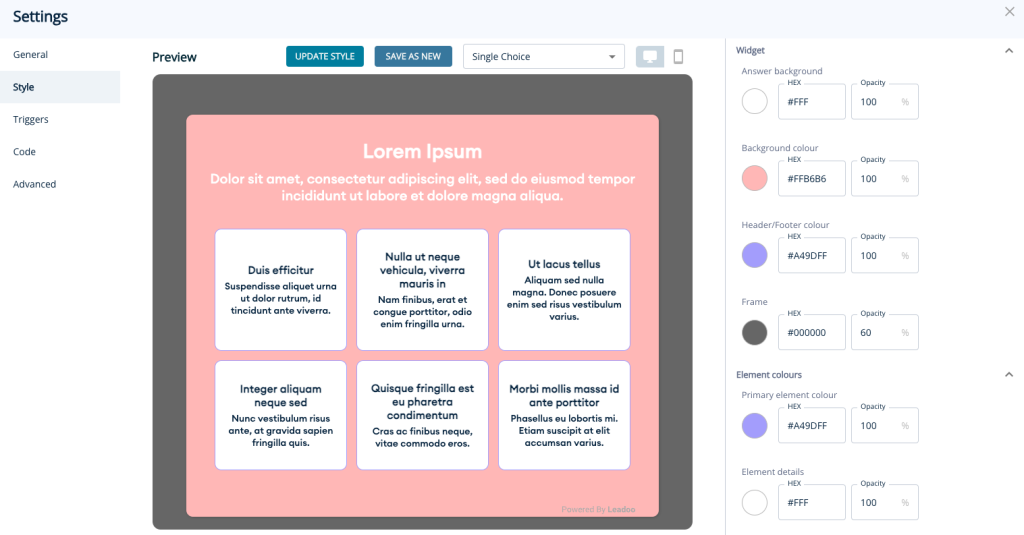
Before we look at the exit intent trigger settings we need to make sure we’ve got the frame colour setup correctly. With exit intent’s the frame basically acts as an overlay on your website which helps the bot to stand out. We recommend using one of your brand colours and setting the opacity to around 60%
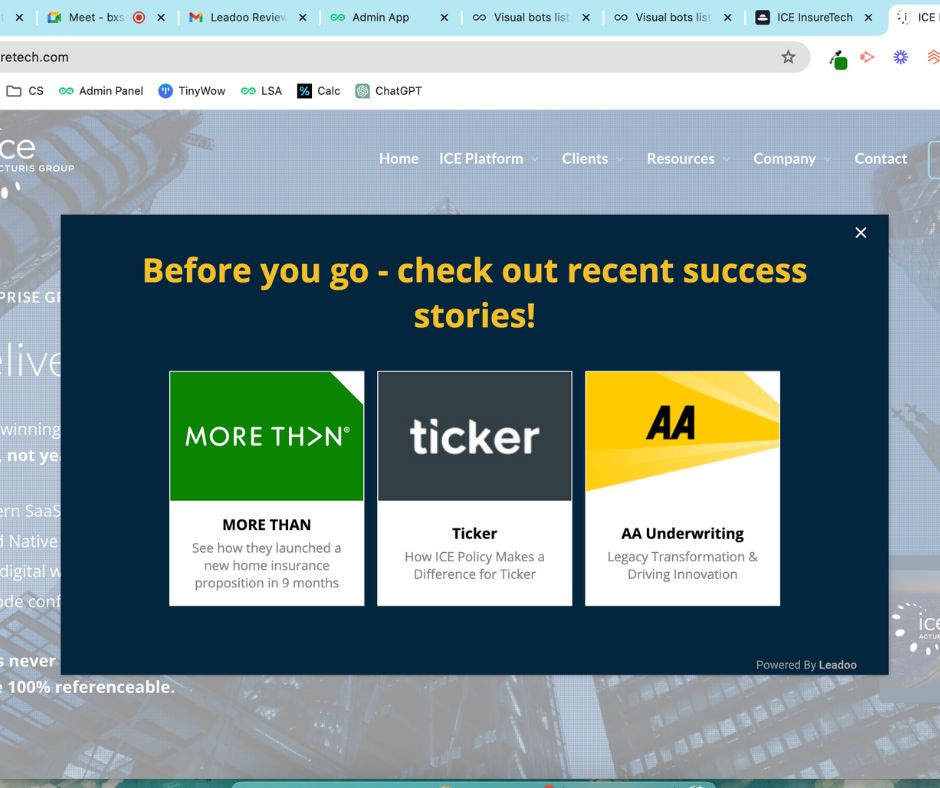
Here’s a nice client example to show you how this will look when it’s live!
Now it’s time to set the exit intent live! Assuming you have the Leadoo tracking script on your site then this will be very quick and easy because the exit intent is triggered by the same logic as the chatbot. If you don’t have the tracking script on your site yet (why not?!) then you can follow this video example of adding it to a WordPress site.
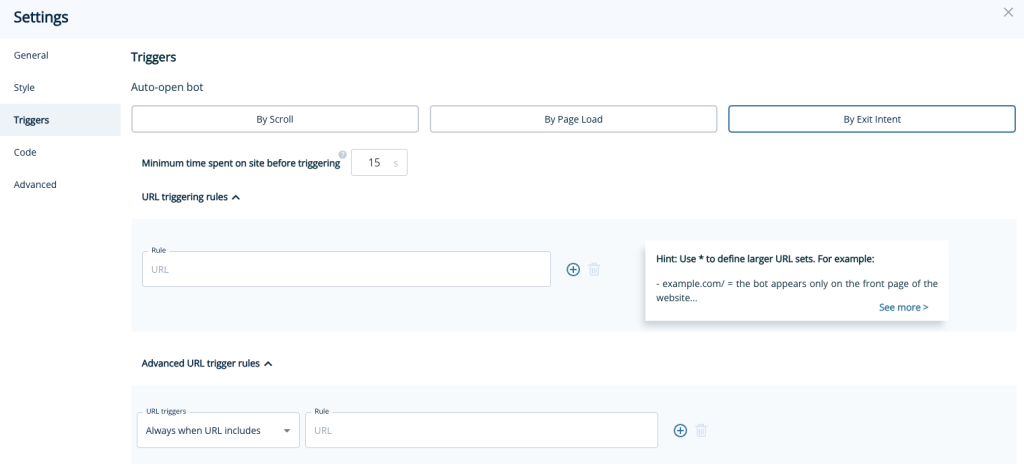
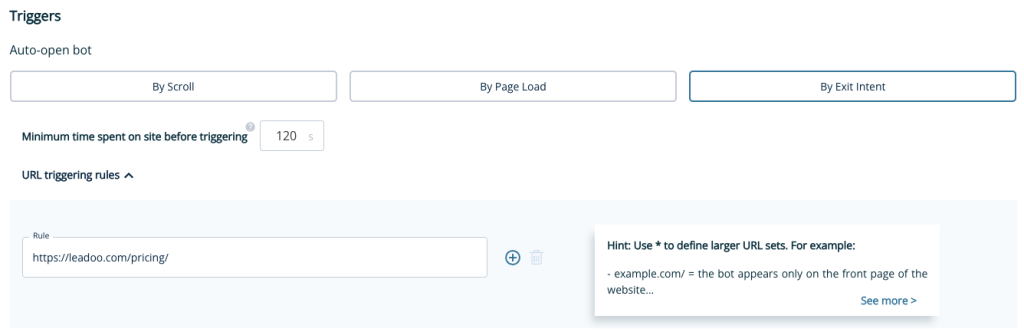
Once you’re in the triggers menu select the By Exit Intent option to get started. From here you’ll need to decide on how long to wait before triggering the exit intent, for some insight into this you should check out the Website Analytics area of the platform to see how long visitors stay on certain pages. We would recommend about half of the average time spent, e.g; if visitors tend to stay on your site for 4 minutes it would be a good idea to trigger the exit intent bot after 2 minutes.
Next up is where you want the exit intent to be shown, simply copy and paste in the URL of the page(s) that you would like it to appear on. This section works in the same way as our chatbot triggers, which you can learn more about here.
Let’s run through a few examples.
1. Adding the exit intent to your pricing page after 2 minutes. This is great for offering discounts and or showcasing ROI calculators. Simply add in the pricing URL and set the minimum time spent to 120s.
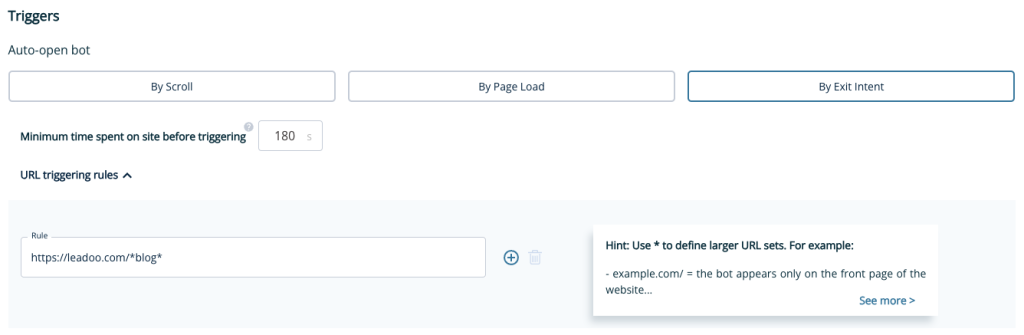
2. Adding the exit intent to all blog pages – this is great for capturing brochure download leads as the visitor will be in the research phase. In this example you’ll notice we’ve used some asterixis when adding a URL, using them allows you to add the exit intent to multiple pages without having to manually add them all. By adding /*blog* the exit intent will show on all our blog pages!
Hope you found this useful, why not get stuck in and try it yourself! Don’t forget if you need any advice or help just reach out to your Account Manager.
Leadoo AI elevates your existing chatbots with real-time, intelligent conversations. It’s trained on your website and documents, enabling it to instantly answer customer questions about your products or services—particularly in situations where manual mapping would be inefficient. Whether visitors are exploring if your offering suits their needs or looking for a specific product, Leadoo AI provides relevant, tailored responses.
It enhances structured journeys and supports more open-ended interactions, letting users navigate freely. Leadoo AI strikes the perfect balance between automation and live chatbot interaction, ensuring a smooth transition to human support when needed, improving user experience and increasing conversions.
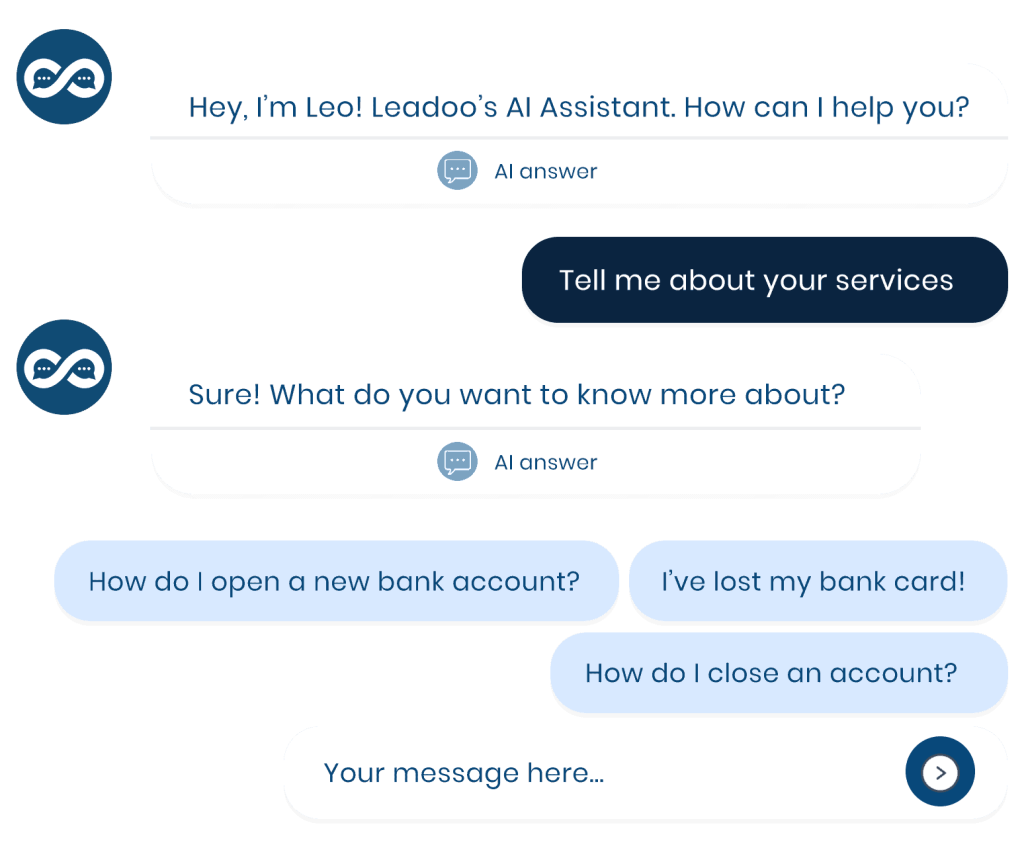
Want to try it out? Discover some of the capabilities here: https://leadoo.com/ai/
Leadoo AI can be easily integrated into your Chatbot and InpageBot flows, just like any other node. Place it strategically where it can make the biggest impact, such as in areas with a broad range of offerings—like training courses—where it’s difficult to predict every possible question. Leadoo AI acts as an expert, guiding visitors through complex queries and driving them toward conversion
It also prevents dead ends by stepping in when predefined options don’t meet a visitor’s needs. Instead of waiting for live support, Leadoo AI instantly provides relevant answers, keeping the conversation flowing seamlessly
*This tool can be used in conjunction with Leadoo AI or with other chatbot functionality.
If Leadoo AI isn’t yet part of your subscription, simply contact your Customer Success Manager to explore how it can benefit your business.
For those already subscribed to Leadoo AI and looking to integrate it into your chatbots, check out the additional articles below for detailed step-by-step guides on building AI functionality into your bots and optimising its potential.
If you’re new to Leadoo AI jump over to this article to give you an overview of what it is and how you can use it in your Leadoo bots – Leadoo AI Overview: Understanding its Features and Integrating with Your Bots
If you’re looking for a step-by-step guide on how to use AI in your Leadoo bots, this is the place to start!
A knowledge base is Leadoo AI’s library of all the information it needs to know to answer your customer queries. This is where you train the AI on all the content and information you think will be most relevant.
You can train the AI using a combination of URLs and documents, and the AI can scan and train on your content in just a few minutes, making setup quick and easy!
Think of your knowledge bases as organised “buckets” of information. If everything is thrown together, it can be tricky for the AI to find the most relevant answers, which can reduce response accuracy. That’s why Leadoo AI gives you the option to create multiple knowledge bases and use them all within one AI node for more precise results.
For instance, if you run an e-commerce business, you might set up separate knowledge bases for “Product Details,” “Shipping & Delivery,” “Returns & Exchanges,” and “Account Help.” This way, customers get responses tailored to their specific needs—whether they’re looking for product specs, order tracking, or account support.
By giving each knowledge base a clear title and description, you make it easy for the AI to understand what information resides in each “bucket.” With this guidance, the AI can quickly search the right knowledge base and deliver accurate, relevant answers to your customers.
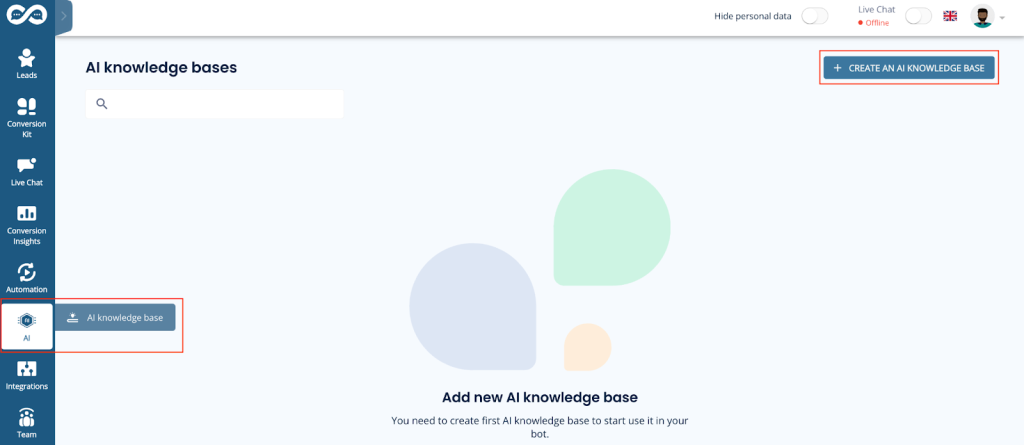
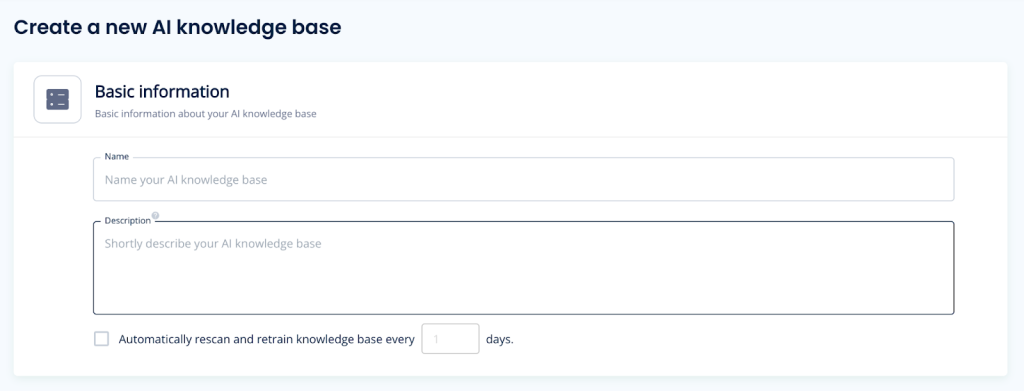
1. Navigate to AI in the left-hand menu, then click Create an AI knowledge base in the top-right corner.
2. Provide a name and description for your knowledge base. If you have multiple knowledge bases, including a clear description is important. Leadoo AI first reviews the descriptions of each knowledge base to determine which one to use to find the answer to the user’s question. After that, it examines the content of the selected knowledge base.
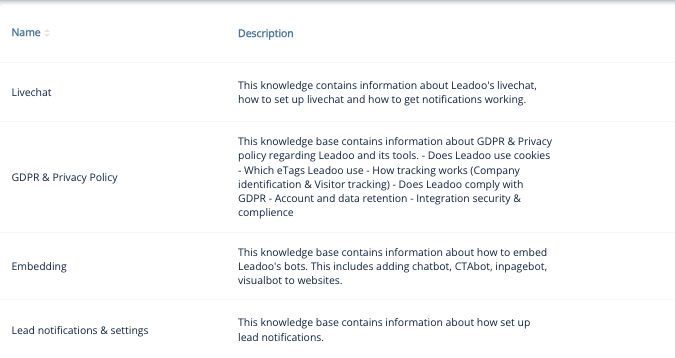
For example, on our knowledge base about embedding, this is the description that accompanies it:
This knowledge base contains information about how to embed Leadoo’s bots. This includes adding chatbot, CTAbot, InpageBot and VisualBot to websites.
3. Choose automatic rescanning frequency. If your website is regularly updated, it’s best practice to enable automatic rescanning to keep the AI’s knowledge fresh.
You can add multiple data sources:
Document Scanning: Useful for content stored outside public web pages, such as PDFs or spreadsheets with product details or FAQs.
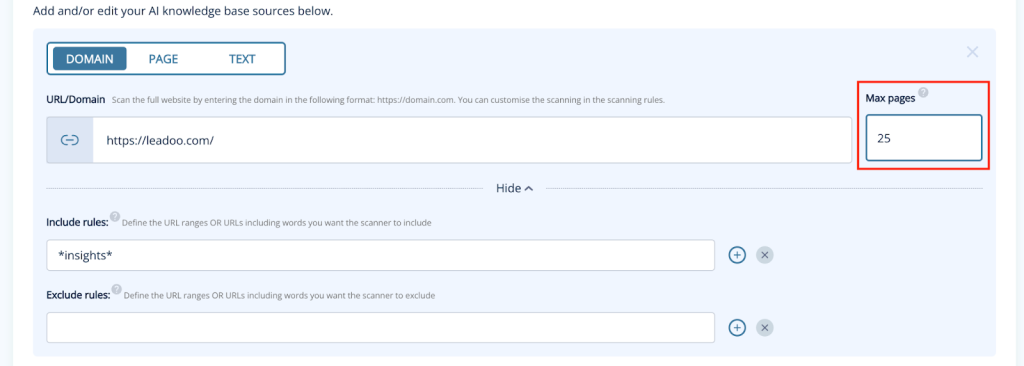
Domain Scanning: Automatically search your website by including/excluding specific keywords. This method focuses on relevant content rather than scanning the entire site.
For example, to build a knowledge base on “Leadoo Insights,” set up the search using rules the rules below.
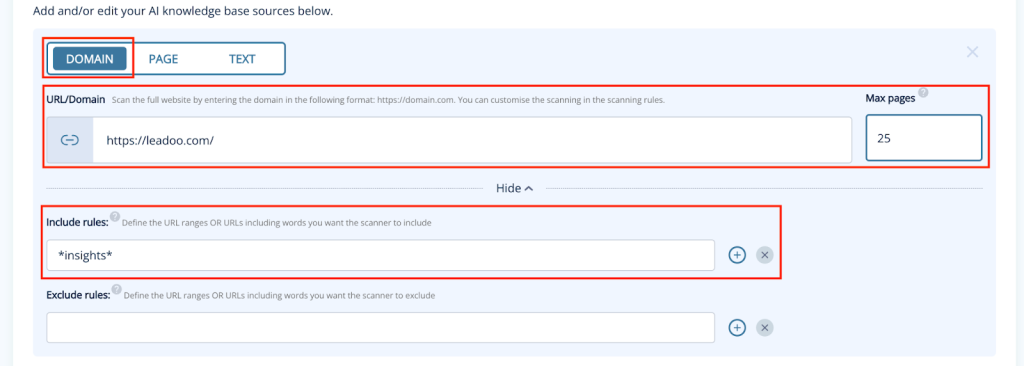
1. Select domain as the source type
2. Add your website URL: https://leadoo.com
3. Include rules: *insights*
The asterisk (*) acts as a wildcard in this case, allowing the crawler to search all URLs on leadoo.com that contain the word “insights” anywhere in the URL, regardless of what comes before or after it. If we only used *insights, the crawler would not include any URLs that had any other text after the word “insights.”
You can add multiple include or exclude rules by clicking on the plus button. This works as an OR condition e.g. scan all pages that include insights or conversion.
4. Select the maximum number of pages you want to scan.
5. Click Scan webpages. After a few minutes, you should see pages populating in the AI knowledge base section below.
Page Scanning: Manually add specific URLs by selecting the “Page” data source.
Text scanning: Manually input text for AI training.
As your data is scanned, sources will show statuses such as Scanning, Ready to Train, or Trained.
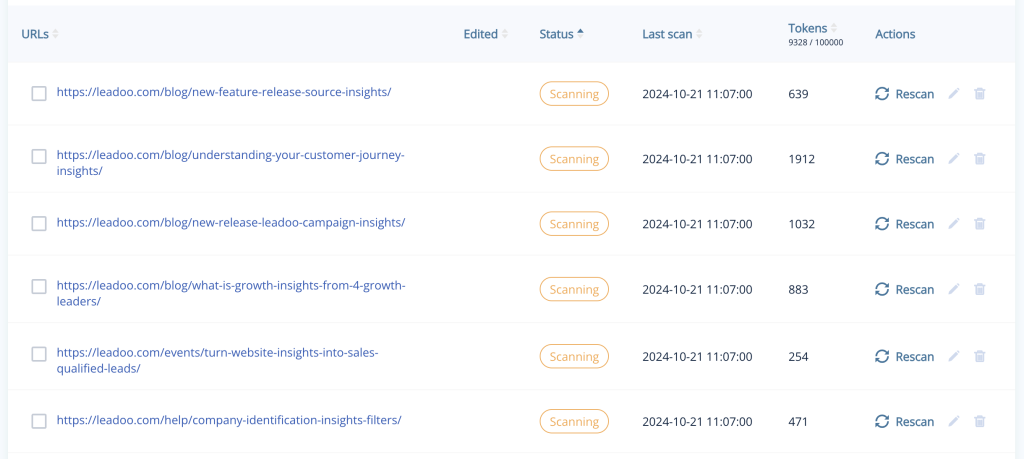
Once trained you can review the content by clicking the status label, which will display the information that has been captured.
If, for any reason, you’re unhappy with the content that the Knowledge Base has scanned and trained you can edit this directly. Simply click on the pencil icon before the page, document etc. This will allow you to make any changes without the need for recanning and training content.

Your knowledge base is now ready to use within your Leadoo bot! Remember you can add and remove sources from a knowledge base at any time.
1. Ensure you’ve adjusted the number of pages to scan
2. Ensure You Have a Public Sitemap
Domain scanning requires your website to have a public sitemap, which is also essential for SEO. To check if you have one, visit: https://[YOUR WEBSITE URL]/robots.txt. If this doesn’t work then contact your website developers for more information.
You should see something like this:

Try rescanning the source. Click the rescan icon on the right-hand side or, tick the box on the left-hand side of the source and click Sync Selected.

Occasionally, Leadoo AI may not capture all the content from your sources. This can occur due to certain webpage elements optimised for page speed or user experience that are incompatible with AI crawlers. These issues can also inadvertently affect your SEO. Understanding these problematic elements can help ensure that essential content remains accessible to the AI.
Elements That Can Cause Problems:
If you need help building your knowledge base, reach out to your Customer Success Manager or our support team at [email protected].
If you’ve already built your knowledge base it’s now time to create your prompt. If you haven’t built your knowledge base yet, refer to these articles first:
Creating the perfect AI chat experience starts with crafting the right prompts. A well-structured prompt can ensure that your AI chatbot delivers accurate, helpful responses that move visitors closer to conversion.
In this article, we’ll cover tips for writing an effective AI system prompt to work in conjunction with the other AI elements including the Knowledge Base, Dynamic Suggestions, Static CTAs, and Custom Intent mapping which we cover in other articles which you can find at the bottom of the page.
If you’re familiar with interacting with an AI chat, a prompt is a question or input that you provide the AI chatbot to get a helpful, relevant response. Whether it’s answering queries about products, guiding users through services, or offering solutions quickly, the prompt sets the conversation in motion.
A system prompt is essentially the brain behind your chatbot’s responses. It defines the rules and guidelines for how the AI should interact with users, ensuring the conversation flows in line with your business goals. This includes the chatbot’s tone of voice, the format of responses, and specific ways to handle frequent queries. By shaping the AI’s behaviour, a thoughtful system prompt can turn a casual conversation into a meaningful engagement that pushes visitors toward action.
Not sure where to start? Use our system prompt template to get started: AI Prompt Template
The ideal length of a prompt is 2k characters with a maximum limit of 4k characters, utilise your doc editor’s word count tool to keep an eye on this.
We’d also recommend keeping a master copy of your prompt on a document so you can easily review, edit and update the prompt within the Leadoo visual bot builder.
You can also build or optimise your prompt with our own GPT here: https://chatgpt.com/g/g-06v43eDwH-prompt-designer
Adding AI to your chatbot is a powerful way to improve user interactions, but it shouldn’t be your only tool for driving conversions. While an AI chat can help answer questions and guide users, it works best as part of a larger strategy to enhance user experience (UX), push people down the funnel, and ultimately convert them.
Your AI chat should complement other features in your bot—such as automated flows and clear call-to-actions (CTAs). AI chat is particularly useful for handling unstructured or complex queries, but for predictable journeys or key conversion points, a more structured flow might be more effective. By combining the strengths of AI and other engagement tools, you can create a seamless user journey that addresses a wide range of customer needs and nudges them closer to conversion.
AI chat isn’t meant to replace your current strategies, but rather to enhance them—giving your visitors instant, relevant information while your other tools keep them on track toward taking action.
To add AI to your bot, open it in the editor and add the AI node to your workspace in the same way you would any other node.
Don’t see the AI node available? You’ll only see this option if you have AI included in your Leadoo subscription. Reach out to your Customer Success Manager to find out how to upgrade.
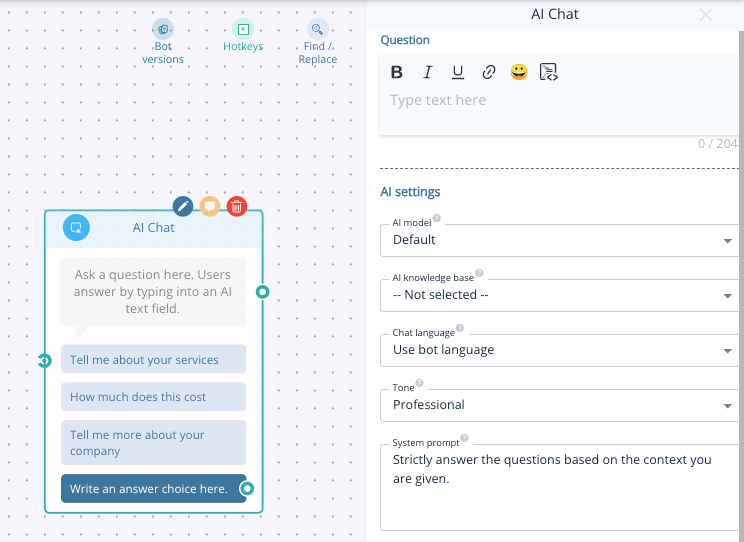
Write an introductory message in the question area.
Select the Knowledge Base(s)
To ensure your website visitors receive the most accurate and relevant responses, we recommend two best practices:
Use knowledge bases at different points in the customer journey to answer questions about specific products or services, and/or
Select multiple knowledge bases for the AI to search across when retrieving information.
By using multiple, targeted knowledge bases with clear names and descriptions, you give Leadoo AI the best possible chance of delivering the right information every time. For more on setting up a knowledge base, plus our top tips, check out this article: Leadoo AI: What is a Knowledge Base and How to Build One | Leadoo – Conversion Platform
Copy and paste your system prompt
You’ll also be able to add some initial suggestions for visitors to ask the bot along with 1 or more static CTA buttons so they don’t get lost in a never-ending AI conversation!
More on that in this article – Leadoo AI: What are Initial and Dynamic Suggestions?
Test your bot!
Use the preview button at the top of the builder to see if the AI is responding in the way you want it to.
Testing is key to fine-tuning your AI chat. Use the preview button in the builder, and stress-test the bot with a wide range of potential questions. For example, a stress test might reveal that the AI struggles to handle complex product queries or misses key FAQs. By getting colleagues involved, you can spot gaps, refine your system prompt, and ensure a consistent user experience.
Fine-tuning your AI chatbot’s system prompt can transform your website interactions and lead to higher conversion rates. If you have any questions or need assistance in setting up or optimising your system prompt, don’t hesitate to reach out to your Customer Success Manager or our Support Team at [email protected] —we’re here to help you succeed!
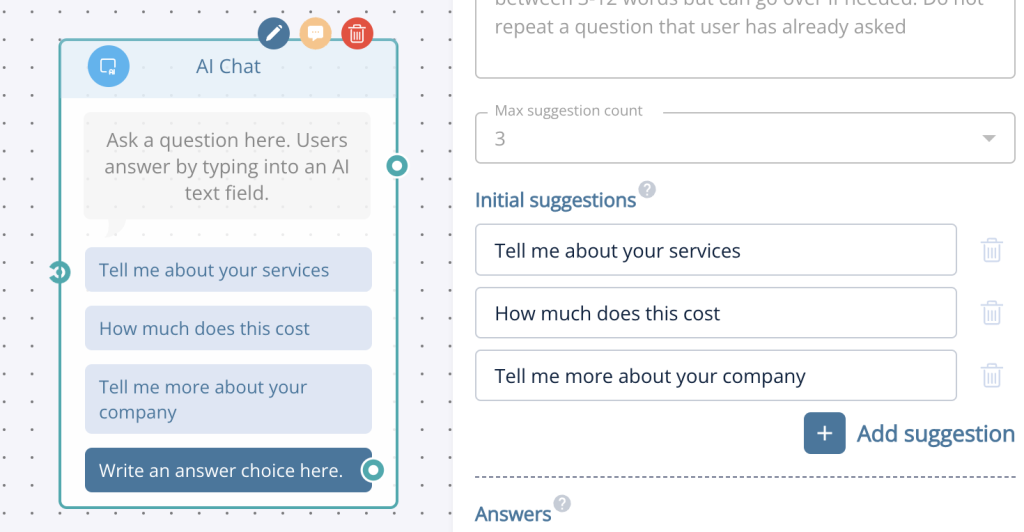
Initial suggestions are pre-set questions you present to customers when they first engage with Leadoo AI, helping them start the conversation. Think of them as starting points that encourage interaction.
When clicked, the AI answers the selected question, allowing the customer to explore further based on their needs. These suggestions should vary depending on the user’s stage in the journey. When you add an AI node to your bot, a few example suggestions are pre-filled for your convenience, but customisation is key.
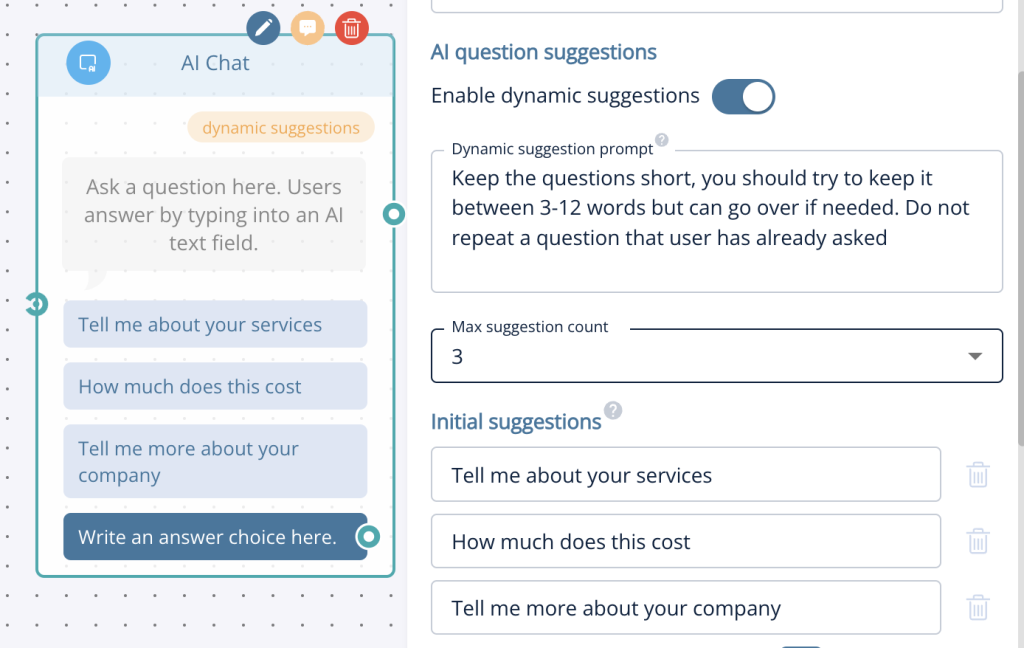
Dynamic suggestions take interaction further by helping customers ask relevant follow-up questions. After each AI response, the system generates possible follow-up queries based on the conversation but not based on the Knowledge Base. This means that the AI chat will not be able to create questions based on content within the Knowledge Base and so occasionally it may offer a suggestion that isn’t 100% relevant to your business. For example, if you’re an online course provider it may create questions for a course that doesn’t exist but could be seen as relevant based on the previous discussion. Let’s say a visitor asks about a marketing course, then it may suggest something like; “Do you offer courses in Creative Writing”
This keeps the dialogue flowing and reveals information the customer may not have initially considered.
However, limit dynamic suggestions to 2-3 options to avoid cluttering the chat window, ensuring the experience remains streamlined and user-friendly.
Enable dynamic suggestions by toggling them on in the AI node. When activated, the AI will display suggestions after each response. There is also an additional prompt field where you can guide the AI on how to approach these dynamic suggestions.
Once live, customers will see these suggestions after their initial interaction, which helps maintain an ongoing and engaging conversation.
If you need help building your AI bot reach out to your Customer Success Manager or our support team at [email protected].
Leadoo’s bot conversations are build with different nodes. With these nodes you can use to personalize your conversations. In this article we explain what are the different node types and how you can use them.
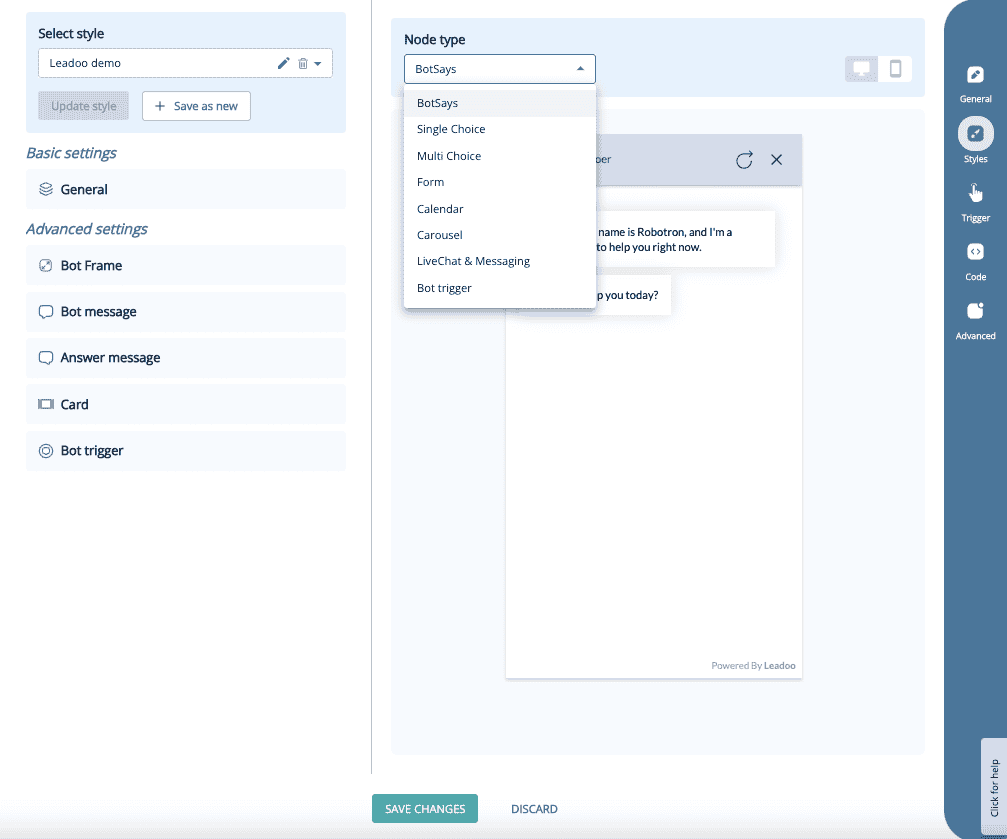
There are 18 different node types which you can use to personalize your conversations.
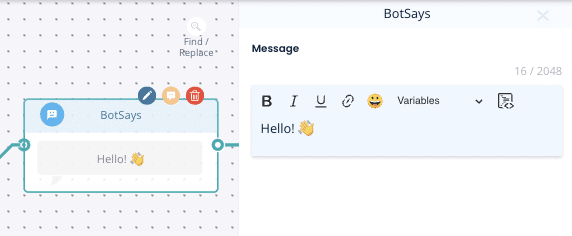
Bot Says – For when you want to ‘say something’ without offering an option and will load the next part of the conversation straight afterwards.
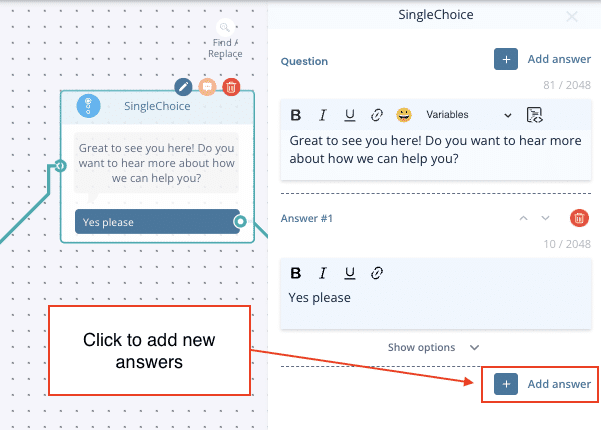
Single Choice – When you want the visitor to select only one choice which can then branch off to different pathways or the same.
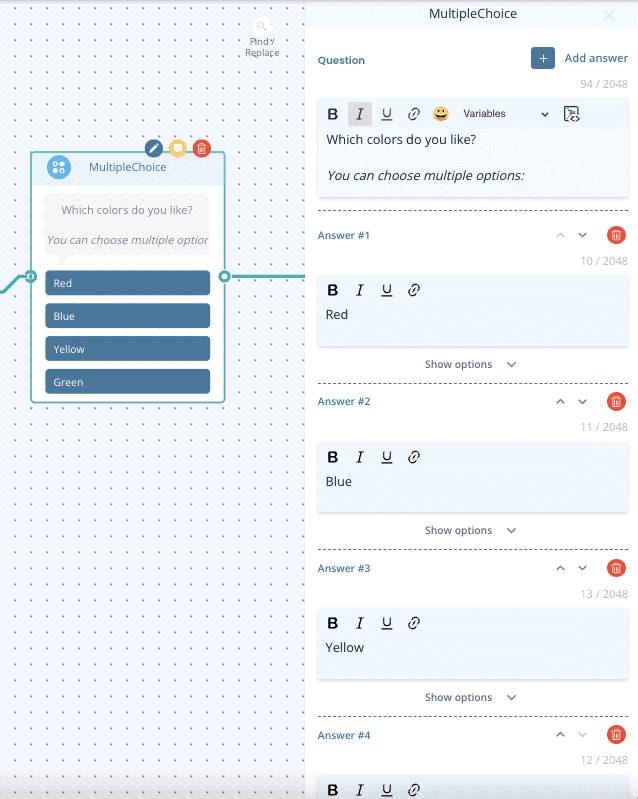
Multiple Choice – When you want the visitor to select multiple options and continue down one path afterwards.
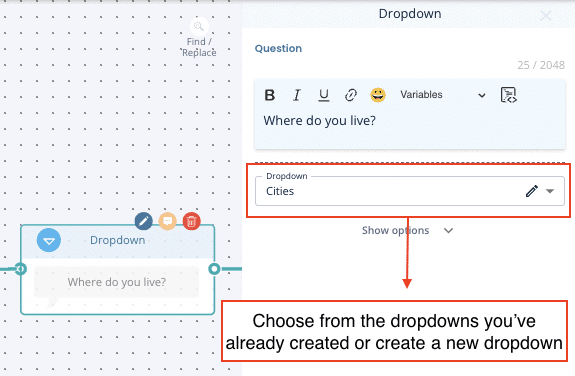
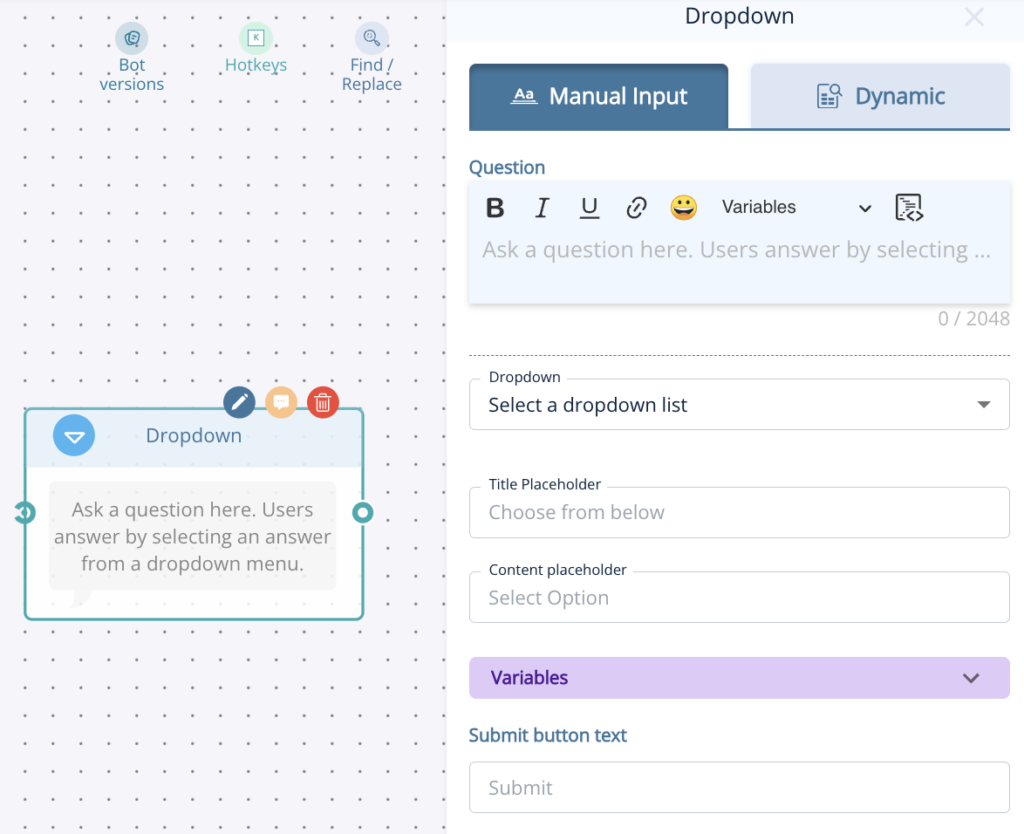
Dropdown – This is useful when you have a long list of options for the visitor to choose from such as location. To use this you must have already created and saved a dropdown list.
Find out how to add dropdown lists here.
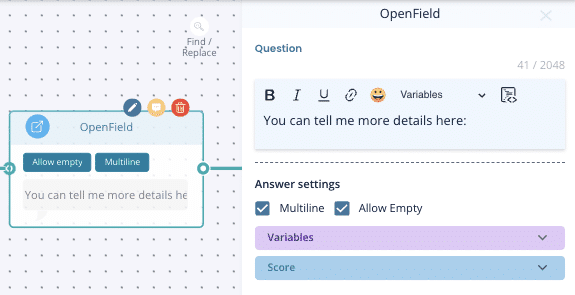
Open field – Adds a box with an open text field for the visitor to complete
Calendar (Date & time picker) – Visitor can choose the date and time freely from the calendar. The time slot they picked won’t be synchronized to any calendar, so this node is just for picking a time.

Calendar (Calendar booking) – Visitor can book a meeting straight from your calendar that has been integrated and synchronized with Leadoo. Calendar Booking makes sure to check you calendar and only shows time slots that are available.
You can read more from here: How to sync your calendar with Leadoo
Logic Router – Use this to determine what option the visitor gets based on their previous responses. This could be via a scoring method or by label.
Using scoring – You will need to add a score to each answer from previous single choice nodes to determine the result here, then set the score you want to determine which result.
e.g. If visitor scored 1-10 they get answer #1, if the score 11-20 they get answer #2.
You can use this to decide if a candidate gets through to the end of an application, or if you want to give a suggestion based on a visitors preferences.
Using labelling – You can also determine a result depending on what labels were most chosen on the single choice options beforehand.
e.g. Visitor selects 3 answers from previous questions, 2/3 of those had the label ‘red’ so they will then see the calculator result for red.
Learn how to set-up labelling here.

Advanced Logic Router – More info here: Cheat sheet: Advanced Logic Router Operations
Calculator – More info here: Creating Dynamic Variables for Calculator and Advanced Logic Router Nodes
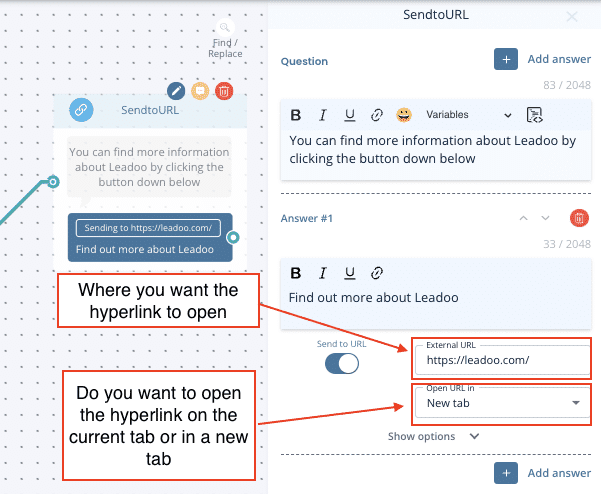
Send To URL – The same as Single Choice but allows you to hyperlink a button to another URL
External URL – is where you want the hyperlink to open
New tab = open in new tab
Current tab = open in the same tab
Standard contact nodes include: Name, Email, Company name & Phone number
Grouped contact nodes
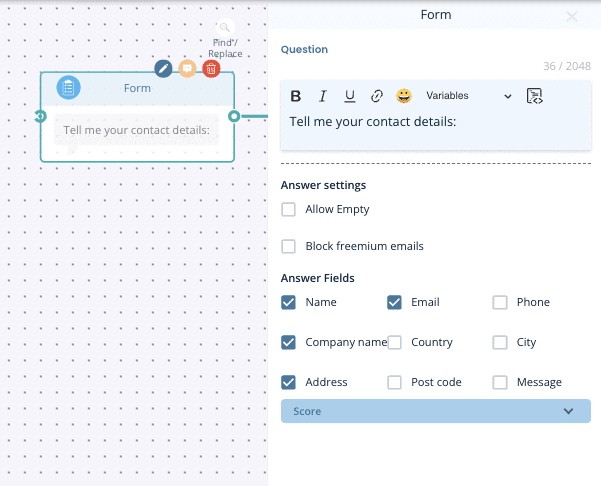
Contact – You can collect all your visitors details in one go and select from: name, email address, phone number, company name, country, city, street address, zip code and an additional message.
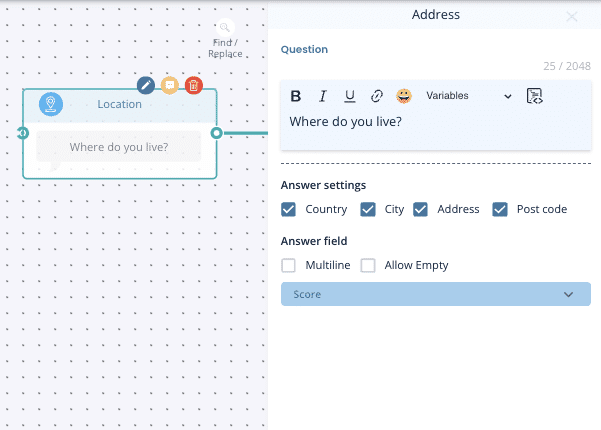
Location– Select which options you want including: country, city, street address & zip code
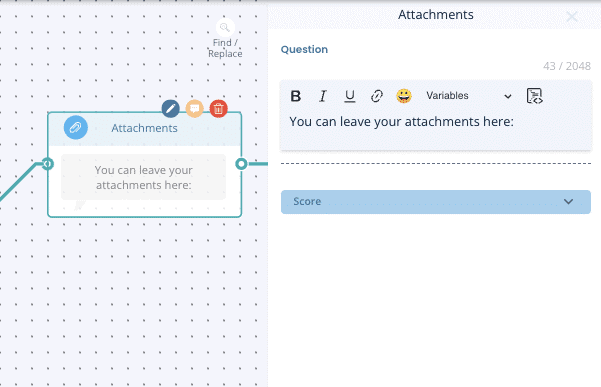
Attachments – Use this to allow visitors to upload documents or images. E.g. a CV or supporting information for IT support.
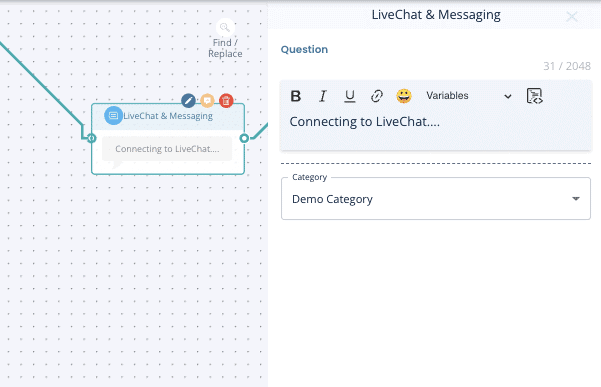
Live Chat – Leadoo live chat can be initiated through single choice options but if you want to add other messaging options too (WhatsApp & Facebook Messenger), you can use the live chat node instead.
TIP – Make sure you still have automated dialogue too so that if there are no agents online your visitor can still get in touch.
Find out how to set-up and use live chat here
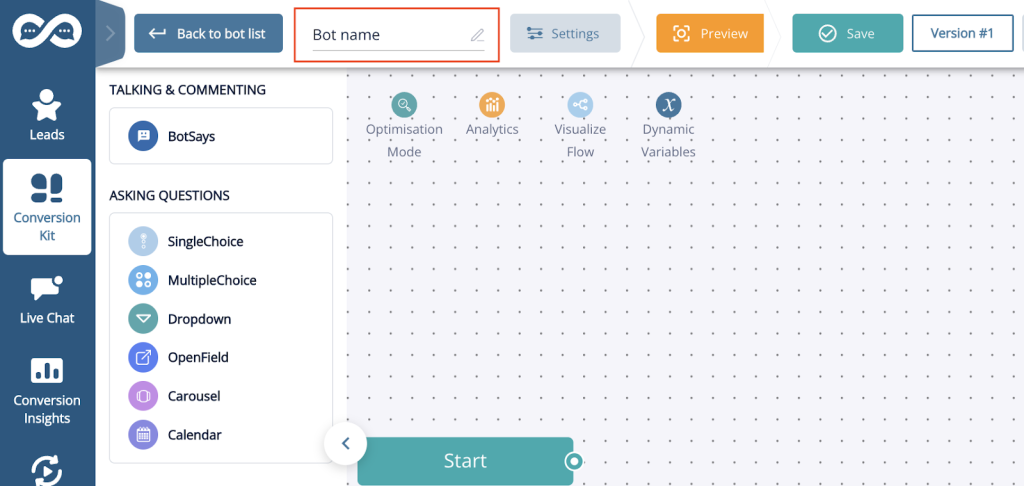
The Visual Bot Builder is your all-in-one workspace for building Chatbots, InpageBots, and VisualBots. Using drag-and-drop features, along with convenient keyboard shortcuts and quick tools, you can effortlessly create and customise decision trees to guide user interactions.
In this article, we’ll walk you through the essentials of building your first bot, so you’ll have a solid foundation to get started. For a breakdown of each node type, check out our guide here.
Watch Senior Technical Account Manager Gavin and Onboarding Development Manager Helen share expert insights in the on-demand webinar below, or continue reading for a step-by-step guide.
For quick tips and time-saving shortcuts in bot editing, simply watch the video below:
Select Your Bot Type
Decide if you want to build a Chatbot, InpageBot, or VisualBot. Navigate to Conversion Kit > InpageBot/Chatbot or VisualBot on the left-hand menu.
Build Your Bot
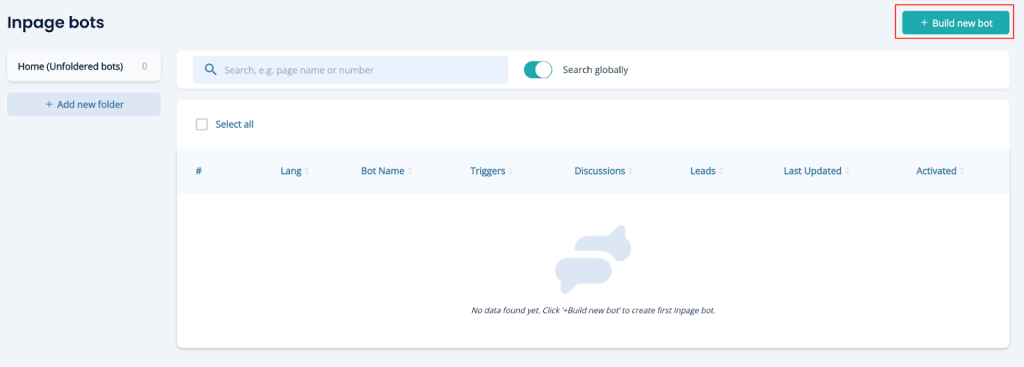
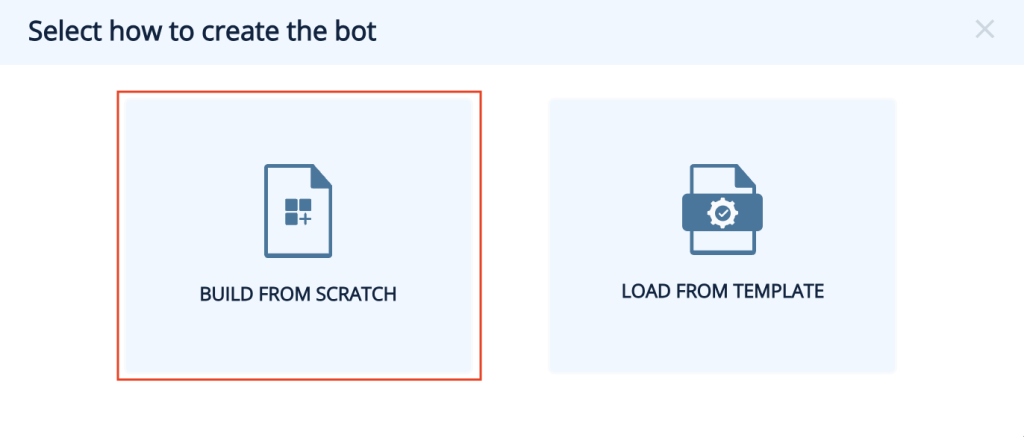
Click + Build new bot > Build from scratch to access a blank workspace. Start by naming your bot.
If you’re using a laptop you can use your usual trackpad gestures to move around and zoom in and out. If you are using a keyboard & mouse here are two essential shortcuts you need to know about.
There are a few methods to add nodes:
1. Drag & Drop
Simply drag a node from the menu on the left into your workspace.
2. Quick-Add
Click and hold the circle on the right of any node, drag it to an open space, and release to open a node menu. Choose the desired node type, which will connect automatically to the starting node.

1. Get Inspiration
Start by exploring pre-built bots for ideas. Check out the Tips & Tricks video above to learn how to copy+paste nodes from one bot to another or even duplicate entire bots.
2. Plan Your Conversation Flow
Use the Bot Says node for introductions, and connect it to a Single Choice node to guide users. Offer varied options to serve different user needs. For example:
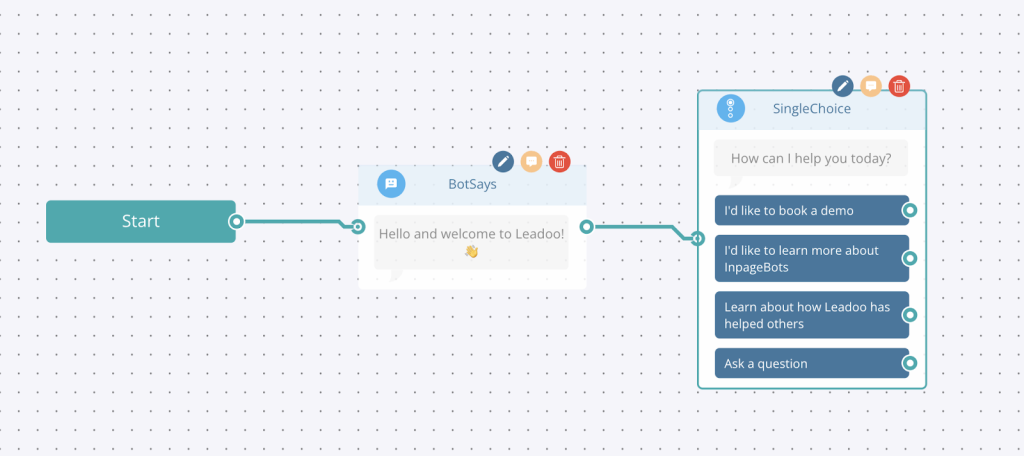
3. Avoid Dead Ends
Always provide multiple choices and avoid abrupt stops. If asking, “Are you ready to book a demo?” provide options like “Yes, I’d like to book a demo” and “Not yet, tell me more about Leadoo Insights.” Including an Ask a question option also encourages customers to reach out.
4. Add Value
Design conversations that go beyond your website’s content. Make information easier to find or offer downloadable resources in exchange for contact details.
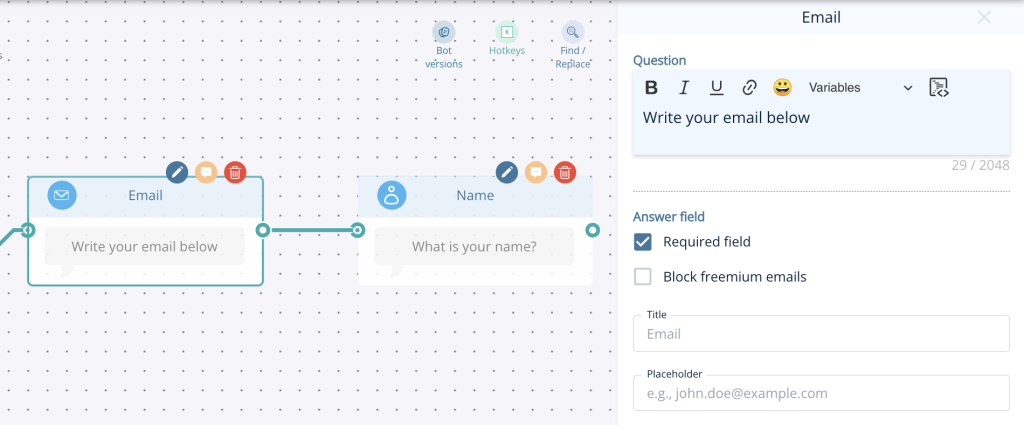
Leadoo offers flexible options for capturing visitor details. Start with essential fields, like Name and Email, to secure key information without overwhelming visitors. For more qualified leads, gradually collect additional data by splitting questions across nodes. This keeps the experience smooth and prevents form fatigue, helping you gather necessary information while maintaining visitor engagement.
Consider collecting only what’s essential to follow up, creating a frictionless path for conversions and improving the overall lead experience.
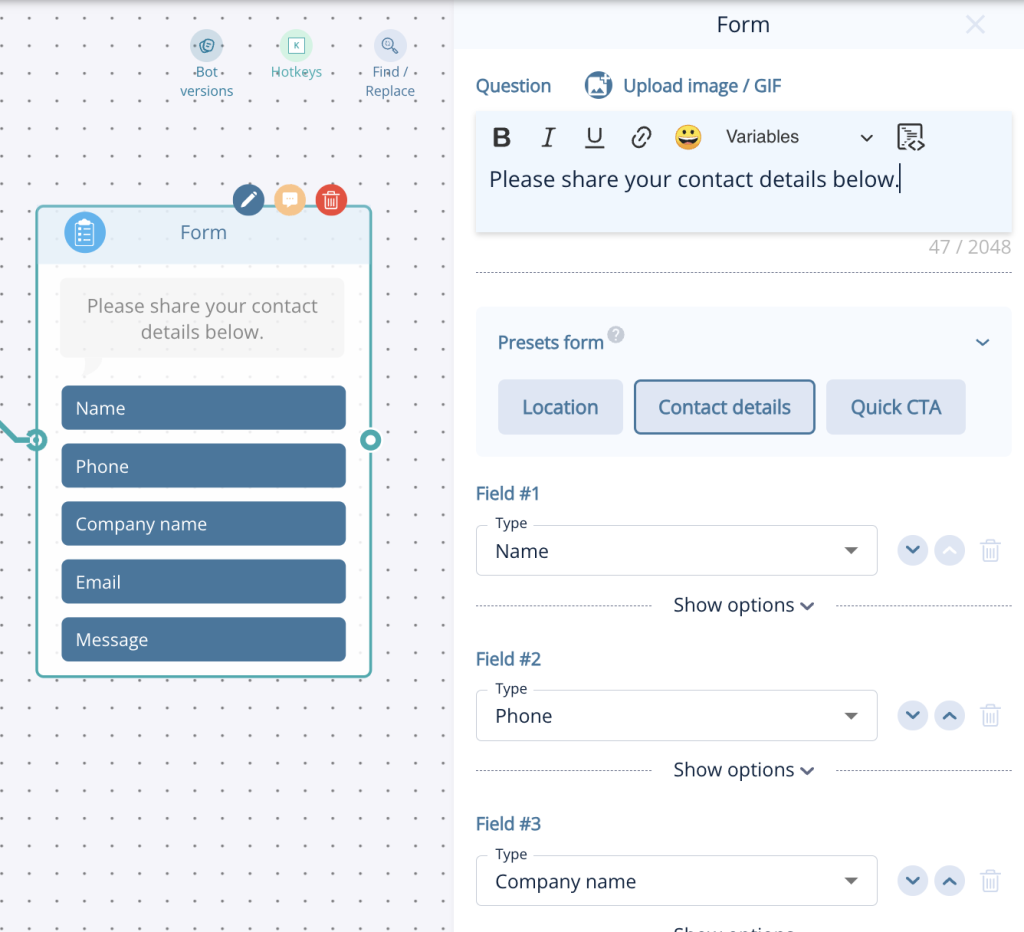
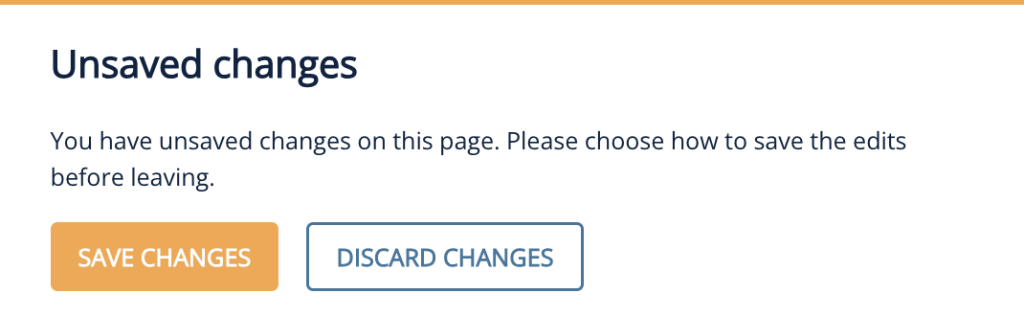
Leadoo bots don’t autosave, so remember to save manually by clicking Save at the top of the page. Exiting without saving will trigger a reminder pop-up.
For further settings and embedding instructions, check out Bot Settings, Bot Styles and Embedding Bots.
Using the dropdown node is a great way to offer your visitors a wide selection of options to choose from in a very user friendly way. This node is great for when the single choice option is getting a little cluttered, generally we would recommend for options of 6 or more.
Let’s start by building the dropdown list, which you can either do directly in the bot builder or in the general bot settings area.
General Bot Settings
Under the Conversion Kit menu you’ll find general bot settings and dropdowns is the first option. From here you can manually add your dropdown list, in the example below I’ve chosen a country list, or if you already have a list you can upload it using the quick import button. To make sure you’ve got your list set up properly, you can use the sample file to get started!
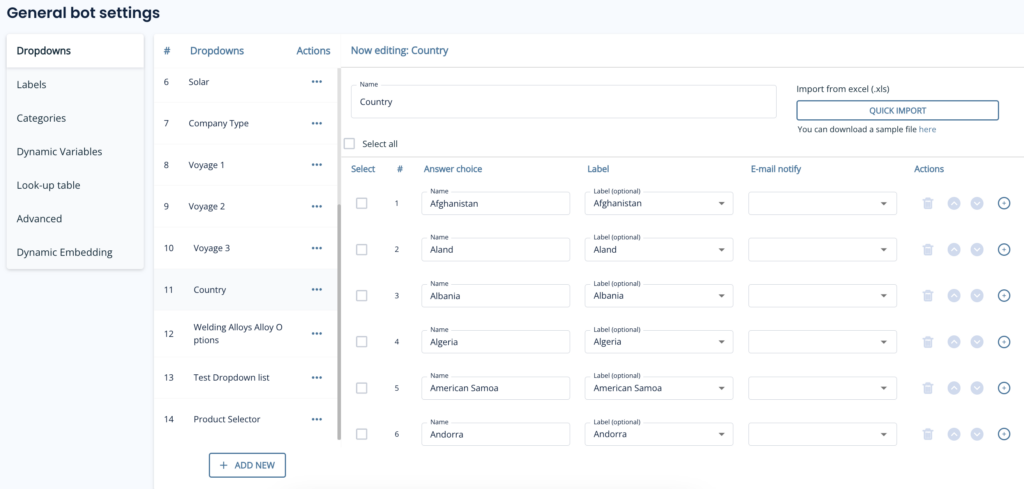
You’ll notice a few headers here, so let’s explain those:
If you prefer to build your dropdowns on the fly then that’s great! Simply add the dropdown node to the canvas and instead of selecting a dropdown list, click ‘create new’.
From here you’ll give your dropdown a name and then add the options one by one and add any relevant labels.

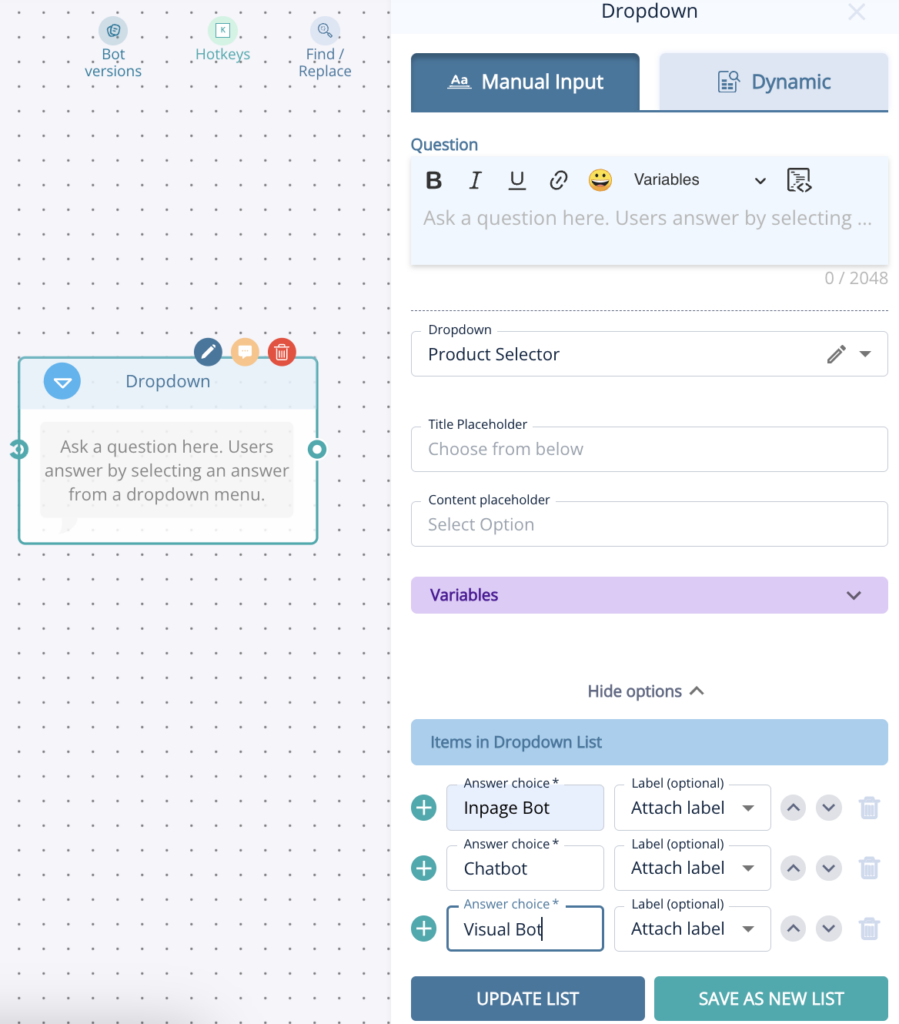
Don’t forget to click either update list or save as new list when adding items this way!
Now it’s time to think about when to use the dropdown option. First of all you can either have it as a standalone node or as part of the form node.
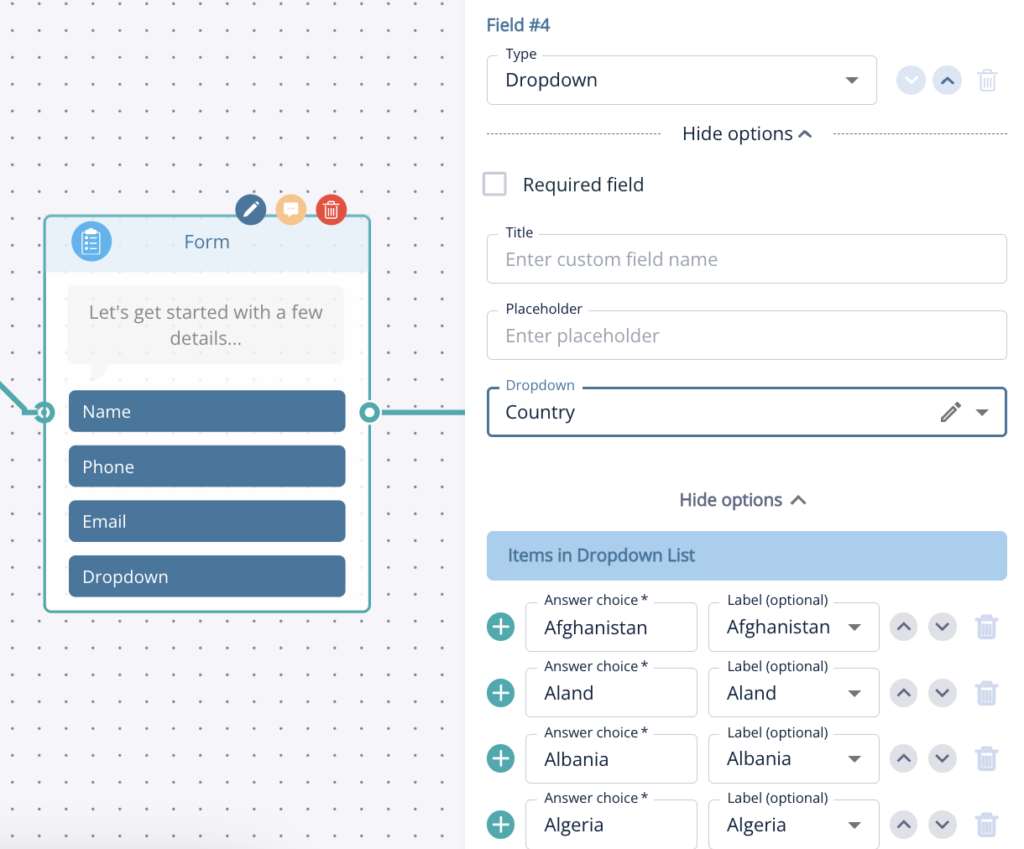
We would suggest using it as a separate node if you’d like to create a more conversational lead capture journey but adding it to the form is always good, just keep in mind that too many questions at once can be off putting!
Enable dynamic suggestions by toggling them on in the AI node. Once activated, the AI will present them after each response. There’s an additional prompt field where you can guide the AI on how to handle these dynamic suggestions.
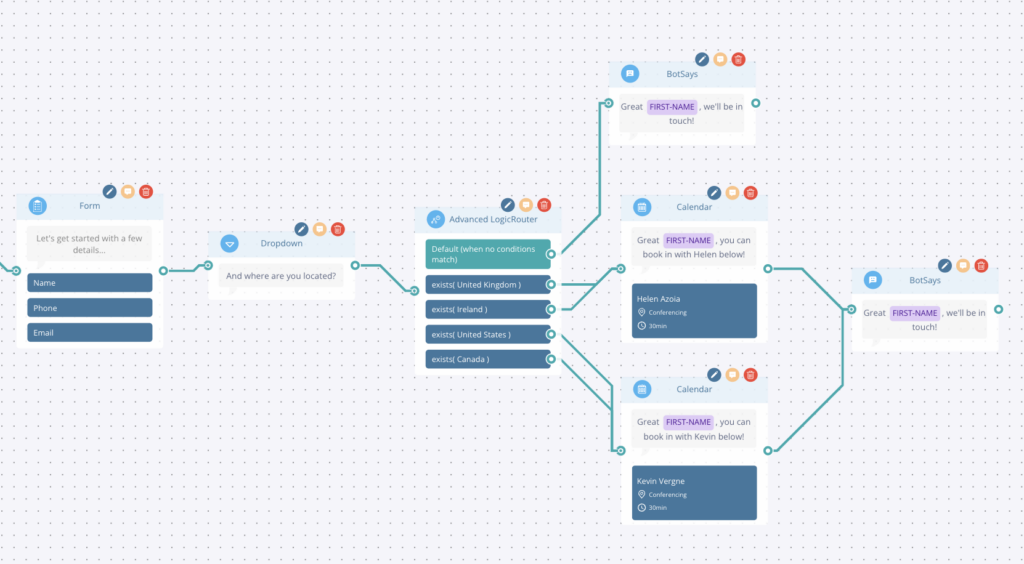
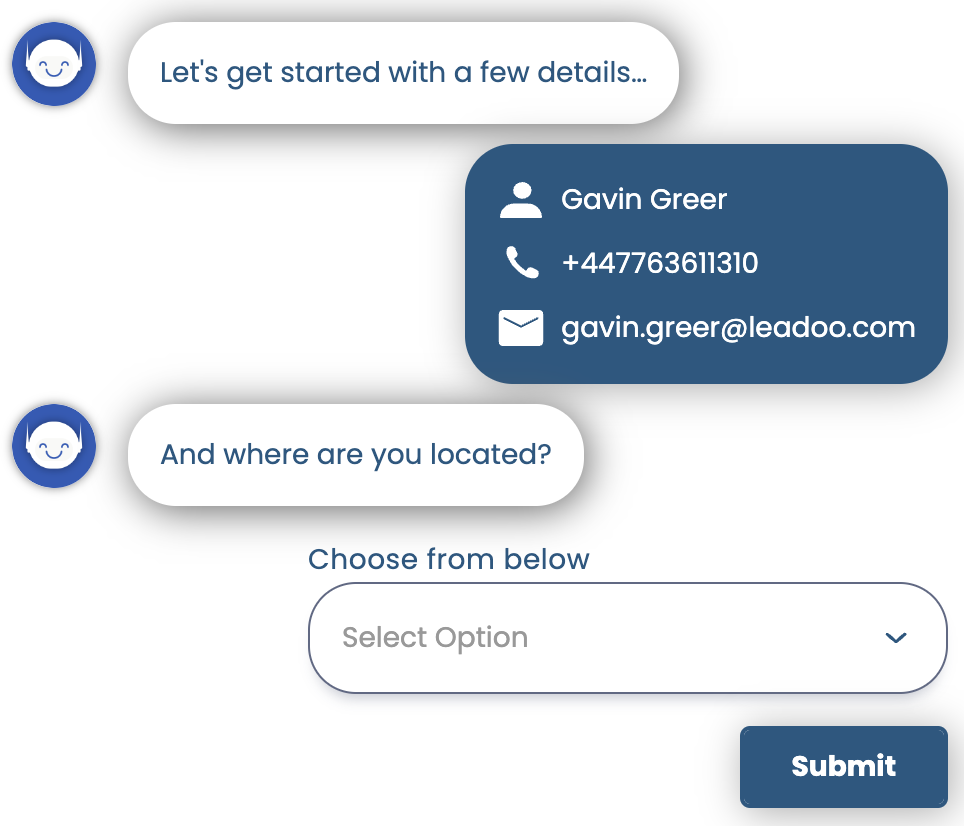
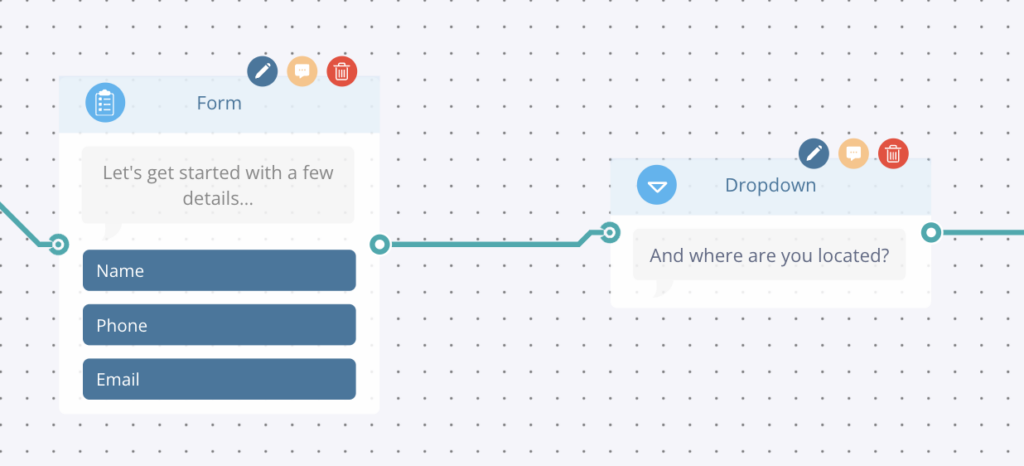
In the example above, we’ve created a conversational pathway to gather some contact details and the visitors location, which we will then use to generate calendar booking for the relevant Business Development Representative.
This is a simple and effective way to use a dropdown list and labels to create a personalised flow which helps filter leads to your team.
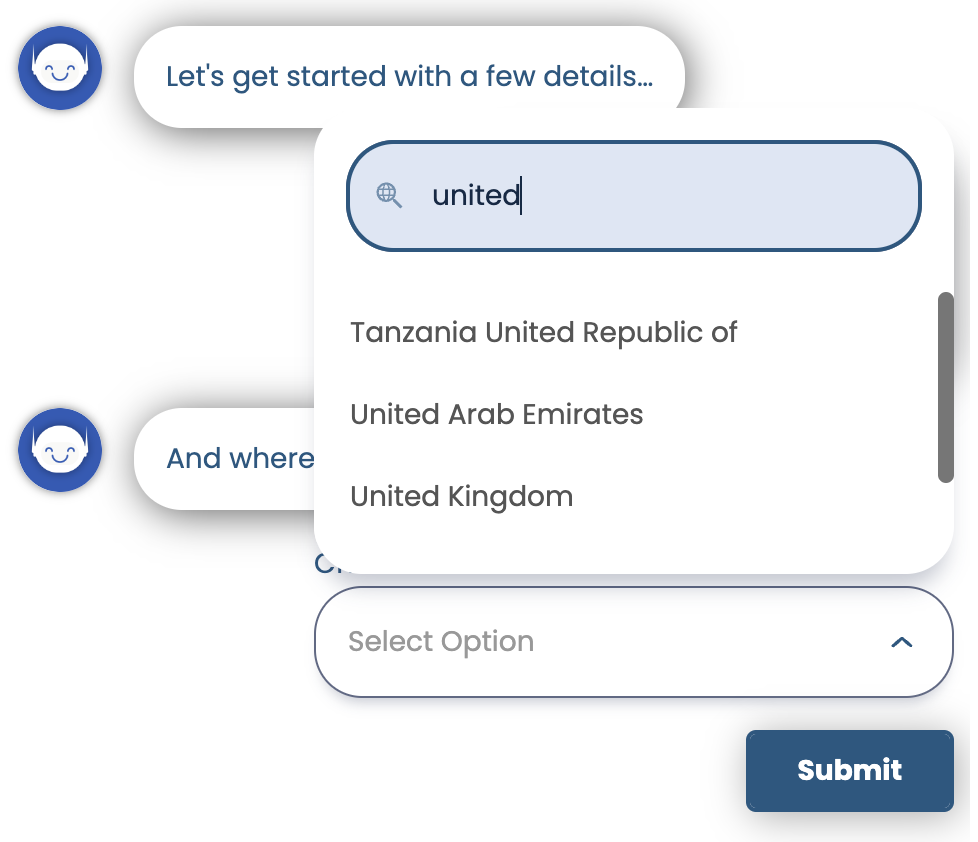
As you can see we ask “And where are you located” as a dropdown, once they answer this it goes into an advanced logic router. This router is checking which label has been applied based on the country of residence that the visitor selected and from there it will send them to a calendar booking with the BDR for that region!
Hope you found this useful, why not get stuck in and try it yourself! Don’t forget if you need any advice or help just reach out to your Account Manager.
Here’s how you can edit the new style settings and what you can edit!
Navigate to the bot whose style you want to change. Click either “edit” or “actions” next to the bot, and then select “settings.” After that, go to the “Style” section.
Under style settings, you can choose an existing style or modify the current one. If you modify the current style, you can either update the changes or save it as a new style. The new style will appear in the dropdown menu, and you can apply it.
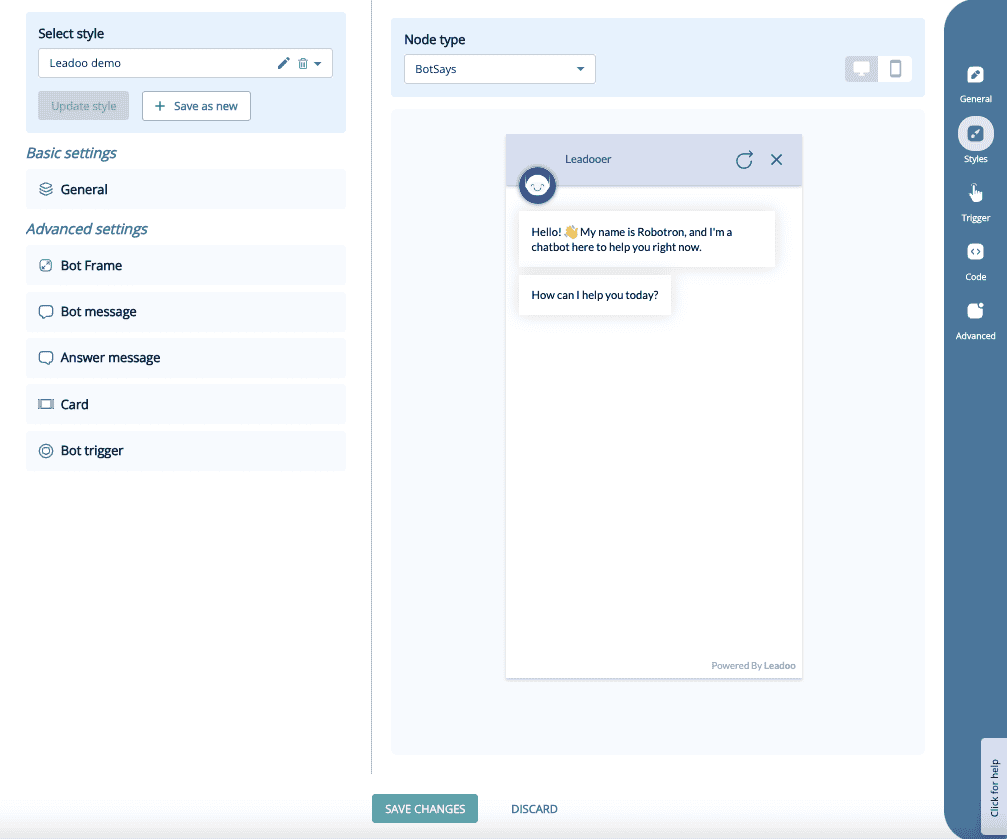
You can compare the changes node by node and preview them on mobile or desktop.
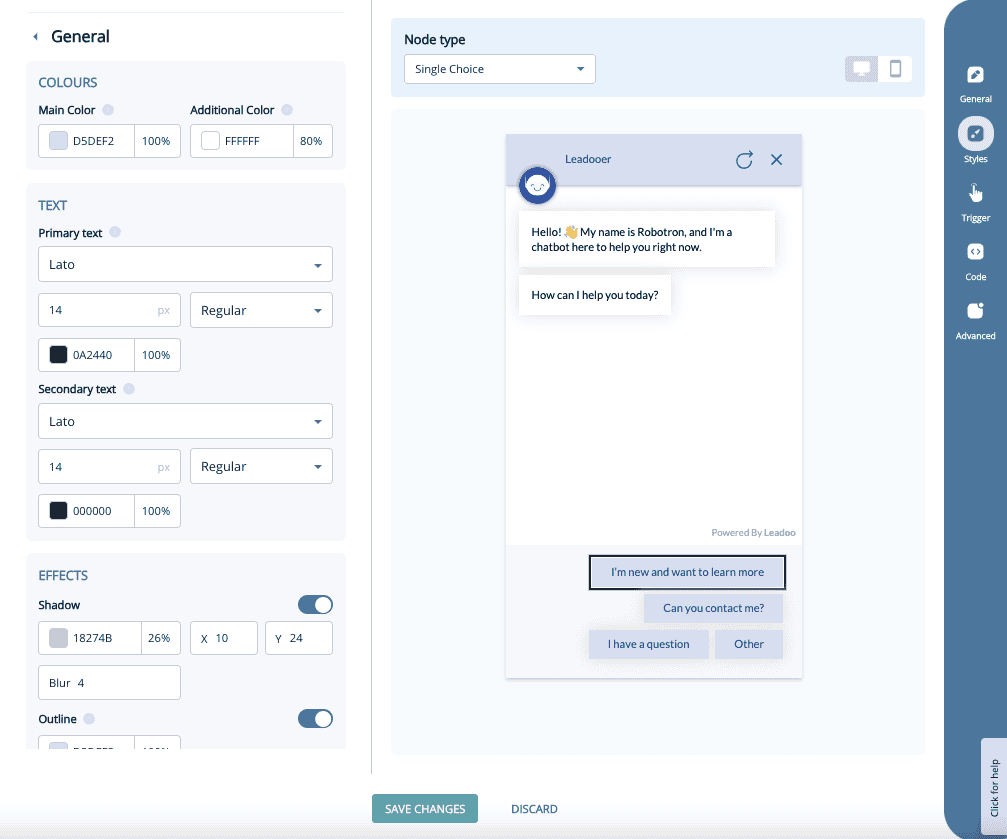
Basic Settings:
Under “Basic settings,” you’ll find the bot’s general style options, such as main colors, fonts, and font sizes. Most changes can be made under the “General” section.
Under Advanced settings, you’ll find more detailed options. These allow you to fine-tune specific elements not covered in the general settings.
The Advanced settings are divided into five different categories:
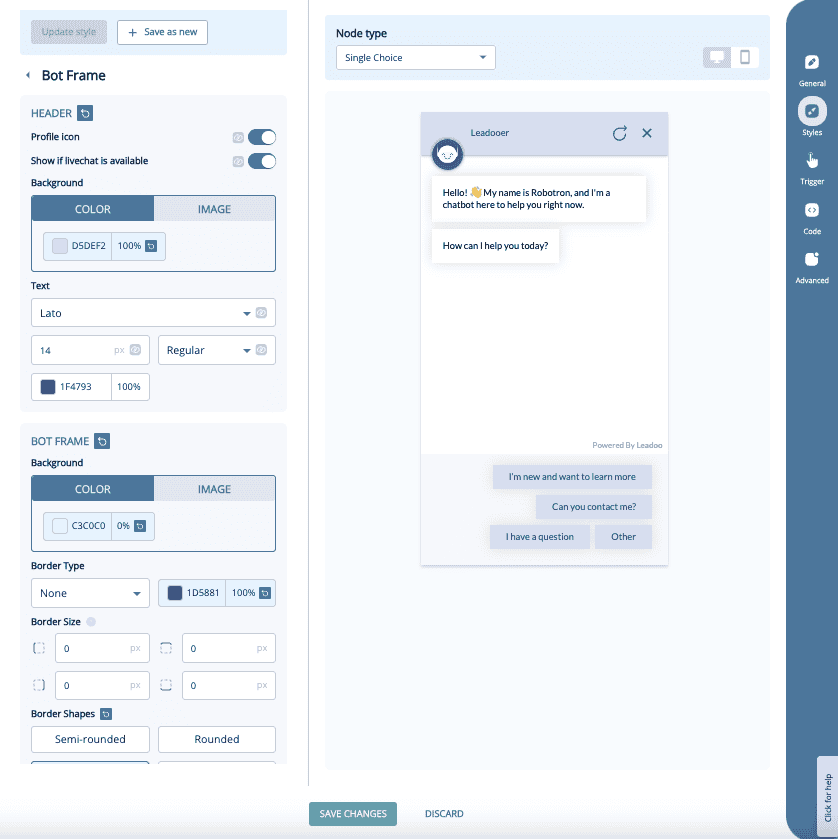
Bot Frame:
You can manage the background of the bot, border shapes and with chatbot the header area.
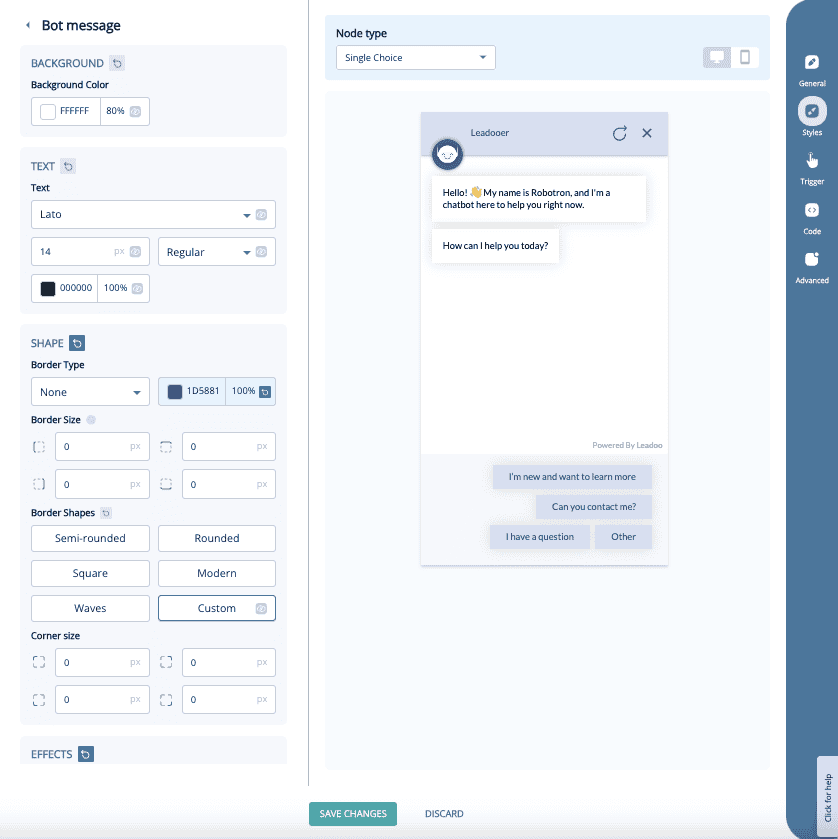
Bot Message:
With this you can manage the message that the bot sends to the website visitor. It includes font, font size, font color, shadow colors and button shapes.
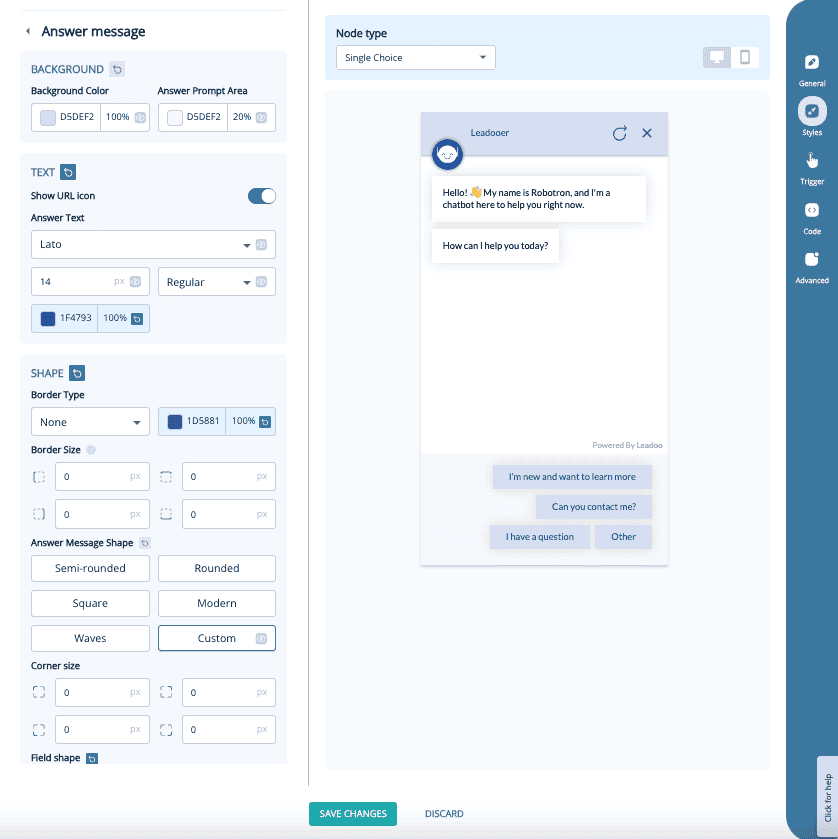
Answer Message:
Similar to the bot message but this is for the buttons that the website visitors click on during the bot discussion.
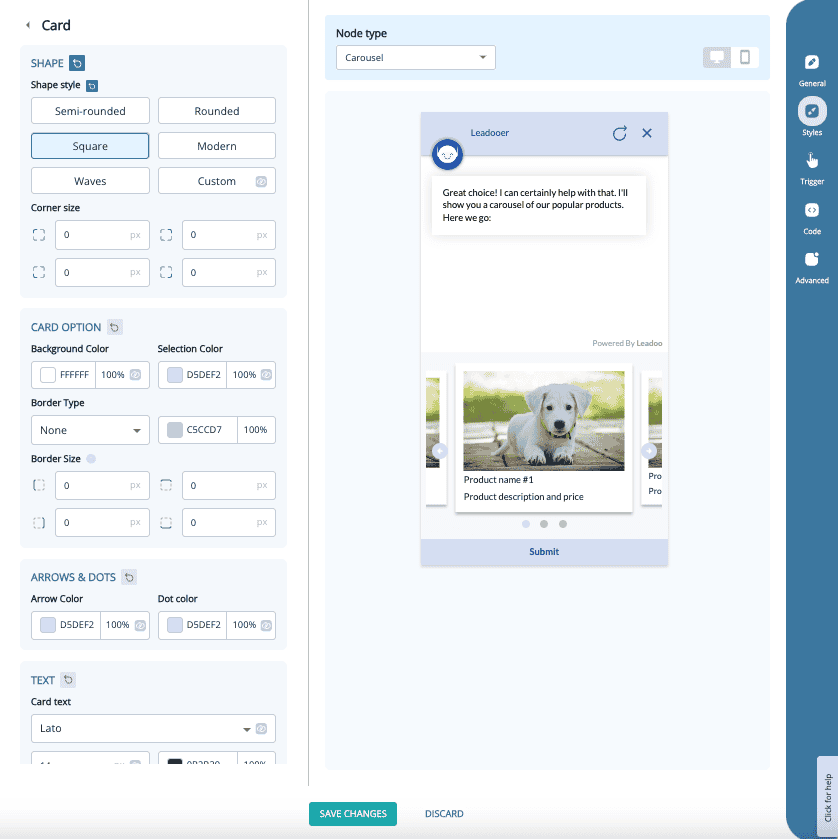
Card:
Only relevant If you’re using the Carousel node. You can edit the card shapes, fonts, font colors and other visual effects.
Bot Trigger:
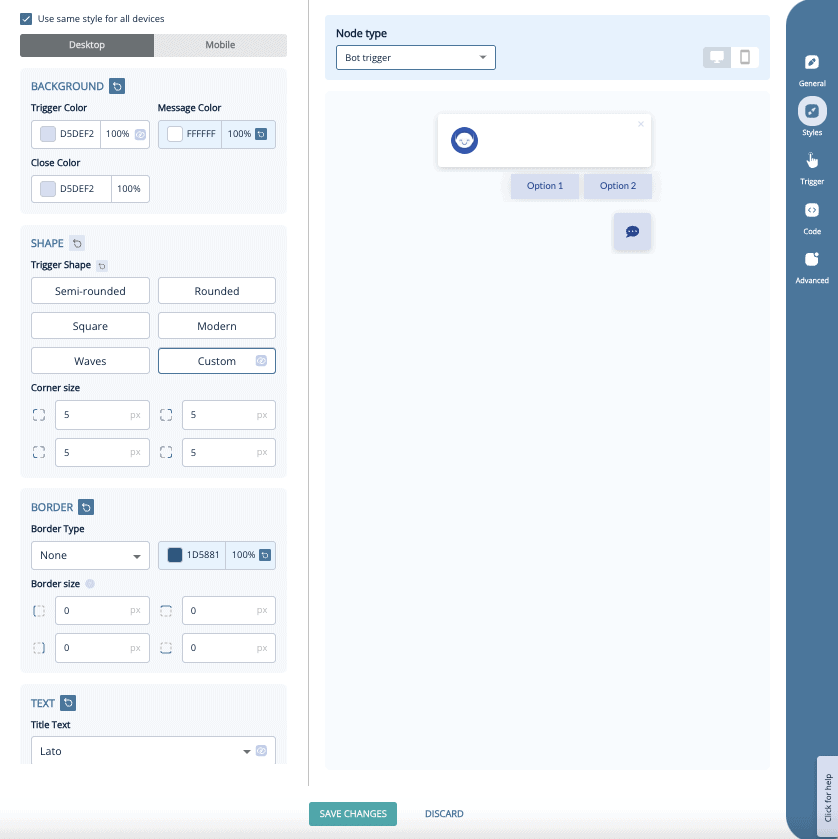
If you have any issues with your style settings you can contact your Leadoo contact person or [email protected]
The Lookup tool is one of Leadoo AI’s advanced bot-building features, allowing you to create more dynamic and interactive conversations in your Inpage, Chat or Visual bot.
By using the Lookup tool, you can integrate logic into your bot conversations to pull results from a table stored in your account. This can be useful for suggesting products, providing articles, offering downloadable content, or displaying course dates.
Note: If you don’t see the Lookup options in your platform, contact your Customer Success Manager to activate them.
Read on for two examples of how to use the Lookup tool in either a Chatbot or Inpage bot.
In this example, we have a selection of eBooks localised for different markets. For instance, a visitor on the Australian page will receive the Australia eBook, while a visitor on the German page will receive the German eBook, and so on.
We aim to use just one bot across all pages, making it easier to implement, build, and update.
First, create a table with column headers and save it as a CSV file. The table should look like this:
So, not only can they prioritise customers who already have shown intent but also talk to them about relevant interests based on their activity.
| URL | Button text | Asset URL |
| United Kingdom | Download the eBook | https://www.leadoo.com/unitedkingdomebook.pdf |
| Germany | Download the eBook | https://www.leadoo.com/germanyebook.pdf |
| Spain | Download the eBook | https://www.leadoo.com/spainebook.pdf |
| France | Download the eBook | https://www.leadoo.com/franceebook.pdf |
Navigate to Conversion Kit in the left-hand menu, select General Bot Settings, and then choose Look-up Table, or visit this link: Look-up Table.
Click + Add New at the bottom of the screen. Name your table, then click Quick Import in the top-right corner to upload your CSV file.
Your table will now appear below. Note: Only the first 50 rows are visible for preview.
Next, we’ll add a simple SingleChoice node with country options as an example of how the Lookup node works. This will serve as a starting point for more complex implementations. (You can automate this step based on the webpage URL—more on that below.)
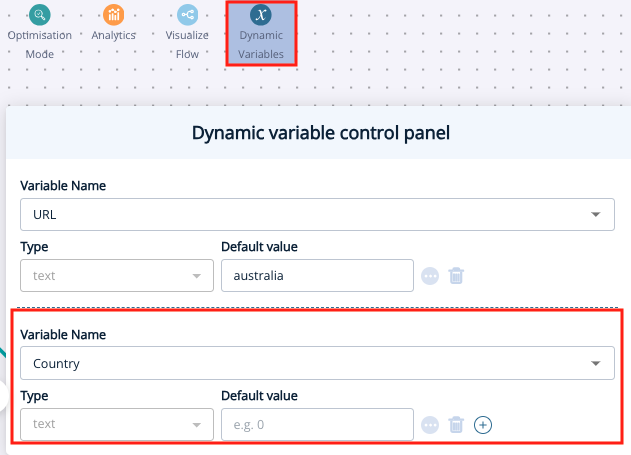
Open the Variables Panel and create a text variable called Country.
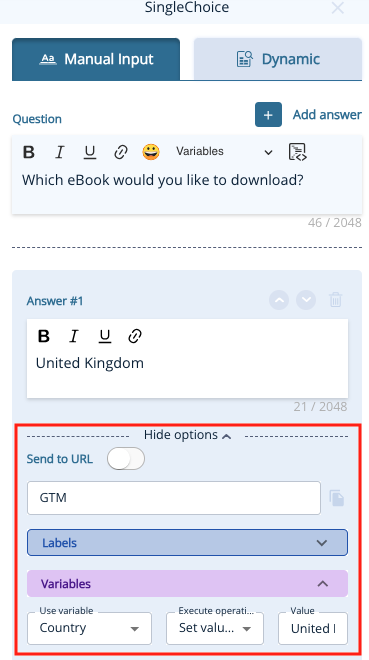
Add a SingleChoice node to your decision tree and apply your variable to each option.
Click Show Options > Variables, and select your variable from the dropdown.
Set the operation to Set Value to, and type the country name in the Value box.
When the visitor selects a country, the bot will set the value of the Country variable accordingly.
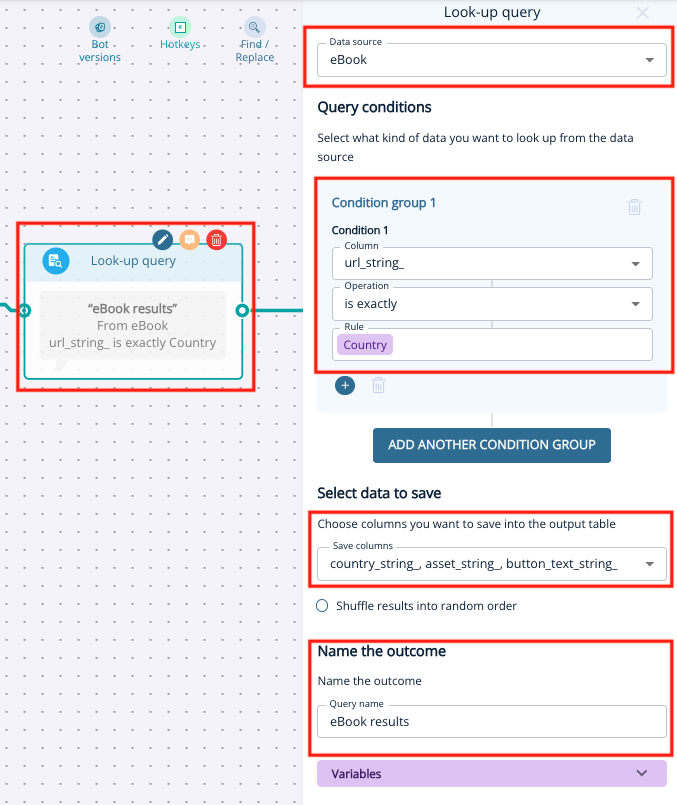
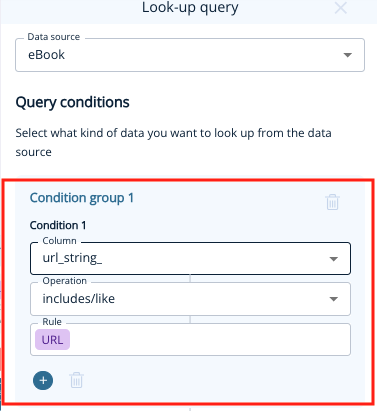
Next, add a Look-up Query node from the node menu.
Choose your table under Data Source, then configure the following:
Under Save Columns, choose Button Text and Asset URL. This is the information the bot will remember for later use.
Finally, give your query a name (e.g., “eBook Results”) for easy selection in the next step.
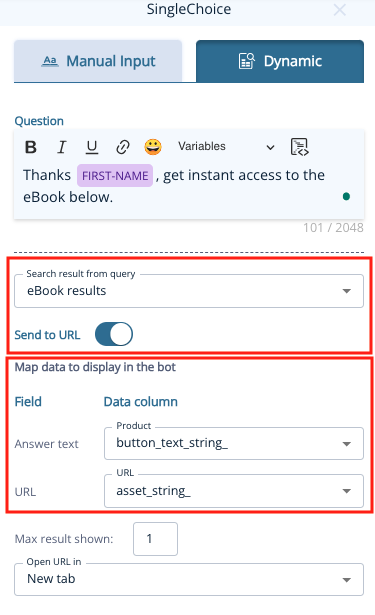
Now, add a SingleChoice node and click the Dynamic tab.
Enter your question as usual, then configure the dynamic content:
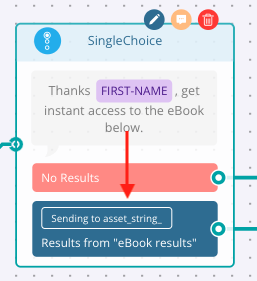
Create a node for a successful download and one to handle cases where the Lookup fails.
Tip: If the button text doesn’t appear correctly, save your bot, reopen the node, and select Asset URL again in the URL field.
Before adding your bot to a webpage, you can test it by adding a default value (e.g., “United Kingdom”) in the Dynamic Variables Panel.
If you have multiple assets across many pages, manually setting this up for each one isn’t scalable. You can automate this step by adding a variable that reads the webpage URL.
Note: For this automation to work, the visitor must have interacted with the bot (e.g., by selecting an option).
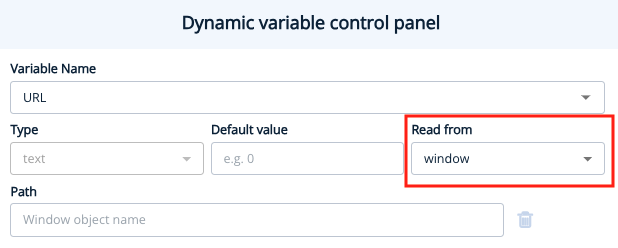
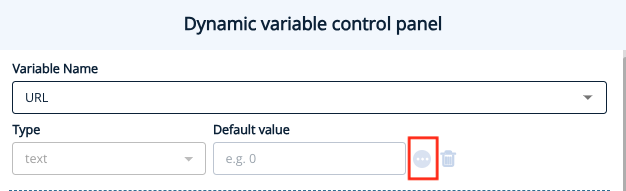
Change the operation to Includes/Like and select the URL variable under Rule.
⚠️ Testing the bot with the Read from Window/URL option active is not possible in preview mode, as it will look at the builder’s URL. To test within the platform, set a default value (e.g., “United Kingdom”), and temporarily remove the window object or RegEx.
In this example, we’ll help visitors find the date and location of their desired course more quickly, without them needing to search multiple pages.
Create a CSV file containing the relevant course data. It should look something like this:
| Course name | Location | Date | Course URL |
| Software Development Intensive | London | 12th May 2024 | https://www.learntocode.com/softwareintesive-london |
| Software Development Intensive | London | 15th June 2024 | https://www.learntocode.com/softwareintesive-london |
| Software Development Intensive | Edinburgh | 1st July 2024 | https://www.learntocode.com/softwareintesive-edinburgh |
| Software Development Intensive | Edinburgh | 1st January 2025 | https://www.learntocode.com/softwareintesive-edinburgh |
| Data Analysis | London | 15th May 2024 | https://www.learntocode.com/data-london |
| Data Analysis | London | 2nd June 2024 | https://www.learntocode.com/data-london |
| Data Analysis | Birmingham | 3rd September 2024 | https://www.learntocode.com/data-birmingham |
| Data Analysis | Liverpool | 3rd September 2024 | https://www.learntocode.com/data-liverpool |
| Data Analysis | Liverpool | 6th February 2025 | https://www.learntocode.com/data-liverpool |
Follow the same steps as outlined above to upload your table.
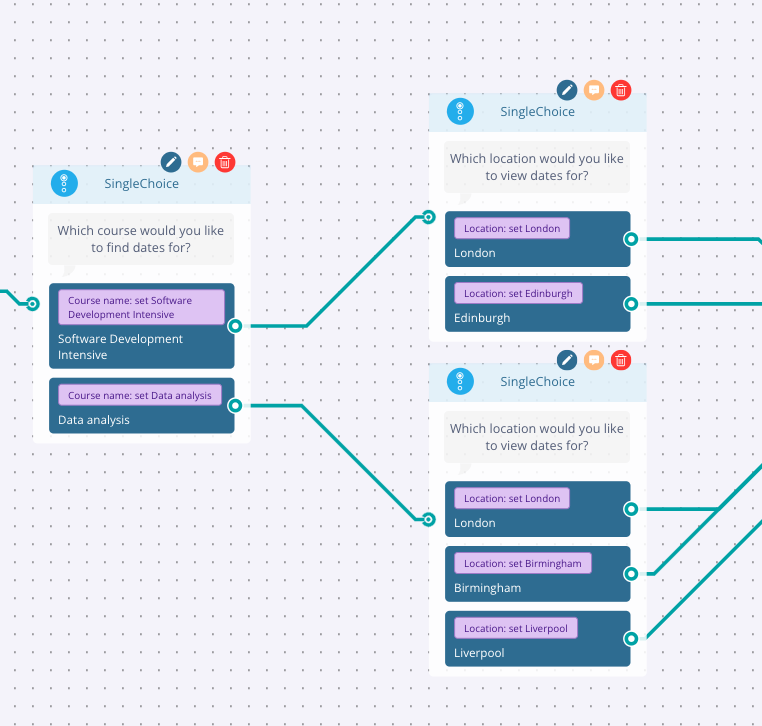
Now, we’ll gather two pieces of information from the visitor: the course name and the location. To simplify the build, add a Dynamic Variable for each option.
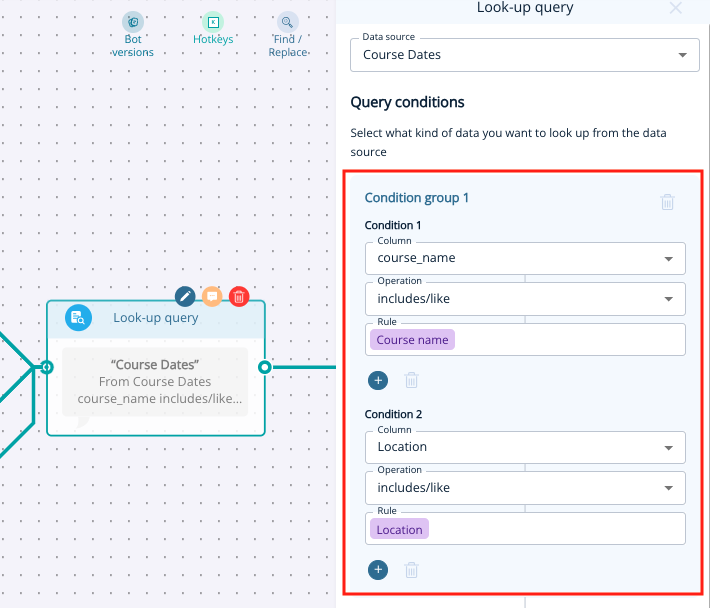
Add a Look-up Query node, selecting your course table as the data source. Set two conditions:
Save all columns and name the query (e.g., “Course Dates”).
Add a SingleChoice node with the following settings:
Also, enable an “Other” option, such as “Enquire About This Course,” to create a potential conversion.
Test the bot to ensure it displays the correct course dates and functions as expected.
To update your Lookup tables, first modify your original CSV file with the new information. Ensure that existing column titles remain unchanged, and if you need to add columns, insert them on the right.
Manually update your tables in General Bot Settings > Look-up Table, by selecting the table and clicking Update Lookup to upload the new CSV file. Your table will update automatically (only the first 50 rows will be visible).

For further assistance with the Lookup tool, contact your Customer Success Manager or our support team at [email protected].

