KNOWLEDGE
Case StudiesBlogsEventsSupport & Starting
Support Articles & HubSupport Videos (Youtube)Try Leadoo Free (Leadoo Lite)Partners & Careers
PartnershipsCareersSecurity & Privacy
Security at Leadoo AIGeneral Terms & ConditionsData & GDPRKNOWLEDGE
Case StudiesBlogsEventsSupport & Starting
Support Articles & HubSupport Videos (Youtube)Try Leadoo Free (Leadoo Lite)Partners & Careers
PartnershipsCareersSecurity & Privacy
Security at Leadoo AIGeneral Terms & ConditionsData & GDPRLabels have many uses however they are most commonly used to aid lead notifications, engagement analysis and integrations as you can easily set up rules based on whether a label has been triggered or not.
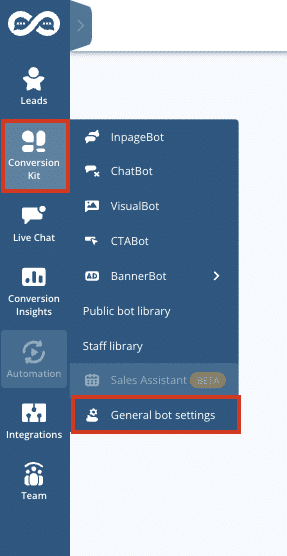
1. Hover your mouse over Conversion Kit and select General Bot settings.
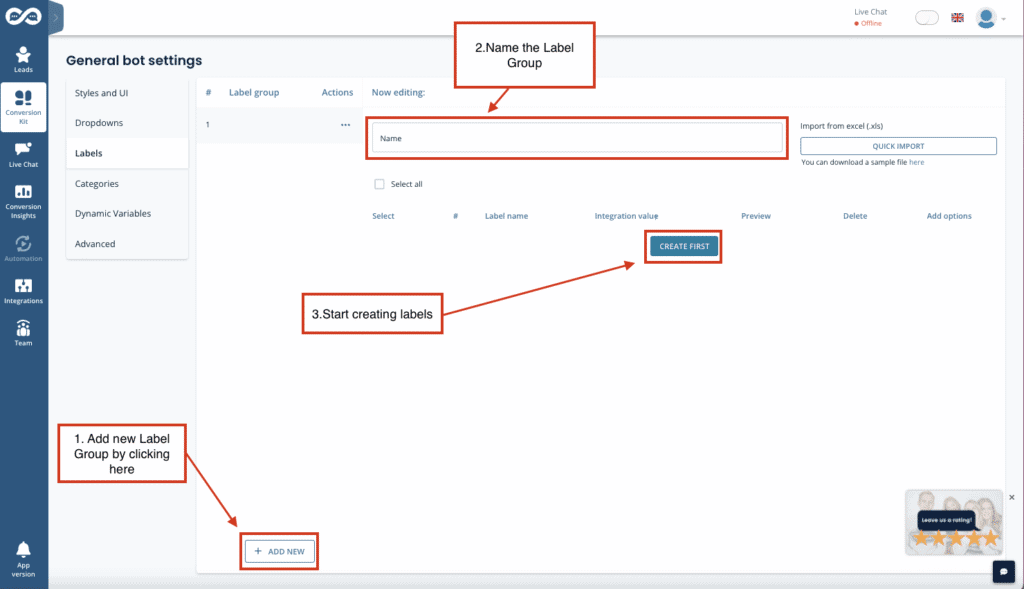
2. Click Labels from the left-hand side menu and the ”+Add New”
Then you can start creating Labels.
*You don’t need to add anything to the Integration value if the labels aren’t used for integration. If you are using labels for integration purposes, please reach out to your Customer Success Manager for help.
It’s best practice to name your label group according to what the labels are used for. e.g. Persona, Service, Department etc.
For example: If labels determine what type of lead has been left to the bot -> Label group name would be: Lead type. And, the labels would be ie. Sales, Recruitment, Customer service and Guide download.

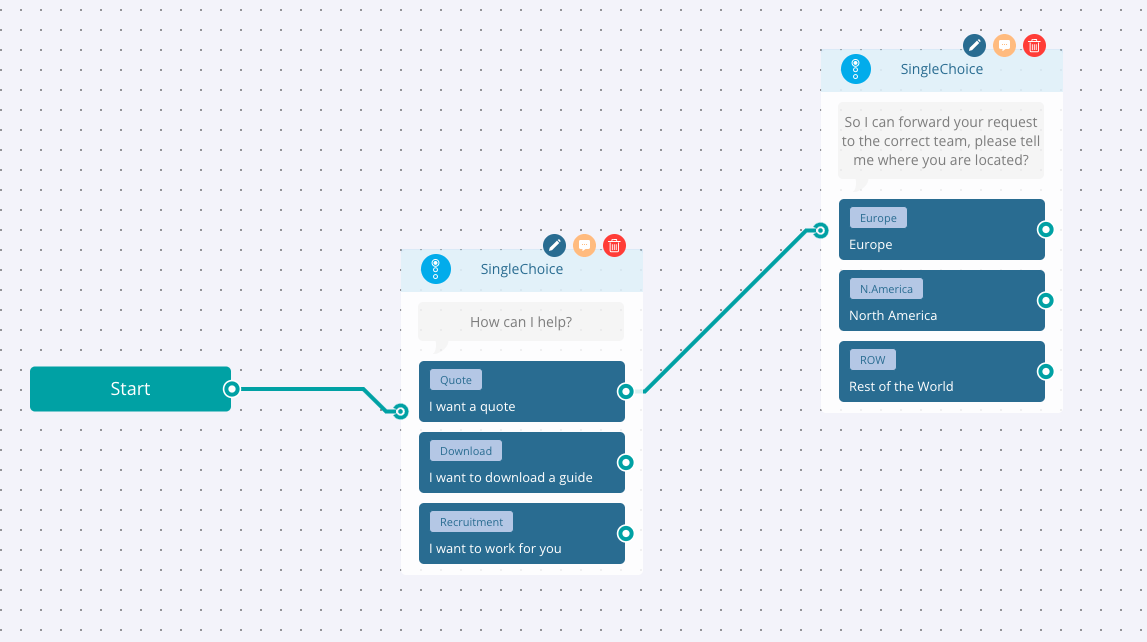
In this example, we want to add labels to understand the purpose of visitors’ enquiries and the region they are based so we can automatically send a lead notification to the right sales team.
Now, when you are setting up lead notifications you simply select the coordinating label for example, [email protected] will only get leads if the ‘Europe’ label is triggered. Note: Labels are always an OR logic.
To send leads where a certain label has been triggered, open settings – general and scroll down to the lead notification section. Next to the email address you can select what leads that email address should receive based on the labels triggered.

You can see how often a label has been triggered across your account via bot insights. You can use this information to understand and optimise for better engagement and leads.
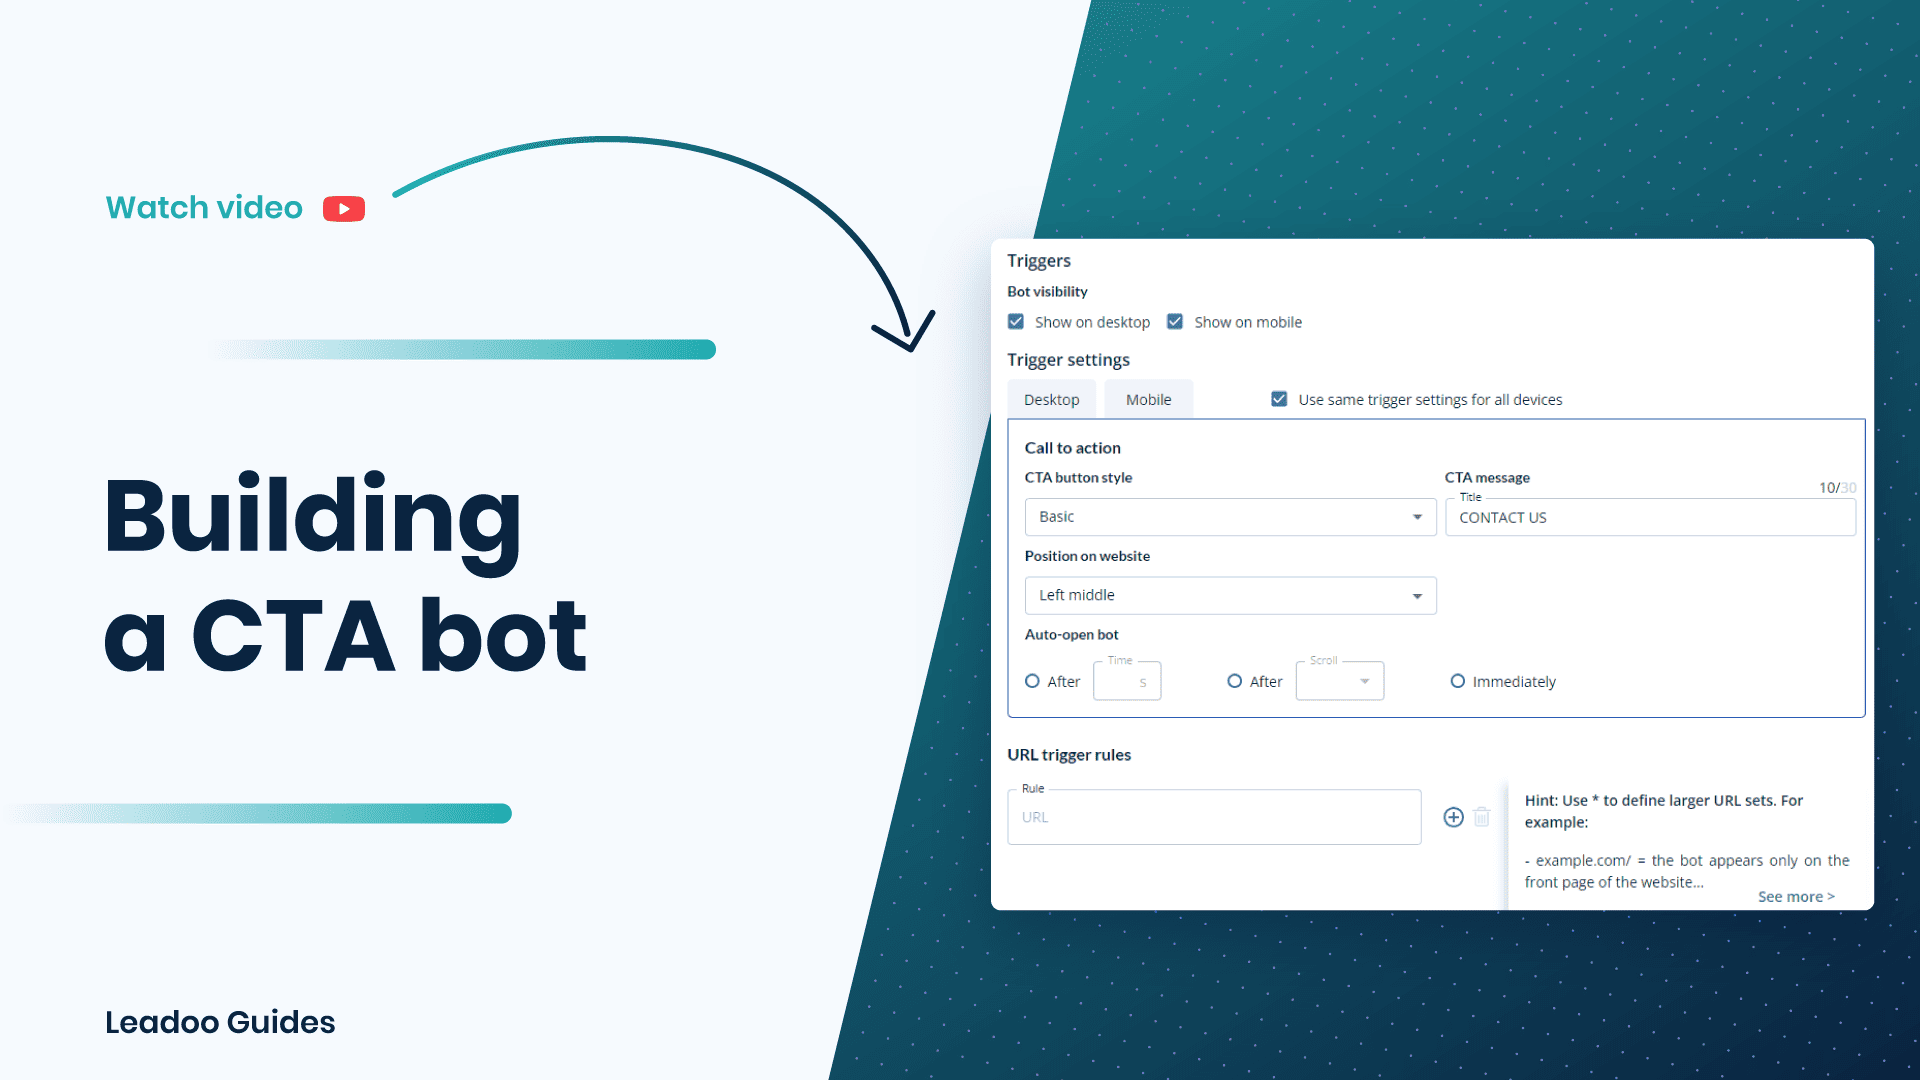
Watch the video below for a guided walkthrough from Gavin.
Contact your Customer Success Manager at Leadoo at [email protected].
Advanced logic router uses “if, then” -type of logic to define what a bot should do next based on what has happened earlier. Here are some common use case examples to help you understand when and how you could make use of the node in your bots.
When wondering which inputs and operations to use as the basis of your logical conditioning, start by thinking what you want to make sure has happened before this point. Maybe one of these fits your case?
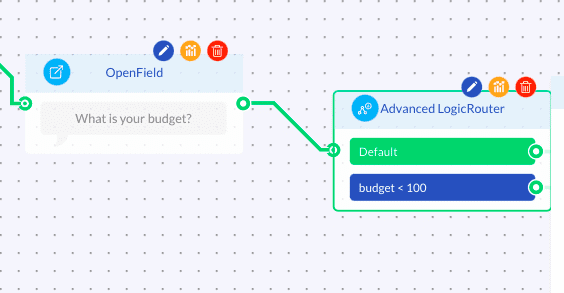
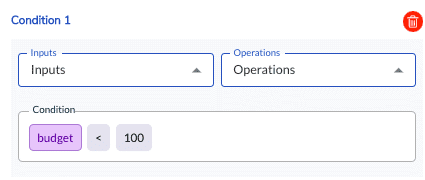
Example case: If the user’s budget is less than 1000 euros, advise them to directly contact the resellers instead.
Input: Dynamic variable with type “number”.
Input collection method: Attach desired dynamic variables to any node where the user can input an answer (e.g. SingleChoice, MultiChoice or OpenField). If needed, use a Calculator node to calculate the total price from user inputs and use that new output variable as the input.
Operation: > (greater than), < (less than), >= (greater than or equal to), <= (less than or equal to) or == (equal to)
Example condition: budget < 1000
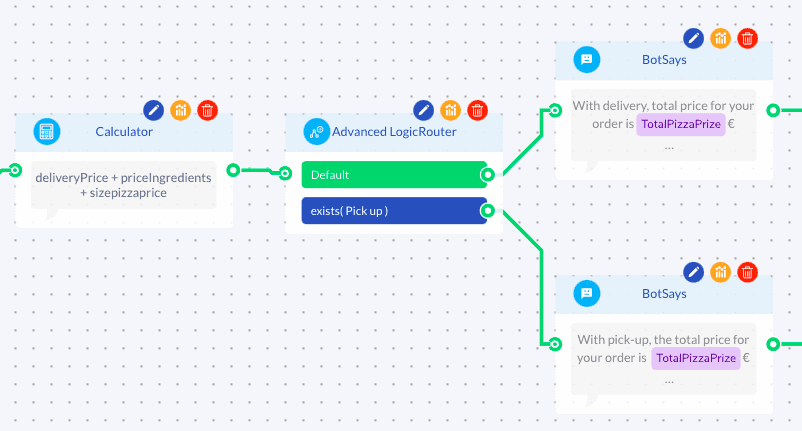
Example case: If user wants to pick-up their pizza order from the restaurant, route them to a conversation path that doesn’t mention any price for the delivery.
Input: Label
Input collection method: Attach a label into desired answer choice(s) in SingleChoice or MultiChoice node. (Show options -> Labels -> Label group (Select/Create new) -> Label (Select/Create new))
Operation: exists(x)
Example condition: exists(pick-up)
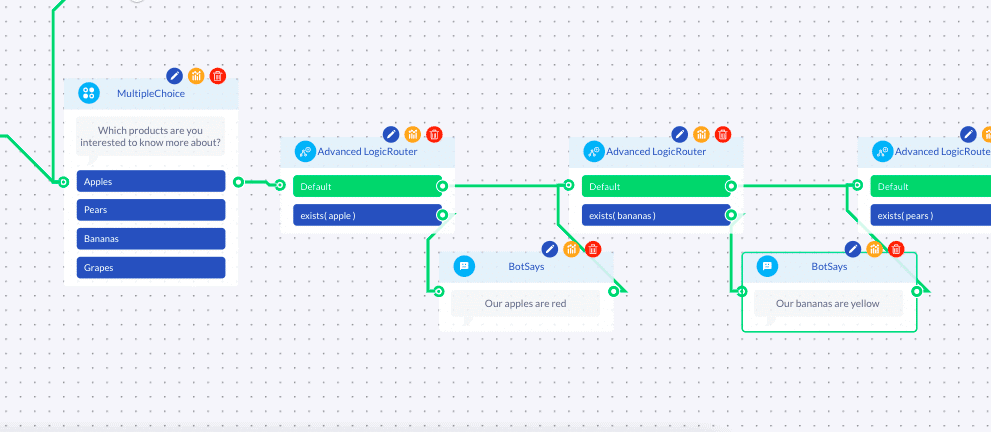
Repeating the exist(label) conditioning for each of the answer choices in a MultipleChoice node allows you to check which conditions from the multiselection question are fulfilled and, if you will, show the user a selection-specific messages accordingly.
Example case: If user selected product A, B and C, show product description for each selection before moving forward.
Example case:
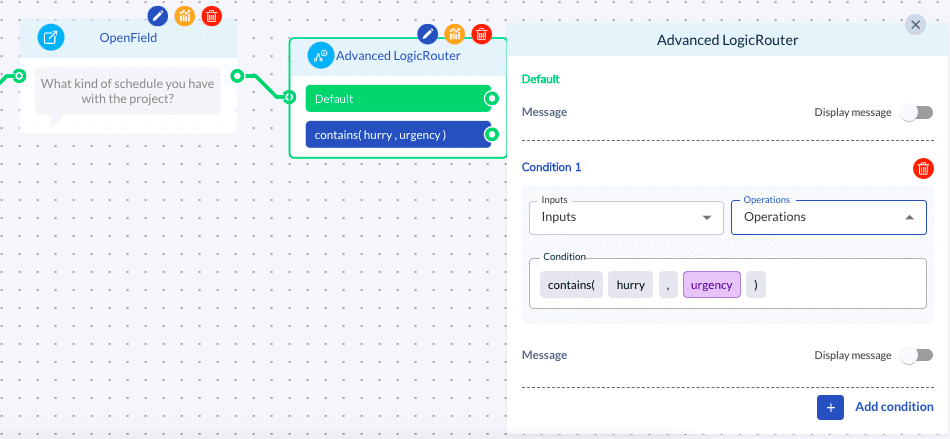
A) If the user mentioned in an OpenField answer that they are in a hurry with their matter, attach a special notion about this into the contact details of the lead.
B) If the user said that his/her country is Finland, advise them to be directly in contact with the local Finnish office.
Input:
A) Dynamic variable with type “text”
B) Lead data (e.g. Name, Email, Phone, Company, Location)
Input collection method:
A) Attach a dynamic variable into the desired open-ended question asked with OpenField. (Variables -> Select/Create new -> Read input)
B) Use a contact detail collection node (e.g. Name, Email, Phone, Company, Location)
Operation: contains (x,y)
*where x = text/keyword you want to check, y = variable attached to the question
Example condition:
A) consists (hurry, urgency)
*where hurry is a keyword and urgency is a dynamic variable
B) consists (finland, Location)

Leadoo Sales Assistant is your own relentless personal assistant who saves you time and helps close more deals. You can have a free Leadoo Sales Assistant that is not linked to your Leadoo paid subscription. You can register for free here: Register free
If you want it to be part of your existing subscription contact your own Customer Success Manager.
After signing up start by syncing your calendar to Leadoo. You can find instructions to it here: How to sync your calendar with Leadoo.
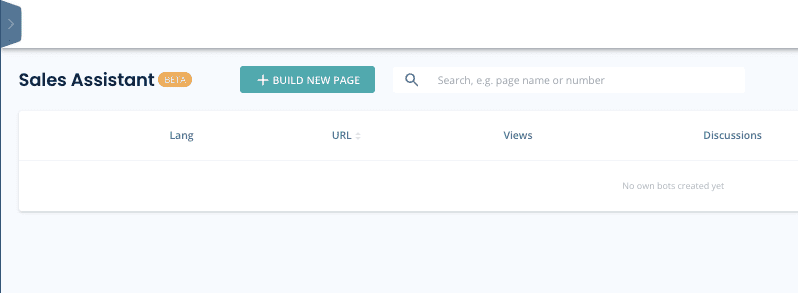
Once you’ve synced your calendar you can move on to creating your Sales Assistant. Move to Sales Assistant page through left hand side navigation and click +BUILD NEW PAGE.
After that fill in the basic information and style your theme settings.
Once you’ve got the looks right click save changes at the bottom of the page. Then you can start building your Sales Assistant bot.
At the bottom of the page you can ”EDIT BOT”. From there you’ll move to the bot builder.
Useful articles:

After you’re done building your bot, test that everything works with your Sales Assistant in a live environment.
If you’ve used Booking Node on your bot, make sure to test your Calendar sync by booking a test meeting to yourself.
You can find the link to your Sales Assistant from the top right corner of the page.


Contact your Customer Success Manager at Leadoo at [email protected]