KNOWLEDGE
Case StudiesBlogsEventsSupport & Starting
Support Articles & HubSupport Videos (Youtube)Try Leadoo Free (Leadoo Lite)Partners & Careers
PartnershipsCareersSecurity & Privacy
Security at Leadoo AIGeneral Terms & ConditionsData & GDPRKNOWLEDGE
Case StudiesBlogsEventsSupport & Starting
Support Articles & HubSupport Videos (Youtube)Try Leadoo Free (Leadoo Lite)Partners & Careers
PartnershipsCareersSecurity & Privacy
Security at Leadoo AIGeneral Terms & ConditionsData & GDPRYou should always add Leadoo’s dynamic script to your website’s <head> tag.
The dynamic script enables the use of Leadoo’s conversion tools and the possibility to enable tracking. You can find your account’s dynamic script at the bottom of this page after logging in to Leadoo.
The dynamic script should fire on each page load regardless of the end-user’s cookie consent.
Additional information can be found here.
Next you should confirm that Leadoo’s tracking settings are set up correctly. Tracking settings can be found on the same page as your dynamic script. By default Leadoo settings should be:
Referrer tracking: start tracking after analytics enabled
User tracking: never
Company tracking: same as user tracking
Remember to click “save” at the bottom of this screen when changing any settings.
Leadoo won’t track any users by default, only after cookie consent has been given by the end-user.
There are two options to enable Leadoo’s tracking:
Option 1: Add a custom consent handling script to your website <head> tag, under Leadoo’s dynamic script. Those scripts check if the cookie consent has been given by the user on each page load to determine if Leadoo’s tracking should be force-enabled. So it’s important that this script loads on each page load. You can find ready made custom consent handling scripts from here: Leadoo – Custom consent handling scripts.
or
Option 2: Add the following script directly to CMP / Google Tag Manager. This code should fire only after a user accepts analytics cookies to force-enable tracking. If cookies are disabled, this script should be removed:
<script>
if (!window.ldanalytics) window.ldanalytics = [];
window.ldanalytics.push(function(a) {
a.toggleTracking(true, false);
});
</script>
There’s a useful video below and you can read more about how Leadoo tracking works here.
Leadoo AI collects information about visiting companies based on the public IP address of the company.
So, the visiting person’s IP address is identified and then checked if it belongs to a company. If it does, the company is shown in the company listing. If it doesn’t, the information isn’t displayed. In either case, the IP address isn’t stored anywhere.
We have a partner company called Clearbit. So, the IP address information goes there and company information comes back from their database. Visitor profiles (if in use) are then linked to these companies either via IP or according to company information given in the bot (i.e., manually filled in the company name into the bot). If there are additional questions / need for clarification, I am happy to answer.
In short, from public sources. Clearbit probably won’t tell where they get their data but almost all such actors (for example, Leadfeeder in Finland, Lead Forensics in UK) make use of several different sources; they have people who browse the web, they use public data sources, etc. However, it’s important to note that these are not personal data, but Clearbit, Leadfeeder etc. link the company’s IP space to the company’s name and its public information. For example, if Nokia Oy owns the IP space 109.68.1.1-109.68.1.45, then whenever a visitor comes from those addresses, it is recognized that the visitor works at Nokia.
Another important thing is, from Clearbit’s point of view they never know whose sites the visitor has even visited and from your site there never goes a call to Clearbit. All traffic to them goes through Leadoo. So, they don’t know whether the person working at Nokia has visited hs.fi, leadoo.com, or etuovi.fi. They don’t even know about the existence of any of these or any information about the person.
Personal data comes from the information people leave in the bot. Before that, we can “identify” the devices that have been used to visit the sites. These people are “unknown visitors” until they leave their contact details through the bot. Identification is done based on the etag left by the device and browser (works the same way as a cookie, but different technology). So how it works: A person comes to the site -> tracking is on if cookies are accepted -> x device is identified. -> person leaves the site -> an “unknown visitor” profile is created -> The person returns to the site the next day with the same device -> the same etag is recognized, meaning the person visiting with the same device is recognized -> the information from the previous day and new information are combined under the same profile -> person leaves their own information in the bot -> “Unknown visitor” becomes an identified person based on lead information.
There are 4 different tracking options you can set up on Leadoo AI’s control panel.
If you want to only track companies, you would choose “Never track” and in Company tracking you’d choose “Always track”.
If you want to add Leadoo tracking to your cookie acceptance but your CMP isn’t TCFv2 compliant you have to use Custom Consent Handling.
So how this should work is that Leadoo AI loads two types of scripts in different ways depending on whether the user accepts statistical cookies or not. So if the user does not accept statistics, the bots will load, but the analytics script will not load. As a result of this loading, cookies etc load correctly automatically. Below is how to make this work like this:
Leadoo AI’s bots can be loaded directly onto the website. However, Leadoo AI’s tracking can be put behind cookie acceptance. This happens in the following way:
From Leadoo AI’s tracking settings, the option “never” is activated <- tracking doesn’t automatically start. By default, Leadoo’s settings are ‘always track’, but it can be changed from Leadoo’s control panel. At the same time, the following script is added to your CMP that overrides the “never” rule after cookie acceptance and Leadoo’s tracking starts to work:
if (!window.ldanalytics) window.ldanalytics = [];
window.ldanalytics.push(function(a) {
a.toggleTracking(true, false);
});
More information here: http://docs.leadoo.io/docs/analytics-tracking#custom-consent-handling
And here’s which category each cookie falls into: https://leadoo.com/help/does-leadoo-use-cookies/. But as mentioned, with the way above, they load correctly depending on cookie acceptance.
Implementing Leadoo is extremely easy. Simply add the Leadoo bot script to your website header or the pages of your choice. You can also implement the chatbots to your website by using Google Tag Manager.
We recommend placing the script within the <head> tags of you websites global header. This allows the triggering of the chat to be managed fully through your Leadoo platform and you never have to add any other Chat / CTA scripts. <head> tags can usually be found from the site’s “Theme editor” (within header.php file).
Alternatively, you can copy paste the script within <body> tag of each page you want the bot to appear in. The content of <body> is often accessible through the pages’ html (text) editor.
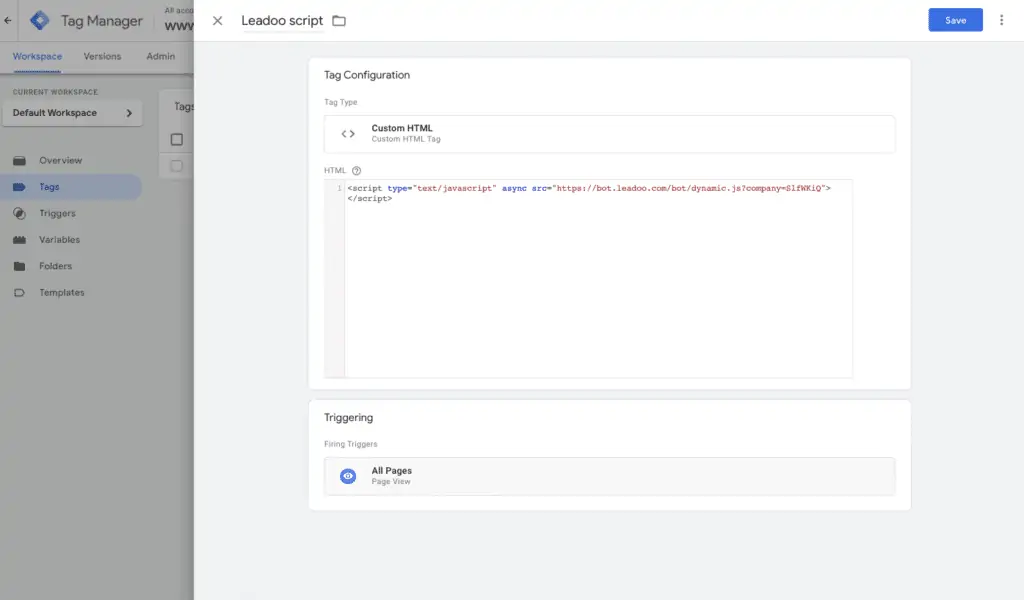
Adding script via Google Tag Manager
We advise you NOT to embed any Leadoo scripts through Google Tag Manager:
When you are embedding an InpageBot / VisualBot, you have multiple options to choose from to find the way to embed, that fits you best.
Both bot types are embedded similarly.
We recommend using the Dynamic Embedding method when embedding InpageBots and VisualBots. That way you can manage the bots on your website directly from Leadoo’s platform and you don’t need to access you CMS anymore every time you want to change the bots on your website.
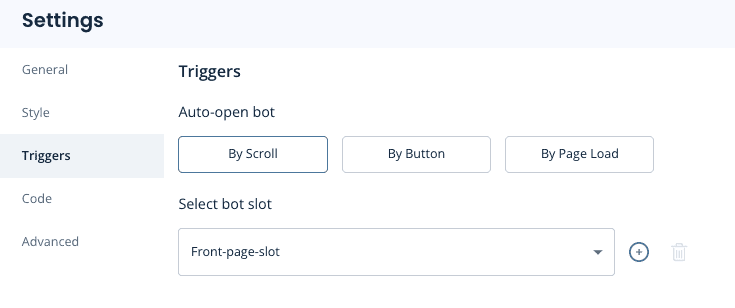
Basically you create slots on your website (eg. Blog-post-slot & Front-page-slot-footer) and then you decide on Leadoo platform, which bot goes in to which slot. Now when you want to update all your blog post bots, you don’t have to change all those manually, but instead you just select different bot to be shown on that specific slot.
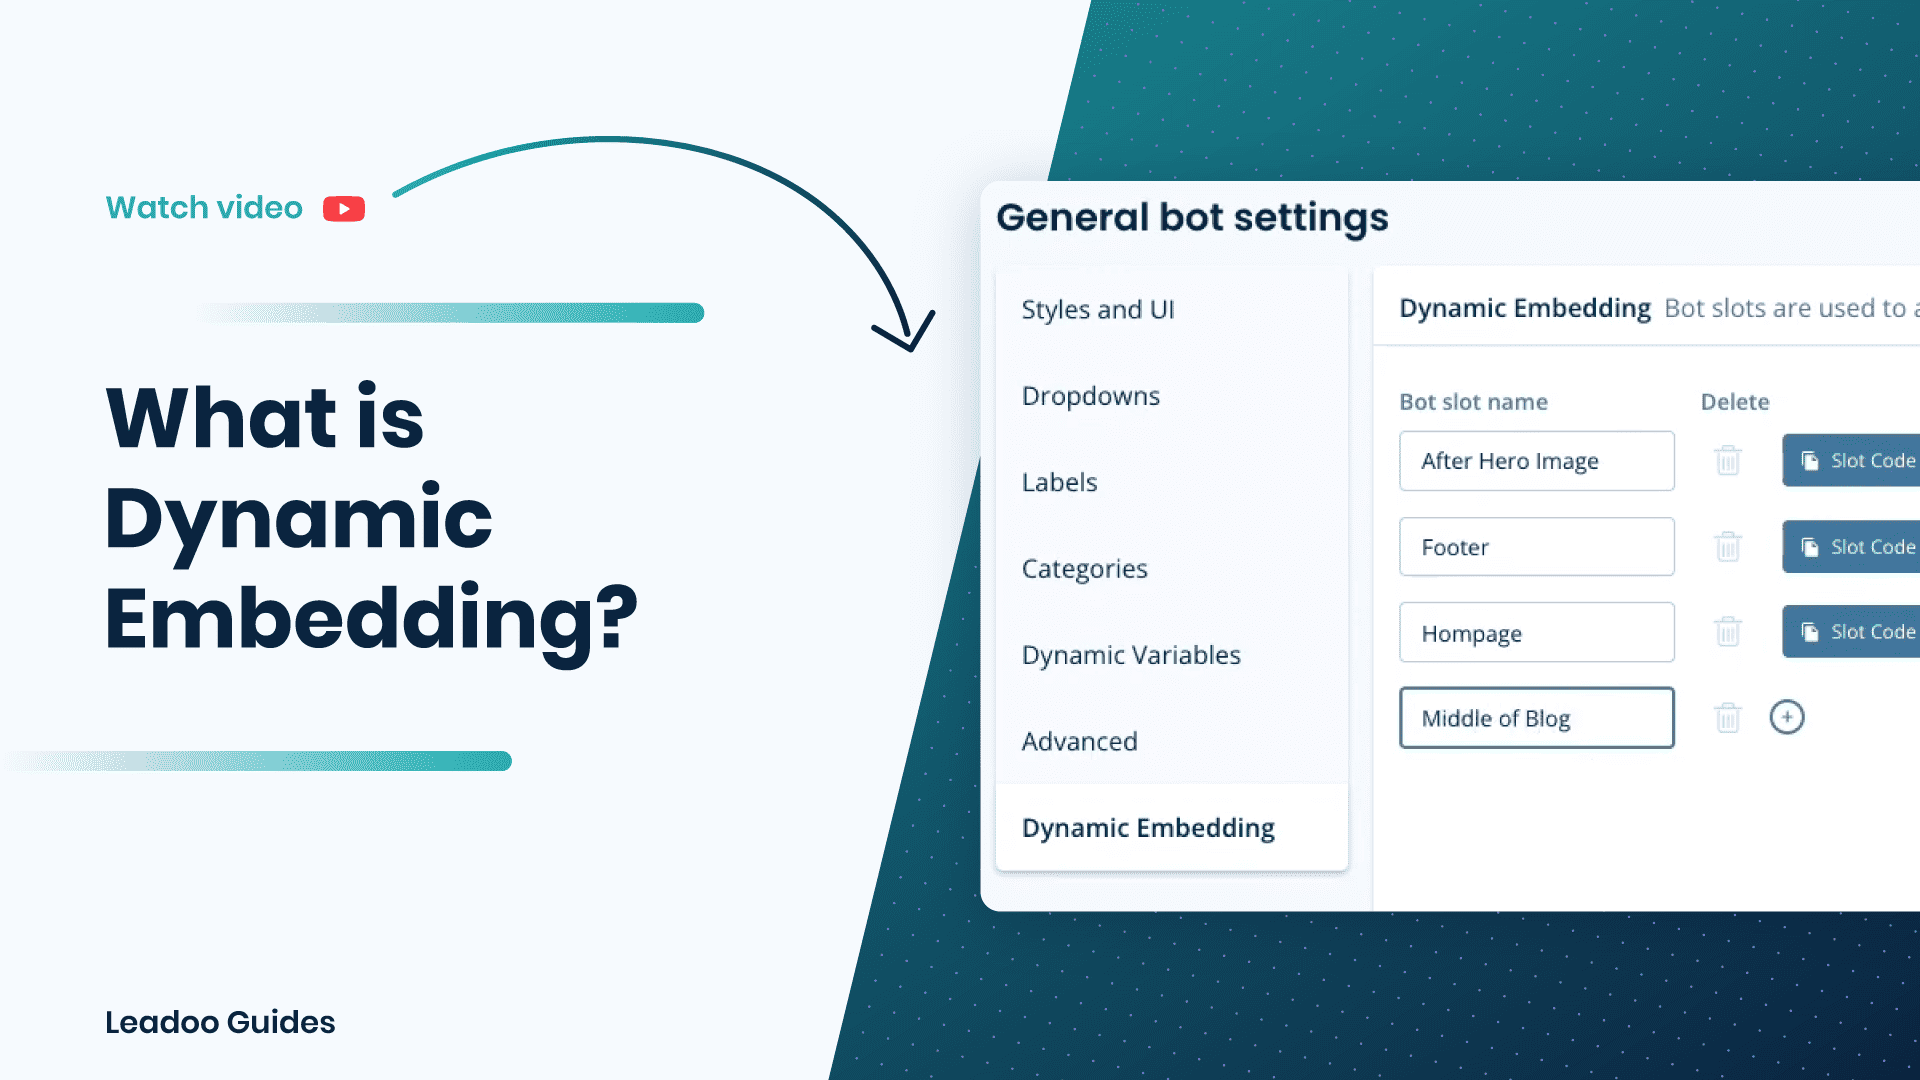
Go to Conversation Kit -> General Bot Settings -> Dynamic Embedding
To create your first bot slot, click on + Add new bot slot. Once you click save the slots will automatically sort into alphabetical order to help you find them easier.
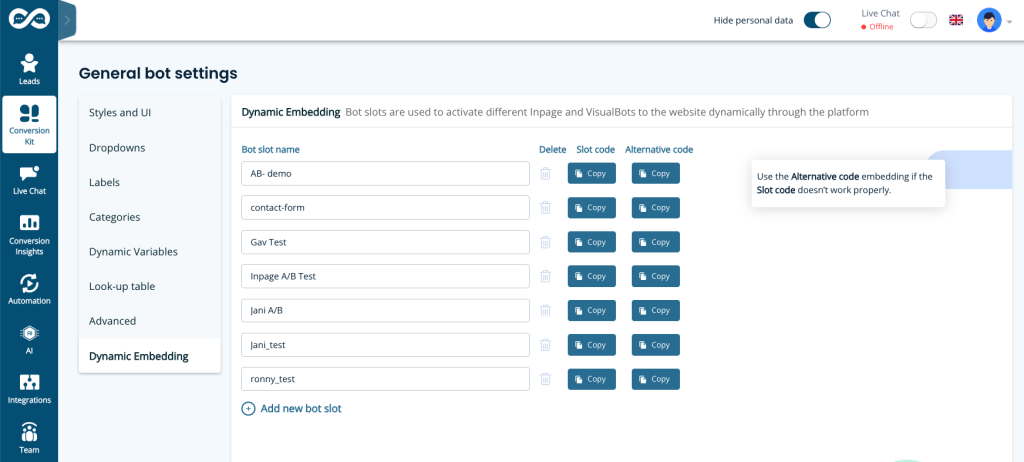
Use URLs to name the bot to make it easy to find and understand where the slot is used.
If you use bot slots on multiple pages, use the same naming logic as in chatbots (wildcards / ie. *leadoo.com/*)
Another way of naming slots is like in the picture above ie. “Front-page-header” etc.
Note! If you rename the slot, you will need to update the script on your website too. Because of this, we don’t recommend renaming them after they have been embedded on your website. If you do rename them, you can always rename them back to what they were to fix this issue.
After creating bots slots, you can assign which bot will appear in each bot slot. For example, find the bot created for blog posts, go to settings then triggers, and select the correct clot e.g. Blog-post-slot. Save, and repeat for each InpageBot and VisualBot as needed.
Note! You can only insert one bot into each slot unless you are running an A/B test.
Now you can copy the slots from the Leadoo platform and add them to your CMS. (If you haven’t selected any bots to be seen on those slots yet, nothing will go live, so you can do this even before making the bots.)
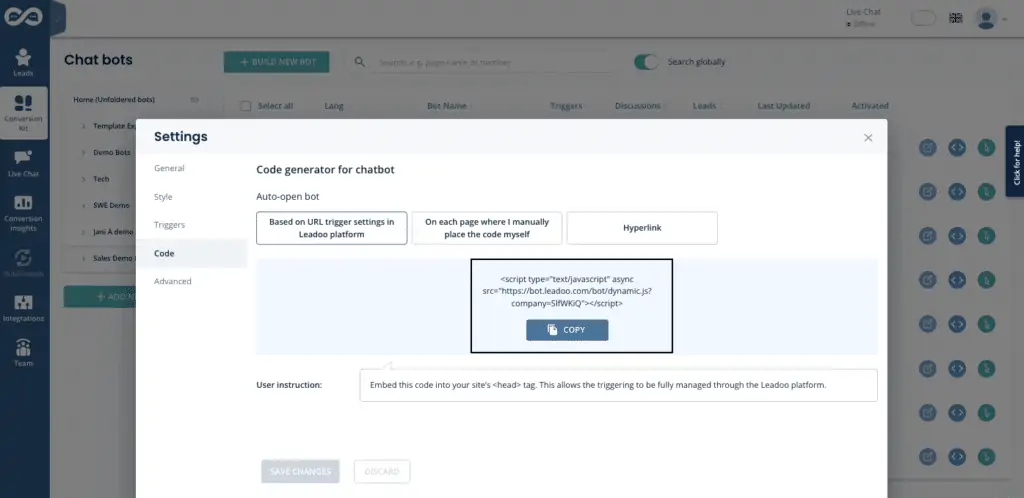
Remember to add the Leadoo dynamic bot script (found in individual bot settings -> code) to your website header. This enables bot slots to work on your site.
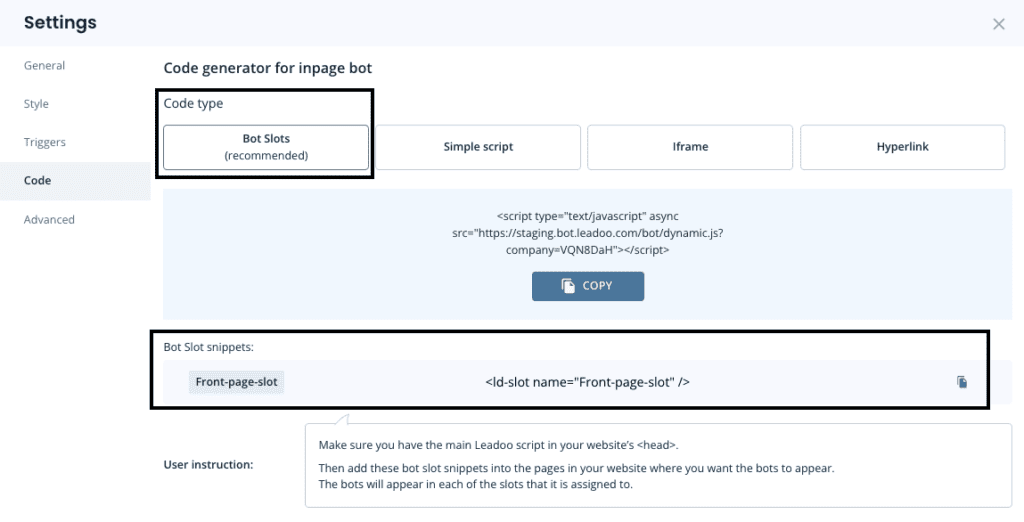
If you are a developer or advanced user, you can also click “Show the full list of code” to see all possible options available.
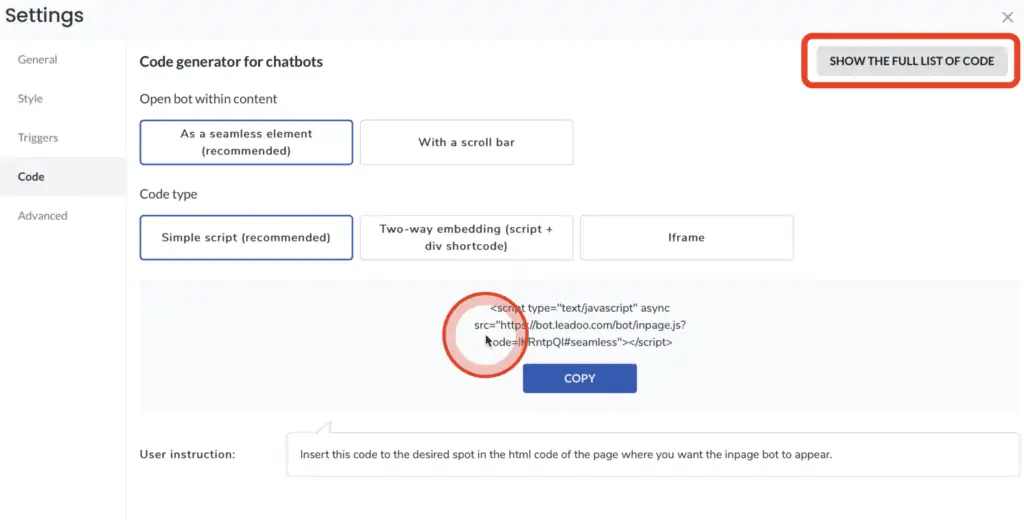
Click the “copy” icon to get the code to your clipboard.

Once you have the code copied, you can go to your website management. If you are using WordPress, the easiest way to embed the bot is to go to your editor. In this example we are embedding with Elementor. But this logic works for any other website management system.
Choose the section where you want to embed the bot. Click on it to open it.
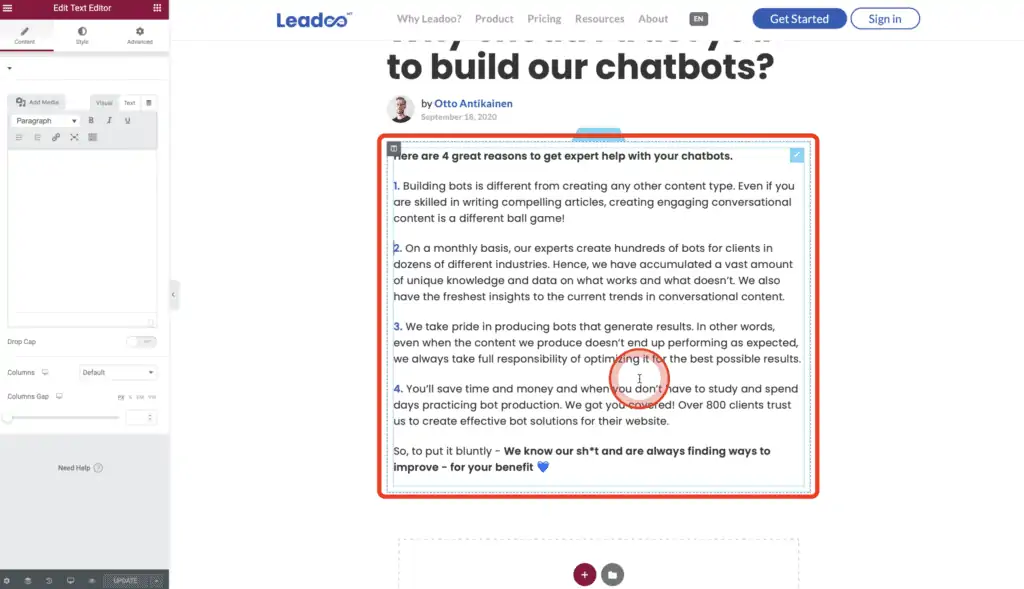
In the Text Editor you can see the visual editor and the text editor. What you want to do, is to work in the Text Editor because this is a HTML site of the website and this is where the bot will go. Switch to the text site and go to the place where you want to put the Bot.
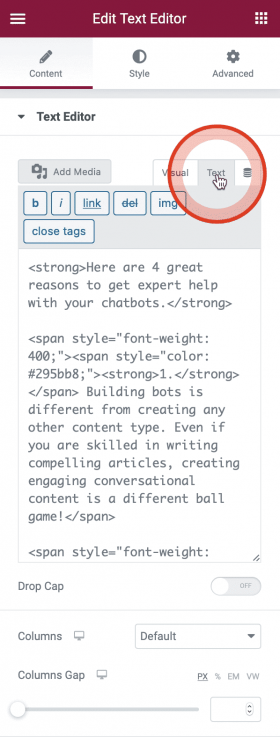
Add a little bit of space between the text and the bot code. Copy-paste the Bot to where you want it to show. And update the page to see the end result.
If you want to embed your Visualbots or Inpagebot using simple script, you can follow the same steps as you would with dynamic embedding. Only difference would be picking a different code. You also don’t have to create bot slots.
Click the “copy” icon to get the code to your clipboard. After this you can move on to Step 2

Leadoo bots are much smaller than many other embedded tools you may be using on your site. We take extra steps to ensure that the bots themselves are small (transfer-size wise) and don’t impact page load performance. We also ensure that our caching rules are flexible enough to allow for caching on the browser-side so that subsequent navigations through your site don’t incur extra transfer costs in downloading our bot(s) more than once.
Leadoo uses a CDN (Content Distribution Network) to store cached copies of our bots close to all of our potential users.
Due to these features, Leadoo strongly recommends against attempting to improve page performance by including third party tools or custom tweaks to improve the performance of our bots. Doing so will, in most cases, result in a less efficient setup or our bots simply failing to run.
More information can be found on https://docs.leadoo.io/docs/config-page-performance
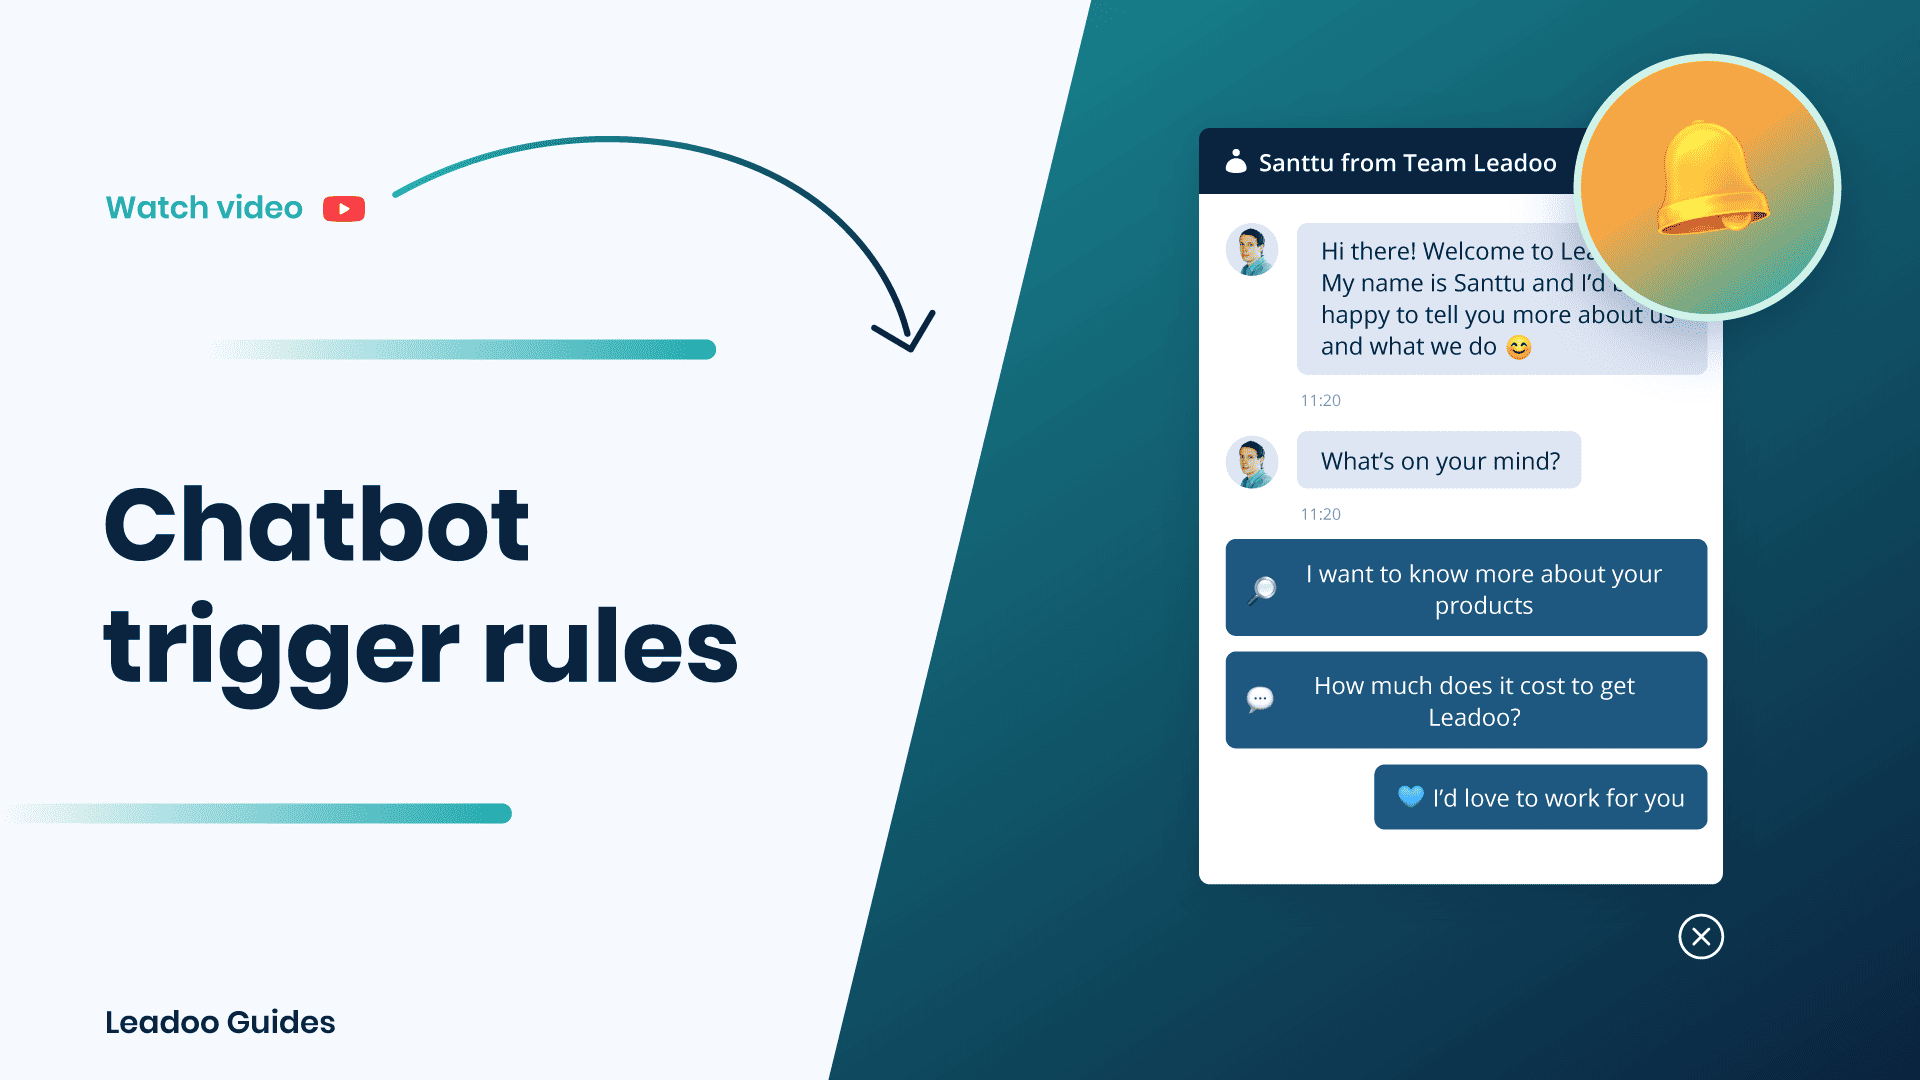
Did you know that the placement and triggering of a chatbot can often define the success or failure of a chatbot when it comes to results?
Follow these simple steps to find out how to engage your visitors with Leadoo Chatbot in the right place and time! 💪
Once you have added the Leadoo script to your website header your chatbot visibility is controlled with settings in your Leadoo platform. Leadoo allows your chats to be displayed to the visitors based on custom URL rules. This means that you can define which chatbot you want to appear on different pages to personalise the visitor’s experience on-site.
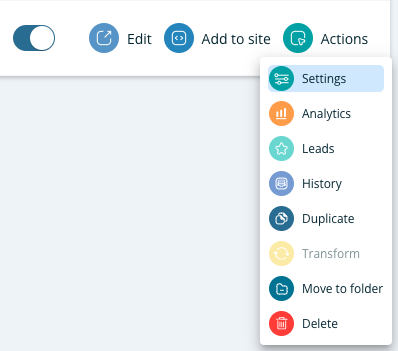
Step 1. Open up the settings for your bot. This can either be found via the bot listing or in the editor.

Step 2. Set the URL trigger rules.
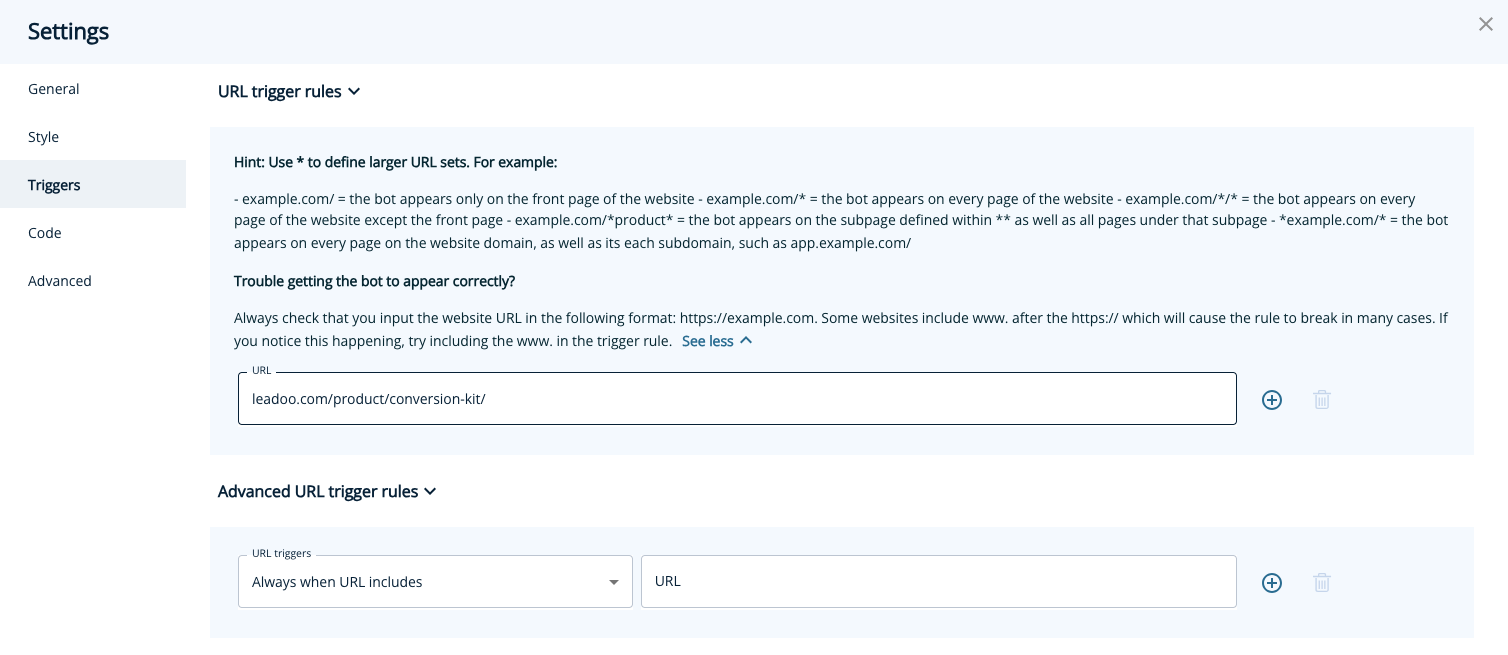 In the example above this chatbot would only appear on leadoo.com/product/conversion-kit. If you wanted your chatbot to appear on every page on your website you would change it to leadoo.com/*. The * acts as a catch-all for all other page URLs.
You can find more page-specific setting examples below or under “See more” within settings.
Page-specific (most popular choice)
= Chat triggers when a visitor enters the exact URL address you define in the given field. You can broaden the selection by using the asterisk sign *.For example:
leadoo.com/ = the chat triggers only on the front page of leadoo.com
leadoo.com/* = the chat triggers globally on each page of leadoo.com domain
*product* = the chat triggers on pages that include the path product (like leadoo.com/product/inpagebot AND leadoo.com/product/chatbot)
You may want to use multiple chatbots across your site or even hide them on certain pages, this is where our advanced URL trigger rules come into place.
Note! Do not add entire URLs in the advanced URL rules, only the keyword that appears in the URL.
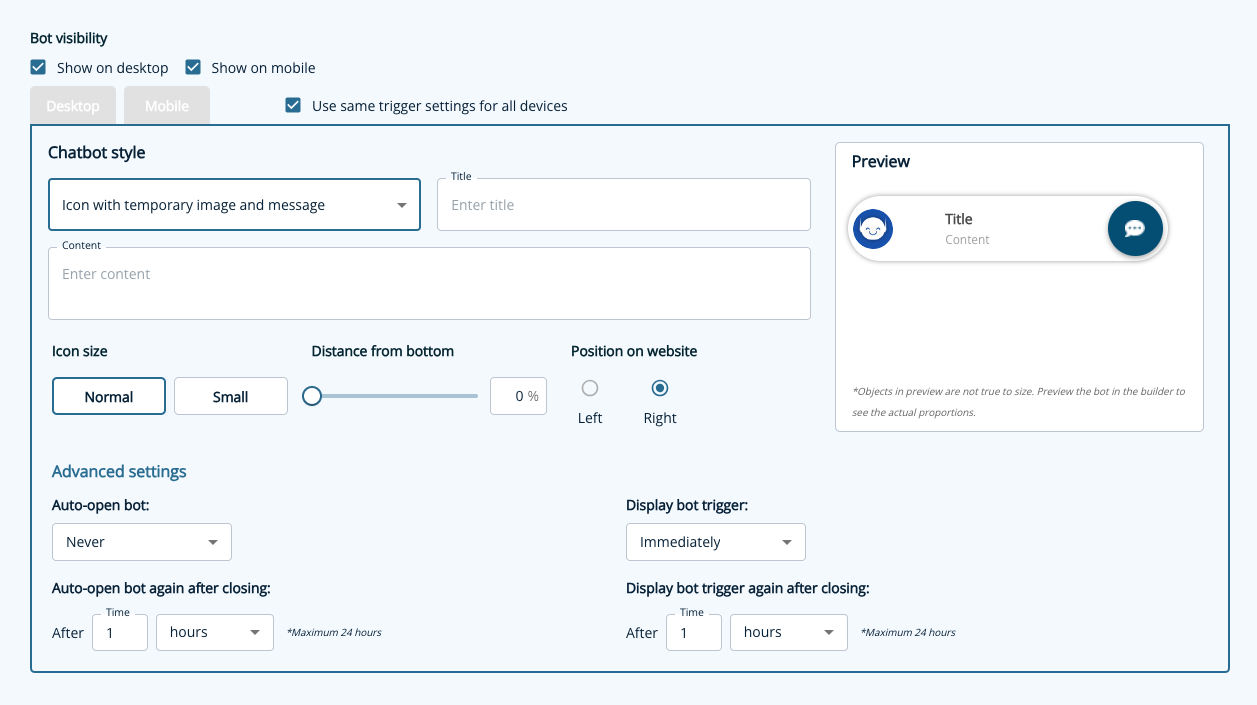
We’ve given you plenty of control over what the trigger and icon look like as well as how frequently it pops up including:
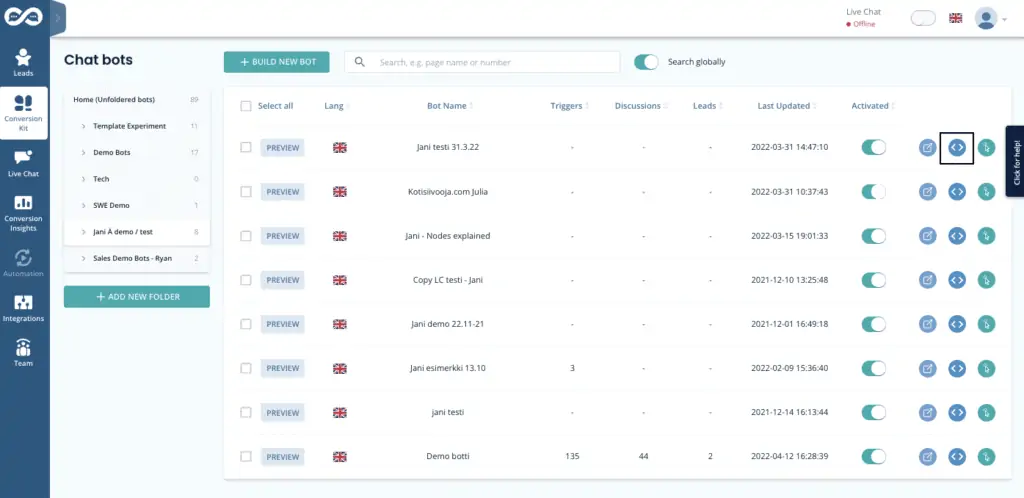
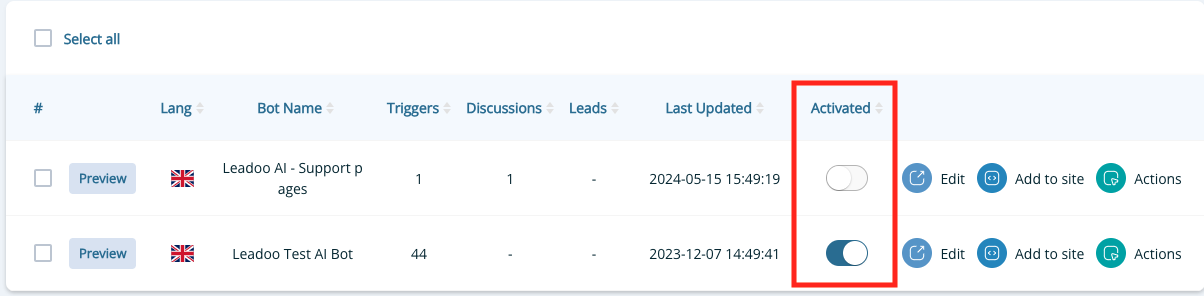
You already know how to hide your chatbot on certain pages, but what if you need to hide it everywhere temporarily? You can easily deactivate your bot within the Leadoo platform in just 1 click! Navigate to the bot type e.g. https://app.leadoo.com/conversion-kit/chat then click the toggle in the ‘Activate’ column.
Remember, no matter how awesome your dialogue is, it won’t have much effect if nobody sees it – so put some time and thought into defining your trigger settings!
If you have any technical challenges reach out to [email protected] or the team member you are currently working with.

