KNOWLEDGE
Case StudiesBlogsEventsSupport & Starting
Support Articles & HubSupport Videos (Youtube)Try Leadoo Free (Leadoo Lite)Partners & Careers
PartnershipsCareersSecurity & Privacy
Security at Leadoo AIGeneral Terms & ConditionsData & GDPRKNOWLEDGE
Case StudiesBlogsEventsSupport & Starting
Support Articles & HubSupport Videos (Youtube)Try Leadoo Free (Leadoo Lite)Partners & Careers
PartnershipsCareersSecurity & Privacy
Security at Leadoo AIGeneral Terms & ConditionsData & GDPRLeadoo’s calendar integration feature allows you to schedule meetings directly into your calendar using Leadoo tools, which can help speed up the sales process. You can find more details about this feature here.
To provide this functionality to our customers, we have partnered with a calendar integration provider called Cronofy. You can review Cronofy’s privacy policy and our data processing and subcontractors by visiting the following links: https://www.cronofy.com/privacy
https://leadoo.com/data-protection-and-gdpr/
One of the reasons we chose to collaborate with Cronofy is because of their strong compliance reporting, which is publicly available on their website here: https://www.cronofy.com/compliance-center. Cronofy holds ISO 27001, ISO 27018, and ISO 27701 certificates and undergoes SOC 2 Type 2 audits annually. For more detailed compliance information or reports, please contact Cronofy directly.
Cronofy obtains its own set of tokens to access the individual’s synced calendar, which is stored in the Cronofy database. At Leadoo, we do not access these tokens. Instead, we call Cronofy to make requests to the calendar using free/busy read/write permissions. This allows us to create new events and view busy times without accessing or seeing any data in the calendar itself. For more detailed information about our method, please visit https://docs.cronofy.com/developers/authorization/individual-connect/.
If you have any questions about Leadoo’s calendar integration please contact your Customer Success Manager or our support team at [email protected].
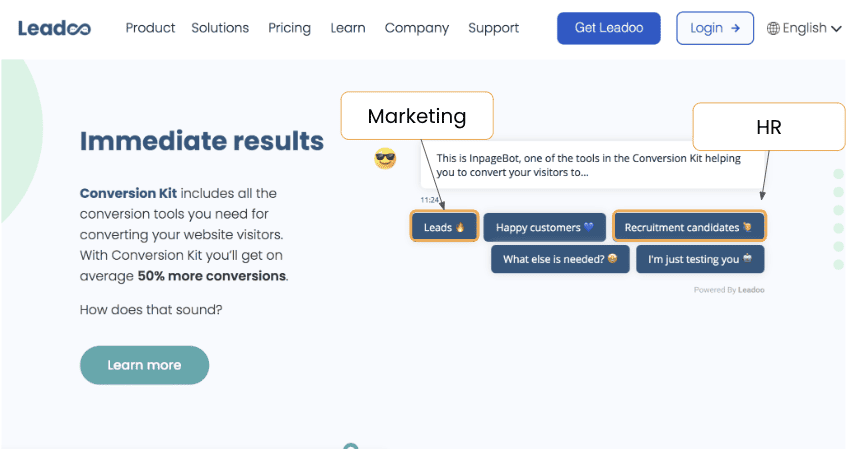
Leadoo AI Sales Alerts brings you Company Identification’s incredible insights straight to you without the hassle of logging in.
Company ID tracks visitor interactions, revealing annual revenue and industry specifics. Dive into a wealth of data, including interactions, conversations, and conversion points, all at your fingertips. Save filters for pinpoint accuracy in identifying the hottest prospects.
Sales Alerts means no more logging in; receiving automatic email notifications with targeted filters in real-time. It’s your shortcut to staying ahead in capturing those hot prospects.
Not familiar with Company Identification yet? Find out all about it here.
Our CPO & Founder Mikael da Costa walks you through it below. Prefer written steps? Keep scrolling.
We’ve given you plenty of control to personalise exactly when and how often you can trigger an alert. But, here’s a step-by-step guide to getting started.
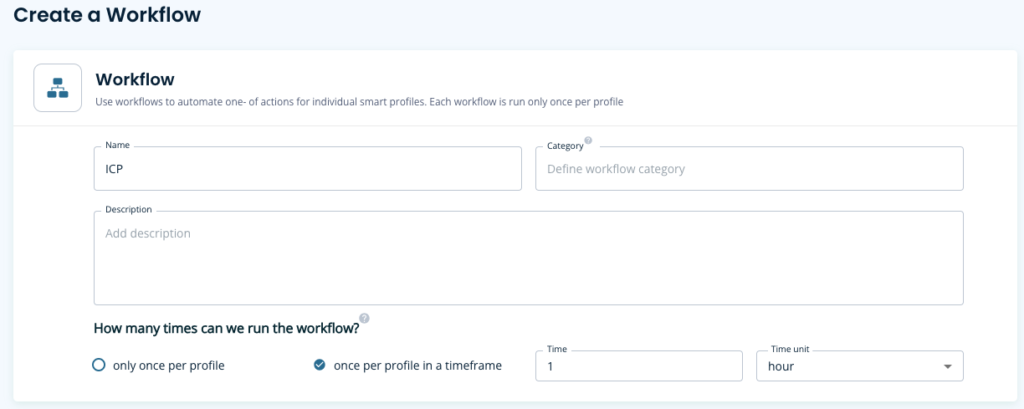
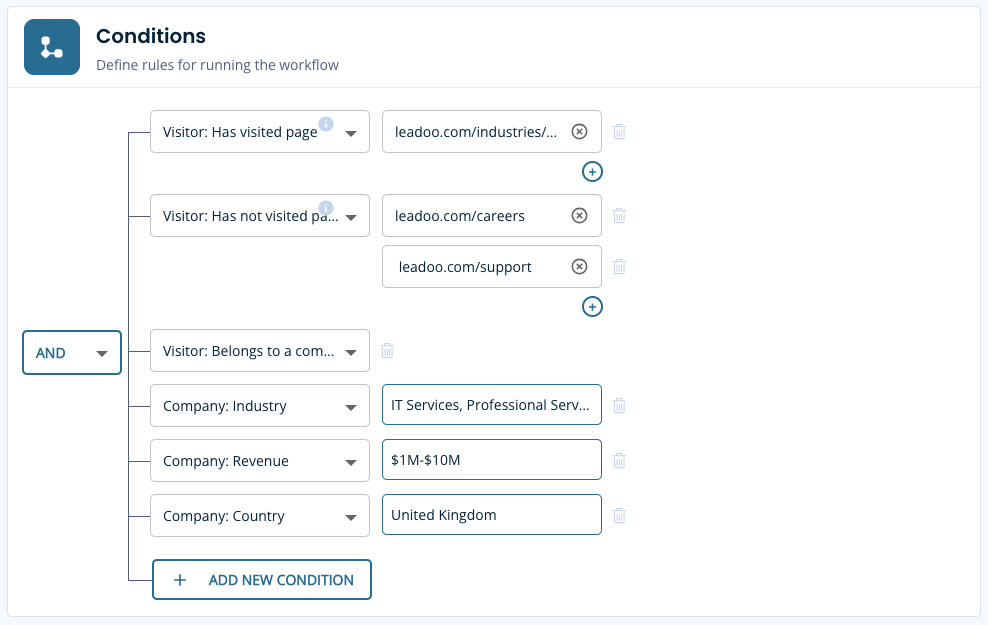
Let’s set up a workflow that alerts you when a company that meets your ICP lands on your site.
Workflow Setup
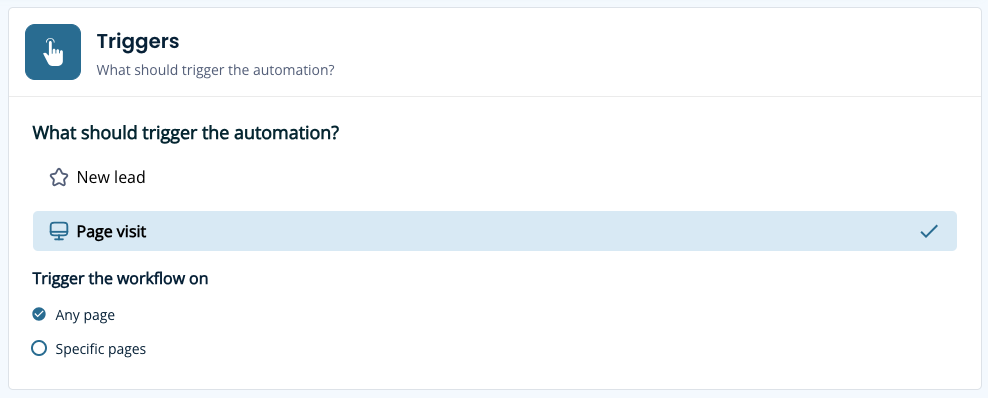
Filter Criteria
Define conditions based on visitor actions, company industry, revenue and country then, filter this against high-intent pages
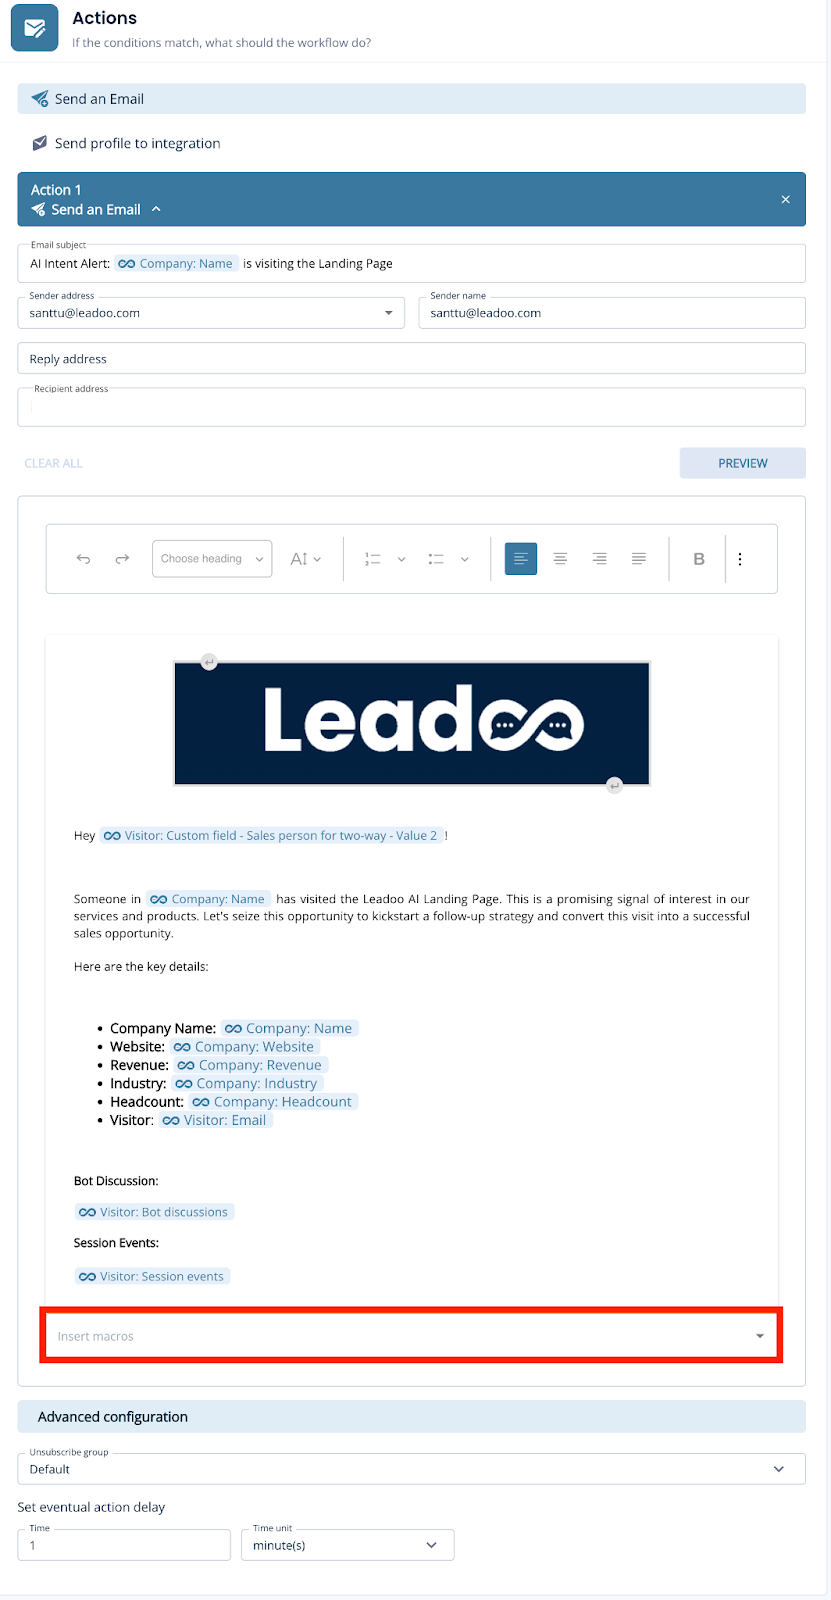
Setup the Notification
Create a notification email to any user on your account with ease. Build your email using the earlier conditions as macros for quick reference. Then you’ll be all set to receive timely email alerts whenever a prospect meets your defined conditions.
Here’s an example you can follow:
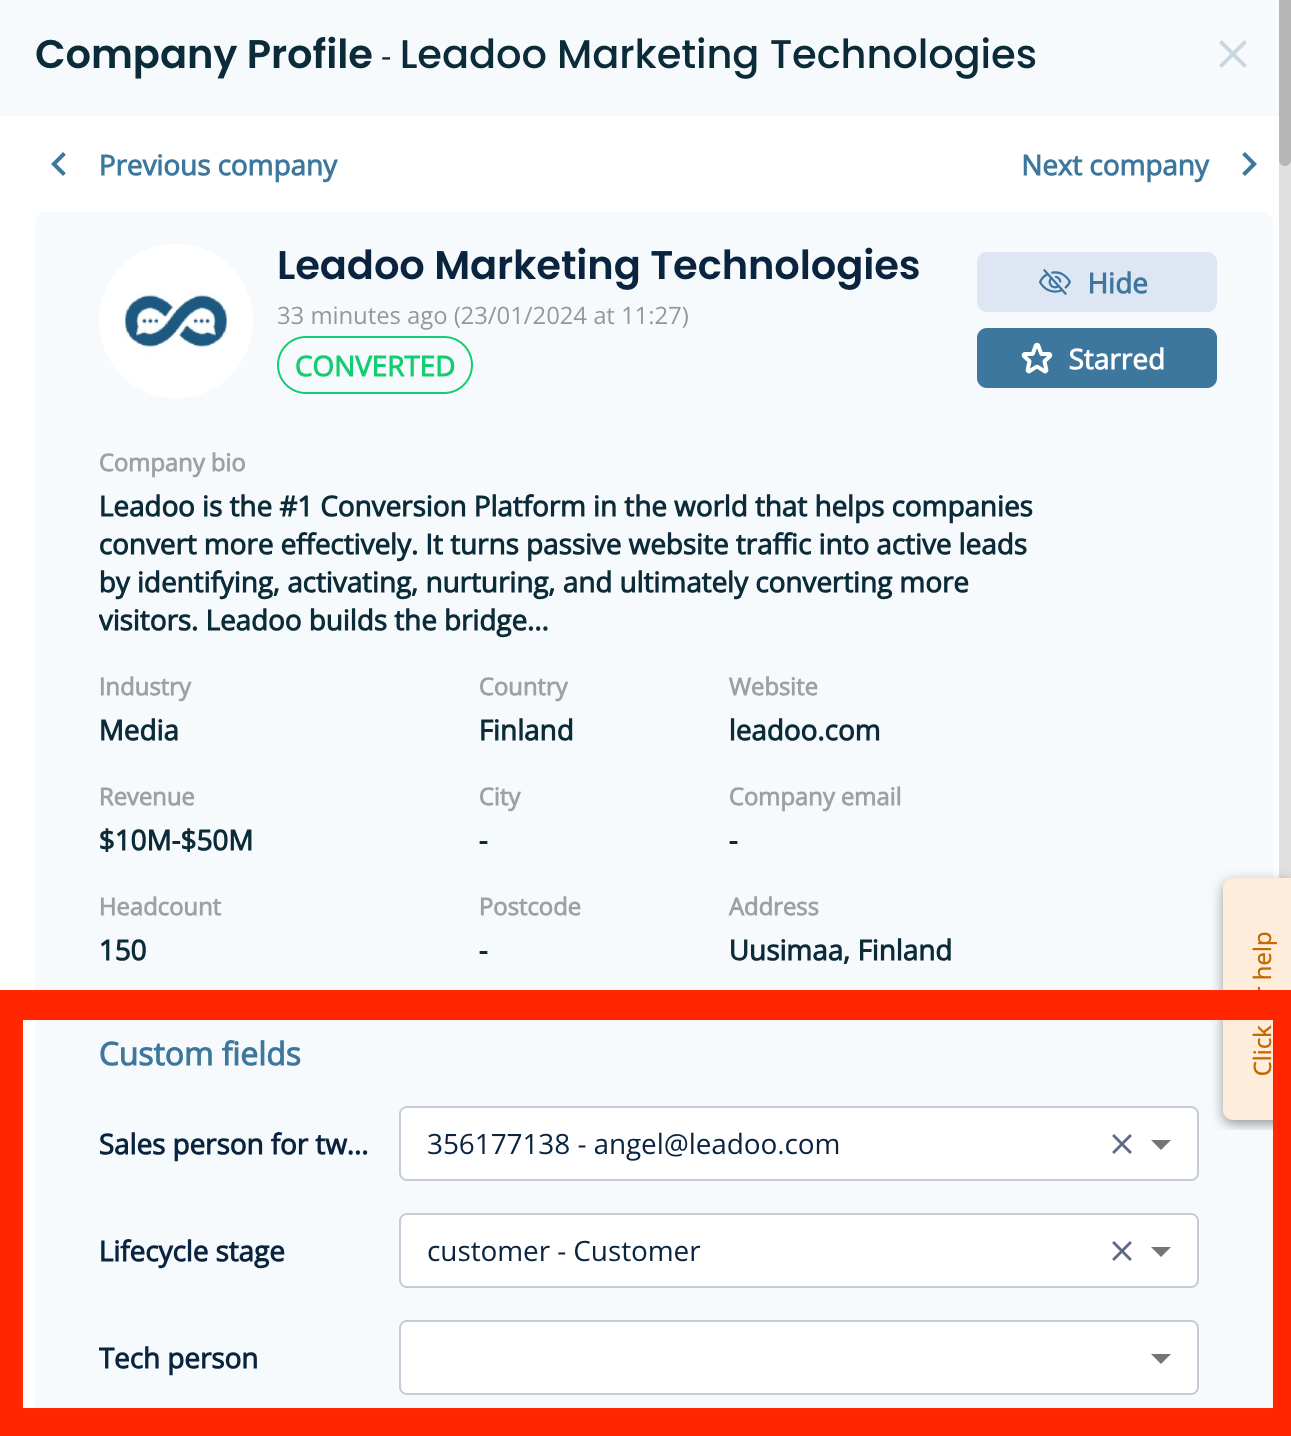
What if the customer is already a prospect or customer?
That’s where our 2-way integration comes into play and ensures seamless notifications to the right salesperson without unnecessary pings.
To do this you’ll need to have an integration already set up and be able to share additional information with us such as:
You’ll then be able to filter Sales Alert notifications more intelligently and sync the data into the platform like below.
To explore the benefits of 2-way integration, reach out to your Onboarding Manager or Customer Success Manager today.
Step 1. Decide what you want to add to your audiences.
Step 2. Create triggers on GTM
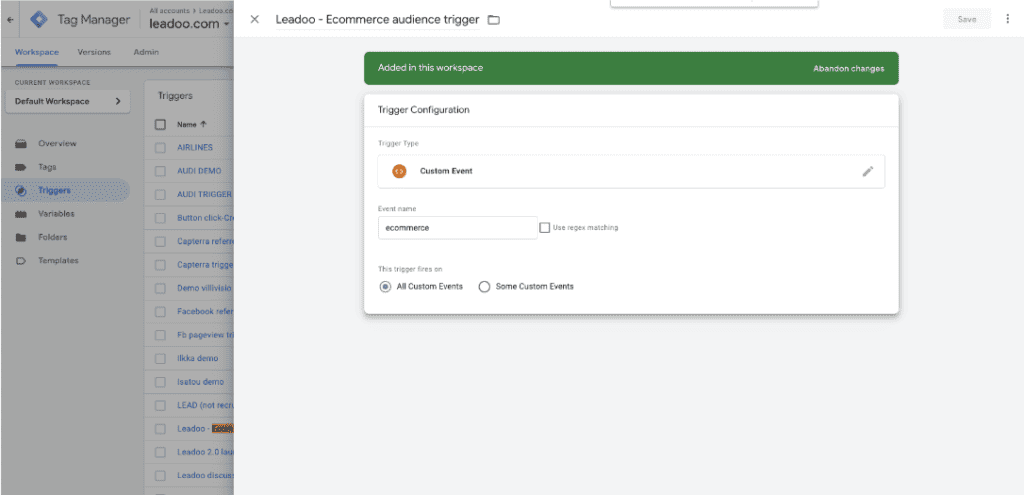
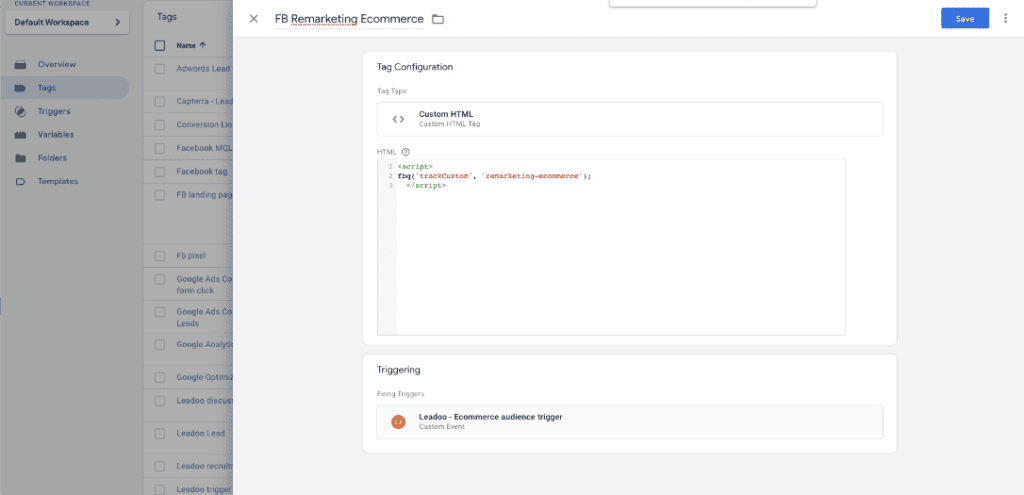
Step 3. Create tags
Facebook:
<script>
fbq(‘trackCustom’, ‘remarketing-ecommerce’);
</script>
‘remarketing-ecommerce’ <- this part of the script will be the name of the audience on your Ads Manager
Google Ads:
Leadoo AI is fully integrated to Google Tag Manager, meaning that custom events can be triggered for every interaction any visitor has with Leadoo’s conversational tools.
Here’s how to implement Google Tag Manager to work with Leadoo AI:
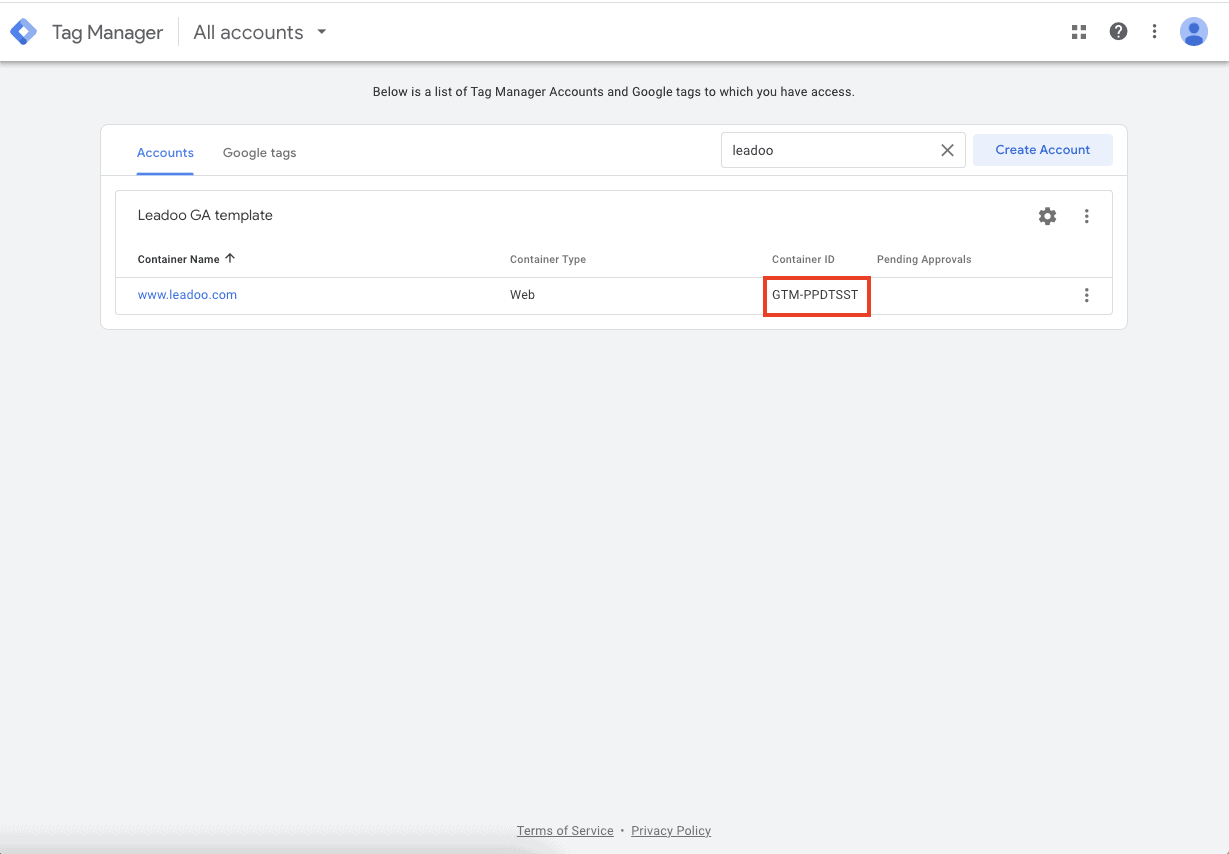
You can find your GTM container ID after logging in to Tag Manager. Copy your GTM container ID.
After that log in to app.leadoo.com/sign-in
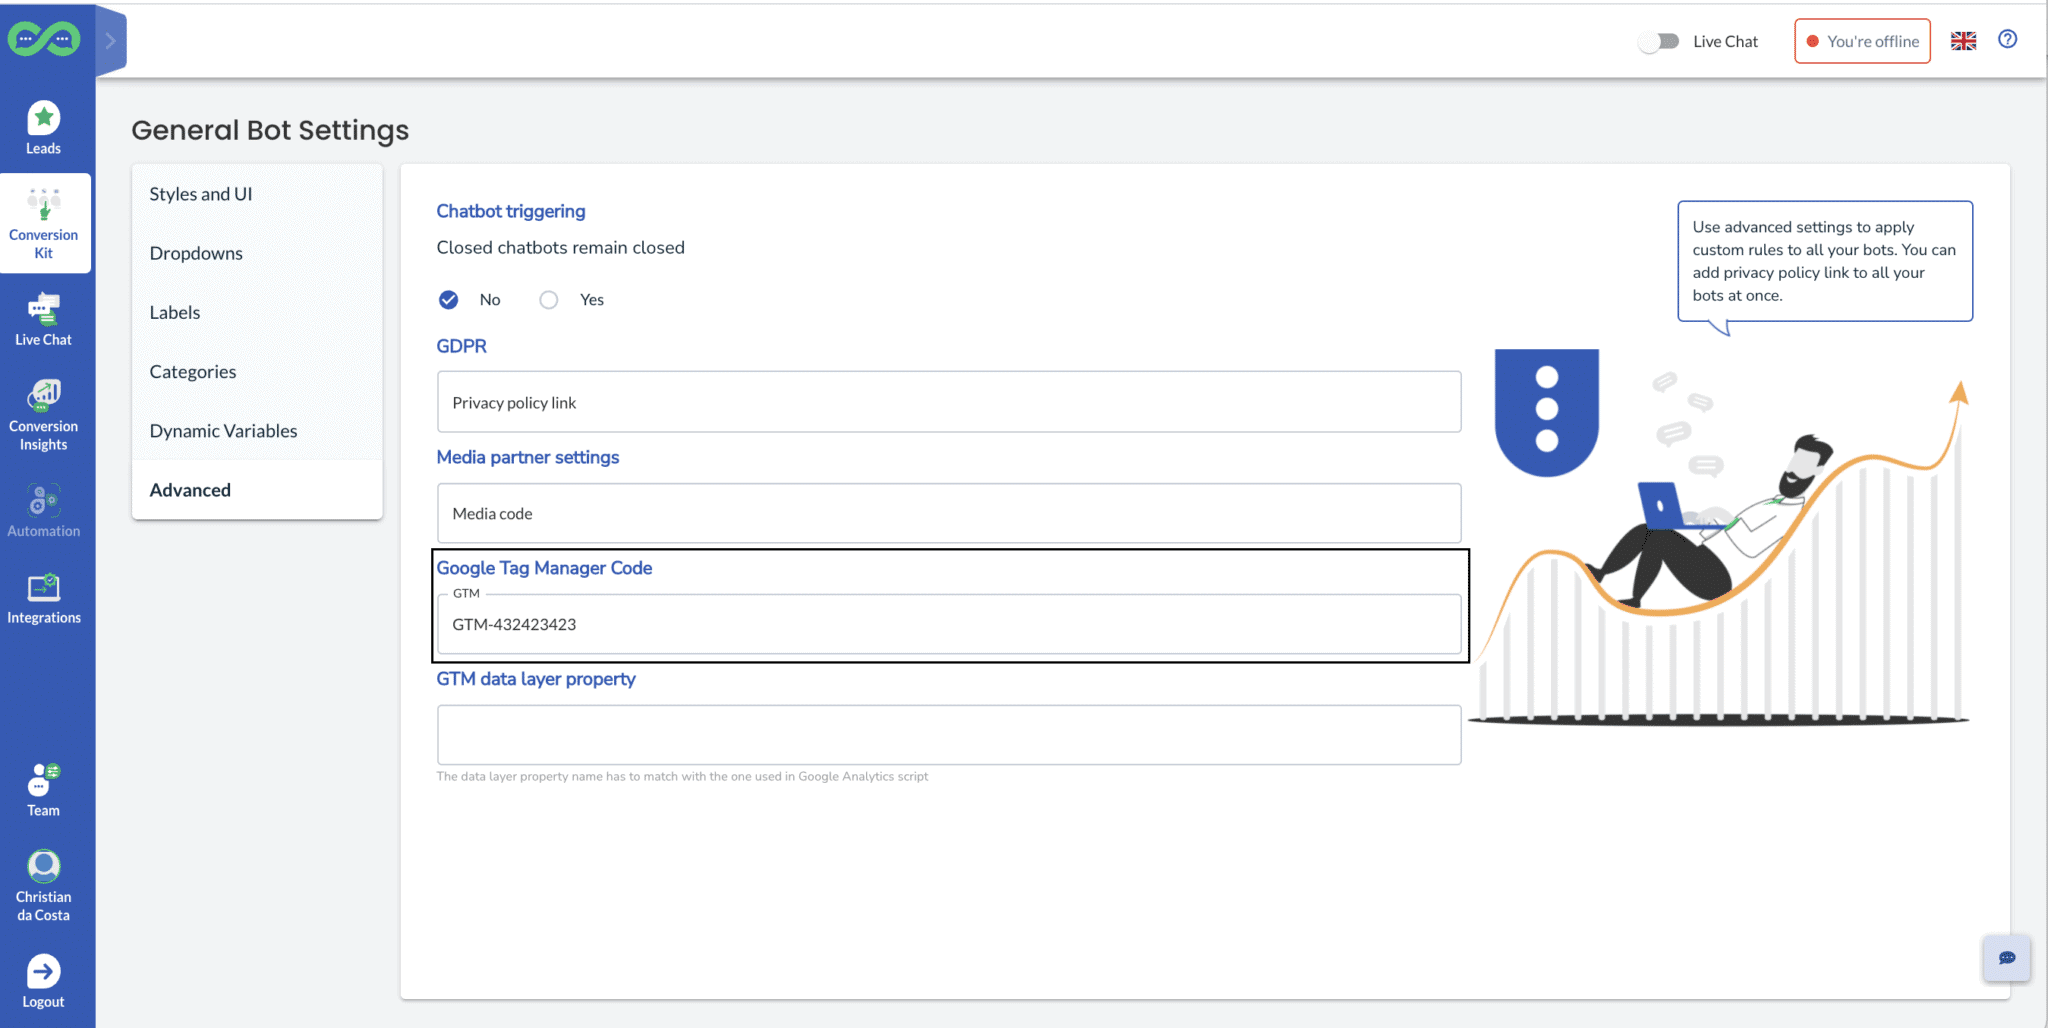
Go to Conversion Kit -> General bot settings -> Advanced
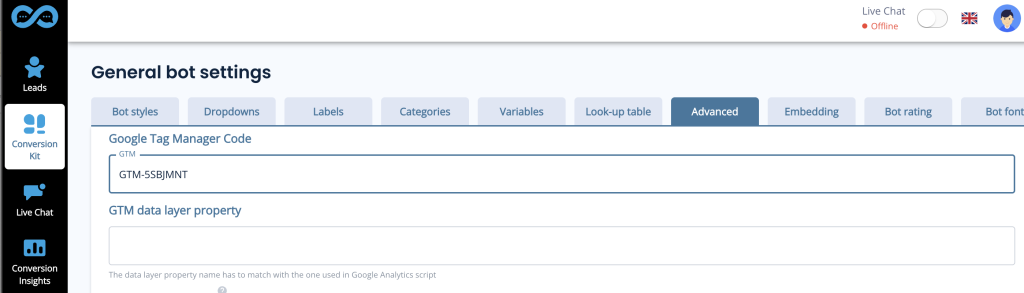
Add your GTM container ID to the Google Tag Manager Code field
*In most cases you can leave GTM data layer property field empty.
After this has been set your bots will start sending events.
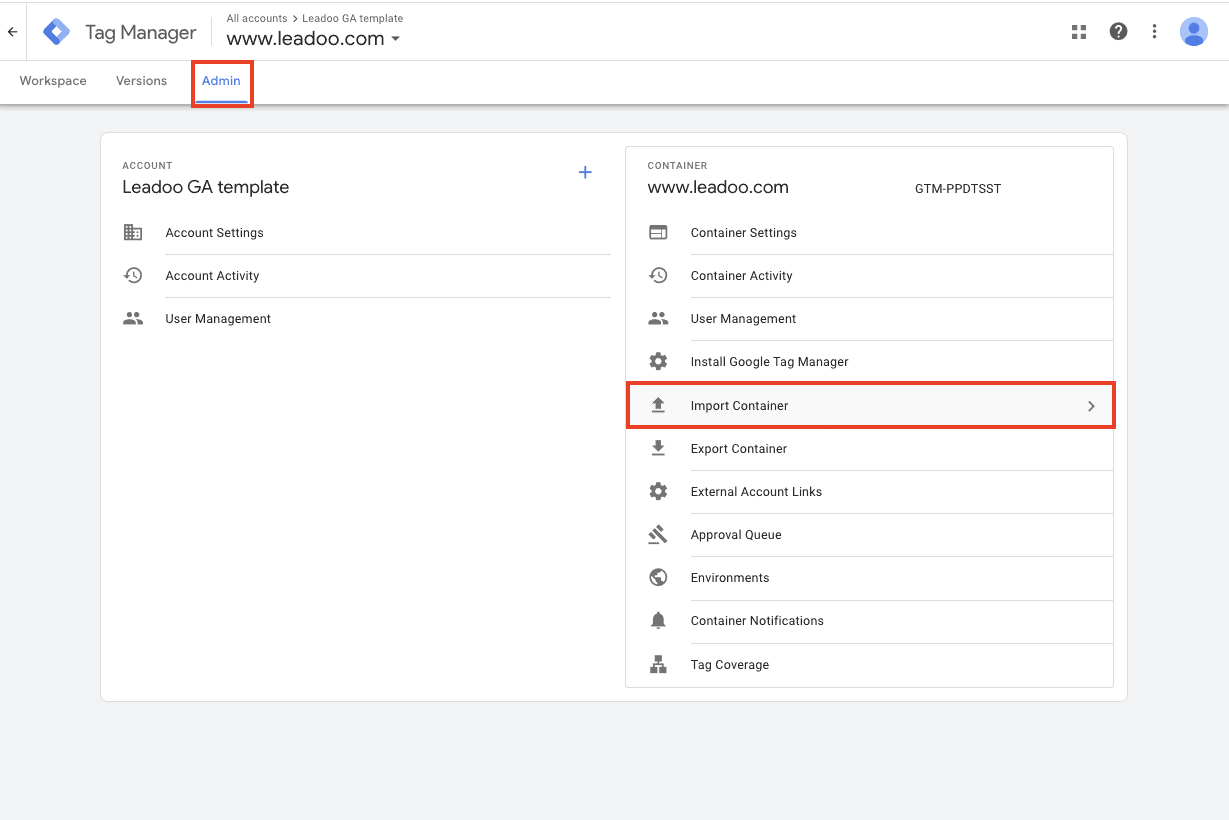
Click Admin. Then, on the right hand side, open Import Container:
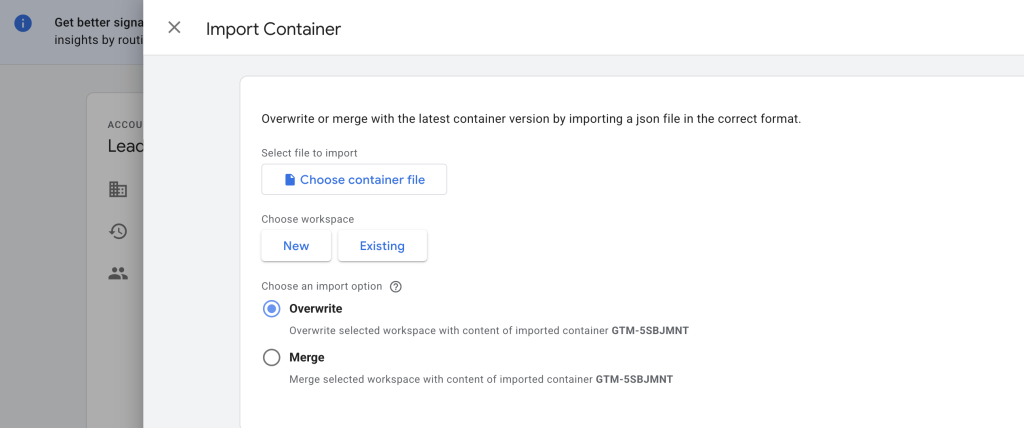
You can download the correct file from here.
Click Choose container file.
Add Leadoo-FB-Qualified-lead-conversion.json file
Choose existing workplace
After this choose an import option. You can merge conflicting tags, triggers and variables
Submit new tags, triggers, variables and templates
Publish changes.
You’ve now connected Leadoo to your Meta Ads Manager
*Make sure you’ve connected your GTM and your Meta Ads Manager with Facebook pixel (https://www.facebook.com/business/help/1021909254506499)
More advanced Google Tag Manager users can also leverage the information sent over on the data layer. The following details can be used to create custom variables
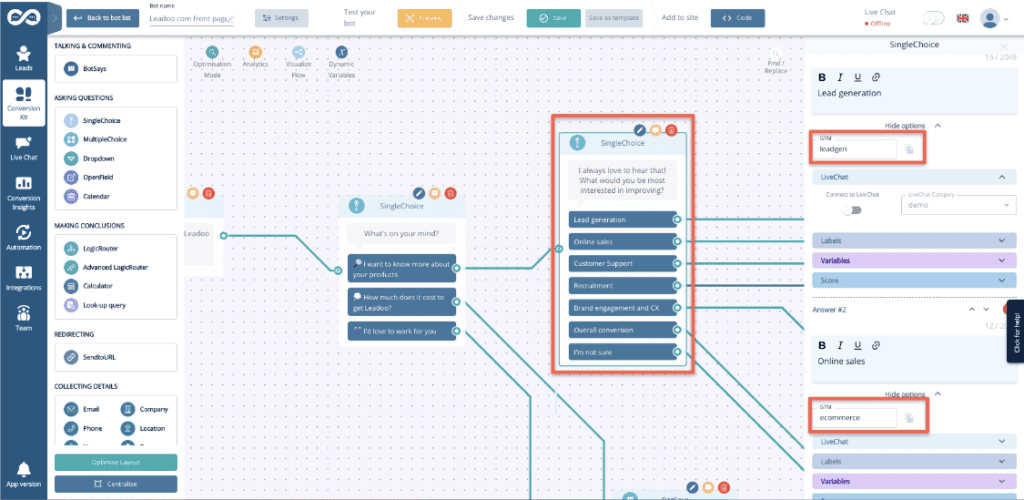
category <- Bot type (embed, chat, cta, modal)
bot_category <- For each bot you can set a bot category on the Leadoo backend, this allows you to create for example separate analytics for sales and recruitment bots
label <- For each multi select answer you can create custom labels. These can be for example interest type of the customer
text <- Info of what text was written on the bot.
bot_name <- Name of the bot
bot_nickname <- Name given on bot settings
You can use these data layer variables to create more accurate retargeting groups and lookalike audiences
If you need any help setting up the integration you can contact [email protected]
Leadoo is fully integrated to Google Tag Manager, meaning that custom events can be triggered for every interaction any visitor does with Leadoo chatbots. Here’s how to implement Google Tag Manager to work with Leadoo.
You can find your GTM container ID after logging in to Tag Manager. Copy your GTM container ID.
After that log in to app.leadoo.com/sign-in
Go to Conversion Kit -> General bot settings -> Advanced
Add your GTM container ID to the Google Tag Manager Code field
*In most cases you can leave GTM data layer property field empty.
After this has been set your bots will start sending events.
Click Admin
On the right hand side open Import Container
You can download the correct file from here.
Click Choose container file
Add Leadoo-GA-GTM-Template.json file
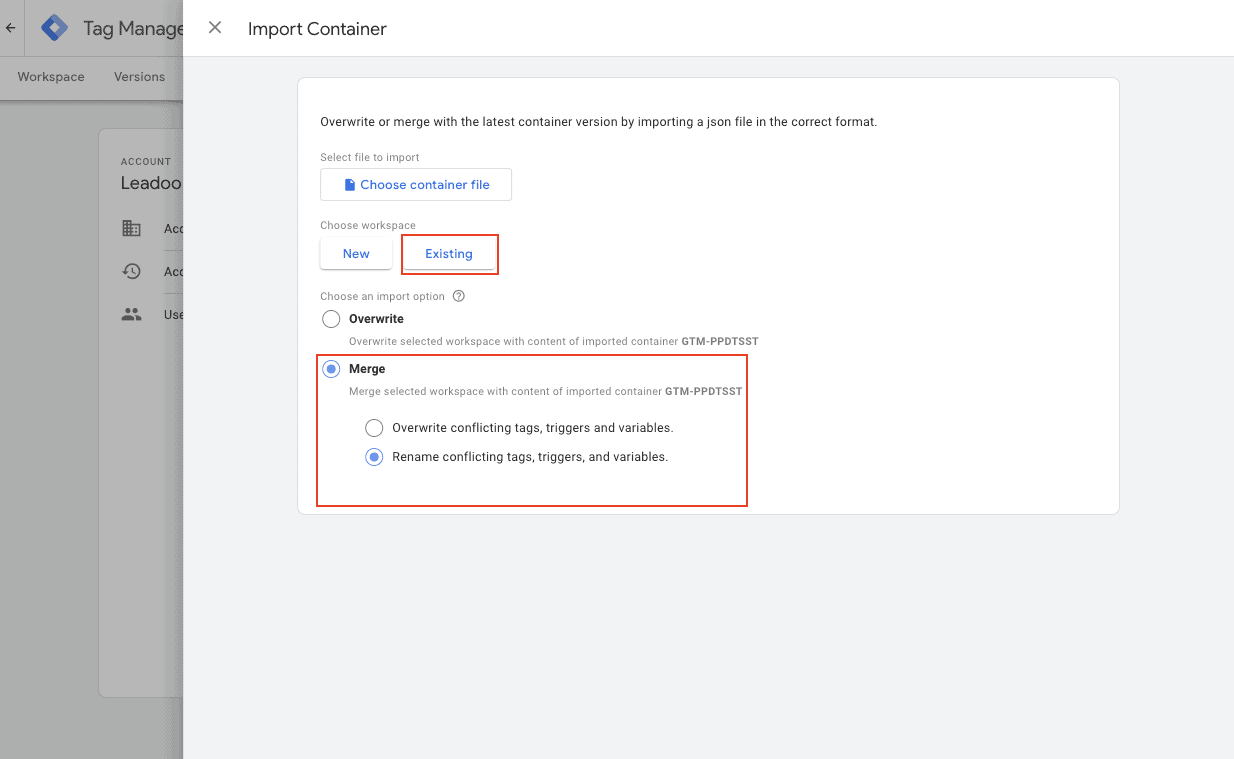
Choose existing workplace
After this choose an import option. You can merge conflicting tags, triggers and variables
Submit new tags, triggers, variables and templates
Go to Tags -> Add your Universal Analytics variable to the tags you’ve just created -> publish changes
You’ve now connected Leadoo to your Google Universal Analytics
If you need any help setting up the integration you can contact [email protected]
Leadoo is fully integrated to Google Tag Manager, meaning that custom events can be triggered for every interaction any visitor does with Leadoo chatbots. Here’s how to implement Google Tag Manager to work with Leadoo.
You can find your GTM container ID after logging in to Tag Manager. Copy your GTM container ID.
After that log in to app.leadoo.com/sign-in
Go to Conversion Kit -> General bot settings -> Advanced
Add your GTM container ID to the Google Tag Manager Code field
*In most cases you can leave GTM data layer property field empty.
After this has been set your bots will start sending events.
Click Admin
On the right hand side open Import Container
You can download the correct file from here.
Click Choose container file
Add Leadoo-GA4-Template.json file
Choose existing workplace
After this choose an import option. You can merge conflicting tags, triggers and variables
Submit new tags, triggers, variables and templates
Go to Tags -> Add your GA4 configuration tag to the tags you’ve just created -> publish changes
You’ve now connected Leadoo to your Google Analytics 4
*If you haven’t connected GTM and GA4 you can connect the two applications. In your GTM container, create a new tag using the following steps:
* You can find Measurement ID from GA4 under Admin -> Data Stream -> click account -> copy Measurement ID
If you need any help setting up the integration you can contact [email protected]
Before you start working with Leadoo you’ll discuss with your Account Executive what type of integration you may need.
We offer 2 levels of integration:
But, how do you know the difference and which one should you choose? Here’s a brief idea.
Still not sure what option you need? Take a look at a record in your CRM system and see which fields are mandatory or conditional for automation. If you have any custom fields which need to be completed that you will probably need a complex integration.
If you have our Engage or Expand package you can most likely upgrade your integration for a one-off amount. Just ask your Onboarding Manager or Customer Success Manager about it.
Most integrations are set up using our in-app integration tool. Before starting any integrations make sure you know what information you need to map across, where it needs to be mapped to and whether there are any mandatory fields that we need to be aware of.
If you are technically confident and setting up a simple integration you can use our guide and templates to set it up yourself.
You can find more information about that here – Setting up an integration to CRM using templates
You can also book a session with one of our Integration Engineers. They’ll help you set everything up but remember, we need you to run tests to make sure you’re getting all the information you need in the right place. Simply contact your Onboarding or Customer Success representative to set this up!
When you have your meeting with an engineer they’ll start by setting up the decision tree like this:

Next, you’ll start mapping the fields from Leadoo to your CRM system which looks like this:
This is where we can see what fields are in your CRM system and what data we need to map to them, so a good working knowledge of your CRM is important during this meeting. If you’re not familiar with the configuration of your system make sure you invite someone along who is.
Once this is complete it’s testing time!
Make sure everything is coming through as it should, if not be clear about what isn’t populating so we can test and fix it.
For complex integrations, the testing process can take up to a week after the set-up. For simple integrations, this should be completed on the same day.
Whilst in your meeting your engineer will send a test via the integration tool. If you need to test outside of the meeting you can use the bot hyperlinks to do so.
Navigate to the bot you want to test then click the <> Add to site on the right-hand side.
Click the hyperlink button and then copy and paste the link into your browser.
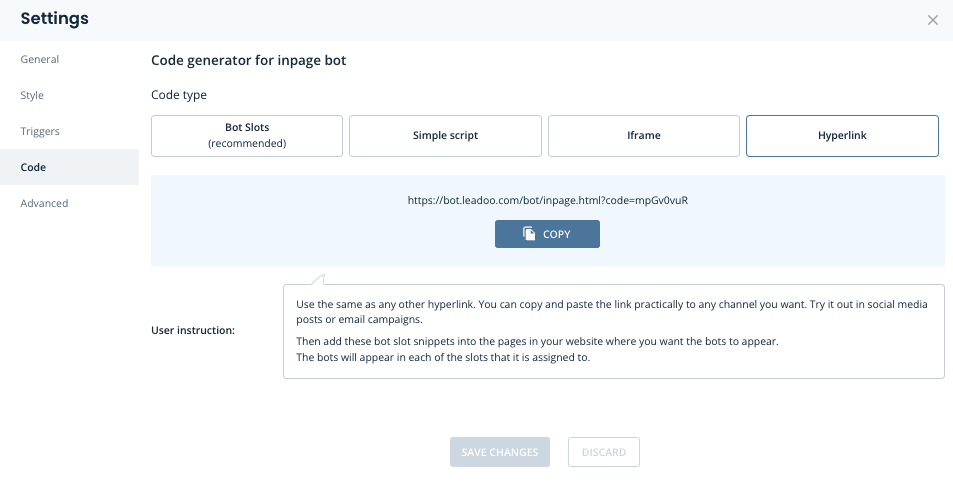
Complete the bot with information as if you were a visitor and check what data comes through to your system.
Once we’ve made sure that everything is populating correctly, your integration is complete!
And remember, Admins on your account can access this integration anytime, but if you need assistance please reach out to us for help.
If you have any questions about integrations reach out to the Leadooer you’re currently working with.
1. Start by navigating to the “Integrations” page.
2. If this your first time creating an integration, you will be asked to generate an API-key. Click the highlighted “here” or open the “Integration settings” to access the API key.
(If you already have an API-key do not regenerate it. It will break existing 3rd party integrations. Skip to #5)
3. Click “Generate API key”
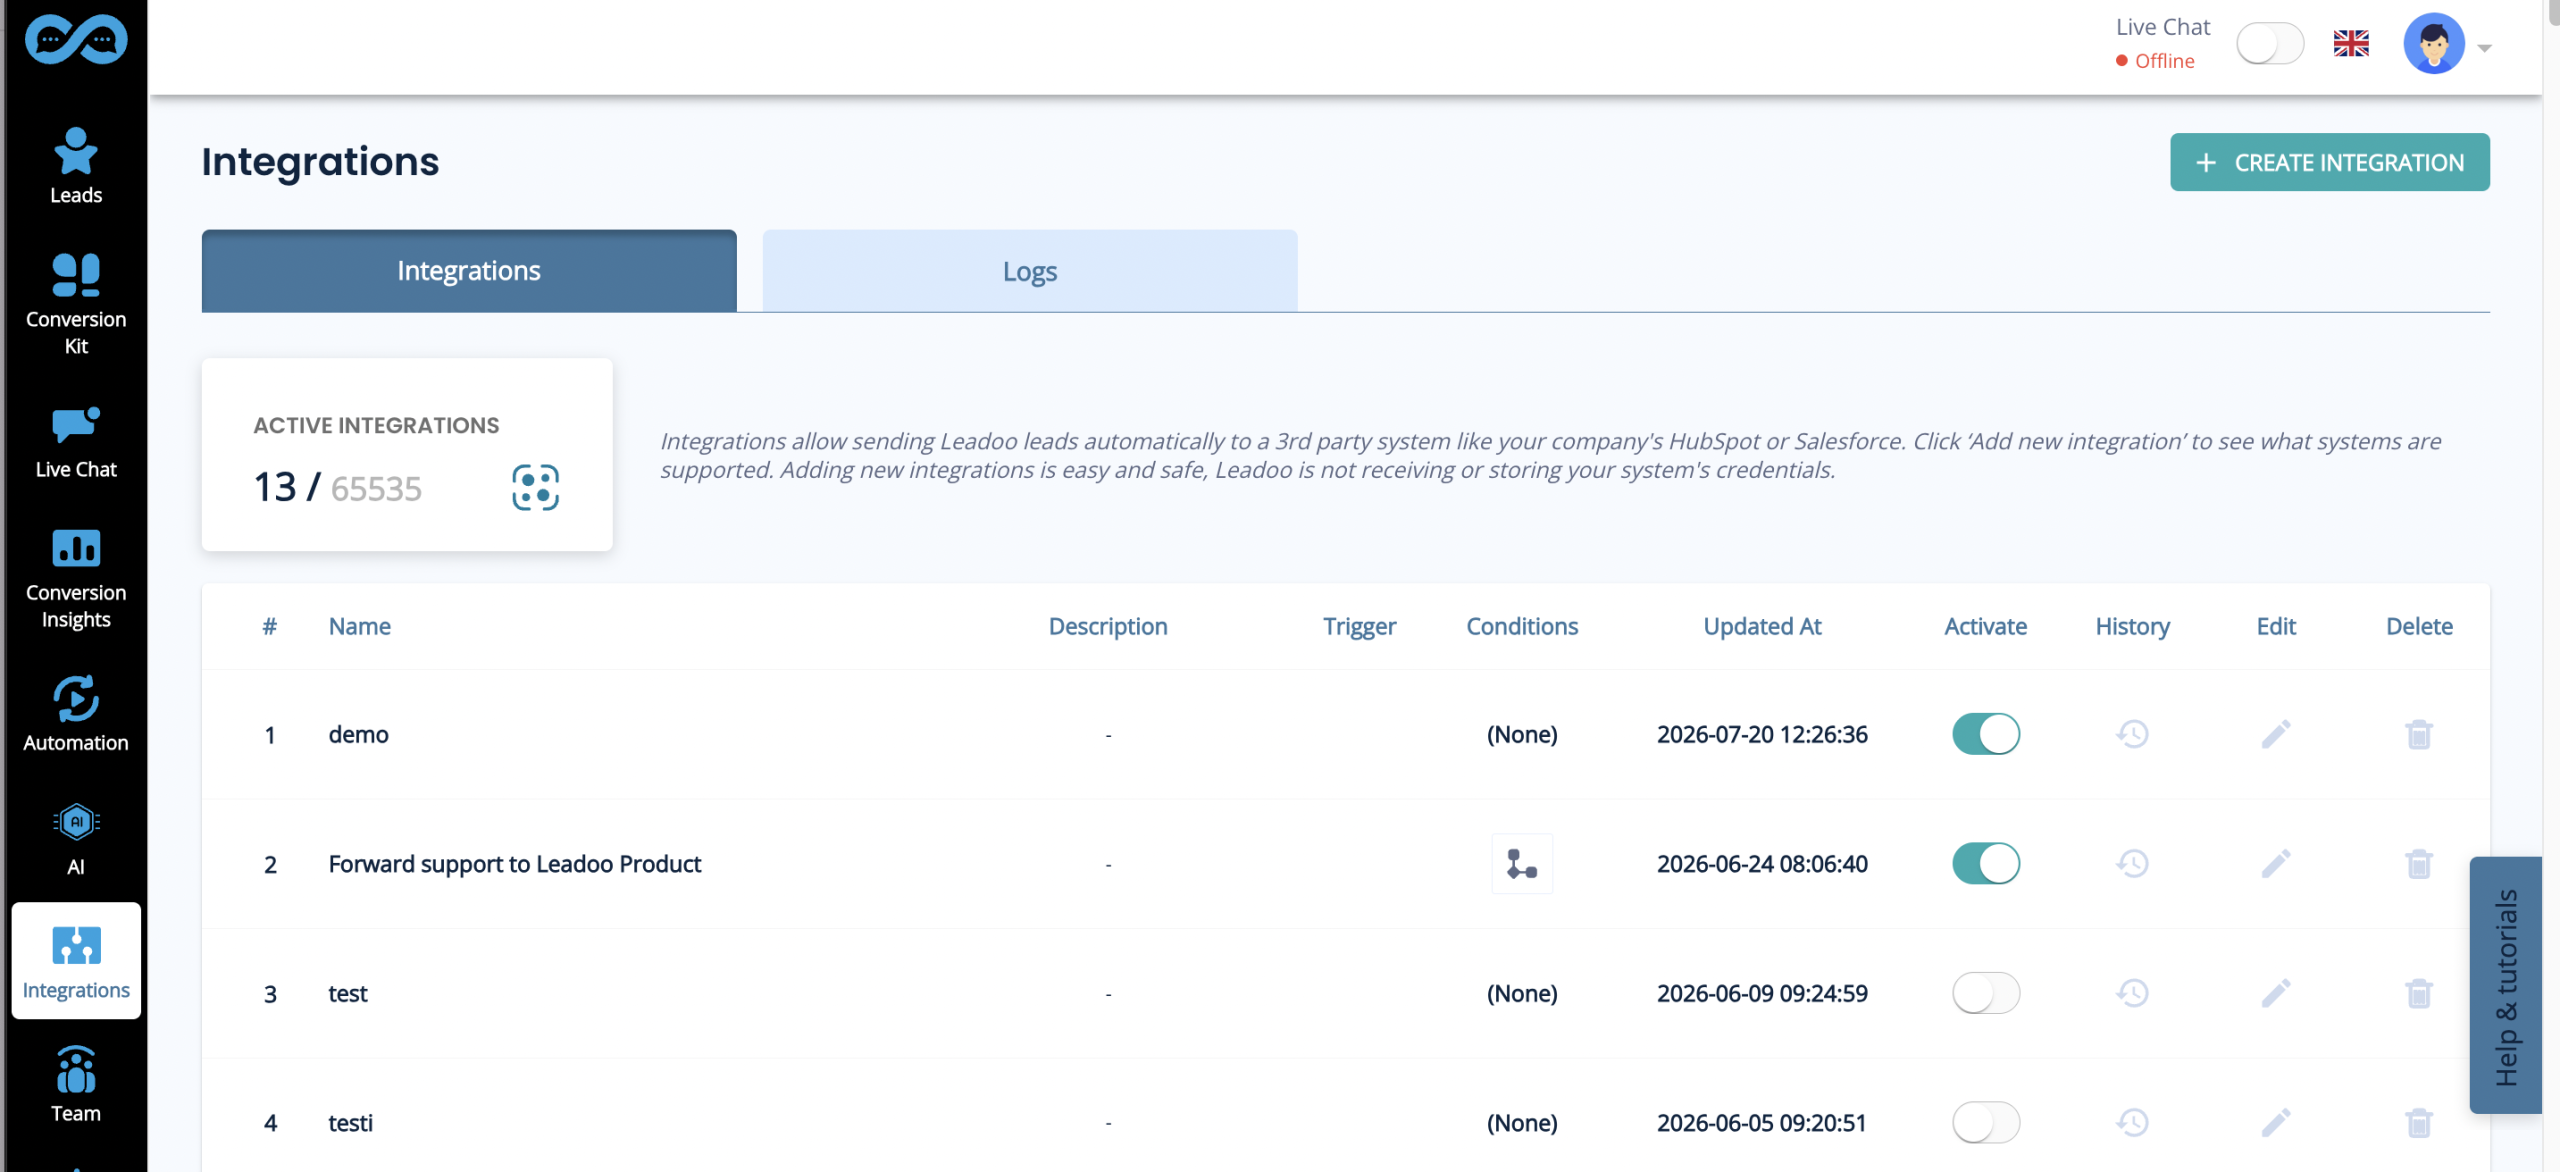
4. Navigate to https://app.leadoo.com/integrations/list by clicking the “Integrations”
5. To create a new integration, click the “Add new integration”.
6. You’ll land on the Triggers & Conditions page which lets you control which leads should be processed by the integration. For example you can filter the leads based on their labels. By default all the leads will be processed. We recommend that you don’t modify the settings unless necessary. -> Click “Continue”
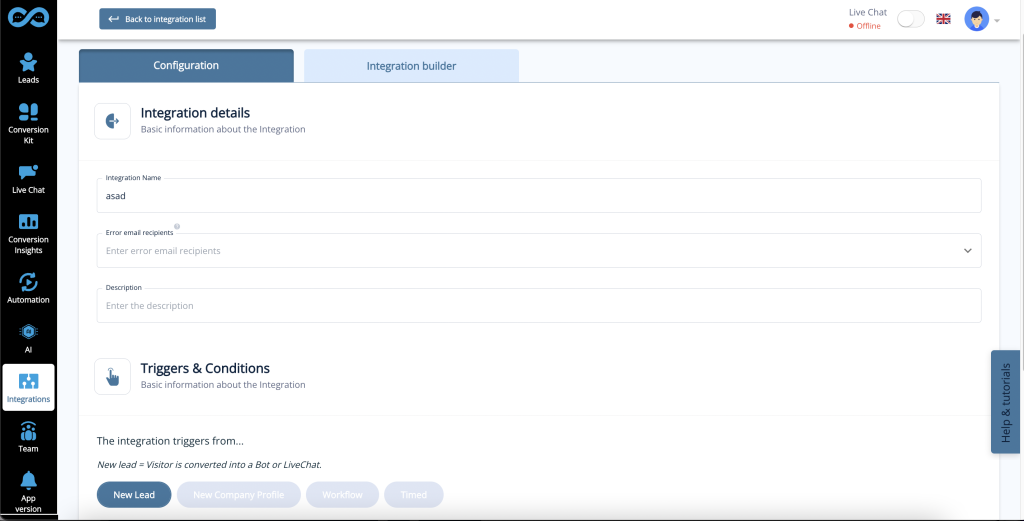
7. You’re now offered the option of creating a template integration or a custom on from scratch. This instruction focusses solely on templates, so click on “From a template“
8. Select your desired system from the templates.
Authentication
1. Click the Pipedrive Application under the “Application Connectors” dropdown and click “Authenticate Now“
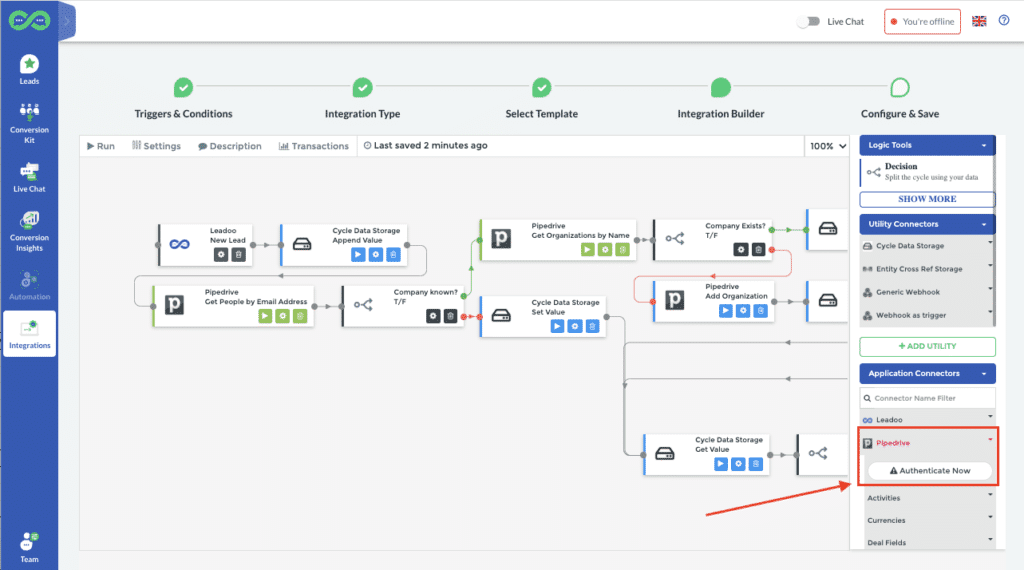
2. You will be taken to the Pipedrive authentication page, which will require you to input the API key for your Pipedrive user/organization.
3. Add the API key and click “Next“
4. The Pipedrive connector should now be authenticated, and you should have been taken back to the Integration builder
5. Complete the setup by following the instructions in the “Field mapping” section.
1. Click the “Step setup” (Cog wheel icon) on the “Add Deal” method/node.
2. You’ll see different field mappings that are predefined. Scroll down to “Stage ID” and click open the dropdown next to it. Now select “Lookup“
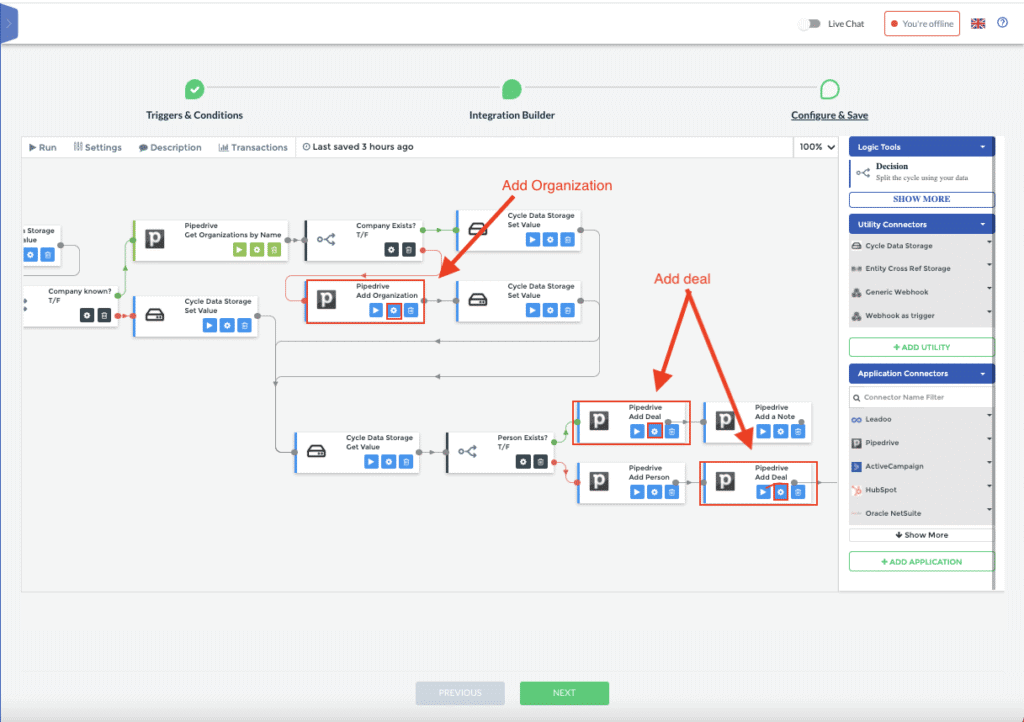
Select the Pipeline you want the leads to be added to, and then the Lead stage. F.e: FIN Pipeline -> Meeting scheduled
Note: You will need to do this for both methods/nodes.
3. If you want, you can assign an owner for the organization by filling out the “Owner ID” in the “Add Organization” method/node.
4. After the IDs have been added, click “Next“
5. Add a name for the integration. You can also add an optional description. In the “Recipients” field you can define the different emails that will receive integrations error messages (Default is Leadoo accounts Owner). Separate the emails by a comma. (f.e: [email protected] , [email protected])
6. Click “Save and Finish“. Make sure you activate the integration by clicking the slider when viewing the integrations list. (https://app.leadoo.com/integrations/list)
Please ensure you’re using an account that has sufficient access rights e.g. Admin.
1. Click open the Application from the “Application Connectors” dropdown.
2. Next, click on “Authenticate Now“.
3. A “Sign-in” button should appear, click it and sign in using your credentials.
4. You will be requested to Authorize the Leadoo Application. Accept.
5. After a successful authentication, you will be returned to the integration builder, and you can now finalise the integration.
Field mapping
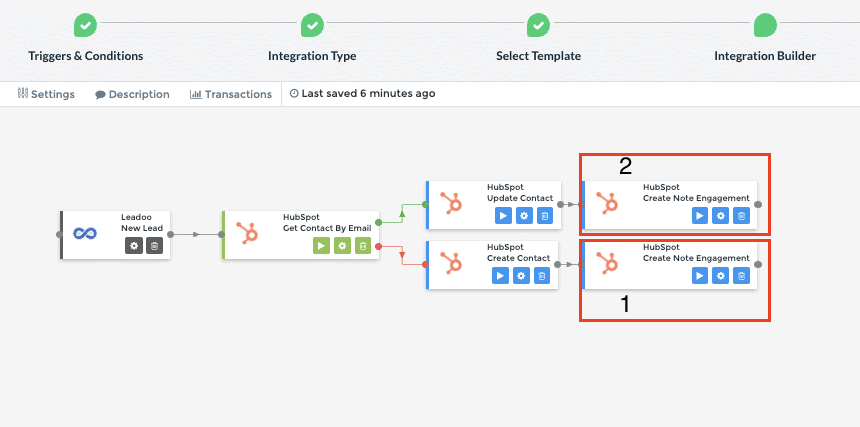
1. Click on the “Set Setup” -button (Cog wheel icon) on the “Create Note Engagement” node(1)
2. The Notes require an owner to be assigned for them.
3. To add the owner, find the “Owner ID” field and click on the dropdown and select “Lookup“. You’re now able to see different users from your organization in Hubspot.
4. You can also do the change above for the “Create Note Engagement” for the “Update Contact” branch (2). The owner will be set based on the existing contact owner by default.
5. When you’re ready, click “Next“
6. Add a name for the integration. You can also add an optional description. In the “Recipients” field you can define the different emails that will receive integrations error messages (Default is Leadoo accounts Owner). Separate the emails by a comma. (f.e: [email protected] , [email protected])
7. Click “Save and Finish“. Make sure you activate the integration by clicking the slider when viewing the integrations list. (https://app.leadoo.com/integrations/list)
1. Click on the “Step Setup” -button (Cog wheel icon) on the “Create Contact” node.
2. Open the “Owner ID” dropdown and select “Lookup“. After this, select the person you want the contacts to be assigned to.
Note: By default the owner will be assigned based on the user that was used to authenticate the integration.

3. When you’re done, click “Next“
4. Add a name for the integration. You can also add an optional description. In the “Recipients” field you can define the different emails that will receive integrations error messages (Default is Leadoo accounts Owner). Separate the emails by a comma. (f.e: [email protected] , [email protected])
5. Click “Save and Finish“. Make sure you activate the integration by clicking the slider when viewing the integrations list. (https://app.leadoo.com/integrations/list)
Additional resources:
Leadoo AI is fully integrated to Google Tag Manager, meaning that custom events can be triggered for every interaction any visitor has with Leadoo AI conversation tools. Here’s how to implement Google Tag Manager to work with Leadoo AI:
Go to Conversion Kit -> General bot settings -> Advanced
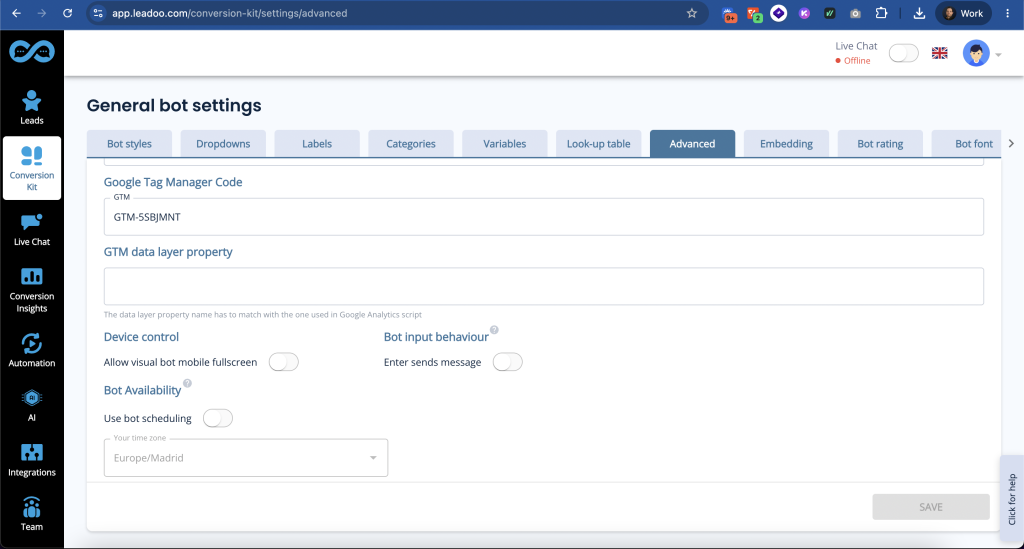
*In most cases you can leave GTM data layer property field empty.
After this has been set your bots will start sending events.
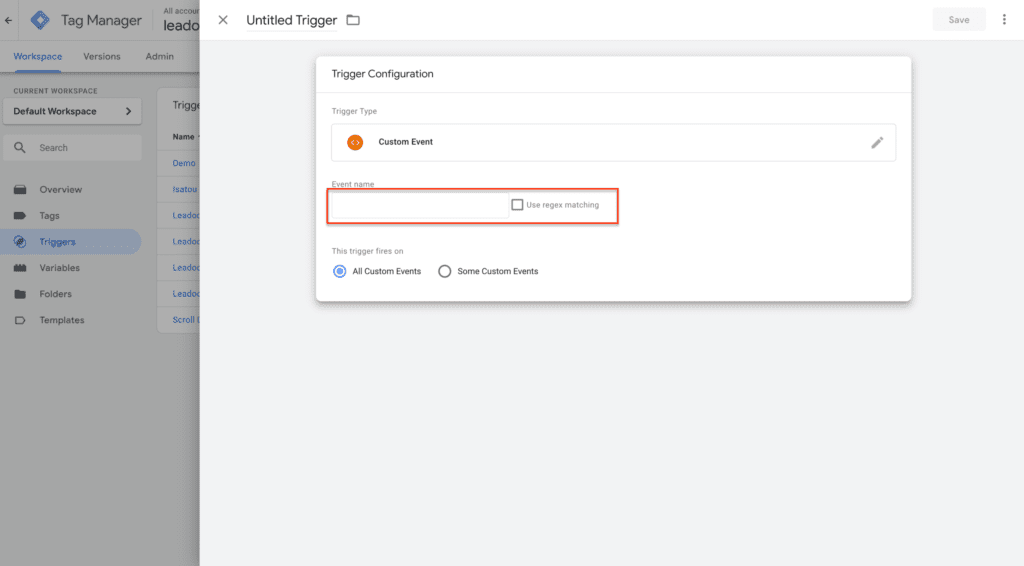
Select “Custom event”
Then set the event name accordingly.
Events sent automatically by Leadoo AI include:
TRIGGER – Sent when a bot is triggered
DISCUSSION – Sent when a bot discussion is started
LEAD – Sent when a lead is converted
LC_TRIGGER – Sent when a live chat conversation is started
AI_DISCUSSION – Sent after the user sends their first message and successfully receives an AI-generated response
PRODUCT_RECS_DISCUSSION – Sent after the user sends their first message and successfully receives a response in a product recommendation discussion
PRODUCT_RECOMMENDATION_DISPLAY – Sent when product recommendations are displayed to the user
Additional value:
product_id – IDs of the displayed productsPRODUCT_RECOMMENDATION_CLICK – Sent when a user clicks a product recommendation
Additional value:
product_id – ID of the clicked productBOT_RATING_SUBMITTED – Sent when the user submits a bot rating by clicking one of the rating stars
Additional value:
rating_value – The submitted bot ratingMultiselect options, used for creating audiences for retargeting ads:
GTM-1234 – Sent when a button is clicked within a bot discussion
By default, event names are generated in a format such as “GTM-2663823”, but they can be edited in the Leadoo AI backend.
To prevent duplicate analytics data:
BOT_RATING_SUBMITTED is sent only once per rating submission. Returning to the rating step does not generate duplicate events.
PRODUCT_RECOMMENDATION_CLICK is sent only once for the same product within a single discussion, even if the user clicks it multiple times.
Choose “Track Type -> Event”
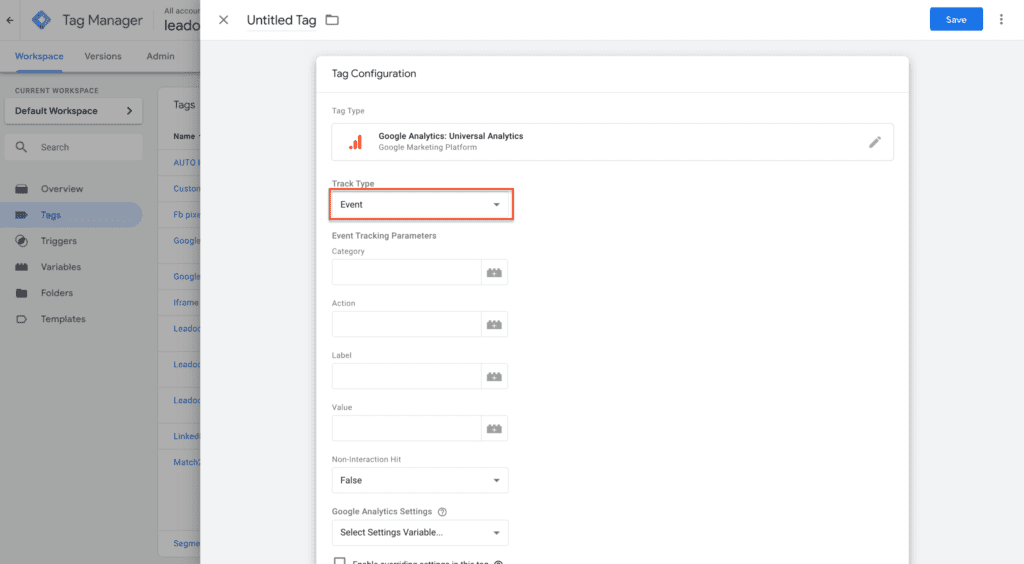
Set the desired values for category, action and label.
Most commonly we suggest to add the following values for basic users when measuring just leads / conversions:
Category: Leadoo
Action: Lead / Discussion / Trigger
Label: Page url variable
Connect this created tag to the trigger that is associated with action set in this section.

Now you will be able to track your Leadoo conversion in Google Analytics.
First start by configuring Your GA4 Tag In Google Tag Manager
Before creating our custom event tag, we need to first configure our GA4 tag in GTM to connect the two applications. In your GTM container, create a new tag using the following steps:
* You can find Measurement ID from GA4 under Admin -> Data Stream -> click account -> copy Measurement ID
After configuring GA4, you can move to creating the tags
Example:
Choose “Tag Type” ->GA4 Event
”Event Name” -> Leadoo_Lead *
Connect this created tag to the trigger that is associated with action set in this section.
*If you want more specific information to be sent to GA4 (Bot type, Bot Category, Label etc.) you should add these to ”Event Parameter”
Fe. You want to see Labels on GA4:
Add row -> Parameter Name: Lead_type -> Value: {{Label}}
(Remember to create ie. {{Label}} variable on GTM using Data layer variable)
Some Leadoo AI events include additional values that can be passed to Google Analytics 4 as event parameters. Create the corresponding Data Layer variables in Google Tag Manager and add them under Event Parameters in your GA4 Event tag.
Use product_id for product recommendation display and click events, and rating_value for bot rating events. The values available depend on the event being tracked.
Now you will be able to track your Leadoo AI conversions in Google Analytics.
Advanced Users
More advanced Google Tag Manager users can also leverage the information sent over on the data layer. The following details can be used to create custom variables
category <- Bot type (embed, chat, cta, modal)bot_category <- For each bot you can set a bot category on the Leadoo AI backend, this allows you to create for example separate analytics for sales and recruitment botslabel <- For each multi select answer you can create custom labels. These can be for example interest type of the customertext <- Info of what text was written on the bot.bot_name <- Name of the botbot_nickname <- Name given on bot settingsproduct_id – The ID of the clicked product or the IDs of the products displayed in a product recommendation event.rating_value – The rating submitted by the user.
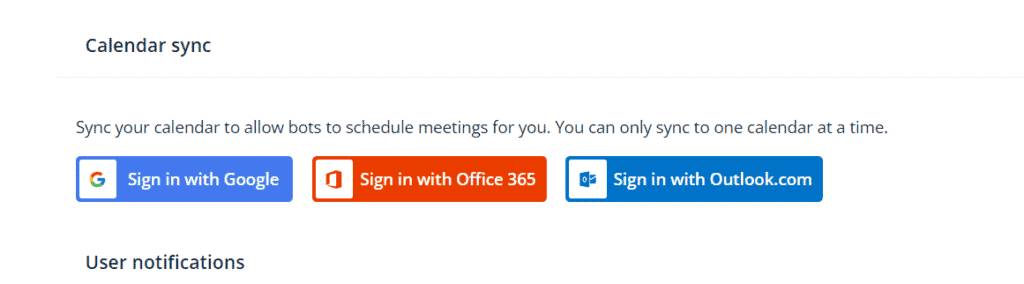
Click your profile image in the top right navigation open your profile menu. In the menu, select “My account” to open the profile.

Scroll down the page to find the section called “Calendar sync“.
If you want to use Google Hangouts conferencing links in your meetings → use a Google account email.
If you want to use Teams conferencing links in your meetings → use a Microsoft account email.
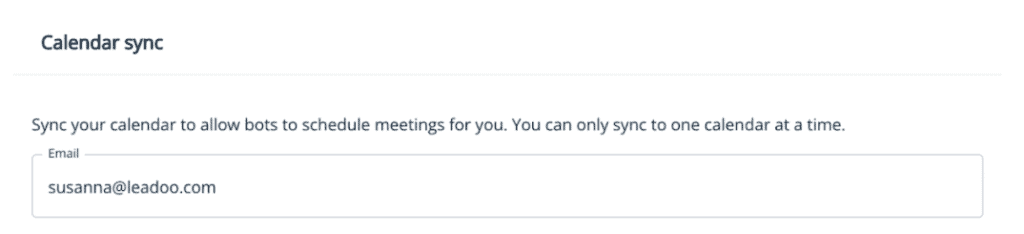
*The system prefills the email field with the address you use in your Leadoo account.
If you want to use another email, replace the prefilled text with the preferred email address.
Also make sure your calendar is not in read-only mode! (Only publicly available calendars can be synced)
If you are unable to edit your email address or click on the Sign with XX ask your Customer Success Manager to check that the feature is enabled for you 👇

Select sign in button depending on the type of calendar service your email uses.
Google Calendar → Sign in with Google
Outlook calendar→ Sign in with Microsoft personal calendars
Office 365 → Sign in with Microsoft business calendars
Allow Leadoo AI to manage your calendar
A separate third-party popup will open to finalize the sync.
In order for the calendar sync to succeed, make sure to check all boxes to give Leadoo full permissions to read and modify your calendar, i.e. handle meeting bookings for you.
Leadoo AI will not use these rights to anything else than making incoming bookings through bots that have booking node where your calendar is linked. Leadoo will not e.g. in any circumstance delete any meetings from your calendar.
When you see this or similar view, your calendar sync was successful. If this doesn’t appear or you get error messages, the sync has failed.
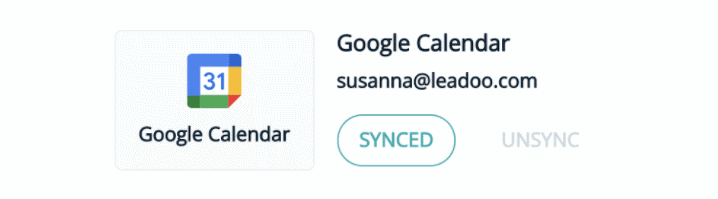
Some reasons why sync might fail:
After the calendar shows synced choose to which hours in the day, how far in future and in what intervals calendar bookings can be made to your calendar.

Availability allows you to choose your time zone and the hours within which calendar bookings can be made each day. Ie. Always from 9am to 12pm and 1pm to 5pm (if you want to block bookings over lunch) or Mondays from 10pm to 5pm so you can start your week by emails and planning.
Remember that despite these availability hours the existing bookings in your calendar will also block anyone from scheduling overlapping meetings. Ie if you have a recurring team meeting every Monday morning this will automatically be unavailable in your calendar.
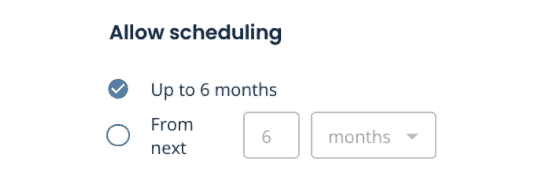
Allow scheduling
Here you can decide how far in future your calendar can be viewed and meetings scheduled.
Buffer time
This comes handy if you want to always have a short break in between meetings so that meetings cannot be booked back to back in your calendar.
Don’t allow scheduling
If you want to make sure there will be no surprise meetings for the same day or no new meetings for next X hours or days. With this rule your calendar can only be viewed and booked starting after the set time. This is also the minimum time that you will have for preparing for the meeting.
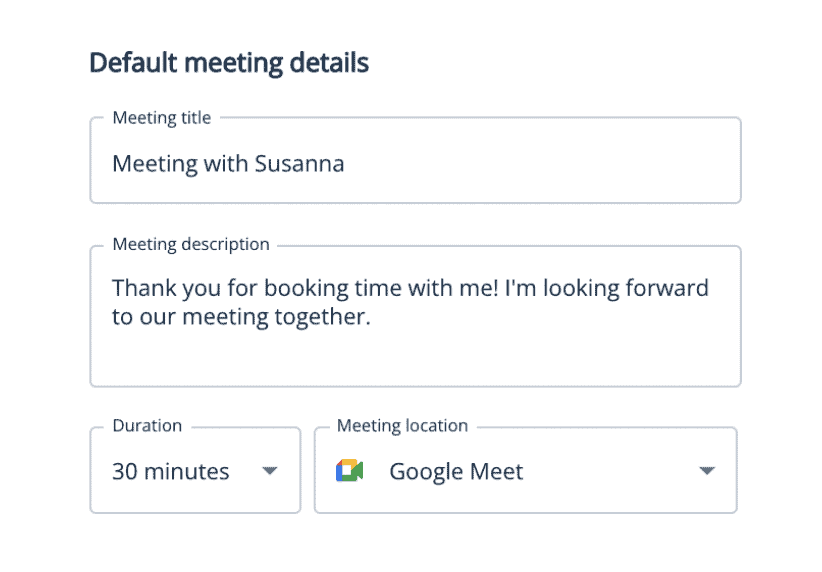
Once a meeting has been scheduled from your calendar both you and the scheduler will get an calendar invite. In default meeting details you can choose what will this calendar invitation state.
Google Calendar → Select Google Meet
Outlook calendar→ Select Teams
Office 365 → Select Teams
NB!
If you have included the scheduling of different meeting types you can also set the meeting details per bot or dialogue branch within the bot editor.
Once the setup is complete your Leadoo Customer SUccess Manager will add you to receive any leads that come through your own personal calendar integration. This way you will both get the calendar invitation as well as the bot dialogue and other lead details collected on the bot.
Once the setup is complete your Leadoo Customer Success Manager will add you to receive any leads that come through your own personal calendar integration.
This way you will both get the calendar invitation as well as the bot dialogue and other lead details collected on the bot.