Getting started
1. Start by navigating to the “Integrations” page.
2. If this your first time creating an integration, you will be asked to generate an API-key. Click the highlighted “here” or open the “Integration settings” to access the API key.
(If you already have an API-key do not regenerate it. It will break existing 3rd party integrations. Skip to #5)

3. Click “Generate API key”
- The API-key will be generated, applied. No need to copy it, unless you’re using the Zapier application
4. Navigate to https://app.leadoo.com/integrations/list by clicking the “Integrations”
5. To create a new integration, click the “Add new integration”.
- To edit existing integrations, click to the “Edit”-button (pencil icon)
6. You’ll land on the Triggers & Conditions page which lets you control which leads should be processed by the integration. For example you can filter the leads based on their labels. By default all the leads will be processed. We recommend that you don’t modify the settings unless necessary. -> Click “Continue”

7. You’re now offered the option of creating a template integration or a custom on from scratch. This instruction focusses solely on templates, so click on “From a template“
8. Select your desired system from the templates.
- If your system is not found, please contact your Leadoo agent for additional information
Authentication & Field mapping
Pipedrive
Authentication
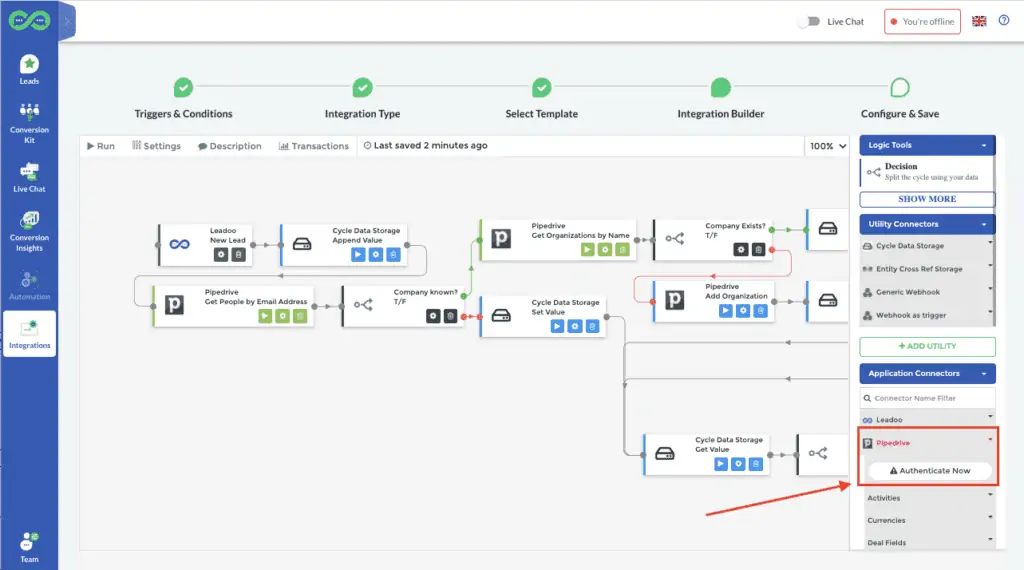
1. Click the Pipedrive Application under the “Application Connectors” dropdown and click “Authenticate Now“

2. You will be taken to the Pipedrive authentication page, which will require you to input the API key for your Pipedrive user/organization.
3. Add the API key and click “Next“
- You can find the Pipedrive API key by following these instructions: https://help.import2.com/en/articles/662571-how-to-obtain-your-pipedrive-api-key
4. The Pipedrive connector should now be authenticated, and you should have been taken back to the Integration builder
5. Complete the setup by following the instructions in the “Field mapping” section.
Field mapping
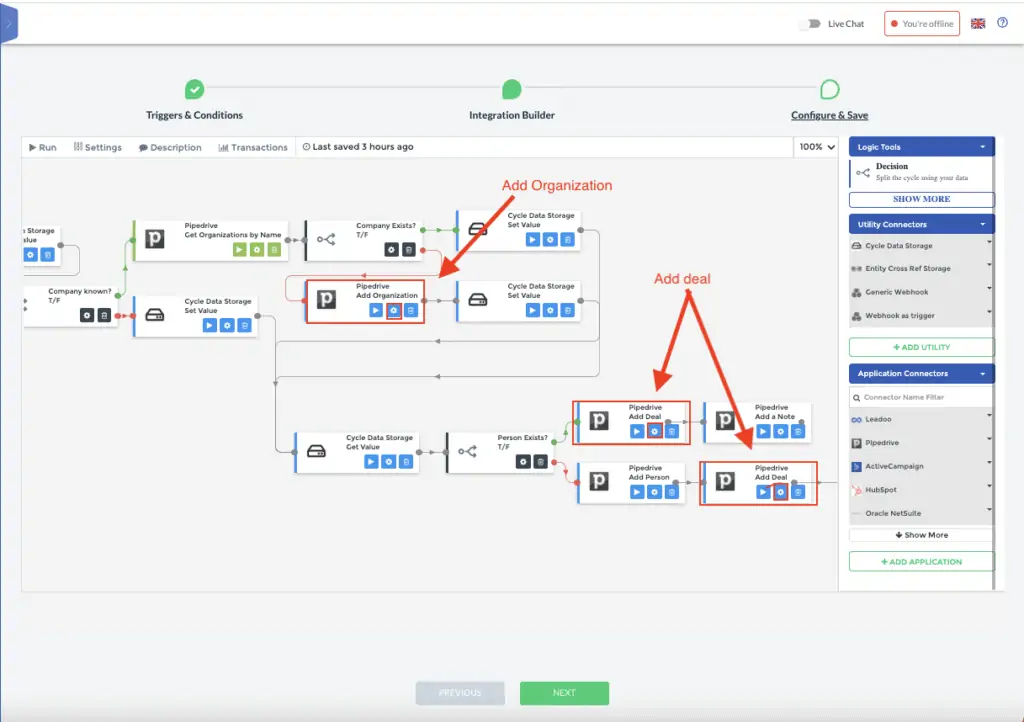
1. Click the “Step setup” (Cog wheel icon) on the “Add Deal” method/node.

2. You’ll see different field mappings that are predefined. Scroll down to “Stage ID” and click open the dropdown next to it. Now select “Lookup“
Select the Pipeline you want the leads to be added to, and then the Lead stage. F.e: FIN Pipeline -> Meeting scheduled
Note: You will need to do this for both methods/nodes.
3. If you want, you can assign an owner for the organization by filling out the “Owner ID” in the “Add Organization” method/node.
4. After the IDs have been added, click “Next“
5. Add a name for the integration. You can also add an optional description. In the “Recipients” field you can define the different emails that will receive integrations error messages (Default is Leadoo accounts Owner). Separate the emails by a comma. (f.e: [email protected] , [email protected])
6. Click “Save and Finish“. Make sure you activate the integration by clicking the slider when viewing the integrations list. (https://app.leadoo.com/integrations/list)
Authentication fo Hubspot & Salesforce (OAuth)
Please ensure you’re using an account that has sufficient access rights e.g. Admin. 1. Click open the Application from the “Application Connectors” dropdown.
2. Next, click on “Authenticate Now“.
3. A “Sign-in” button should appear, click it and sign in using your credentials.
- If other fields appear, fill in the requested information and click on the pink “Next” -button. You should now be able to login.
4. You will be requested to Authorize the Leadoo Application. Accept.
5. After a successful authentication, you will be returned to the integration builder, and you can now finalize the integration.
Hubspot
Field mapping
1. Click on the “Set Setup” -button (Cog wheel icon) on the “Create Note Engagement” node(1)

2. The Notes require an owner to be assigned for them.
3. To add the owner, find the “Owner ID” field and click on the dropdown and select “Lookup“. You’re now able to see different users from your organization in Hubspot.
4. You can also do the change above for the “Create Note Engagement” for the “Update Contact” branch (2). The owner will be set based on the existing contact owner by default.
5. When you’re ready, click “Next“
6. Add a name for the integration. You can also add an optional description. In the “Recipients” field you can define the different emails that will receive integrations error messages (Default is Leadoo accounts Owner). Separate the emails by a comma. (f.e: [email protected] , [email protected])
7. Click “Save and Finish“. Make sure you activate the integration by clicking the slider when viewing the integrations list. (https://app.leadoo.com/integrations/list)
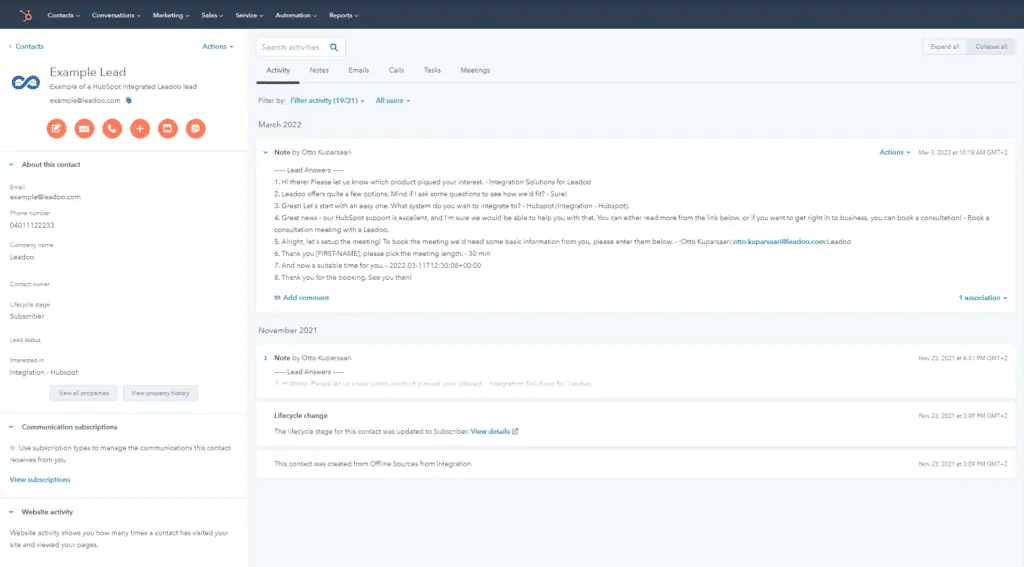
What the lead looks like on Hubspot:

Salesforce
Field mapping (optional)
1. Click on the “Step Setup” -button (Cog wheel icon) on the “Create Contact” node.
2. Open the “Owner ID” dropdown and select “Lookup“. After this, select the person you want the contacts to be assigned to.
Note: By default the owner will be assigned based on the user that was used to authenticate the integration.

3. When you’re done, click “Next“
4. Add a name for the integration. You can also add an optional description. In the “Recipients” field you can define the different emails that will receive integrations error messages (Default is Leadoo accounts Owner). Separate the emails by a comma. (f.e: [email protected] , [email protected])
5. Click “Save and Finish“. Make sure you activate the integration by clicking the slider when viewing the integrations list. (https://app.leadoo.com/integrations/list)
Additional resources:
https://docs.leadoo.io/docs/integrate-integration-tool
https://docs.cyclr.com/field-mapping
