KNOWLEDGE
Case StudiesBlogsEventsSupport & Starting
Support Articles & HubSupport Videos (Youtube)Try Leadoo Free (Leadoo Lite)Partners & Careers
PartnershipsCareersSecurity & Privacy
Security at Leadoo AIGeneral Terms & ConditionsData & GDPRKNOWLEDGE
Case StudiesBlogsEventsSupport & Starting
Support Articles & HubSupport Videos (Youtube)Try Leadoo Free (Leadoo Lite)Partners & Careers
PartnershipsCareersSecurity & Privacy
Security at Leadoo AIGeneral Terms & ConditionsData & GDPRYou should always add Leadoo’s dynamic script to your website’s <head> tag.
The dynamic script enables the use of Leadoo’s conversion tools and the possibility to enable tracking. You can find your account’s dynamic script at the bottom of this page after logging in to Leadoo.
The dynamic script should fire on each page load regardless of the end-user’s cookie consent.
Additional information can be found here.
Next you should confirm that Leadoo’s tracking settings are set up correctly. Tracking settings can be found on the same page as your dynamic script. By default Leadoo settings should be:
Referrer tracking: start tracking after analytics enabled
User tracking: never
Company tracking: same as user tracking
Remember to click “save” at the bottom of this screen when changing any settings.
Leadoo won’t track any users by default, only after cookie consent has been given by the end-user.
There are two options to enable Leadoo’s tracking:
Option 1: Add a custom consent handling script to your website <head> tag, under Leadoo’s dynamic script. Those scripts check if the cookie consent has been given by the user on each page load to determine if Leadoo’s tracking should be force-enabled. So it’s important that this script loads on each page load. You can find ready made custom consent handling scripts from here: Leadoo – Custom consent handling scripts.
or
Option 2: Add the following script directly to CMP / Google Tag Manager. This code should fire only after a user accepts analytics cookies to force-enable tracking. If cookies are disabled, this script should be removed:
<script>
if (!window.ldanalytics) window.ldanalytics = [];
window.ldanalytics.push(function(a) {
a.toggleTracking(true, false);
});
</script>
There’s a useful video below and you can read more about how Leadoo tracking works here.
The Leadoo calendar node is a great way to create a sense of urgency within your visitors, leading to higher conversion rates and a better user experience. But how does it work?
The calendar node has two functions, first is a live calendar booking that syncs directly with your own calendar (Google, Outlook and Office365) so that prospects or customers can book in with directly. The second is a way for visitors to indicate a date and time that they would prefer, but it can also be great for asking about project start dates etc.
Let’s start with the live booking feature but before you add the calendar node make sure that you have connected your calendar in the platform, you can do this from the My Account area. Here’s an article to help you get connected. Now you’ve got your calendar linked, you’re ready to go!
To use the live booking function, simply add a calendar node to the canva and click on calendar booking, you’ll notice that this changes the settings. From here you’ll need to select which calendar you’d like to connect (you can choose multiple) and update the meeting title and details if you wish. The title, description, duration and location will all be pulled in from the settings in the My Account area so you normally don’t need to change these!
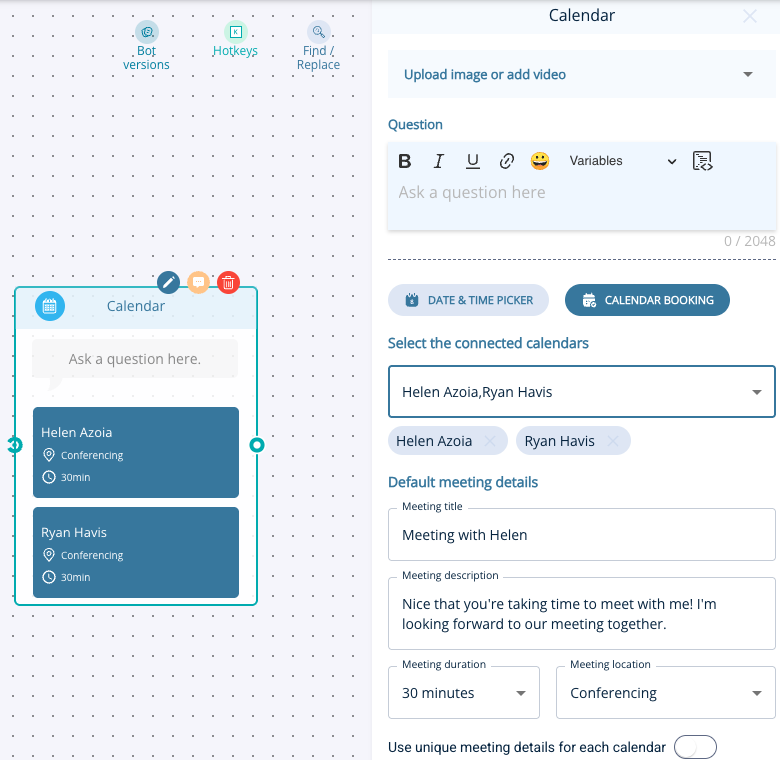
If you’re adding multiple calendars the default meeting details will use the first calendar you added but you can easily change this by toggling on the option to use unique meeting details for each calendar. This will allow you add another level of customisation for the meetings, you’ll be able to use variables to include personalisation options like name and company name etc.

Once you’ve done this you can preview the flow to make sure you’re happy! Here’s a few screenshots of what it will look it. You’ll see that the visitor is prompted to add their email to confirm the booking, but you can also ask for contact details before sending them to the calendar node and it won’t ask for their email again.
The other option when adding a calendar node is to use the offline scheduler which is essentially a date and time picker for the visitor to select. This is great when asking for times they prefer to the contacted, when their project is starting or when they could start a new job.
To get started you’ll need to decide on whether or not they can pick a time as well as a date. If you allow a time to be select you can customise the availablity to create set windows. For example you can allow 9am – 5pm everyday or create certain windows of availability on set days, check out the screenshots below for some inspiration.
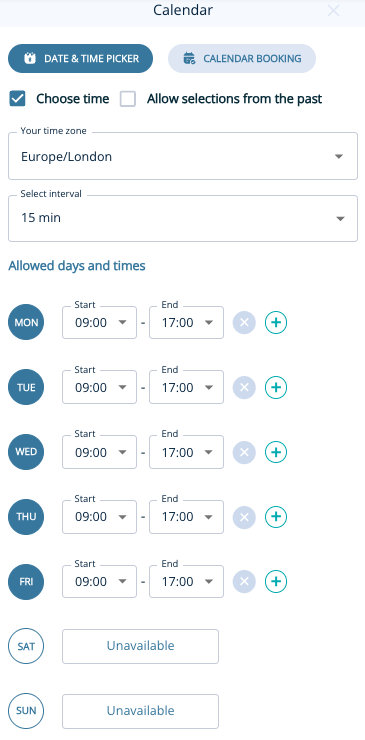
If you’ve chosen to not allow a time to be selected, you’ll simply need to decide on which days you wish to be available.
Leadoo won’t track any users by default, only after cookie consent has been given by the end-user.
You’ll notice that with this option the visitor won’t need to give their email address to confirm because they are not booking directly into you calendar, so it’s generally a good idea to ask for their details before the calendar node!
And that’s all there is to it!
Exit intent is a way of triggering the Visual Bot to capture visitors who are just about to leave your site/page which creates great opportunities for lead capture. We tend to see success with this type of trigger when you’re offering something of real value to your visitors, e.g. brochure or case study download, event registration or everyone’s favourite, a discount!
With exit intent triggering you can:
First things first, you’ll need a visual bot to use this feature. You can either build one from scratch or use an existing one. In fact, if you’ve already got a product finder or event registration page but it’s static on the page then duplicating that and deploying it as a visual bot has the potential to generate some quick wins!
If you need help building a visual bot you can check this guide. For now, I’m going to assume you’ve got one ready to go.
Here we have a simple lead capture visual bot that’s offering visitors the chance to download the latest case studies before they leave. This is a good strategy if your visitors are still in the decision making phase.
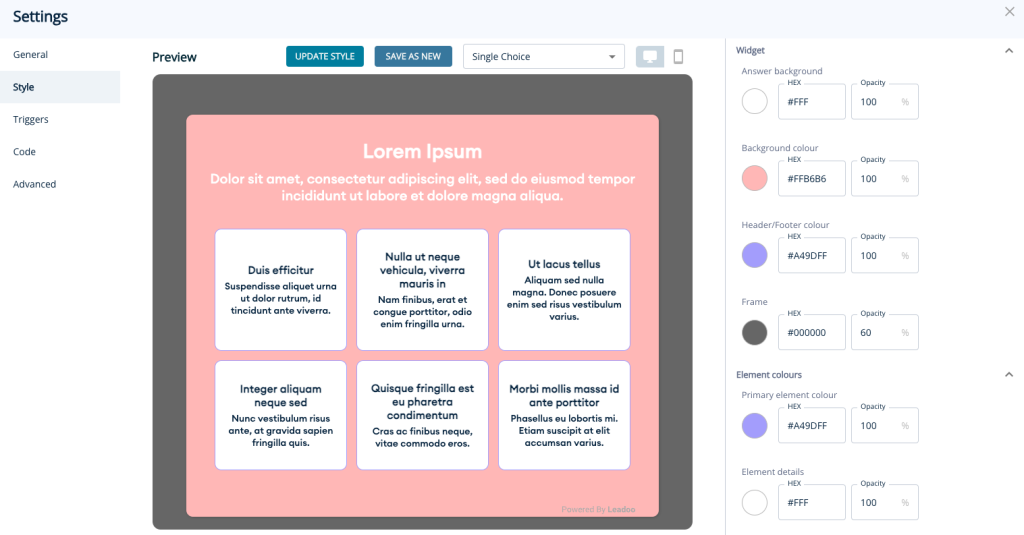
Before we look at the exit intent trigger settings we need to make sure we’ve got the frame colour setup correctly. With exit intent’s the frame basically acts as an overlay on your website which helps the bot to stand out. We recommend using one of your brand colours and setting the opacity to around 60%
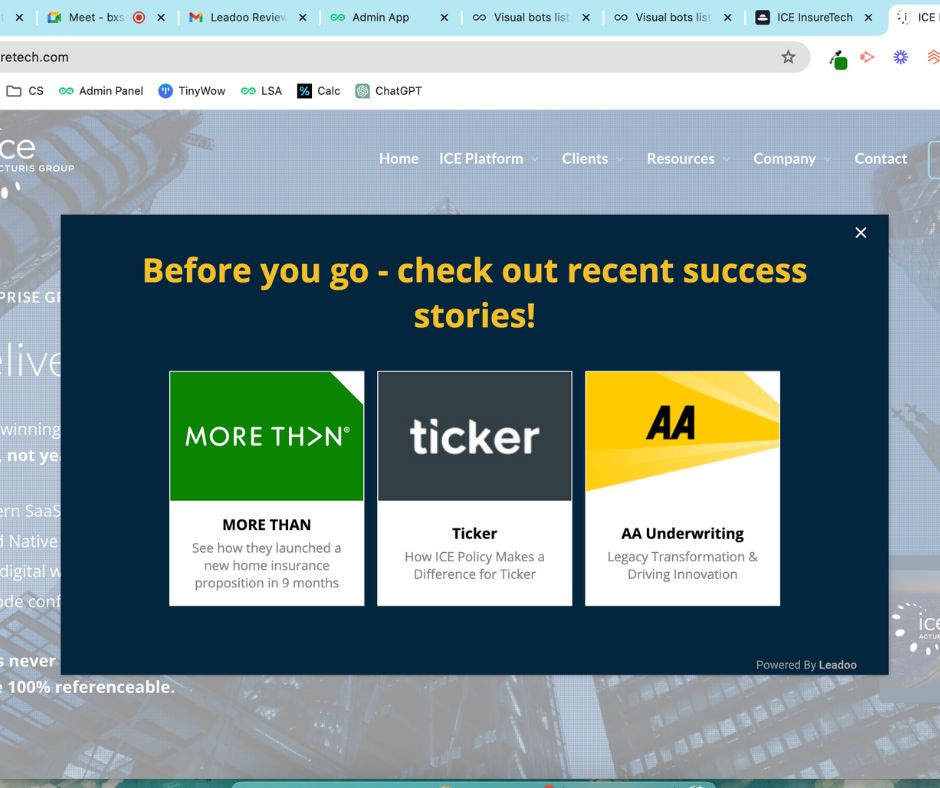
Here’s a nice client example to show you how this will look when it’s live!
Now it’s time to set the exit intent live! Assuming you have the Leadoo tracking script on your site then this will be very quick and easy because the exit intent is triggered by the same logic as the chatbot. If you don’t have the tracking script on your site yet (why not?!) then you can follow this video example of adding it to a WordPress site.
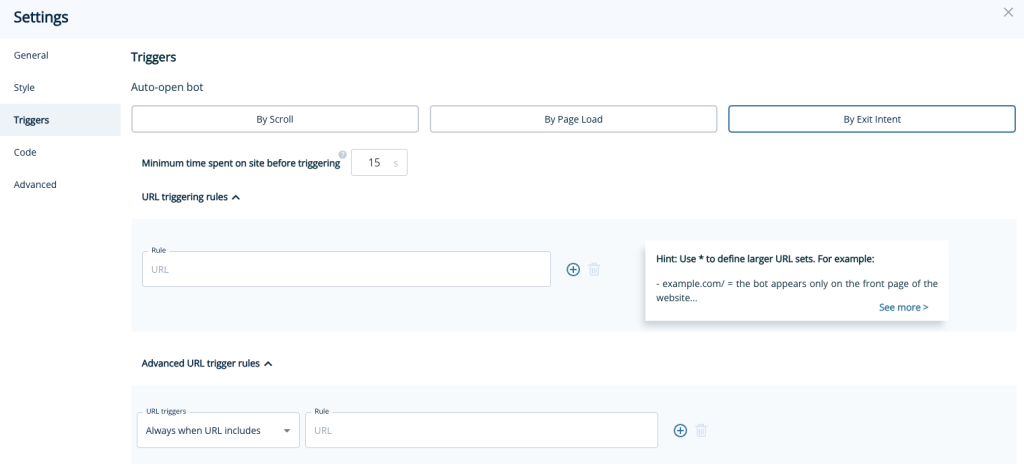
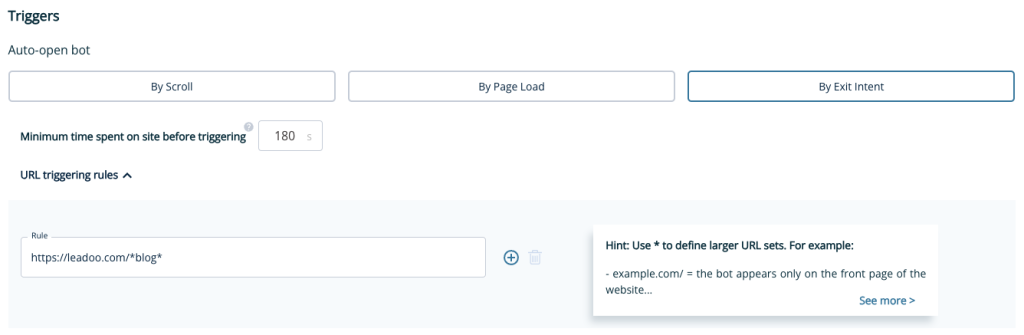
Once you’re in the triggers menu select the By Exit Intent option to get started. From here you’ll need to decide on how long to wait before triggering the exit intent, for some insight into this you should check out the Website Analytics area of the platform to see how long visitors stay on certain pages. We would recommend about half of the average time spent, e.g; if visitors tend to stay on your site for 4 minutes it would be a good idea to trigger the exit intent bot after 2 minutes.
Next up is where you want the exit intent to be shown, simply copy and paste in the URL of the page(s) that you would like it to appear on. This section works in the same way as our chatbot triggers, which you can learn more about here.
Let’s run through a few examples.
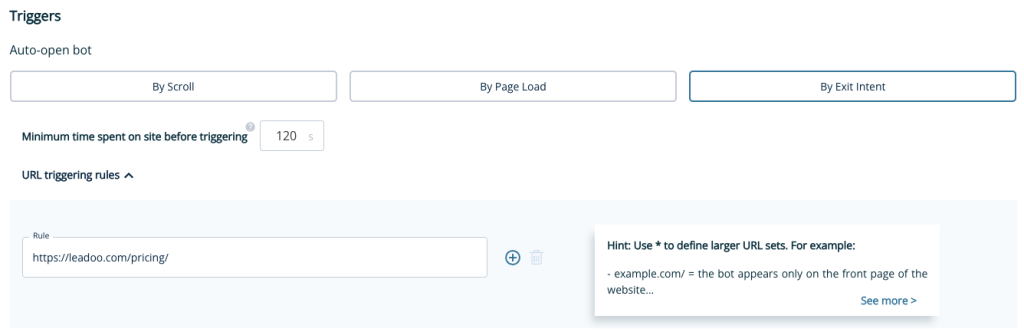
1. Adding the exit intent to your pricing page after 2 minutes. This is great for offering discounts and or showcasing ROI calculators. Simply add in the pricing URL and set the minimum time spent to 120s.
2. Adding the exit intent to all blog pages – this is great for capturing brochure download leads as the visitor will be in the research phase. In this example you’ll notice we’ve used some asterixis when adding a URL, using them allows you to add the exit intent to multiple pages without having to manually add them all. By adding /*blog* the exit intent will show on all our blog pages!
Hope you found this useful, why not get stuck in and try it yourself! Don’t forget if you need any advice or help just reach out to your Account Manager.
In this guide, we’ll walk you through the Leadoo AI dashboard, helping you navigate the essential features of the platform with ease.
To start, here’s a short video on what you’ll find on the dashboard homepage:
Let’s dive into the details!
The dashboard menu provides quick access to all the main tools and insights. Here’s what each section offers:
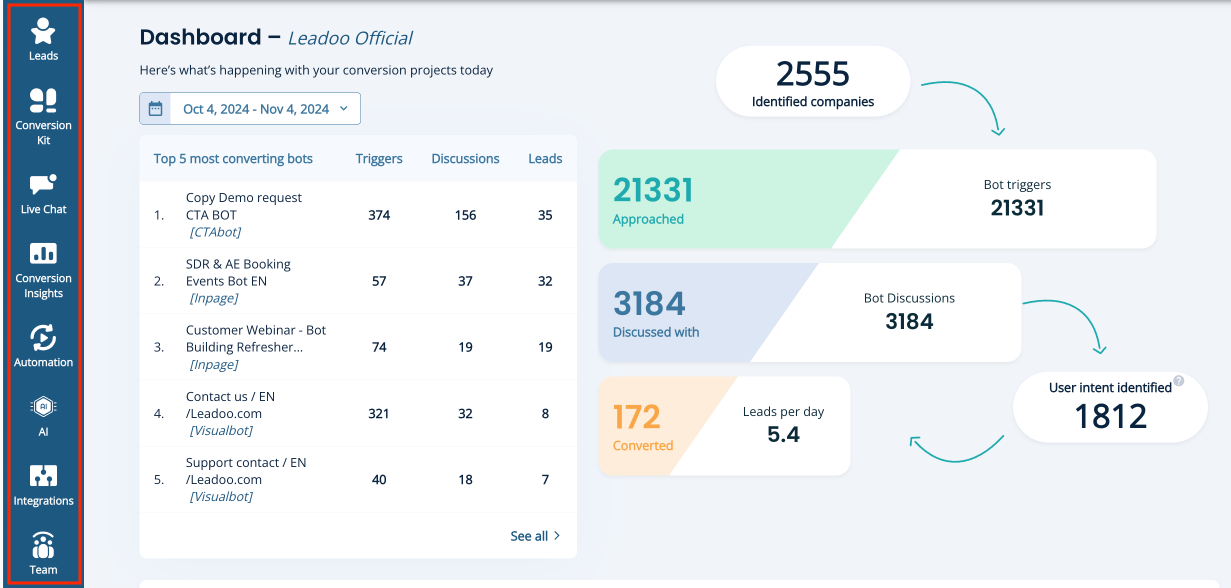
You’ll receive an email notification each time a lead is captured, and if you’ve integrated with your CRM, a new contact will be created there as well. All leads are stored in this section, where you can view full conversation details and apply filters to locate specific leads.
This is where you can find and build all your bots, including:
Find key analytics in pre-built dashboards, covering the following:
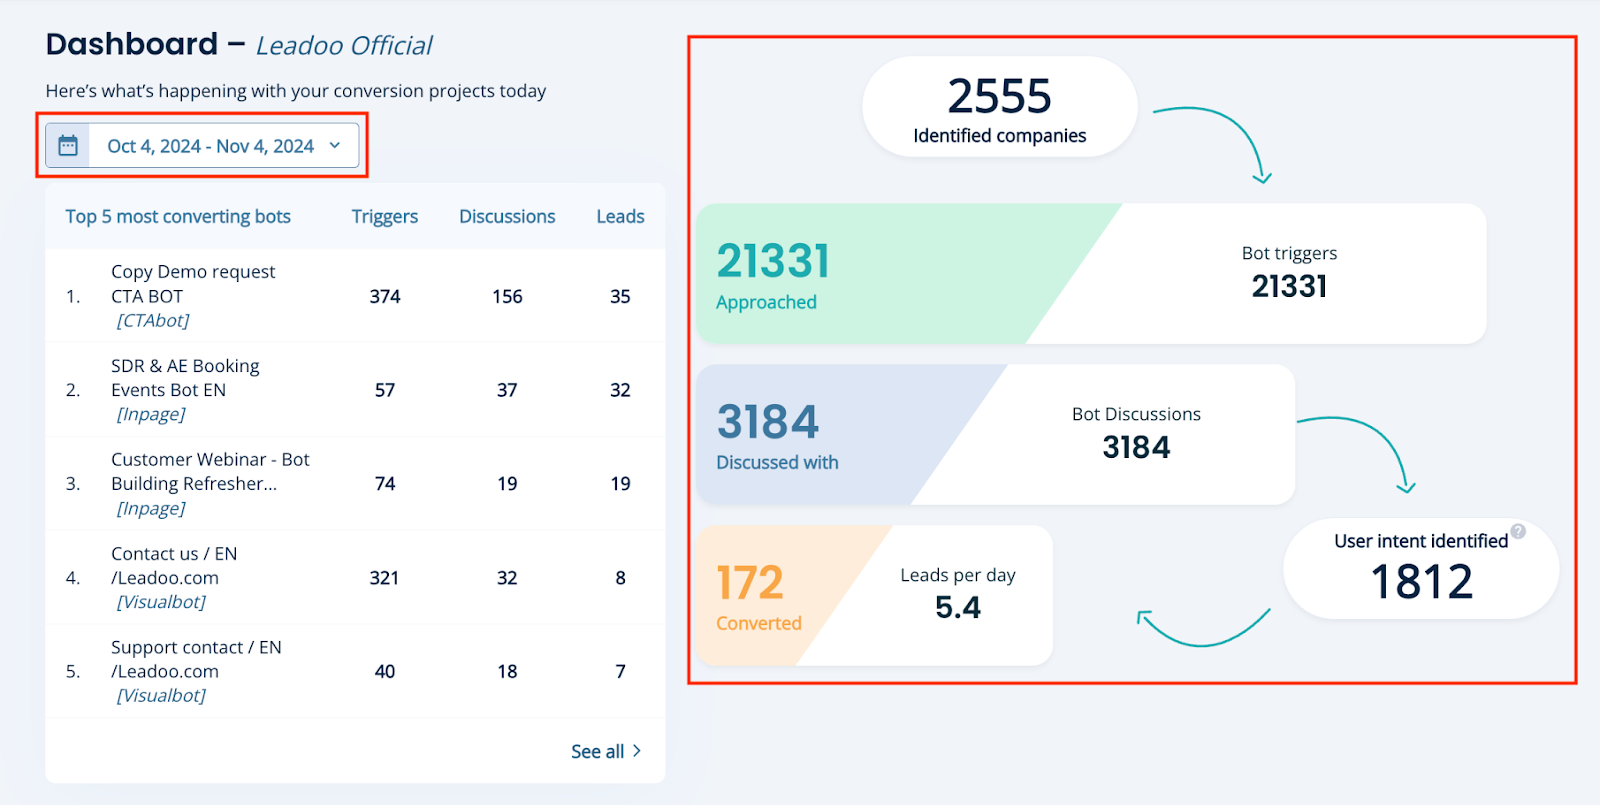
Bot Triggers
Bot triggers are similar to impressions or page views—this figure represents how often a bot was displayed to website visitors.
Bot Discussions
Consider these engagements. Every time a visitor starts an interaction with a bot, it’s counted as a discussion.
Leads Per Day
This figure is based on the lead criteria set within your bots. For instance, if you’ve set it to require a name and email, a lead is counted once both fields are captured.
Identified Companies
This is based on data captured by the Company Identification tool, which identifies companies that have visited your site. Learn more about it here.
User Intent Identified
This metric shows the number of visitors who have engaged with a bot but have not yet converted—these are your potential future conversions!
You can adjust the date range on the right-hand side to view these metrics over different periods.
There are two options to enable Leadoo’s tracking:
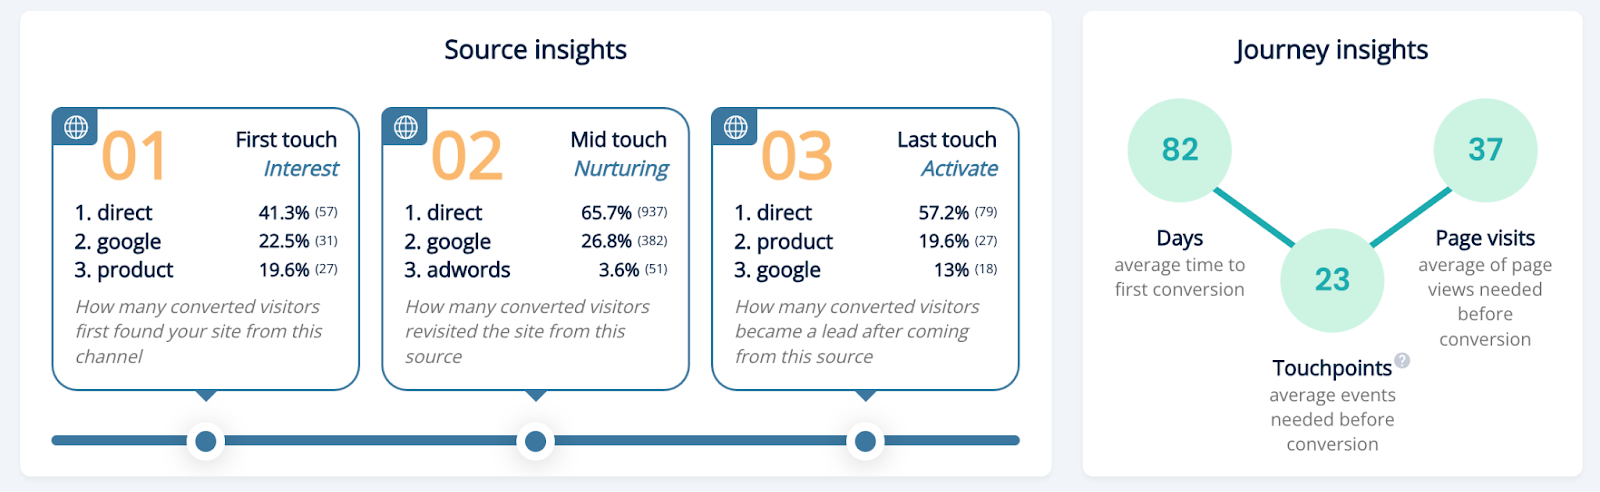
In the dashboard, you’ll find a snapshot of referral sources for your Leadoo AI conversions, along with an aggregated view of the customer journey. Delve deeper by filtering data by campaign, URL, or company details such as industry and location. This data is available under Source Insights, included with our Engage & Elite packages, or as an add-on with other subscriptions.
For more on Source Insights, see the below video:
At the bottom of the dashboard, you’ll find a snapshot of companies identified as having visited your site, highlighting key companies that haven’t yet converted. Company Identification is available to all users and provides access to a targeted list of engaged prospects, complete with extensive filters so you can refine your visitor insights.
Learn more about Company Identification here.
Ready for more? Find more videos and guides in our Knowledge Base.
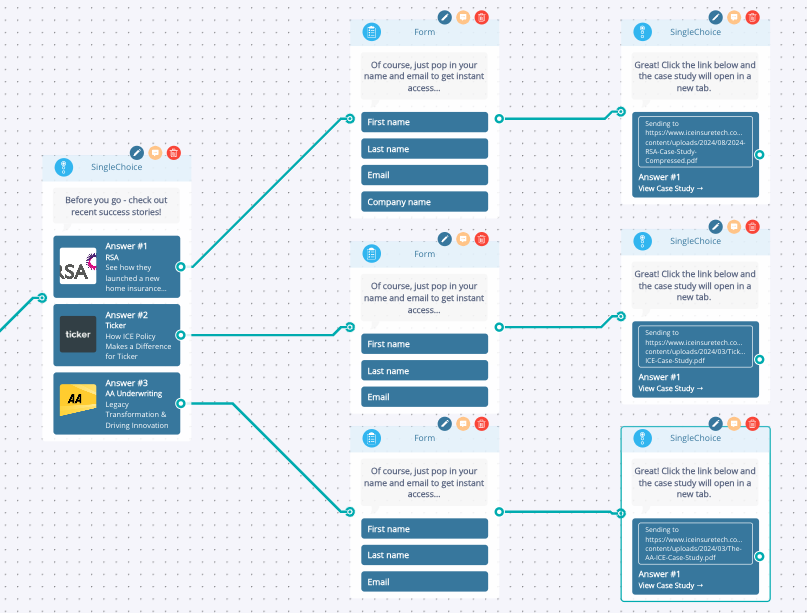
Leadoo’s bot conversations are build with different nodes. With these nodes you can use to personalize your conversations. In this article we explain what are the different node types and how you can use them.
There are 18 different node types which you can use to personalize your conversations.
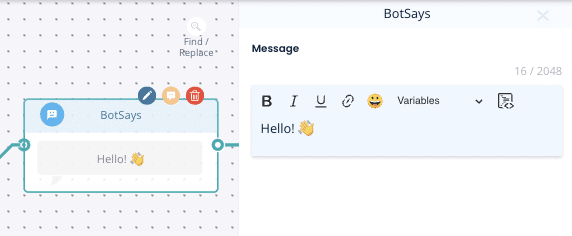
Bot Says – For when you want to ‘say something’ without offering an option and will load the next part of the conversation straight afterwards.
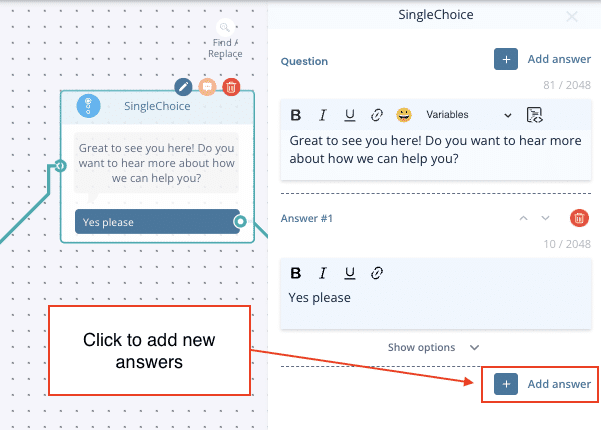
Single Choice – When you want the visitor to select only one choice which can then branch off to different pathways or the same.
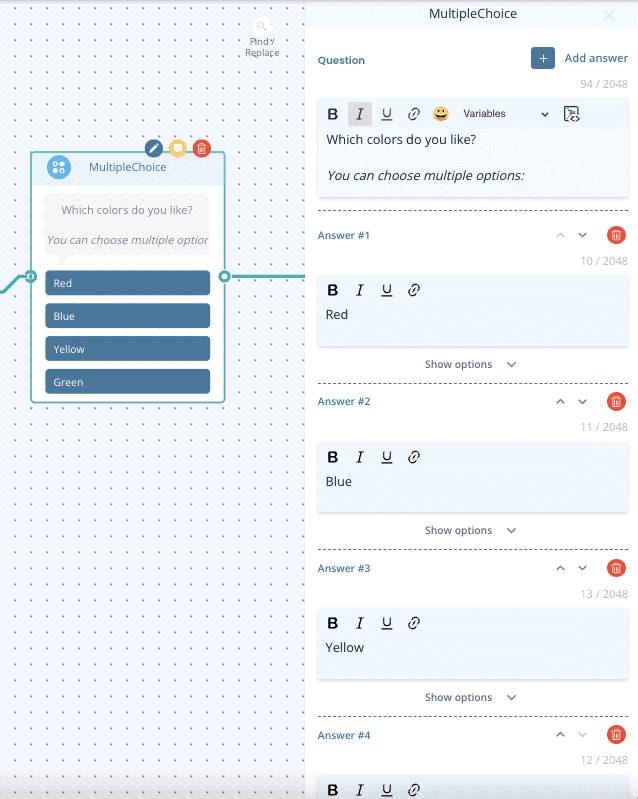
Multiple Choice – When you want the visitor to select multiple options and continue down one path afterwards.
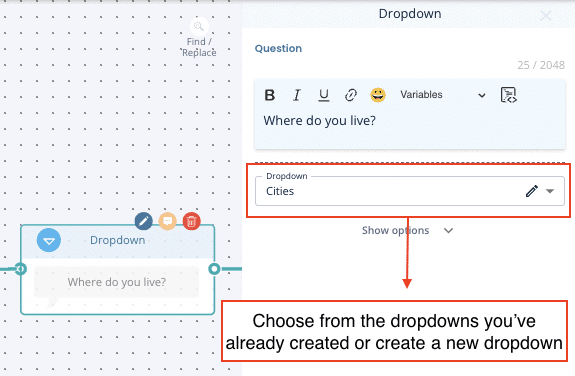
Dropdown – This is useful when you have a long list of options for the visitor to choose from such as location. To use this you must have already created and saved a dropdown list.
Find out how to add dropdown lists here.
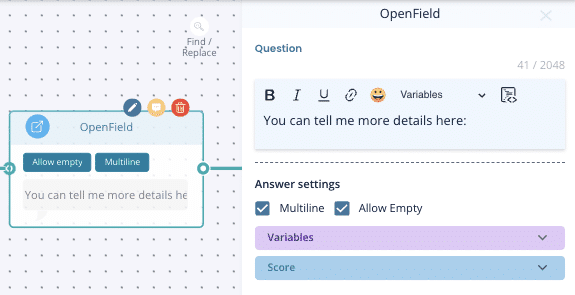
Open field – Adds a box with an open text field for the visitor to complete
Calendar (Date & time picker) – Visitor can choose the date and time freely from the calendar. The time slot they picked won’t be synchronized to any calendar, so this node is just for picking a time.

Calendar (Calendar booking) – Visitor can book a meeting straight from your calendar that has been integrated and synchronized with Leadoo. Calendar Booking makes sure to check you calendar and only shows time slots that are available.
You can read more from here: How to sync your calendar with Leadoo
Logic Router – Use this to determine what option the visitor gets based on their previous responses. This could be via a scoring method or by label.
Using scoring – You will need to add a score to each answer from previous single choice nodes to determine the result here, then set the score you want to determine which result.
e.g. If visitor scored 1-10 they get answer #1, if the score 11-20 they get answer #2.
You can use this to decide if a candidate gets through to the end of an application, or if you want to give a suggestion based on a visitors preferences.
Using labelling – You can also determine a result depending on what labels were most chosen on the single choice options beforehand.
e.g. Visitor selects 3 answers from previous questions, 2/3 of those had the label ‘red’ so they will then see the calculator result for red.
Learn how to set-up labelling here.

Advanced Logic Router – More info here: Cheat sheet: Advanced Logic Router Operations
Calculator – More info here: Creating Dynamic Variables for Calculator and Advanced Logic Router Nodes
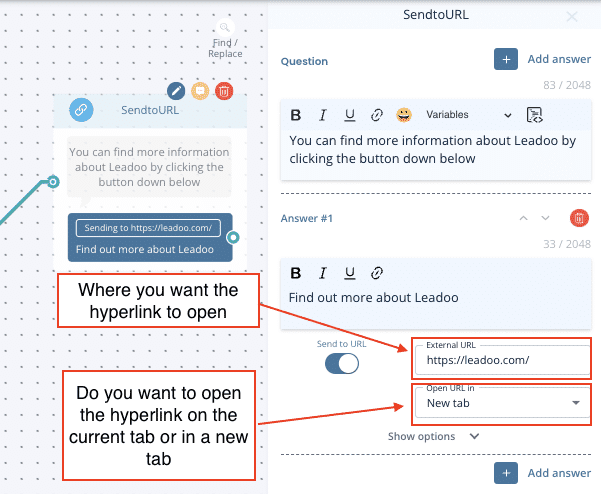
Send To URL – The same as Single Choice but allows you to hyperlink a button to another URL
External URL – is where you want the hyperlink to open
New tab = open in new tab
Current tab = open in the same tab
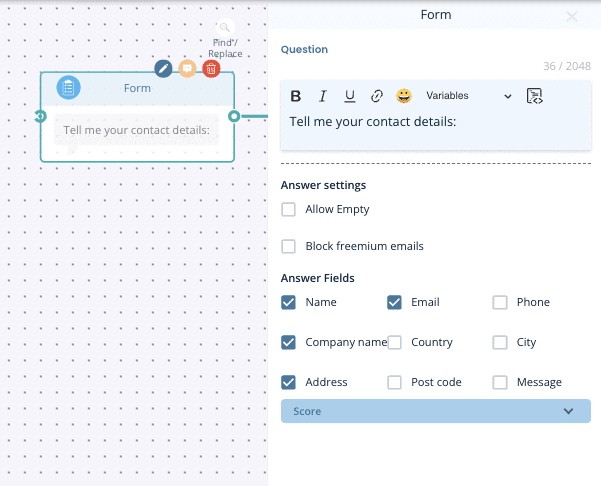
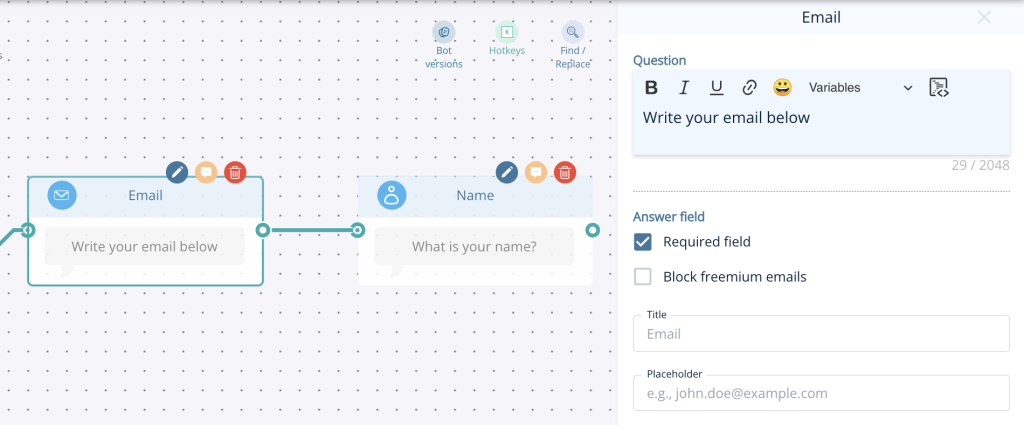
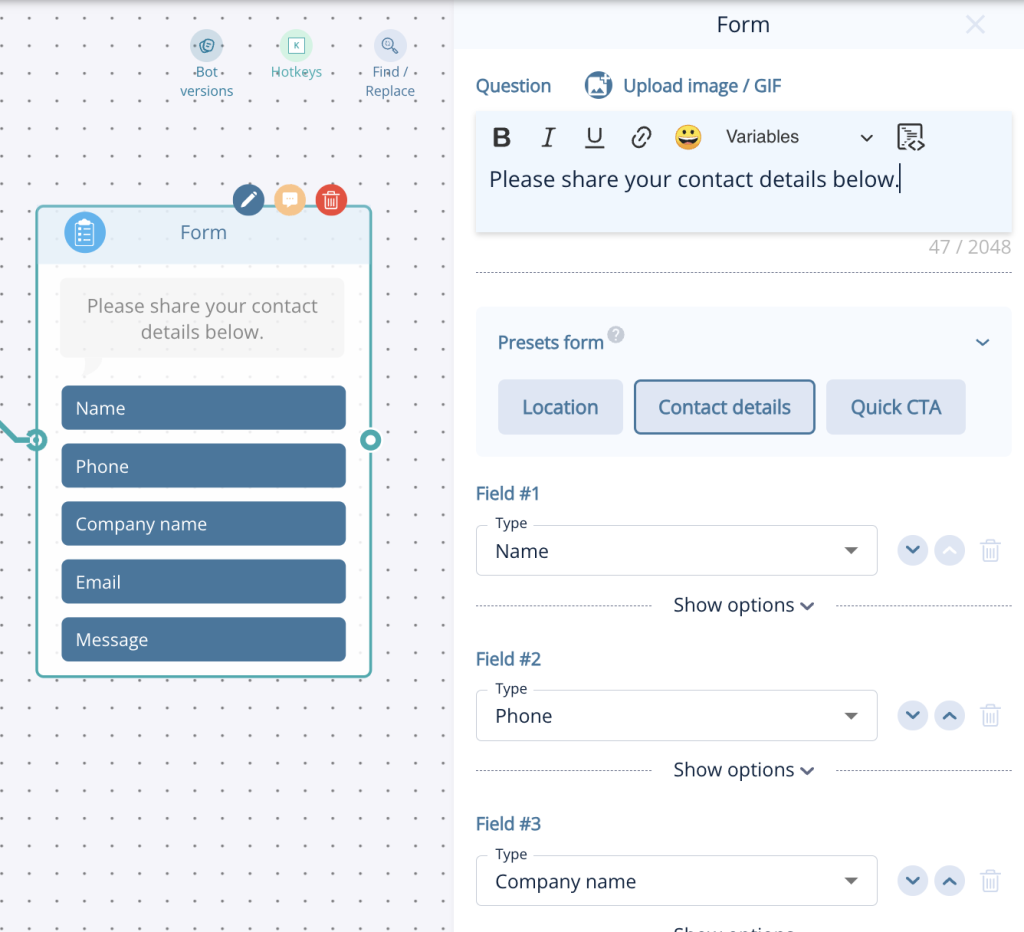
Standard contact nodes include: Name, Email, Company name & Phone number
Grouped contact nodes
Contact – You can collect all your visitors details in one go and select from: name, email address, phone number, company name, country, city, street address, zip code and an additional message.
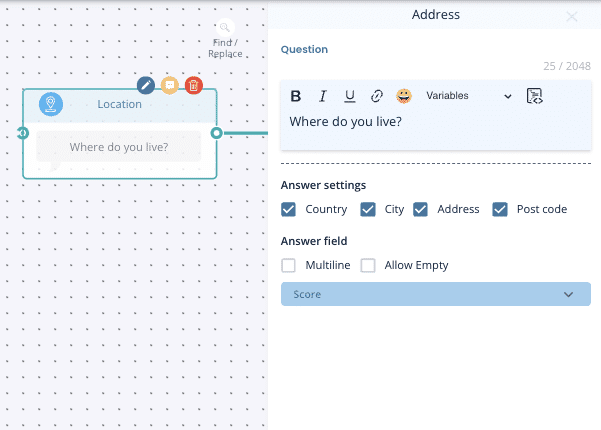
Location– Select which options you want including: country, city, street address & zip code
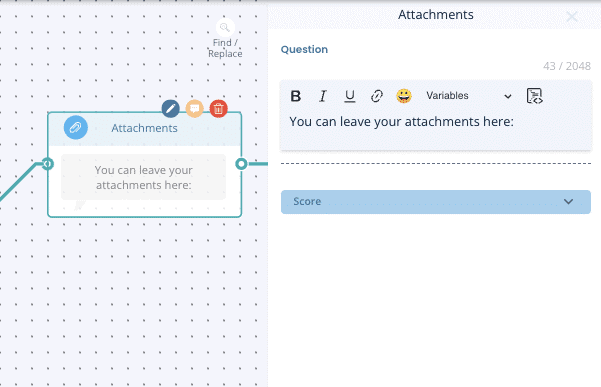
Attachments – Use this to allow visitors to upload documents or images. E.g. a CV or supporting information for IT support.
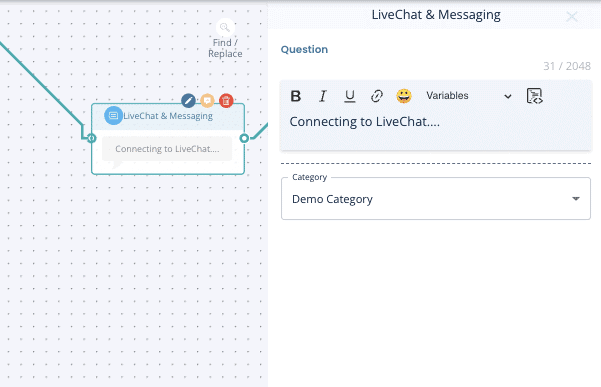
Live Chat – Leadoo live chat can be initiated through single choice options but if you want to add other messaging options too (WhatsApp & Facebook Messenger), you can use the live chat node instead.
TIP – Make sure you still have automated dialogue too so that if there are no agents online your visitor can still get in touch.
Find out how to set-up and use live chat here
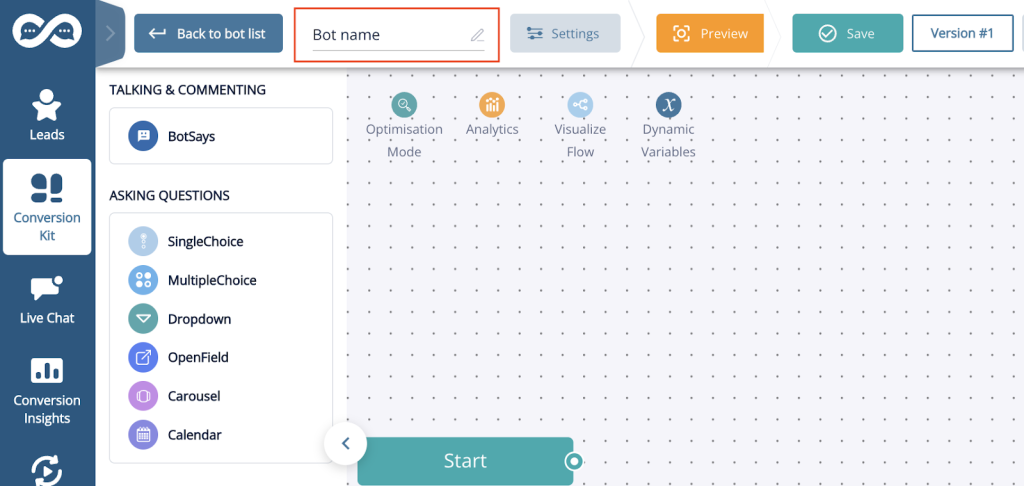
The Visual Bot Builder is your all-in-one workspace for building Chatbots, InpageBots, and VisualBots. Using drag-and-drop features, along with convenient keyboard shortcuts and quick tools, you can effortlessly create and customise decision trees to guide user interactions.
In this article, we’ll walk you through the essentials of building your first bot, so you’ll have a solid foundation to get started. For a breakdown of each node type, check out our guide here.
Watch Senior Technical Account Manager Gavin and Onboarding Development Manager Helen share expert insights in the on-demand webinar below, or continue reading for a step-by-step guide.
For quick tips and time-saving shortcuts in bot editing, simply watch the video below:
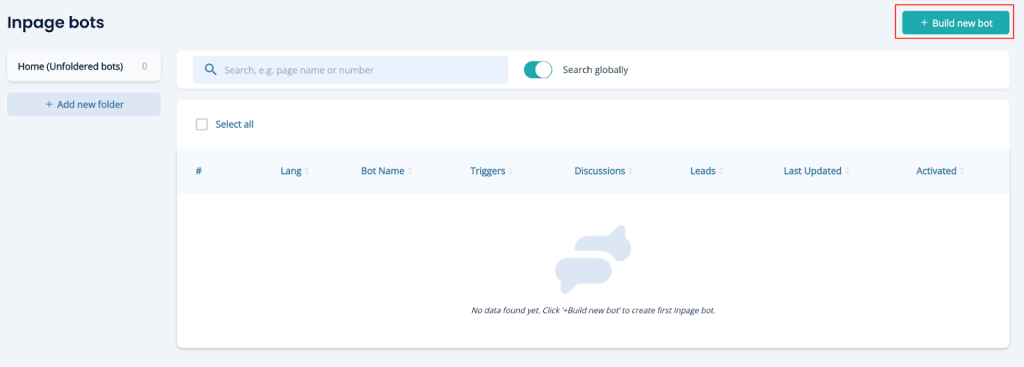
Select Your Bot Type
Decide if you want to build a Chatbot, InpageBot, or VisualBot. Navigate to Conversion Kit > InpageBot/Chatbot or VisualBot on the left-hand menu.
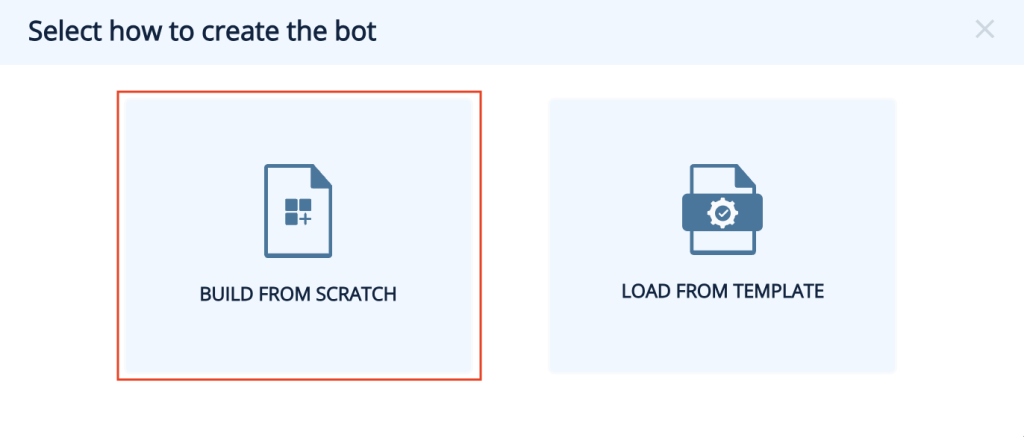
Build Your Bot
Click + Build new bot > Build from scratch to access a blank workspace. Start by naming your bot.
If you’re using a laptop you can use your usual trackpad gestures to move around and zoom in and out. If you are using a keyboard & mouse here are two essential shortcuts you need to know about.
There are a few methods to add nodes:
1. Drag & Drop
Simply drag a node from the menu on the left into your workspace.
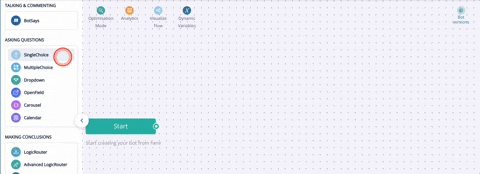
2. Quick-Add
Click and hold the circle on the right of any node, drag it to an open space, and release to open a node menu. Choose the desired node type, which will connect automatically to the starting node.

1. Get Inspiration
Start by exploring pre-built bots for ideas. Check out the Tips & Tricks video above to learn how to copy+paste nodes from one bot to another or even duplicate entire bots.
2. Plan Your Conversation Flow
Use the Bot Says node for introductions, and connect it to a Single Choice node to guide users. Offer varied options to serve different user needs. For example:
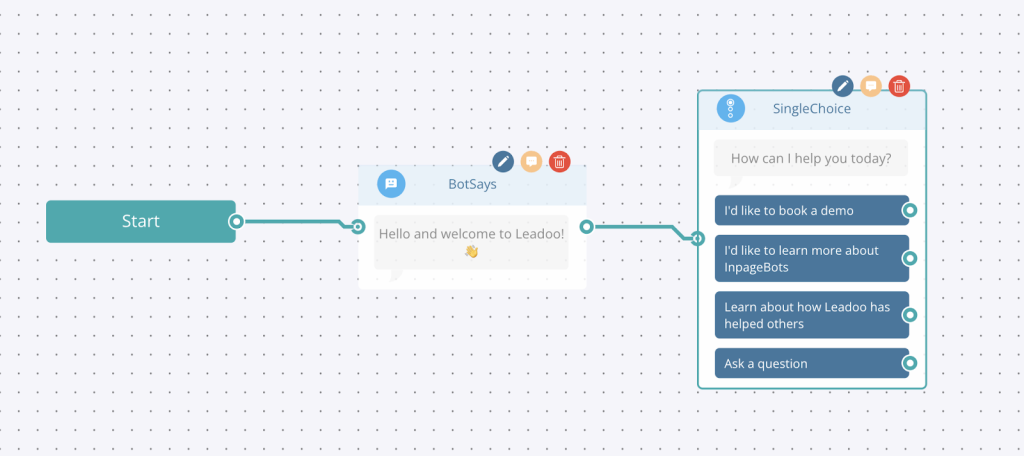
3. Avoid Dead Ends
Always provide multiple choices and avoid abrupt stops. If asking, “Are you ready to book a demo?” provide options like “Yes, I’d like to book a demo” and “Not yet, tell me more about Leadoo Insights.” Including an Ask a question option also encourages customers to reach out.
4. Add Value
Design conversations that go beyond your website’s content. Make information easier to find or offer downloadable resources in exchange for contact details.
Leadoo offers flexible options for capturing visitor details. Start with essential fields, like Name and Email, to secure key information without overwhelming visitors. For more qualified leads, gradually collect additional data by splitting questions across nodes. This keeps the experience smooth and prevents form fatigue, helping you gather necessary information while maintaining visitor engagement.
Consider collecting only what’s essential to follow up, creating a frictionless path for conversions and improving the overall lead experience.
Leadoo bots don’t autosave, so remember to save manually by clicking Save at the top of the page. Exiting without saving will trigger a reminder pop-up.
For further settings and embedding instructions, check out Bot Settings, Bot Styles and Embedding Bots.
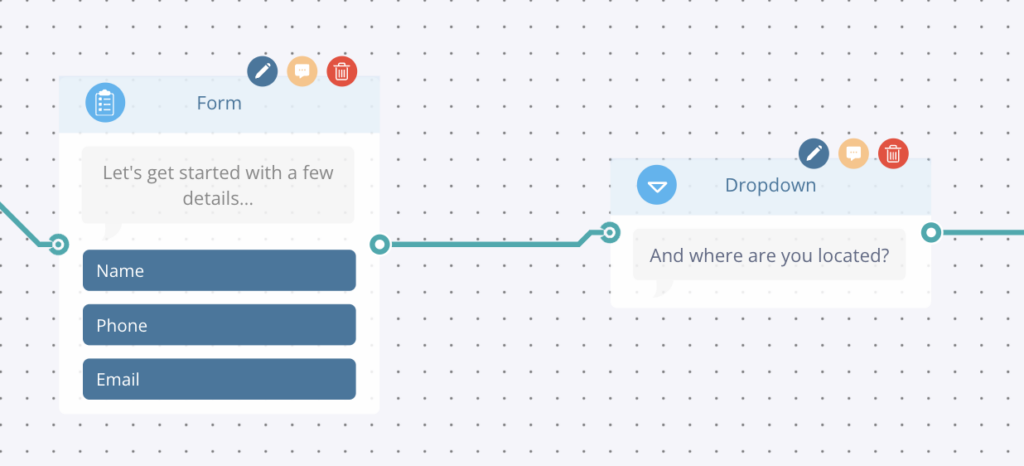
Using the dropdown node is a great way to offer your visitors a wide selection of options to choose from in a very user friendly way. This node is great for when the single choice option is getting a little cluttered, generally we would recommend for options of 6 or more.
Let’s start by building the dropdown list, which you can either do directly in the bot builder or in the general bot settings area.
General Bot Settings
Under the Conversion Kit menu you’ll find general bot settings and dropdowns is the first option. From here you can manually add your dropdown list, in the example below I’ve chosen a country list, or if you already have a list you can upload it using the quick import button. To make sure you’ve got your list set up properly, you can use the sample file to get started!
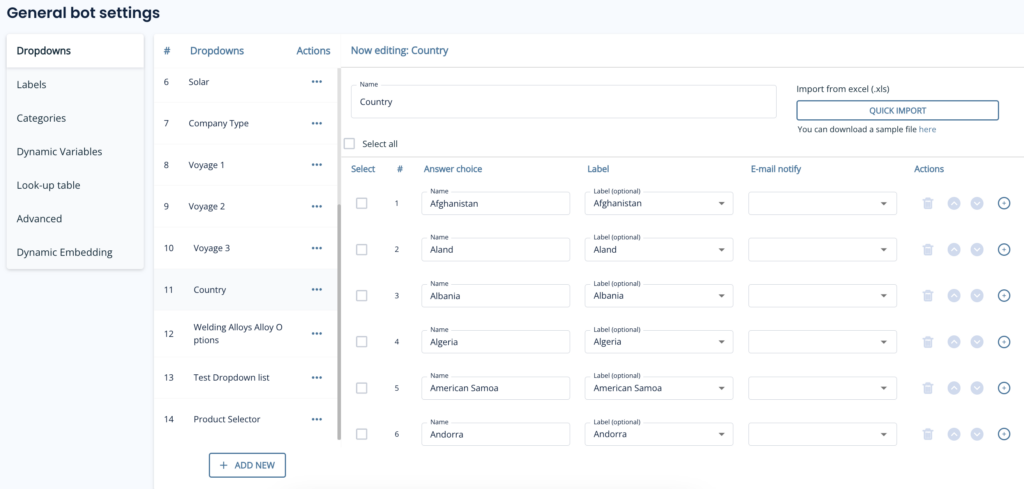
You’ll notice a few headers here, so let’s explain those:
If you prefer to build your dropdowns on the fly then that’s great! Simply add the dropdown node to the canvas and instead of selecting a dropdown list, click ‘create new’.
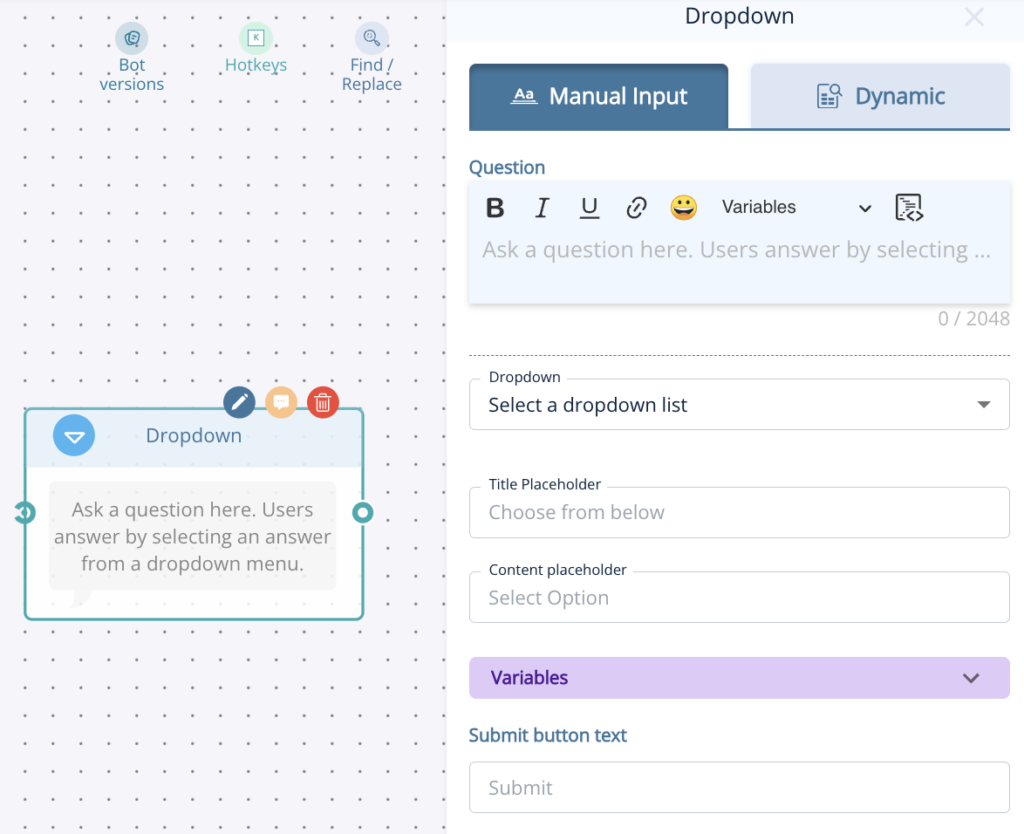
From here you’ll give your dropdown a name and then add the options one by one and add any relevant labels.

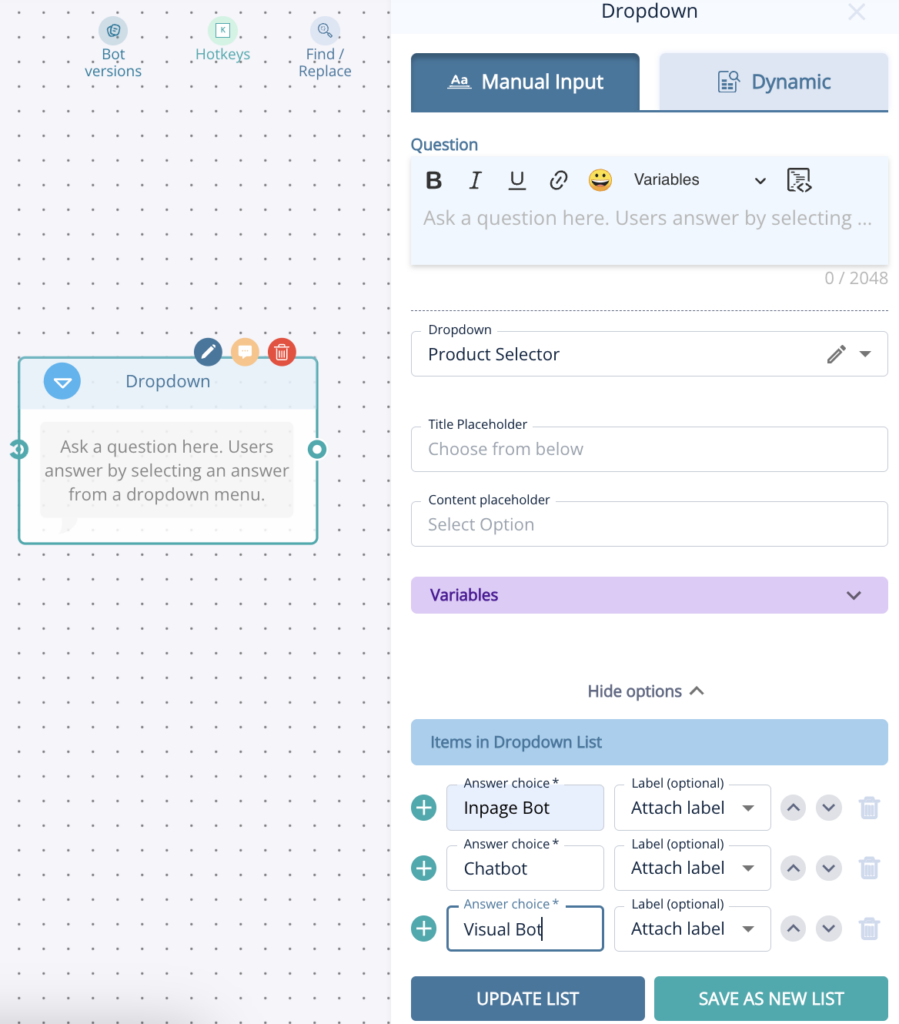
Don’t forget to click either update list or save as new list when adding items this way!
Now it’s time to think about when to use the dropdown option. First of all you can either have it as a standalone node or as part of the form node.
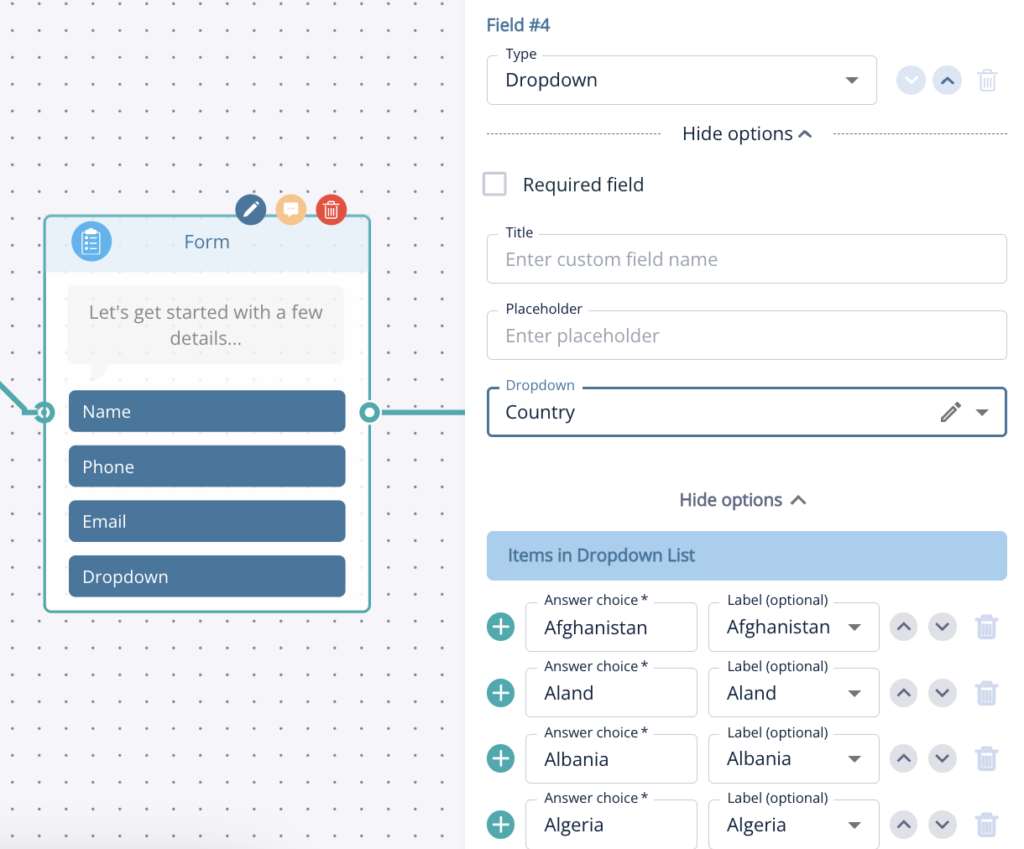
We would suggest using it as a separate node if you’d like to create a more conversational lead capture journey but adding it to the form is always good, just keep in mind that too many questions at once can be off putting!
Enable dynamic suggestions by toggling them on in the AI node. Once activated, the AI will present them after each response. There’s an additional prompt field where you can guide the AI on how to handle these dynamic suggestions.
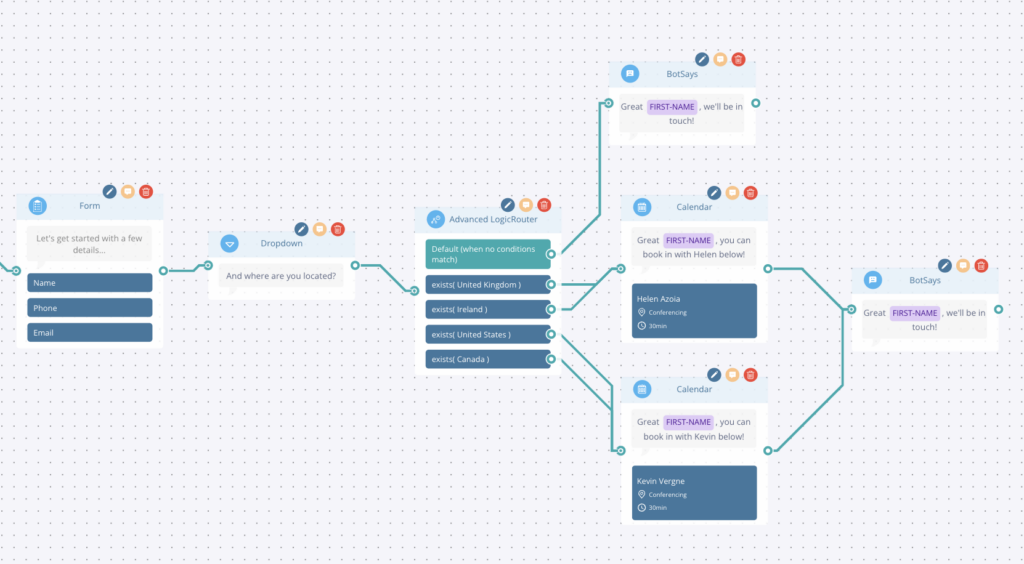
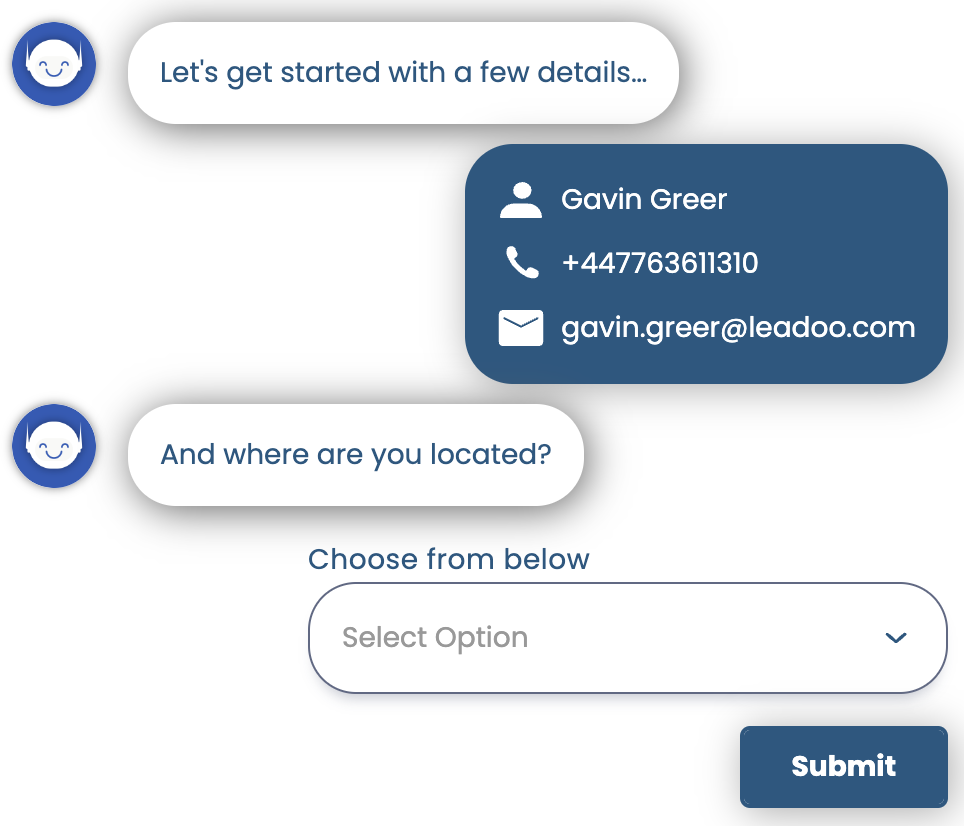
In the example above, we’ve created a conversational pathway to gather some contact details and the visitors location, which we will then use to generate calendar booking for the relevant Business Development Representative.
This is a simple and effective way to use a dropdown list and labels to create a personalised flow which helps filter leads to your team.
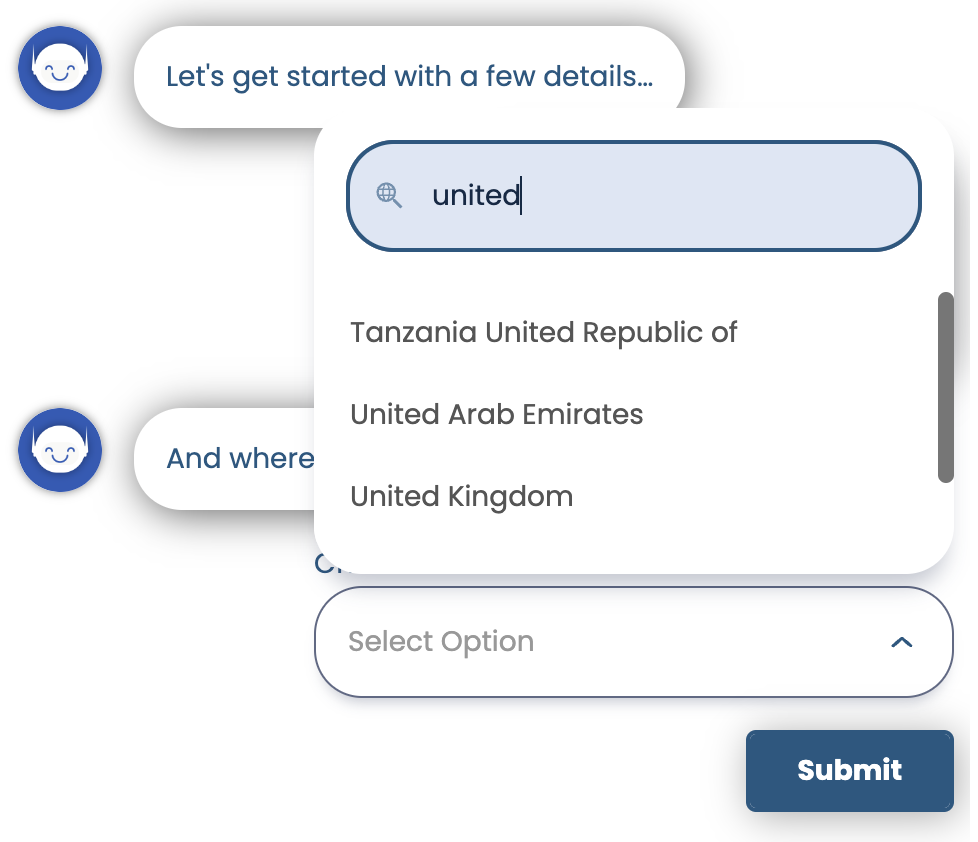
As you can see we ask “And where are you located” as a dropdown, once they answer this it goes into an advanced logic router. This router is checking which label has been applied based on the country of residence that the visitor selected and from there it will send them to a calendar booking with the BDR for that region!
Hope you found this useful, why not get stuck in and try it yourself! Don’t forget if you need any advice or help just reach out to your Account Manager.
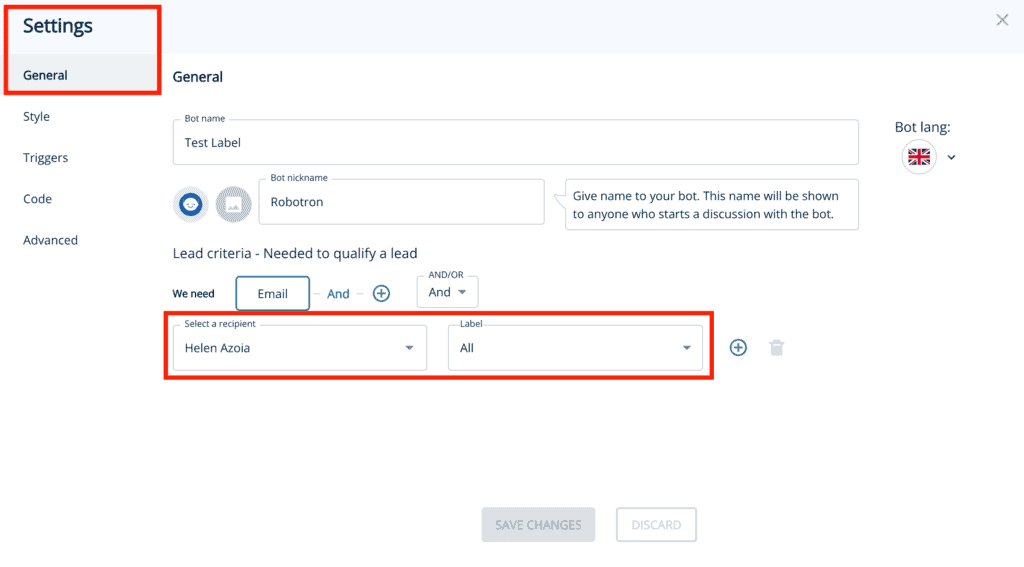
Need to set or update the lead notification settings for your bot? Read on!
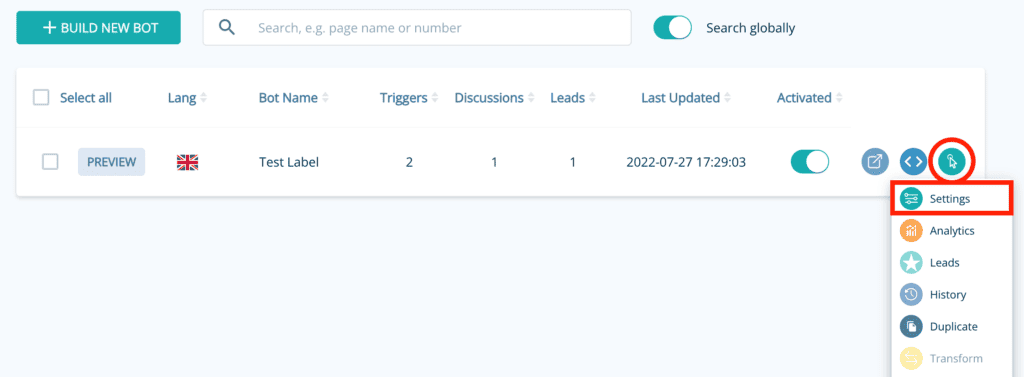
Lead notifications are triggered by settings in each bot for ultimate control. Open bot settings either in the Visual Bot Builder or by clicking the actions button from the bot listing.
On the general tab, you’ll see the option to select a recipient. You can select from a list of users on your account or manually add an email address you’d like to send notifications to by typing into the box.
You can add one person or multiple people to receive lead notifications. To add more people, just click the “plus” button and select more people from the drop-down.
By default, the recipient will receive all leads. If you want to be more conditional about who receives what type of notifications, i.e. support requests go to the support team and sales enquiries to the sales team, you can use labelling.
Contact your Customer Success Manager at Leadoo or reach out to our general support line – [email protected]
There’s a good chance that you or your colleagues have had some less-than-ideal experiences buying and onboarding a new Martech platform.
Unfortunately it’s a common problem for marketers. So how is Leadoo AI different than other Martech tools and SaaS platforms in this regard? Time to find out with our onboarding overview guide!
Our secret sauce in delivering a great experience from the get-go is that we will never just dump our tech on you and hope for the best.
If you’ve signed up for one of our Engage, Expand or Elite packages, our Onboarding and Customer Success teams will be on hand to help you setup and achieve success quickly!
Leadoo AI’s onboarding service is an integral part of our customer experience. This means that our experts will assist you in setting up Leadoo from day one – including defining goals, sorting out technical details and creating the first set of bot designs with you. Our customers agree that it’s worth the fee. Some even claim that it’s one of the best parts of choosing Leadoo AI.
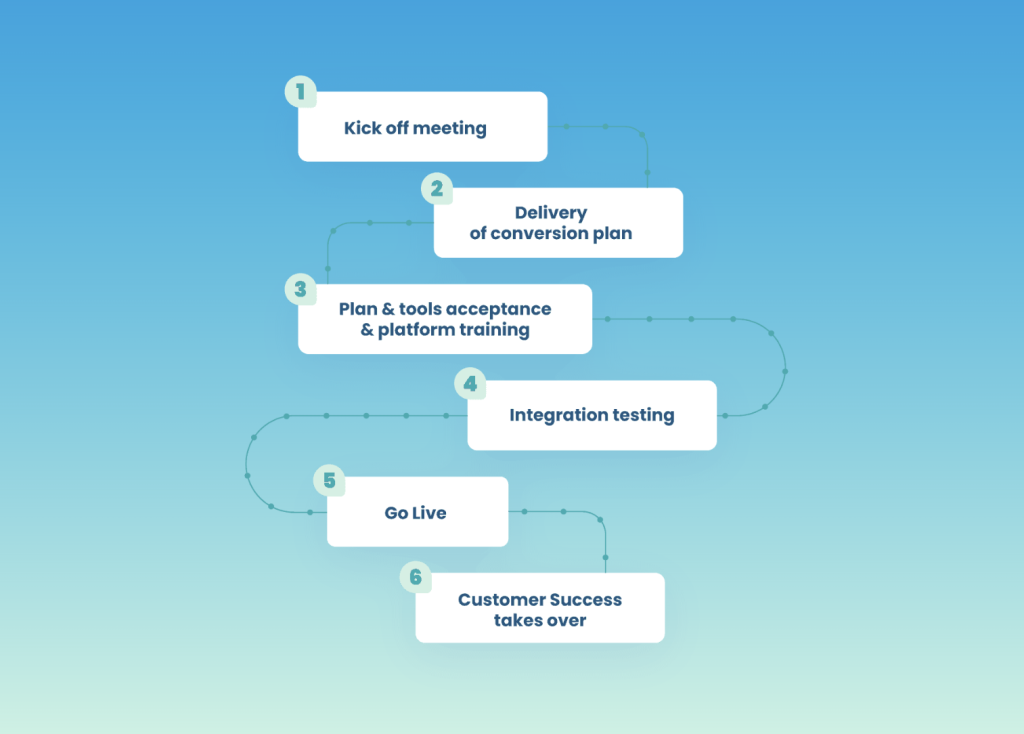
Here’s a guide for what to expect when getting started with us. However, depending on your subscription and needs our onboarding team will adjust where necessary to make sure we launch successfully!
Within 1-2 days of signing the contract, you’ll be contacted by the Leadoo team to schedule a time for a 30-60 minute kickoff call. In this call, your Leadoo AI onboarding representative will consult and plan out a solution tailored to your conversion goals.
The kickoff call will cover subjects such as:
1️⃣ The target pages and conversion types on your website to enhance with conversational experiences
2️⃣ CTAs, messaging and content to include within the conversational pathways
3️⃣ Your metrics for success, both from a marketing and wider business point of view
Your onboarding rep will provide you with a full list of subjects to be covered ahead of time, so you’ll have time to prepare. In this call, we’ll also schedule follow-up sessions as needed such as feedback and training sessions
After the kickoff call, we’ll roll up our sleeves and start implementing the planned bot solution (depending on which package you’ve selected this could be up to 3, 6 or 9 Leadoo bots).
That’s right, our conversational marketing specialists will build your first bots for you. This is good news since each member of our expert team has built hundreds of bots for a range of companies in different industries. So you’ll get their best practice expertise, and can build upon their templates in future iterations of your bots.
The timeline for this varies depending on revisions and requirements, but we aim to have your bot complete and live within a week if you are able to help us with feedback and sign-off!
Once your holistic bot solution is done, we’ll send our work your way for review and feedback. If needed, we’ll make necessary adjustments based on your comments. When you’re happy with the outcome, we’ll show you how to get the bots on your website.
Most of our subscriptions include the option to send your leads straight into your CRM system for easier lead management and marketing tracking.
Set-up and testing takes around 1-2 weeks depending on the complexity. Read more about what integrations we can setup here.
Get personal training for you and your team on what you need to know including Leadoo AI platform overview, viewing analytics & insights, editing bots and live chat.
The final step of the onboarding process is to publish the bots on your website. Adding Leadoo to your website is included in our service – and you’ll get it done faster if you do it through us instead of a third party. If you opt for us to do this for you, be prepared that we will need admin-level access to your content management system or Google Tag Manager.
Once Leadoo AI is up and running on your website, as standard we’ll book you a review session for 4-6 weeks after the bots are published with one of our Customer Success team members.
Our Customer Success team will take over to make sure you are happy with our service and that Leadoo AI keeps generating results now and in the future. You can set the frequency of review meetings based on your preferences, and the Conversion Expert hours in your Leadoo package. Your Customer Success Manager will always come with ideas and show you how to make the most of the platform in between your sessions together.

