KNOWLEDGE
Case StudiesBlogsEventsSupport & Starting
Support Articles & HubSupport Videos (Youtube)Try Leadoo Free (Leadoo Lite)Partners & Careers
PartnershipsCareersSecurity & Privacy
Security at Leadoo AIGeneral Terms & ConditionsData & GDPRKNOWLEDGE
Case StudiesBlogsEventsSupport & Starting
Support Articles & HubSupport Videos (Youtube)Try Leadoo Free (Leadoo Lite)Partners & Careers
PartnershipsCareersSecurity & Privacy
Security at Leadoo AIGeneral Terms & ConditionsData & GDPRYou should always add Leadoo’s dynamic script to your website’s <head> tag.
The dynamic script enables the use of Leadoo’s conversion tools and the possibility to enable tracking. You can find your account’s dynamic script at the bottom of this page after logging in to Leadoo.
The dynamic script should fire on each page load regardless of the end-user’s cookie consent.
Additional information can be found here.
Next you should confirm that Leadoo’s tracking settings are set up correctly. Tracking settings can be found on the same page as your dynamic script. By default Leadoo settings should be:
Referrer tracking: start tracking after analytics enabled
User tracking: never
Company tracking: same as user tracking
Remember to click “save” at the bottom of this screen when changing any settings.
Leadoo won’t track any users by default, only after cookie consent has been given by the end-user.
There are two options to enable Leadoo’s tracking:
Option 1: Add a custom consent handling script to your website <head> tag, under Leadoo’s dynamic script. Those scripts check if the cookie consent has been given by the user on each page load to determine if Leadoo’s tracking should be force-enabled. So it’s important that this script loads on each page load. You can find ready made custom consent handling scripts from here: Leadoo – Custom consent handling scripts.
or
Option 2: Add the following script directly to CMP / Google Tag Manager. This code should fire only after a user accepts analytics cookies to force-enable tracking. If cookies are disabled, this script should be removed:
<script>
if (!window.ldanalytics) window.ldanalytics = [];
window.ldanalytics.push(function(a) {
a.toggleTracking(true, false);
});
</script>
There’s a useful video below and you can read more about how Leadoo tracking works here.
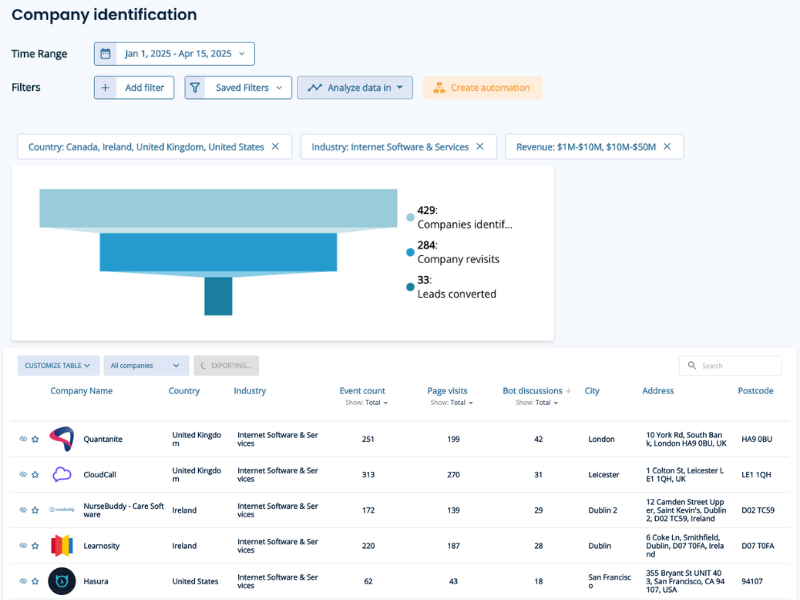
Leadoo isn’t just about creating super engaging bots to activate your website visitors! Oh no, it’s much more than that. Did you know that we help you identify anonymous website visitors? Using our unique tracking script we can identify visitors to your website and which company they belong to!
“The ability to reconnect with the majority of people who weren’t ready to convert upon their first interaction with your brand is what makes retargeting the most powerful piece of your digital marketing campaign.” – Forbes
Using the data you’ll get from Leadoo’s Company Identification tool is a great way to improve your campaigns and specifically digital ads, which can be a risky and expensive investment! By retargeting an already engaged audience you’ll see:
It couldn’t be easier, the hard work is all done in the background by having the Leadoo tracking script on your website. This will start tracking your anonymous website visitors and identify the companies they belong too! Now all you have to do is create a target list for your campaigns.
By creating persona-specific filters, such as company size, industry, which pages they’ve visited, etc., you can create a targeted list of potential prospects. Not only have these prospects visited your website, but you now have a clearer picture of who they are and what they are interested in.
Once you’ve created your filters, it’s time to export the data. By clicking on the export button it will automatically select all companies within your chosen filter. You can also choose either a CSV or XLSX format.
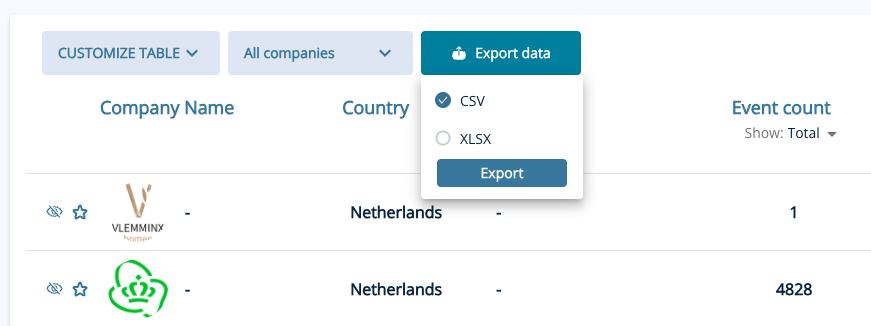
Once it’s ready to download you’ll be prompted to download now, the time for the file to be processed will vary depending on how many companies are in your filters.
To add a customer list in LinkedIn, you’ll be using the LinkedIn Ads Campaign Manager for uploading and creating Matched Audiences. This involves creating a new audience, selecting “Matched Audience” and then “Company” and finally uploading your list after downloading the appropriate template. Here’s a step-by-step breakdown:
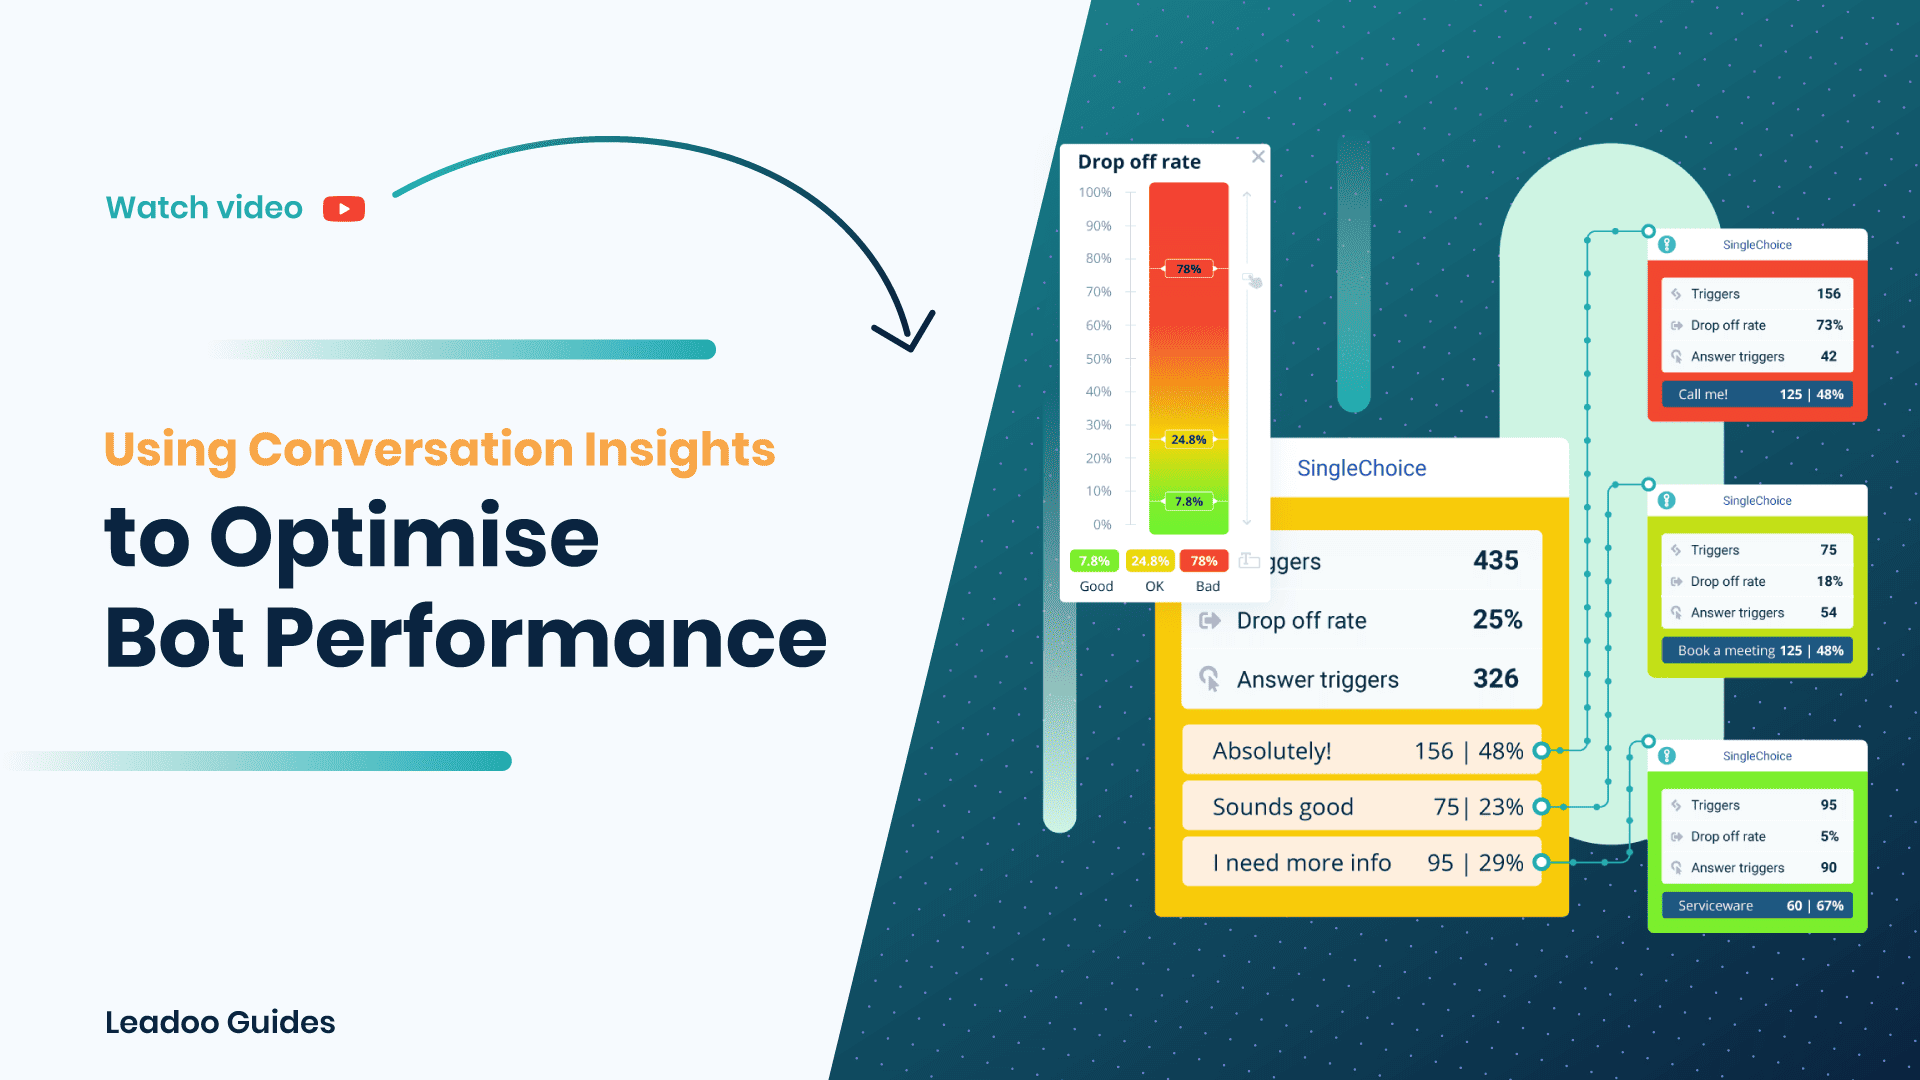
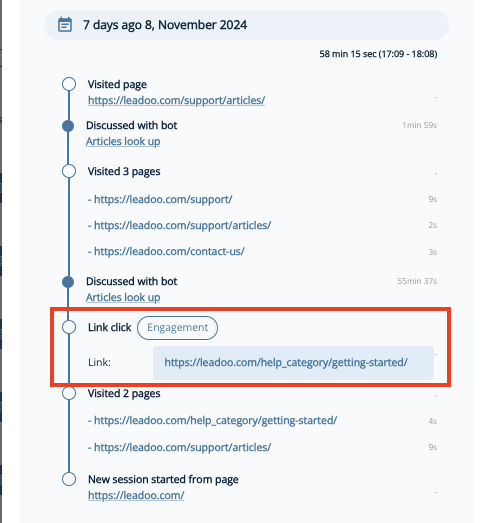
Event tracking is a feature in Leadoo where you can see also other website events under Visitor profile and Company profiles. Basically it provides detailed insights into user website interactions by monitoring button clicks, link clicks, and form submissions.
Event tracking is based on visitor tracking so if you’re not familiar how it works you can read this article: https://leadoo.com/help/how-leadoo-tracking-works-how-to-set-it-up/
So to track other website interactions visitor tracking needs to be enabled.
You can enable event tracking from https://app.leadoo.com/insights/settings/tracking. If it’s greyed out, contact your Leadoo contact person who can enable it for you.
There are 3 different options in Event tracking setting:
Regardless of what you choose as your tracking option Leadoo automatically ignores all passwords.
After Event tracking is enabled, there is a slight delay before you see events in https://app.leadoo.com/insights/settings/event-mapping. From that page you can start mapping the events to either engagements or conversions.
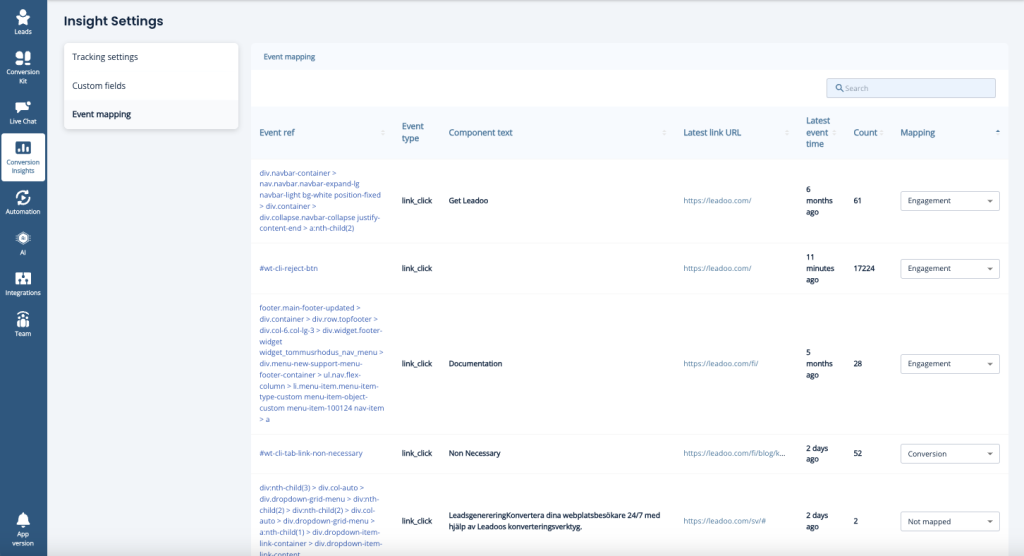
After that mapped events will be visible under Visitor and company profiles. Events not mapped won’t be visible on any other page apart from the event-mapping page.
Hope you found this useful, why not get stuck in and try it yourself! Don’t forget if you need any advice or help just reach out to your Account Manager.
In this guide, we’ll walk you through the Leadoo AI dashboard, helping you navigate the essential features of the platform with ease.
To start, here’s a short video on what you’ll find on the dashboard homepage:
Let’s dive into the details!
The dashboard menu provides quick access to all the main tools and insights. Here’s what each section offers:
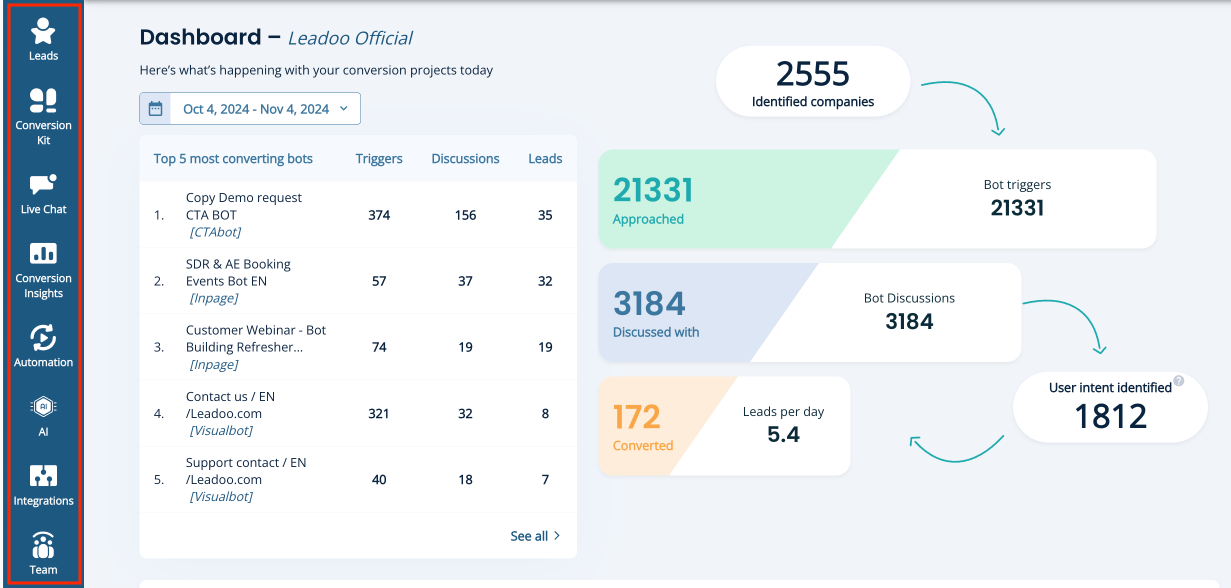
You’ll receive an email notification each time a lead is captured, and if you’ve integrated with your CRM, a new contact will be created there as well. All leads are stored in this section, where you can view full conversation details and apply filters to locate specific leads.
This is where you can find and build all your bots, including:
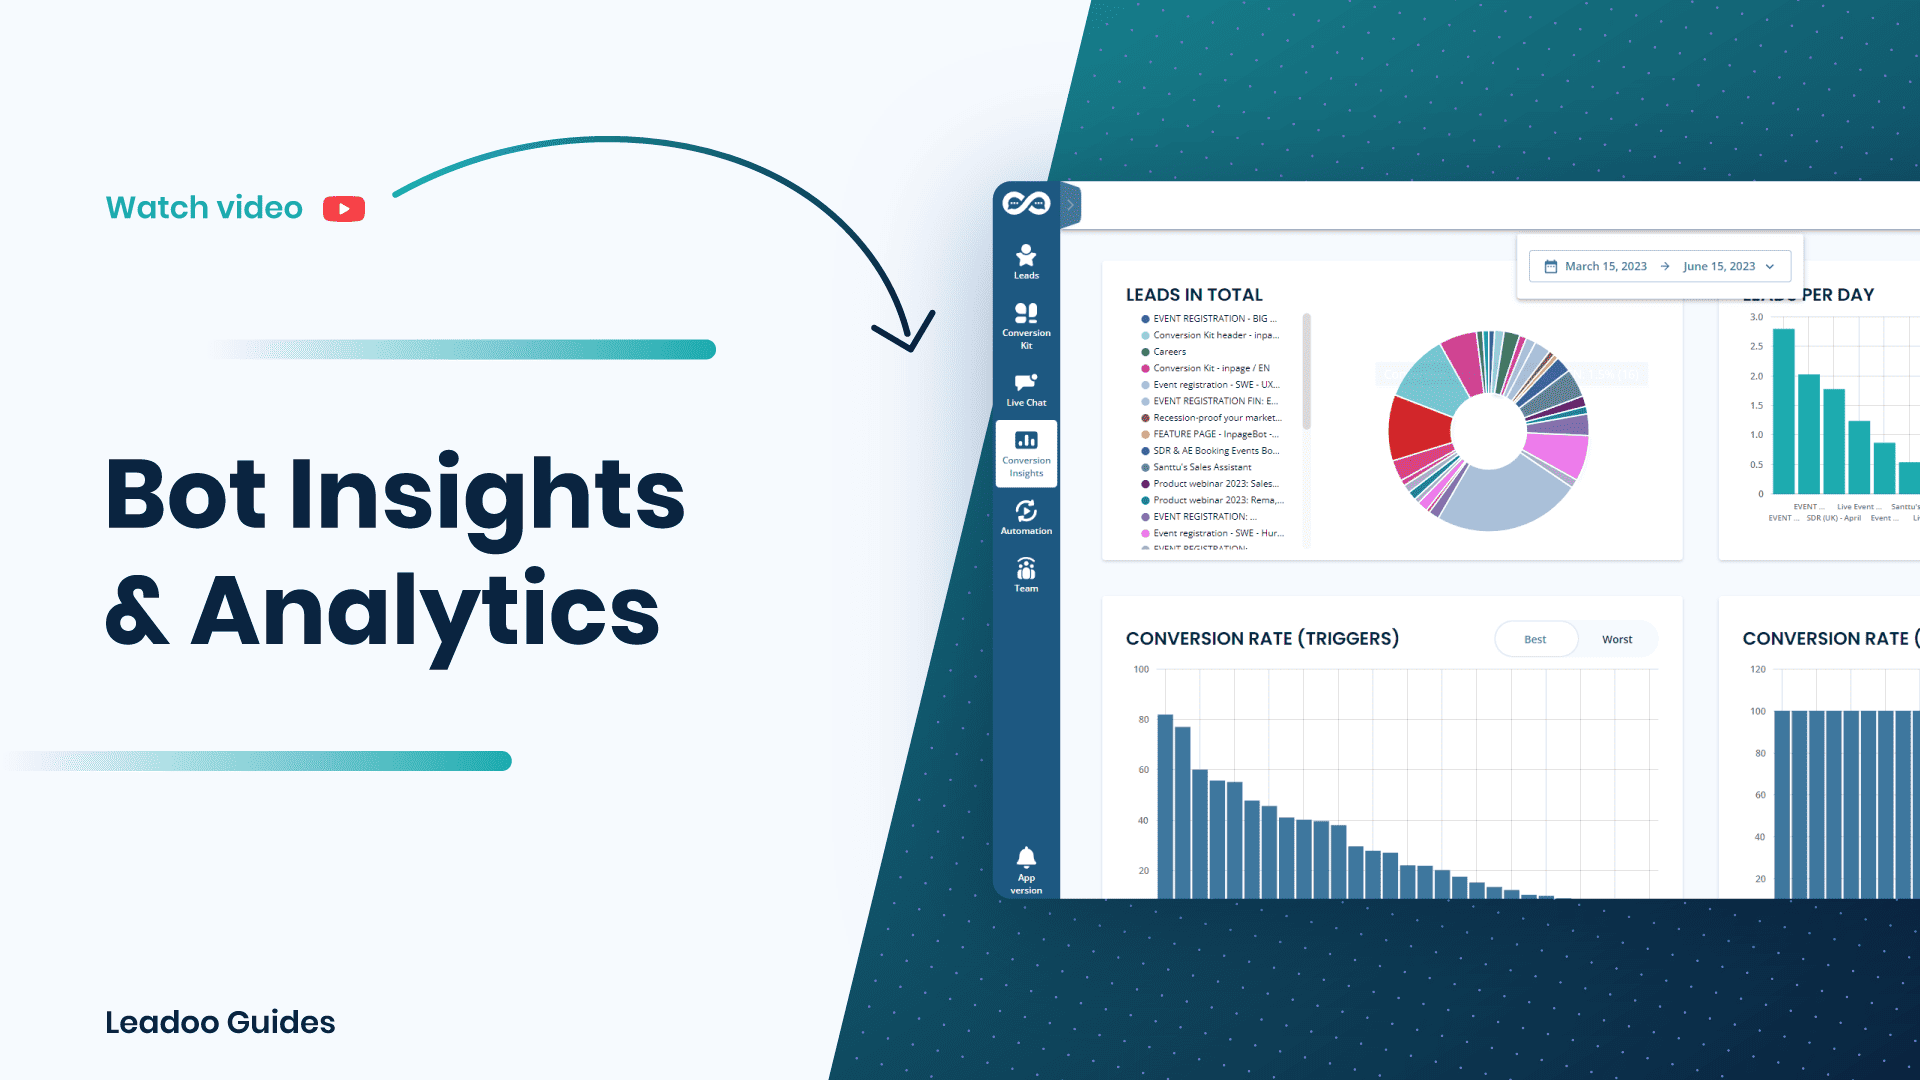
Find key analytics in pre-built dashboards, covering the following:
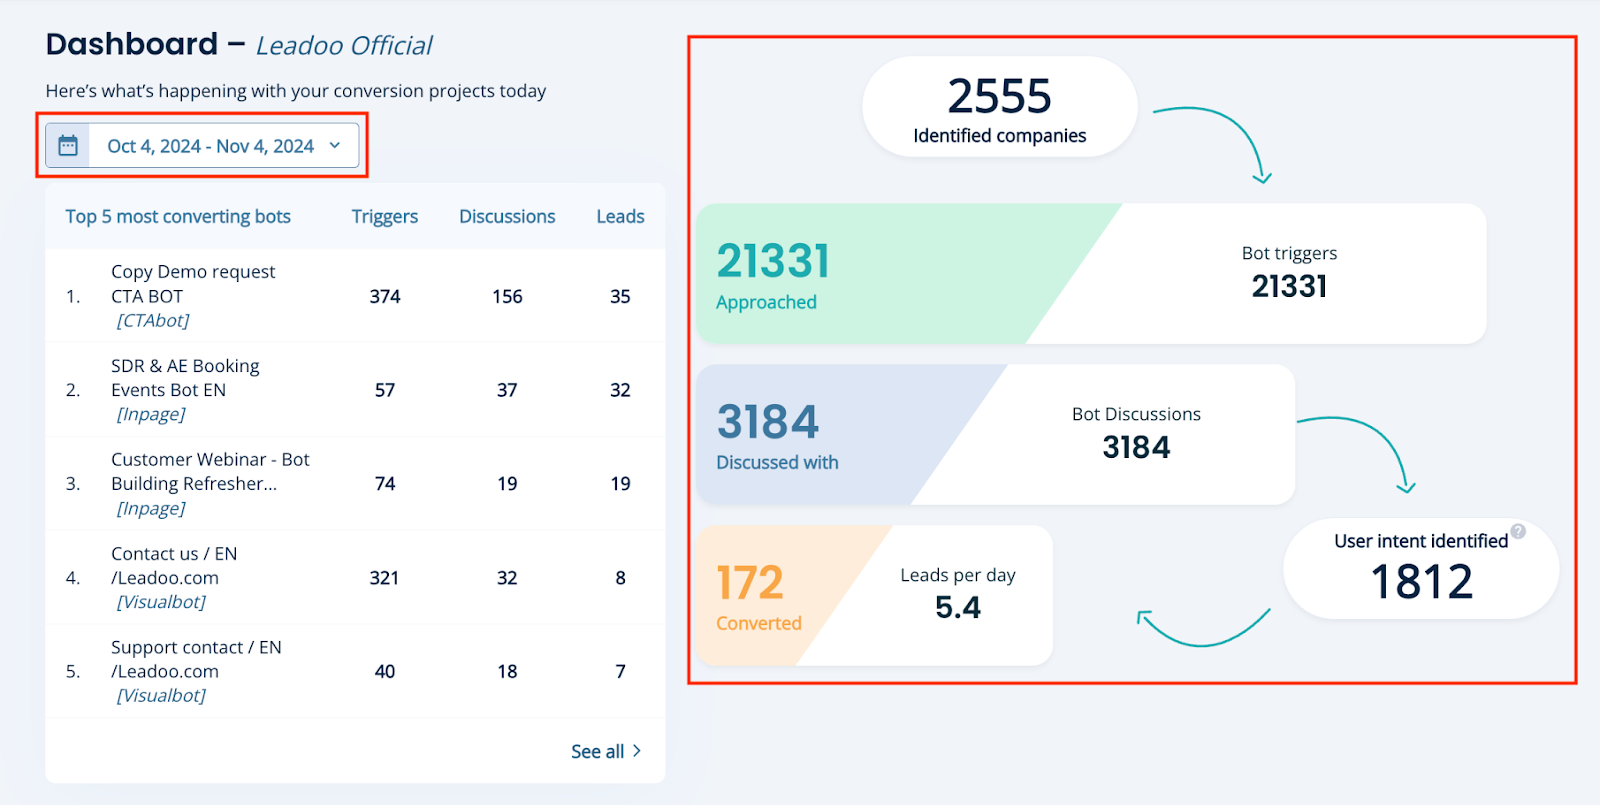
Bot Triggers
Bot triggers are similar to impressions or page views—this figure represents how often a bot was displayed to website visitors.
Bot Discussions
Consider these engagements. Every time a visitor starts an interaction with a bot, it’s counted as a discussion.
Leads Per Day
This figure is based on the lead criteria set within your bots. For instance, if you’ve set it to require a name and email, a lead is counted once both fields are captured.
Identified Companies
This is based on data captured by the Company Identification tool, which identifies companies that have visited your site. Learn more about it here.
User Intent Identified
This metric shows the number of visitors who have engaged with a bot but have not yet converted—these are your potential future conversions!
You can adjust the date range on the right-hand side to view these metrics over different periods.
There are two options to enable Leadoo’s tracking:
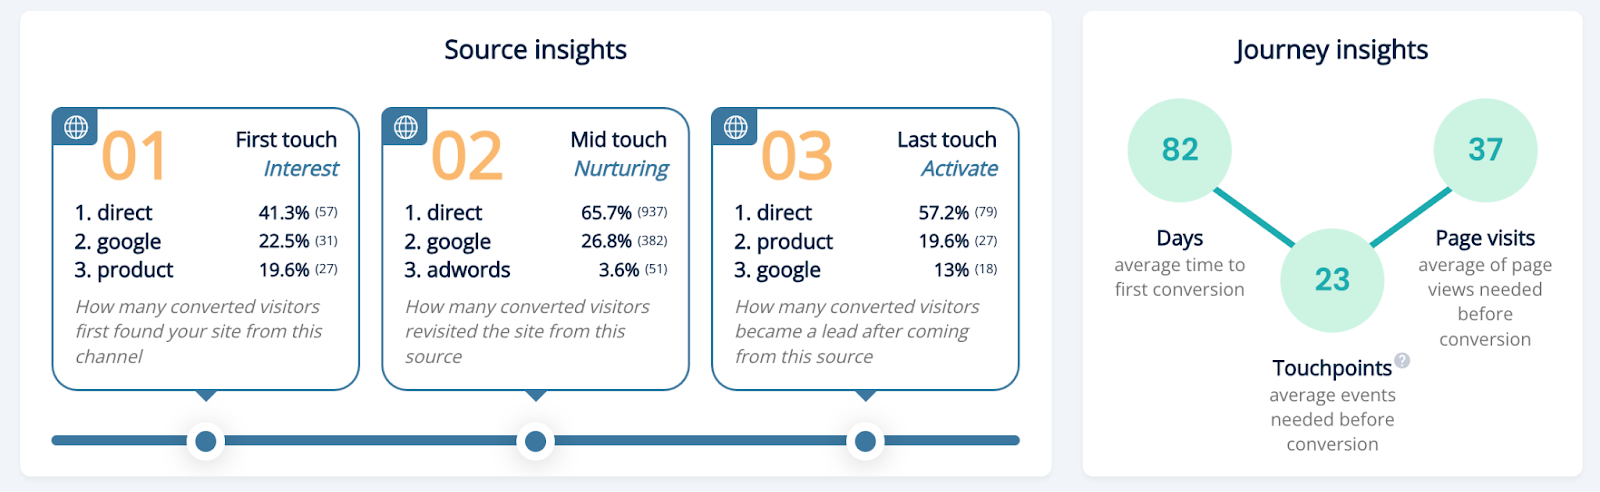
In the dashboard, you’ll find a snapshot of referral sources for your Leadoo AI conversions, along with an aggregated view of the customer journey. Delve deeper by filtering data by campaign, URL, or company details such as industry and location. This data is available under Source Insights, included with our Engage & Elite packages, or as an add-on with other subscriptions.
For more on Source Insights, see the below video:
At the bottom of the dashboard, you’ll find a snapshot of companies identified as having visited your site, highlighting key companies that haven’t yet converted. Company Identification is available to all users and provides access to a targeted list of engaged prospects, complete with extensive filters so you can refine your visitor insights.
Learn more about Company Identification here.
Ready for more? Find more videos and guides in our Knowledge Base.
Leadoo AI Sales Alerts brings you Company Identification’s incredible insights straight to you without the hassle of logging in.
Company ID tracks visitor interactions, revealing annual revenue and industry specifics. Dive into a wealth of data, including interactions, conversations, and conversion points, all at your fingertips. Save filters for pinpoint accuracy in identifying the hottest prospects.
Sales Alerts means no more logging in; receiving automatic email notifications with targeted filters in real-time. It’s your shortcut to staying ahead in capturing those hot prospects.
Not familiar with Company Identification yet? Find out all about it here.
Our CPO & Founder Mikael da Costa walks you through it below. Prefer written steps? Keep scrolling.
We’ve given you plenty of control to personalise exactly when and how often you can trigger an alert. But, here’s a step-by-step guide to getting started.
Let’s set up a workflow that alerts you when a company that meets your ICP lands on your site.
Workflow Setup
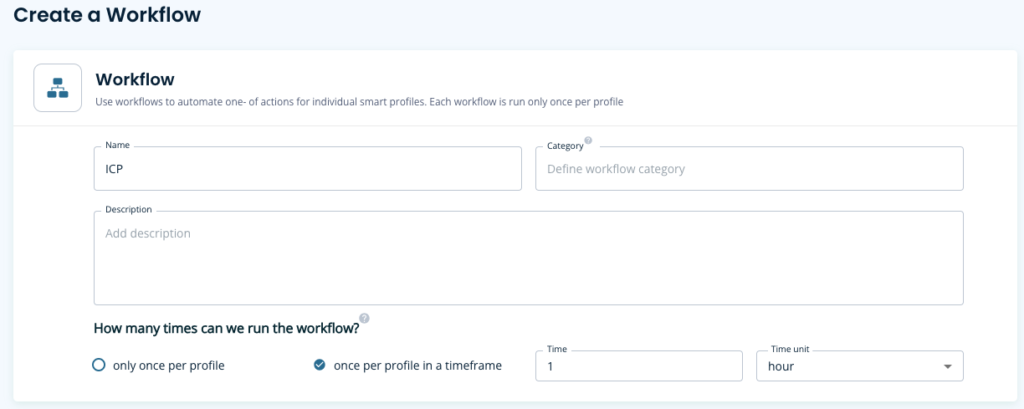
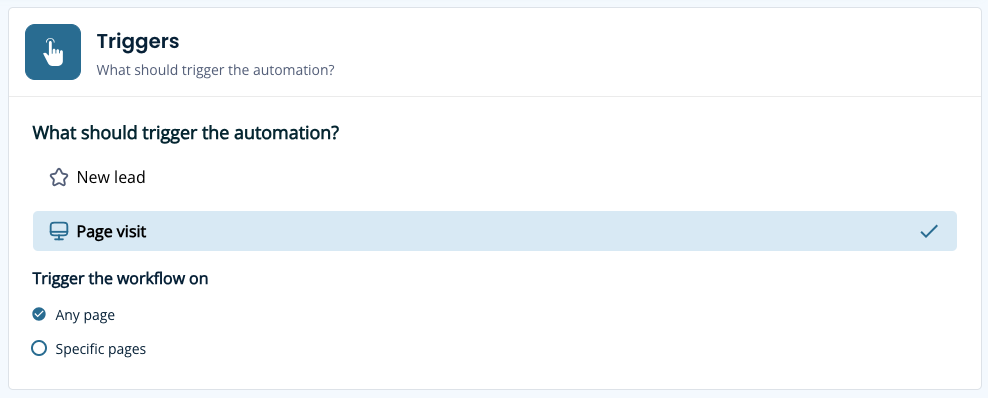
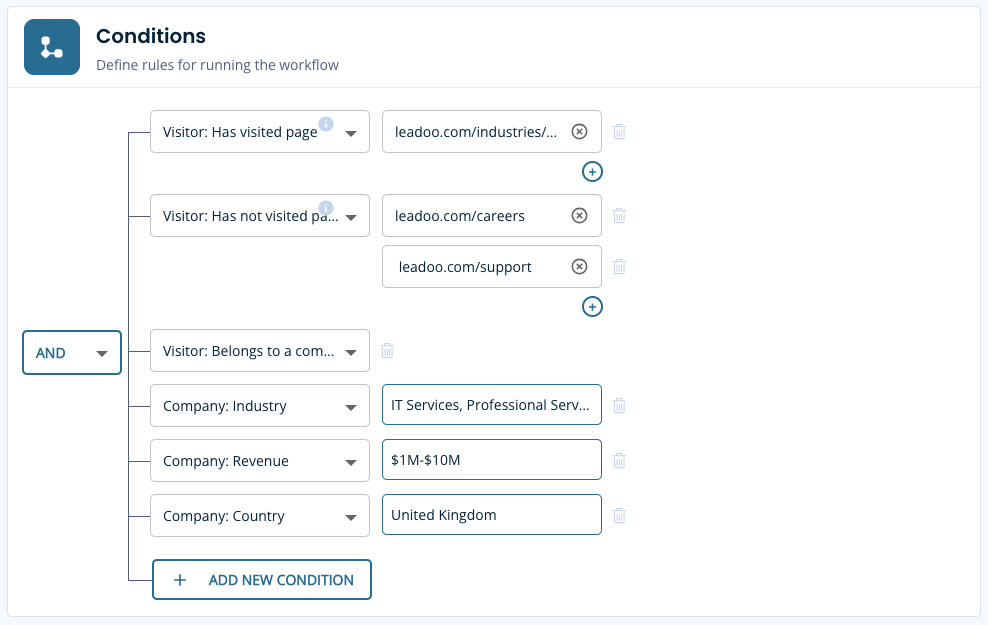
Filter Criteria
Define conditions based on visitor actions, company industry, revenue and country then, filter this against high-intent pages
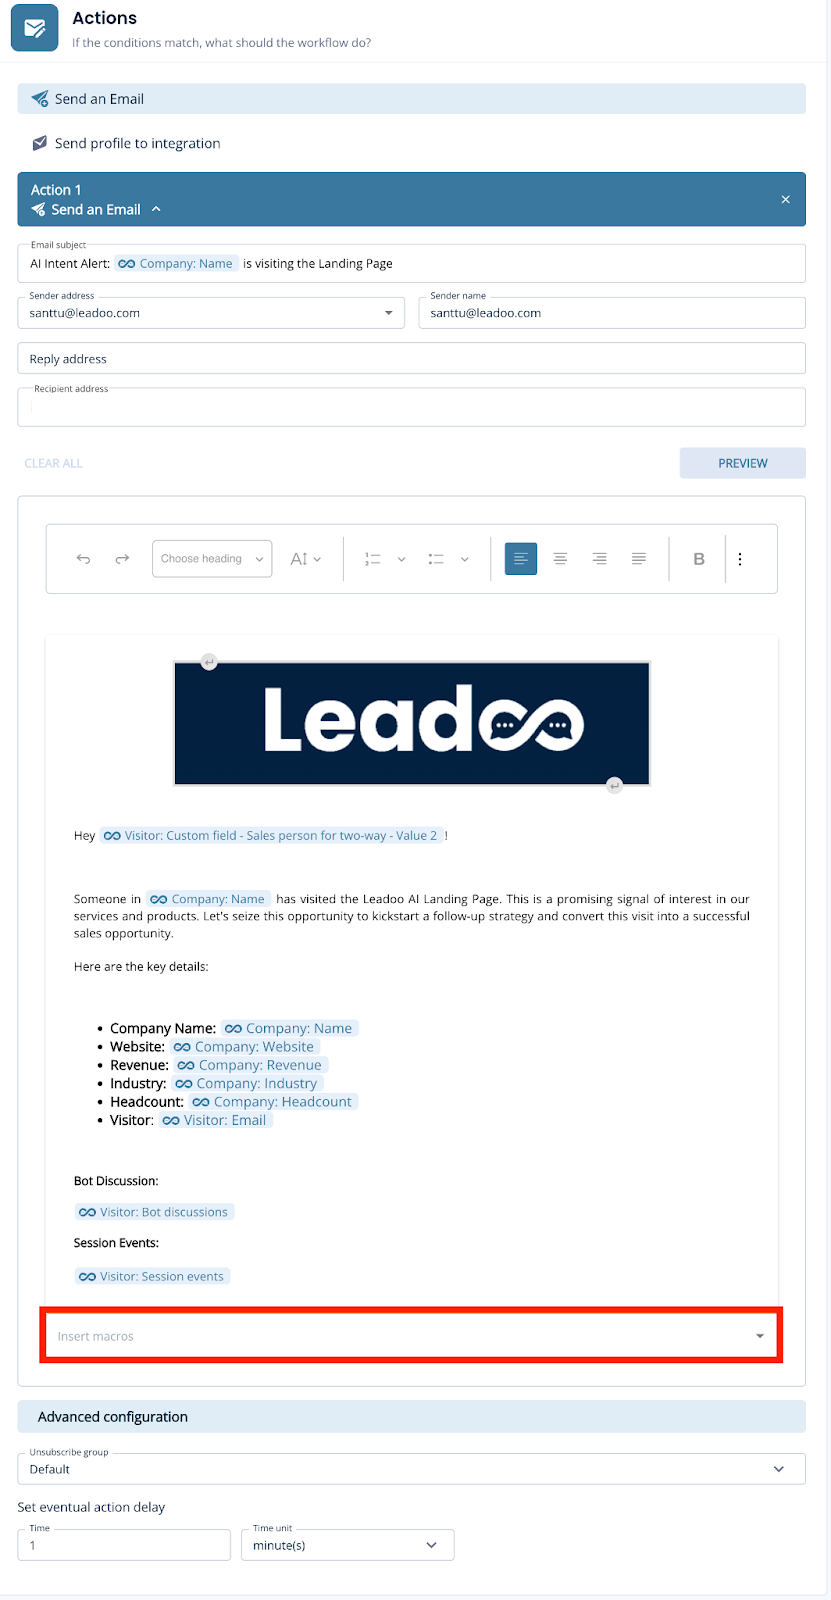
Setup the Notification
Create a notification email to any user on your account with ease. Build your email using the earlier conditions as macros for quick reference. Then you’ll be all set to receive timely email alerts whenever a prospect meets your defined conditions.
Here’s an example you can follow:
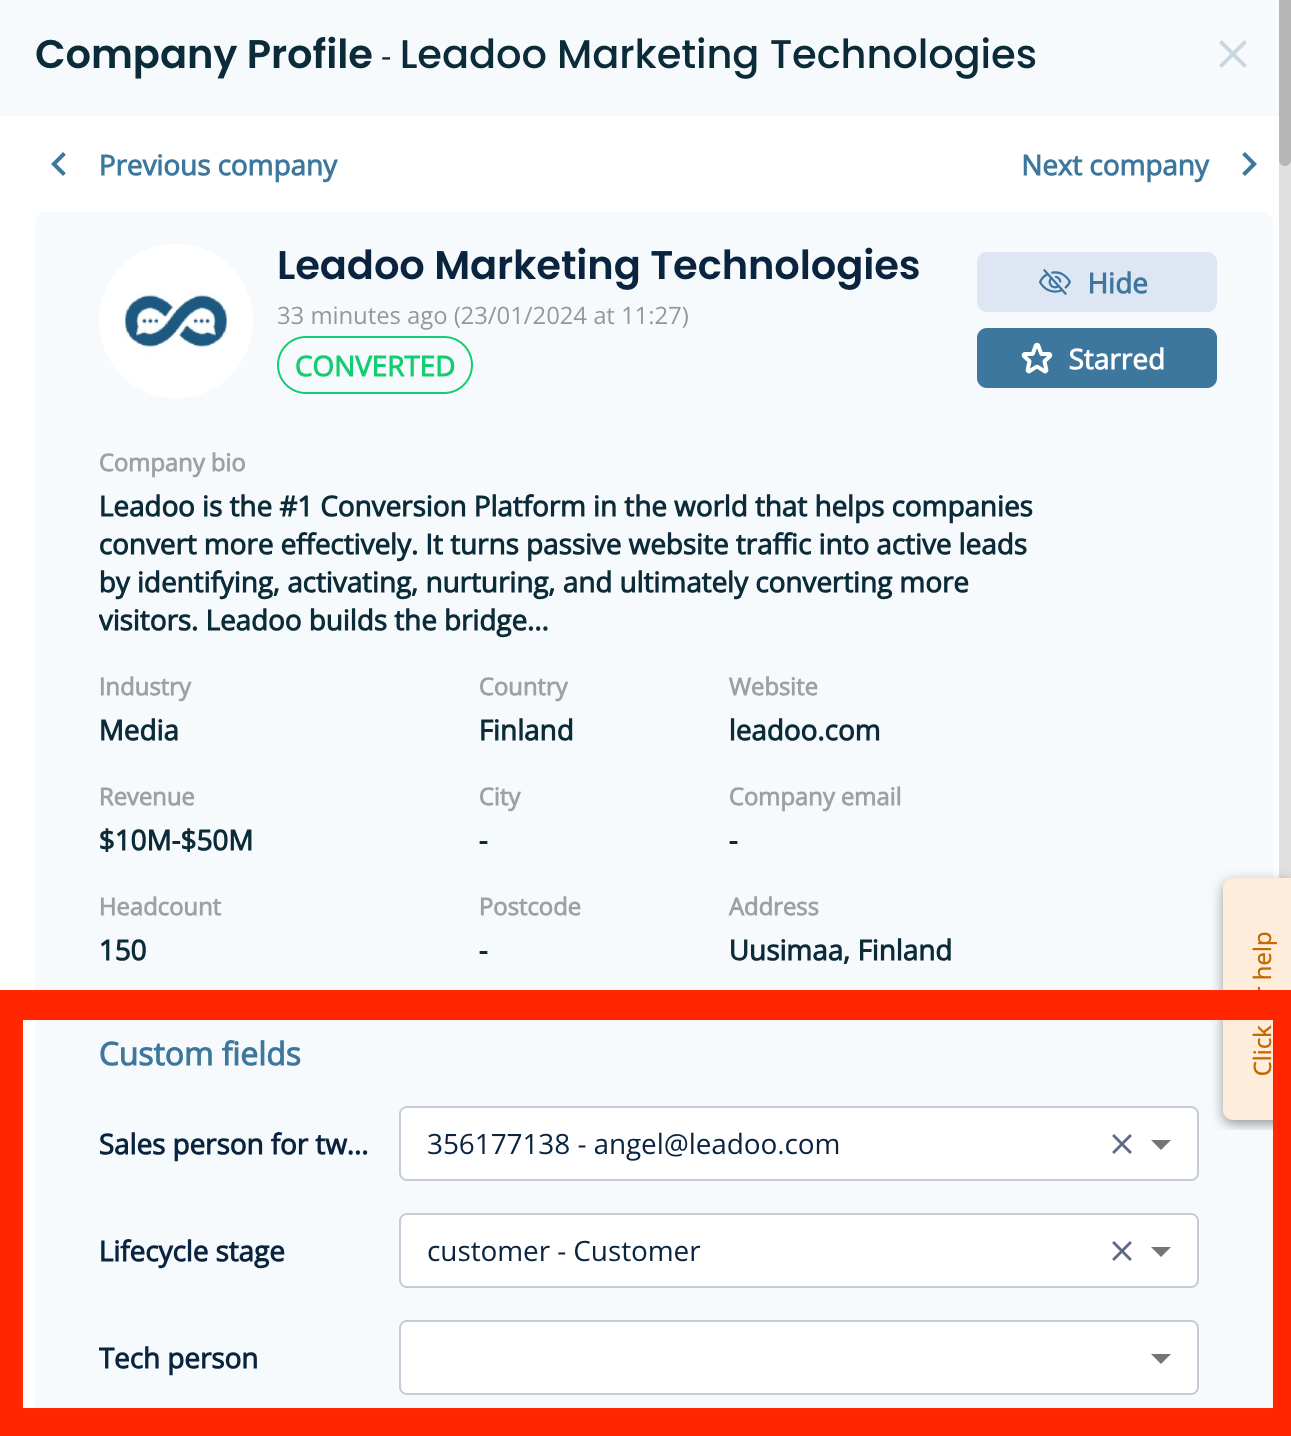
What if the customer is already a prospect or customer?
That’s where our 2-way integration comes into play and ensures seamless notifications to the right salesperson without unnecessary pings.
To do this you’ll need to have an integration already set up and be able to share additional information with us such as:
You’ll then be able to filter Sales Alert notifications more intelligently and sync the data into the platform like below.
To explore the benefits of 2-way integration, reach out to your Onboarding Manager or Customer Success Manager today.
Step 1. Decide what you want to add to your audiences.
Step 2. Create triggers on GTM
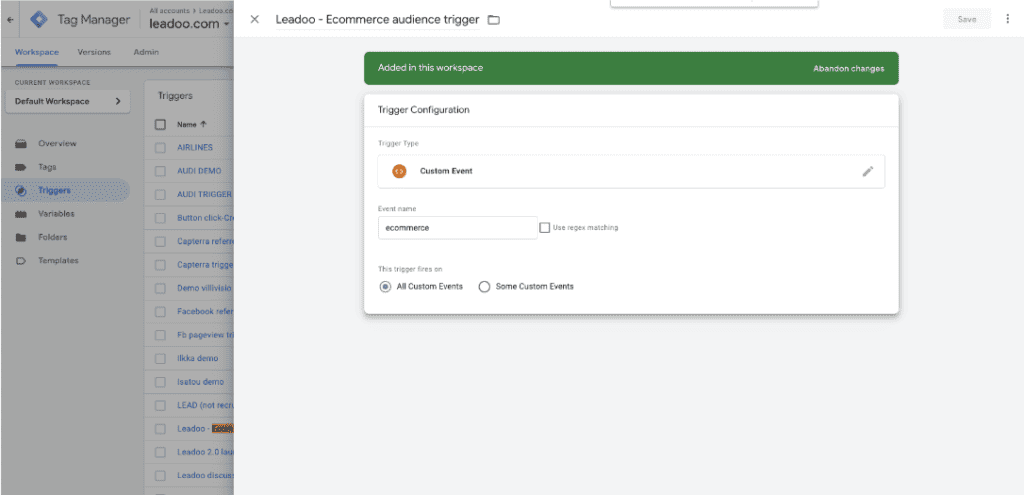
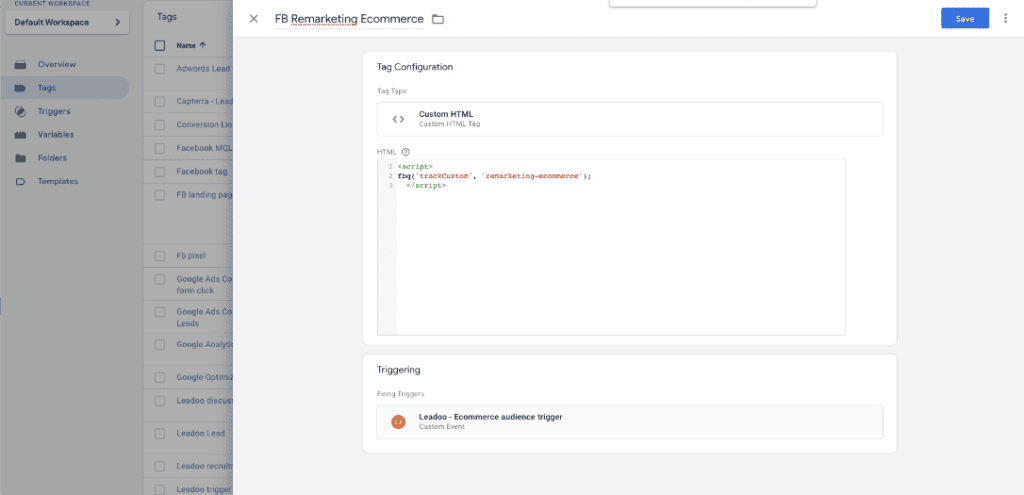
Step 3. Create tags
Facebook:
<script>
fbq(‘trackCustom’, ‘remarketing-ecommerce’);
</script>
‘remarketing-ecommerce’ <- this part of the script will be the name of the audience on your Ads Manager
Google Ads:
Leadoo AI collects information about visiting companies based on the public IP address of the company.
So, the visiting person’s IP address is identified and then checked if it belongs to a company. If it does, the company is shown in the company listing. If it doesn’t, the information isn’t displayed. In either case, the IP address isn’t stored anywhere.
We have a partner company called Clearbit. So, the IP address information goes there and company information comes back from their database. Visitor profiles (if in use) are then linked to these companies either via IP or according to company information given in the bot (i.e., manually filled in the company name into the bot). If there are additional questions / need for clarification, I am happy to answer.
In short, from public sources. Clearbit probably won’t tell where they get their data but almost all such actors (for example, Leadfeeder in Finland, Lead Forensics in UK) make use of several different sources; they have people who browse the web, they use public data sources, etc. However, it’s important to note that these are not personal data, but Clearbit, Leadfeeder etc. link the company’s IP space to the company’s name and its public information. For example, if Nokia Oy owns the IP space 109.68.1.1-109.68.1.45, then whenever a visitor comes from those addresses, it is recognized that the visitor works at Nokia.
Another important thing is, from Clearbit’s point of view they never know whose sites the visitor has even visited and from your site there never goes a call to Clearbit. All traffic to them goes through Leadoo. So, they don’t know whether the person working at Nokia has visited hs.fi, leadoo.com, or etuovi.fi. They don’t even know about the existence of any of these or any information about the person.
Personal data comes from the information people leave in the bot. Before that, we can “identify” the devices that have been used to visit the sites. These people are “unknown visitors” until they leave their contact details through the bot. Identification is done based on the etag left by the device and browser (works the same way as a cookie, but different technology). So how it works: A person comes to the site -> tracking is on if cookies are accepted -> x device is identified. -> person leaves the site -> an “unknown visitor” profile is created -> The person returns to the site the next day with the same device -> the same etag is recognized, meaning the person visiting with the same device is recognized -> the information from the previous day and new information are combined under the same profile -> person leaves their own information in the bot -> “Unknown visitor” becomes an identified person based on lead information.
There are 4 different tracking options you can set up on Leadoo AI’s control panel.
If you want to only track companies, you would choose “Never track” and in Company tracking you’d choose “Always track”.
If you want to add Leadoo tracking to your cookie acceptance but your CMP isn’t TCFv2 compliant you have to use Custom Consent Handling.
So how this should work is that Leadoo AI loads two types of scripts in different ways depending on whether the user accepts statistical cookies or not. So if the user does not accept statistics, the bots will load, but the analytics script will not load. As a result of this loading, cookies etc load correctly automatically. Below is how to make this work like this:
Leadoo AI’s bots can be loaded directly onto the website. However, Leadoo AI’s tracking can be put behind cookie acceptance. This happens in the following way:
From Leadoo AI’s tracking settings, the option “never” is activated <- tracking doesn’t automatically start. By default, Leadoo’s settings are ‘always track’, but it can be changed from Leadoo’s control panel. At the same time, the following script is added to your CMP that overrides the “never” rule after cookie acceptance and Leadoo’s tracking starts to work:
if (!window.ldanalytics) window.ldanalytics = [];
window.ldanalytics.push(function(a) {
a.toggleTracking(true, false);
});
More information here: http://docs.leadoo.io/docs/analytics-tracking#custom-consent-handling
And here’s which category each cookie falls into: https://leadoo.com/help/does-leadoo-use-cookies/. But as mentioned, with the way above, they load correctly depending on cookie acceptance.
Leadoo Website Analytics is automatically added to all existing Leadoo subscriptions and it doesn’t cost anything. You can find it from the navigation by clicking “Conversion Insights”.
To view your Leadoo Website Analytics…
1. Log into your Leadoo account (free for all existing customers)
2. Make sure to copy the Leadoo dynamic script to your website header if you haven’t already done so
3. Dive into your website analytics!
If you can’t find Leadoo Website Analytics on your Leadoo account, please contact your Customer Success Manager at Leadoo at [email protected] or [email protected]
New Release: Leadoo Website Analytics: https://leadoo.com/blog/new-release-leadoo-website-analytics/
Custom consent handling: https://docs.leadoo.io/docs/analytics-tracking#custom-consent-handling