KNOWLEDGE
Case StudiesBlogsEventsSupport & Starting
Support Articles & HubSupport Videos (Youtube)Try Leadoo Free (Leadoo Lite)Partners & Careers
PartnershipsCareersSecurity & Privacy
Security at Leadoo AIGeneral Terms & ConditionsData & GDPRKNOWLEDGE
Case StudiesBlogsEventsSupport & Starting
Support Articles & HubSupport Videos (Youtube)Try Leadoo Free (Leadoo Lite)Partners & Careers
PartnershipsCareersSecurity & Privacy
Security at Leadoo AIGeneral Terms & ConditionsData & GDPRUsing the dropdown node is a great way to offer your visitors a wide selection of options to choose from in a very user friendly way. This node is great for when the single choice option is getting a little cluttered, generally we would recommend for options of 6 or more.
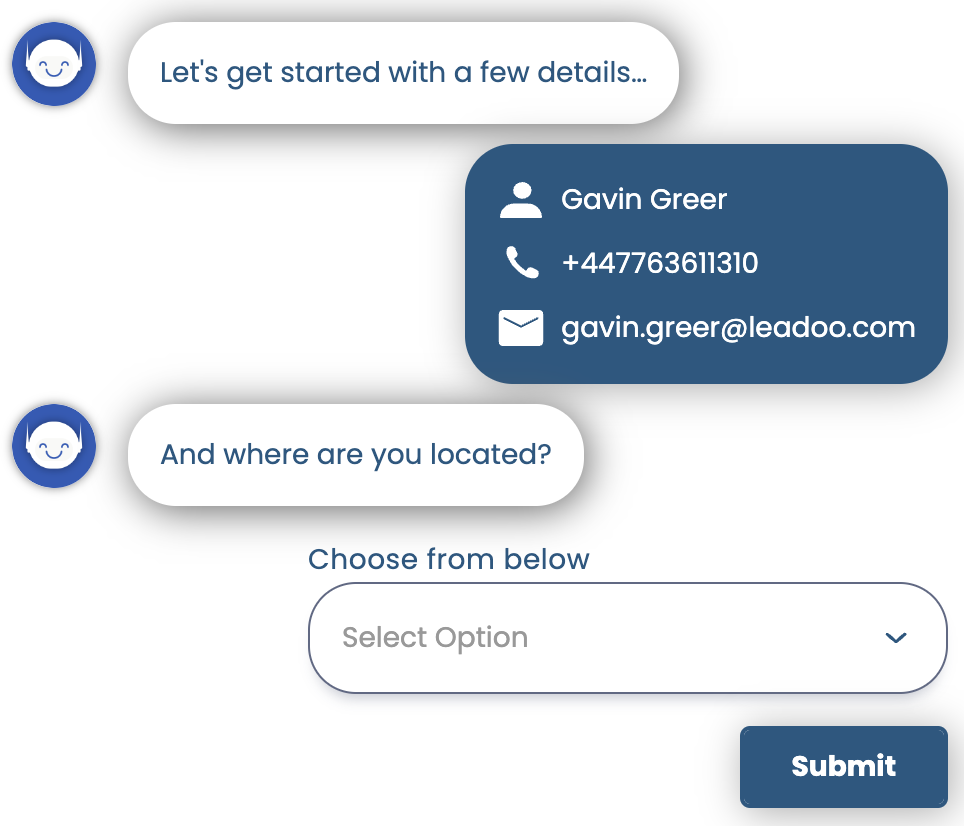
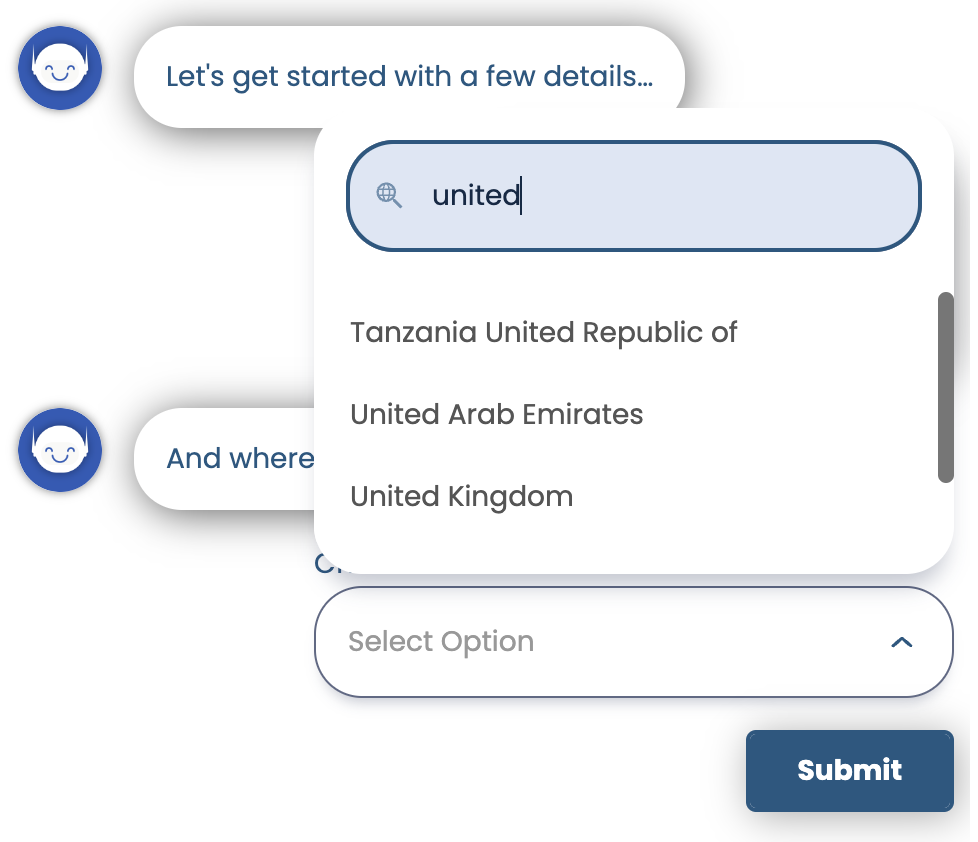
Let’s start by building the dropdown list, which you can either do directly in the bot builder or in the general bot settings area.
General Bot Settings
Under the Conversion Kit menu you’ll find general bot settings and dropdowns is the first option. From here you can manually add your dropdown list, in the example below I’ve chosen a country list, or if you already have a list you can upload it using the quick import button. To make sure you’ve got your list set up properly, you can use the sample file to get started!
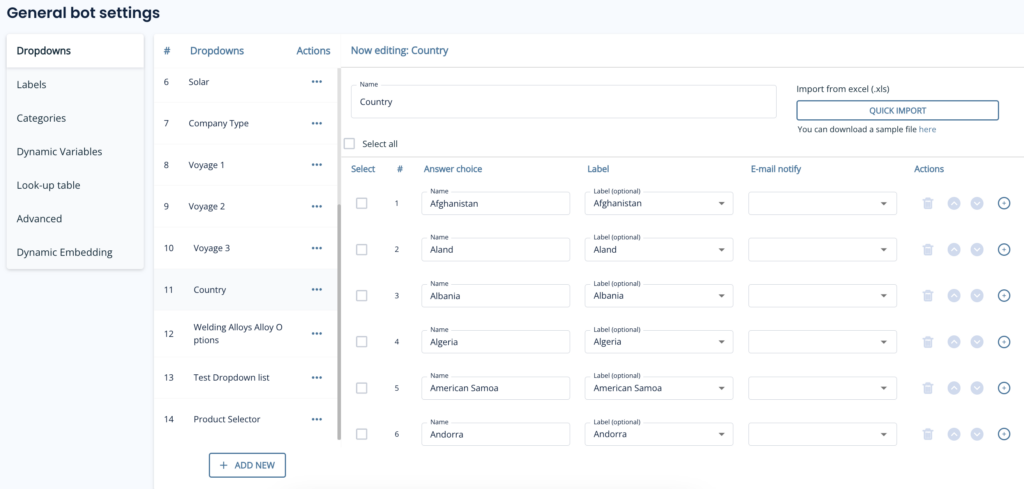
You’ll notice a few headers here, so let’s explain those:
If you prefer to build your dropdowns on the fly then that’s great! Simply add the dropdown node to the canvas and instead of selecting a dropdown list, click ‘create new’.
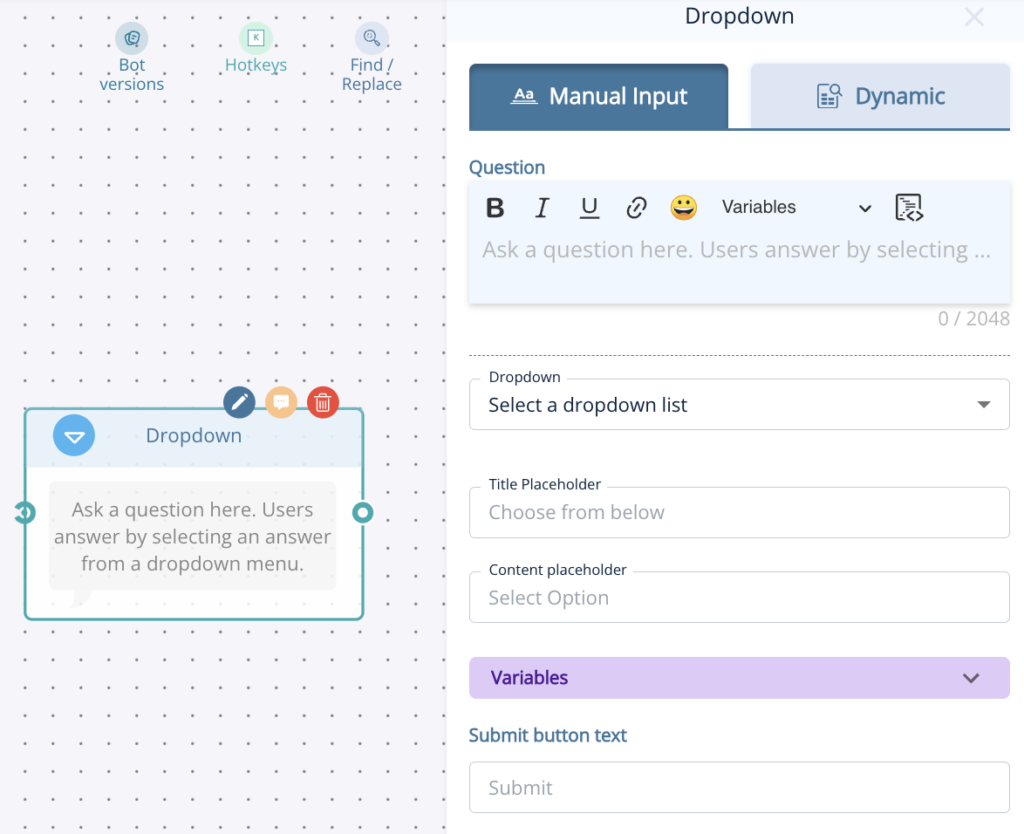
From here you’ll give your dropdown a name and then add the options one by one and add any relevant labels.
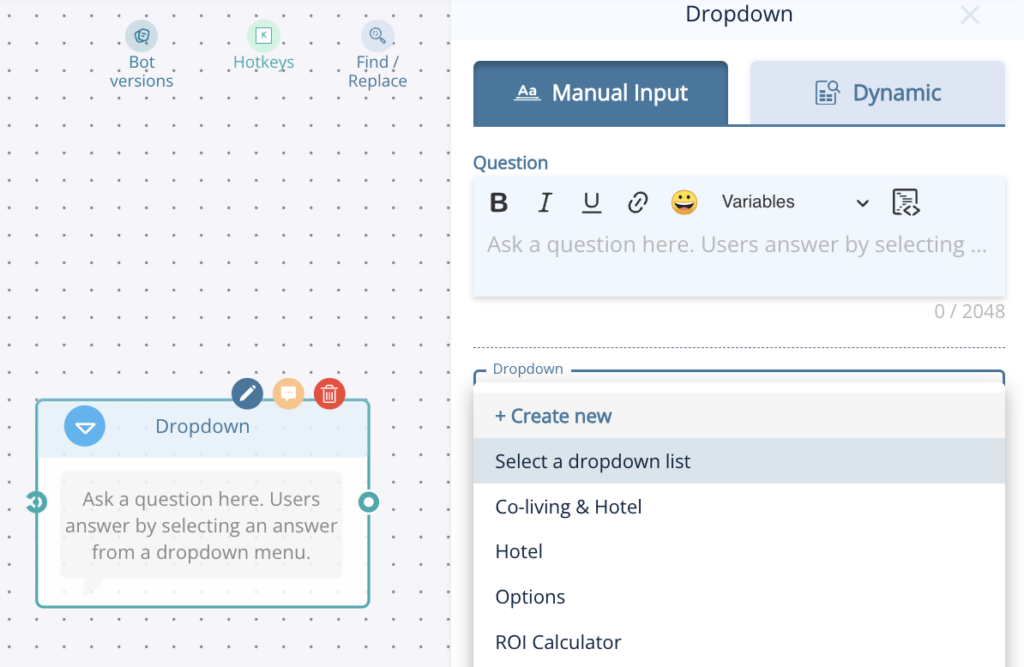
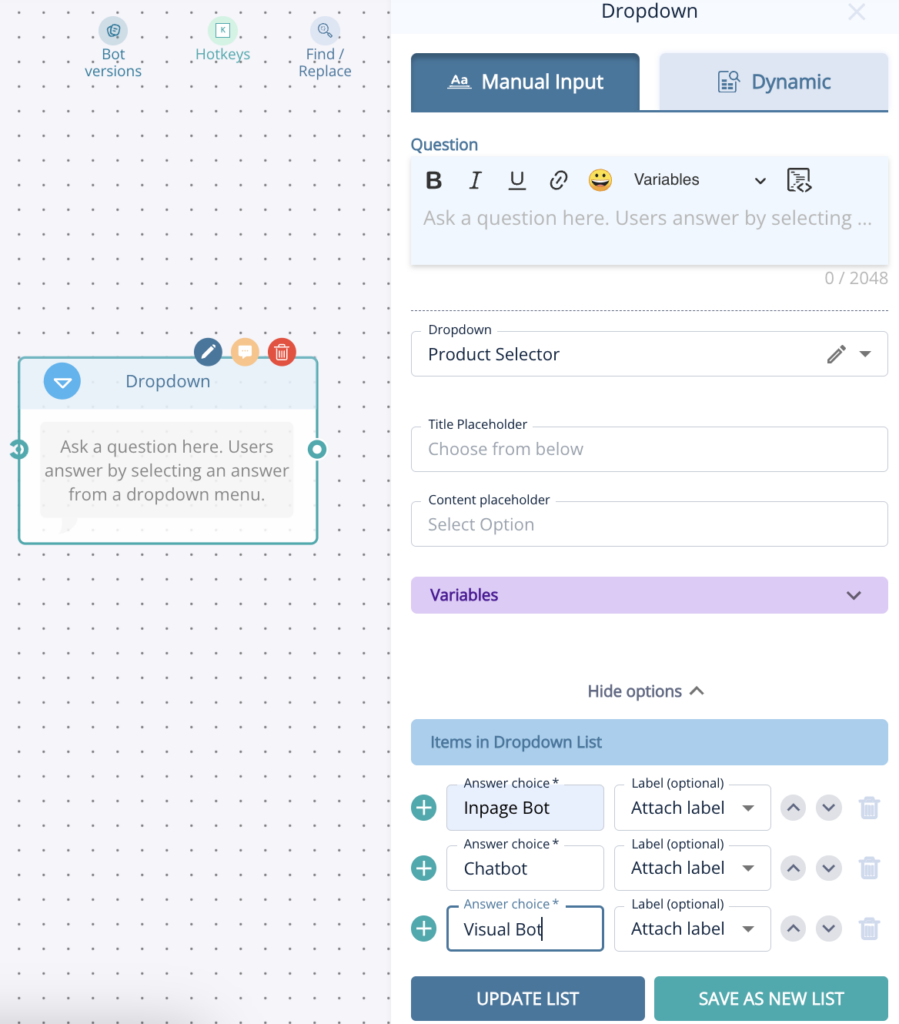
Don’t forget to click either update list or save as new list when adding items this way!
Now it’s time to think about when to use the dropdown option. First of all you can either have it as a standalone node or as part of the form node.
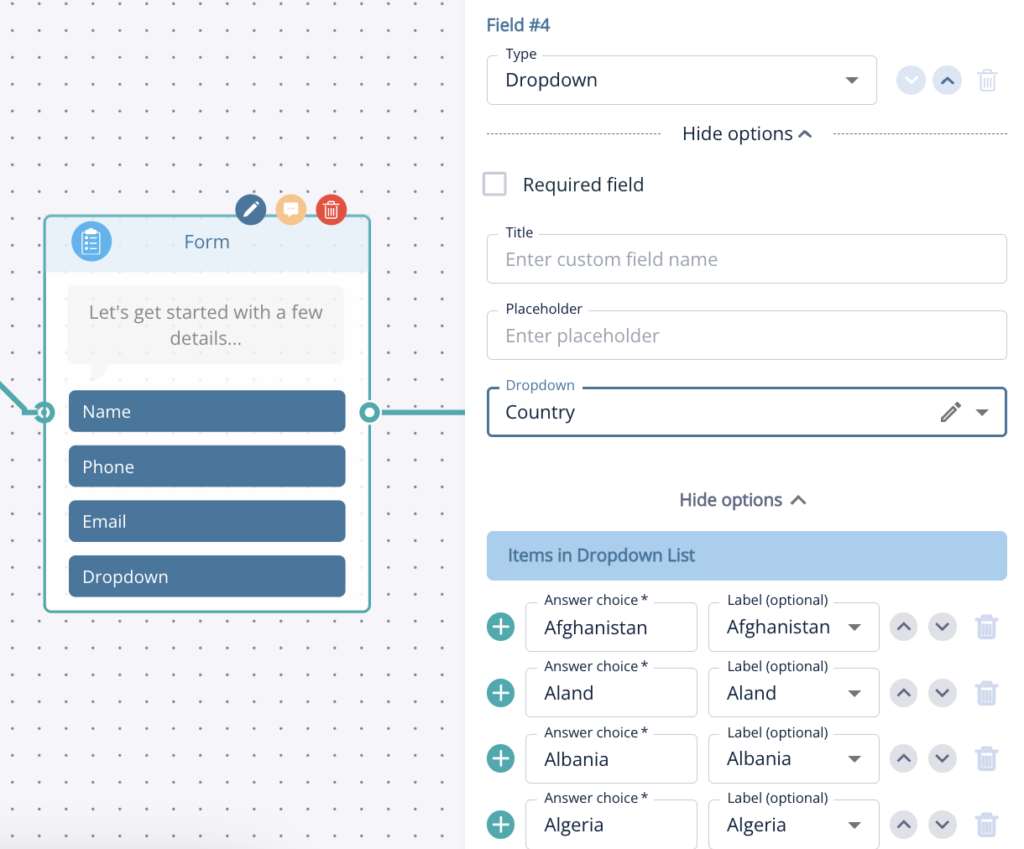
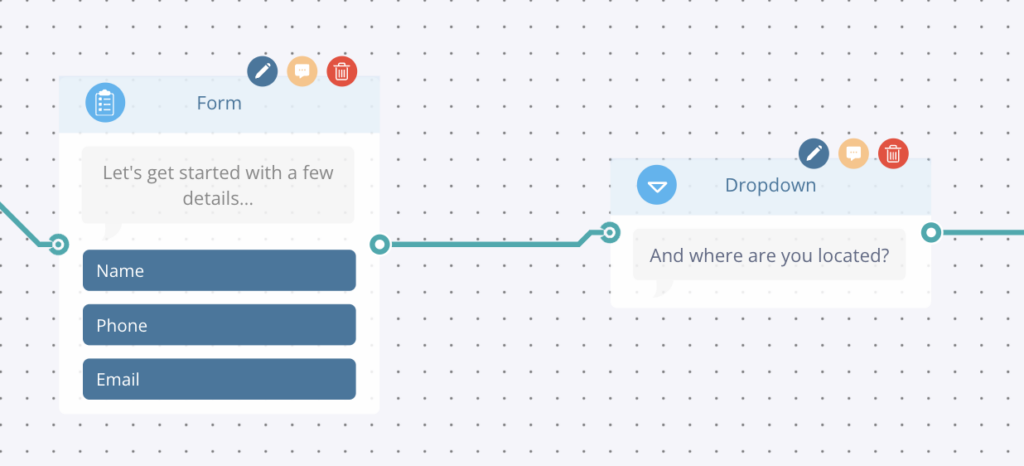
We would suggest using it as a separate node if you’d like to create a more conversational lead capture journey but adding it to the form is always good, just keep in mind that too many questions at once can be off putting!
Enable dynamic suggestions by toggling them on in the AI node. Once activated, the AI will present them after each response. There’s an additional prompt field where you can guide the AI on how to handle these dynamic suggestions.
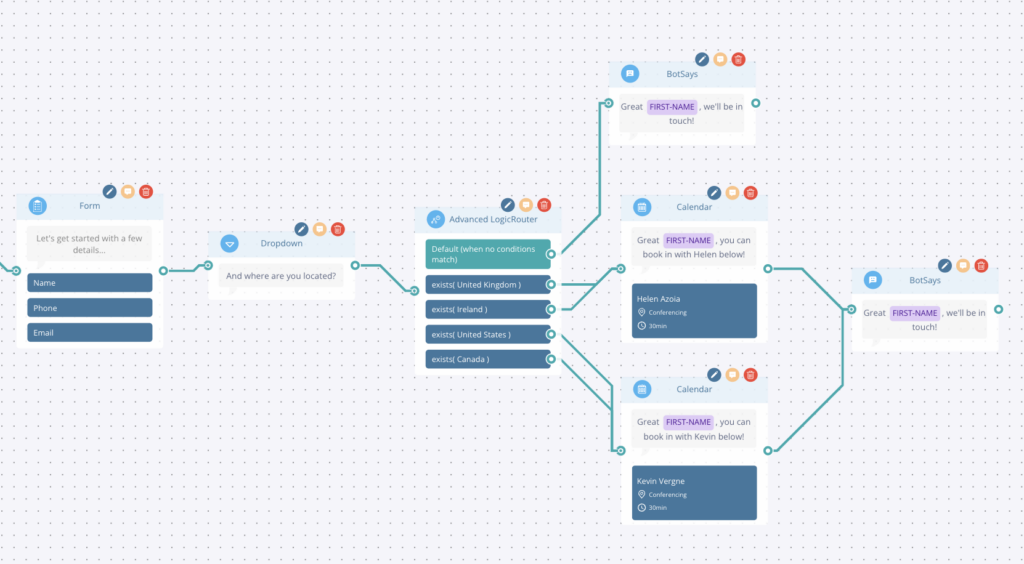
In the example above, we’ve created a conversational pathway to gather some contact details and the visitors location, which we will then use to generate calendar booking for the relevant Business Development Representative.
This is a simple and effective way to use a dropdown list and labels to create a personalised flow which helps filter leads to your team.
As you can see we ask “And where are you located” as a dropdown, once they answer this it goes into an advanced logic router. This router is checking which label has been applied based on the country of residence that the visitor selected and from there it will send them to a calendar booking with the BDR for that region!
Hope you found this useful, why not get stuck in and try it yourself! Don’t forget if you need any advice or help just reach out to your Account Manager.
At Leadoo, we strive to make our Conversion Tools fit seamlessly onto your website. That doesn’t just mean in terms of site speed and accessibility. We know they also need to look good!
So we’re happy to announce that you can now include Icons and GIFs as triggers for Leadoo Chatbots!
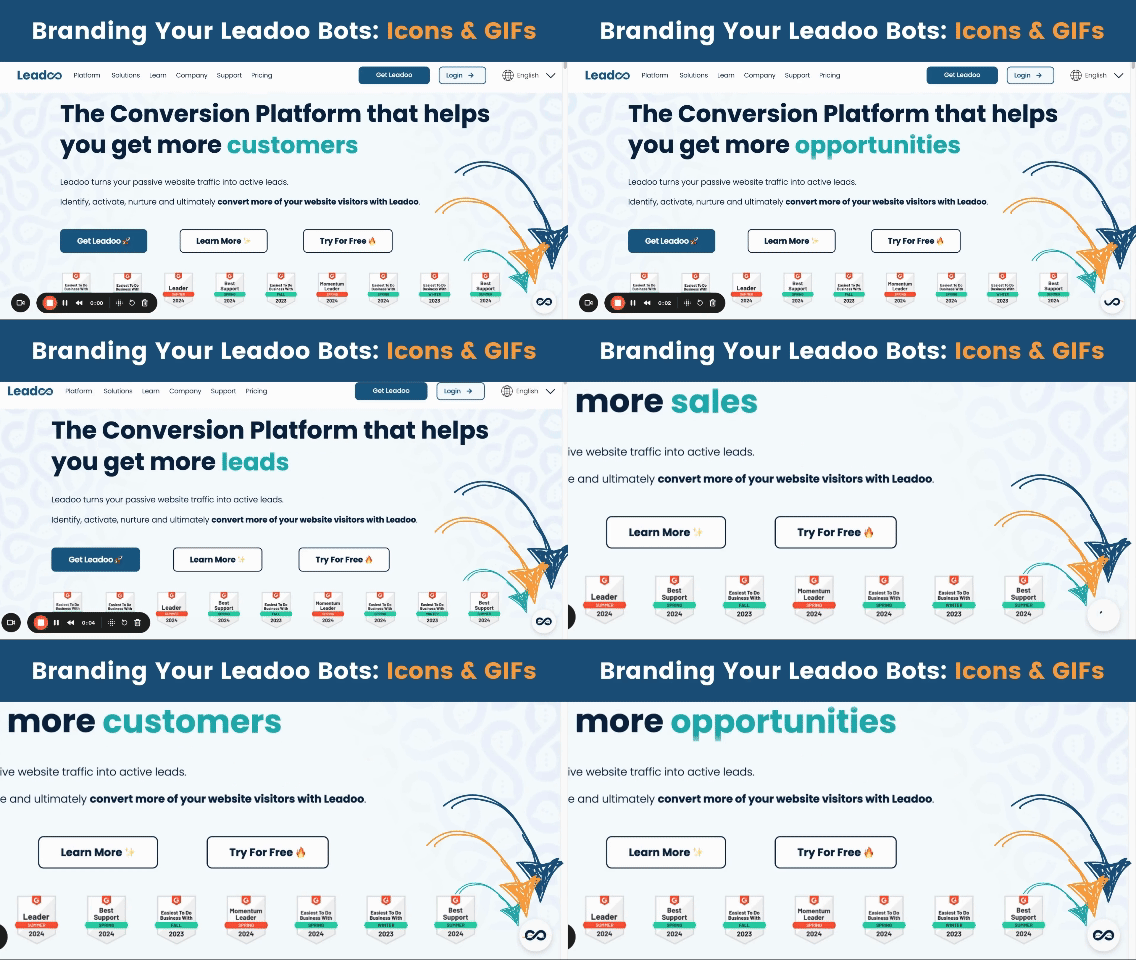
Why icons and GIFs? Well firstly, we want our chatbots to be an extension of your brand. They do speak directly to your customers after all.
With all of our conversion tools, you’ve always been able to customise them with specific colour codes, messaging and formatting that reflects your organisation and branding. But now, before users even start a discussion with a Chatbot, they can see your branding assets.
Above you’ll see that we’re using an animated GIF of the Leadoo logo on our website’s chatbots. But they don’t have to be branded at all. Indeed, you could use icons and GIFs to visualise the use case for any specific chatbot.
For eCommerce websites for example, you might have seen that we recently unveiled carousal product listings and real-time API call functionality within our ChatBots.
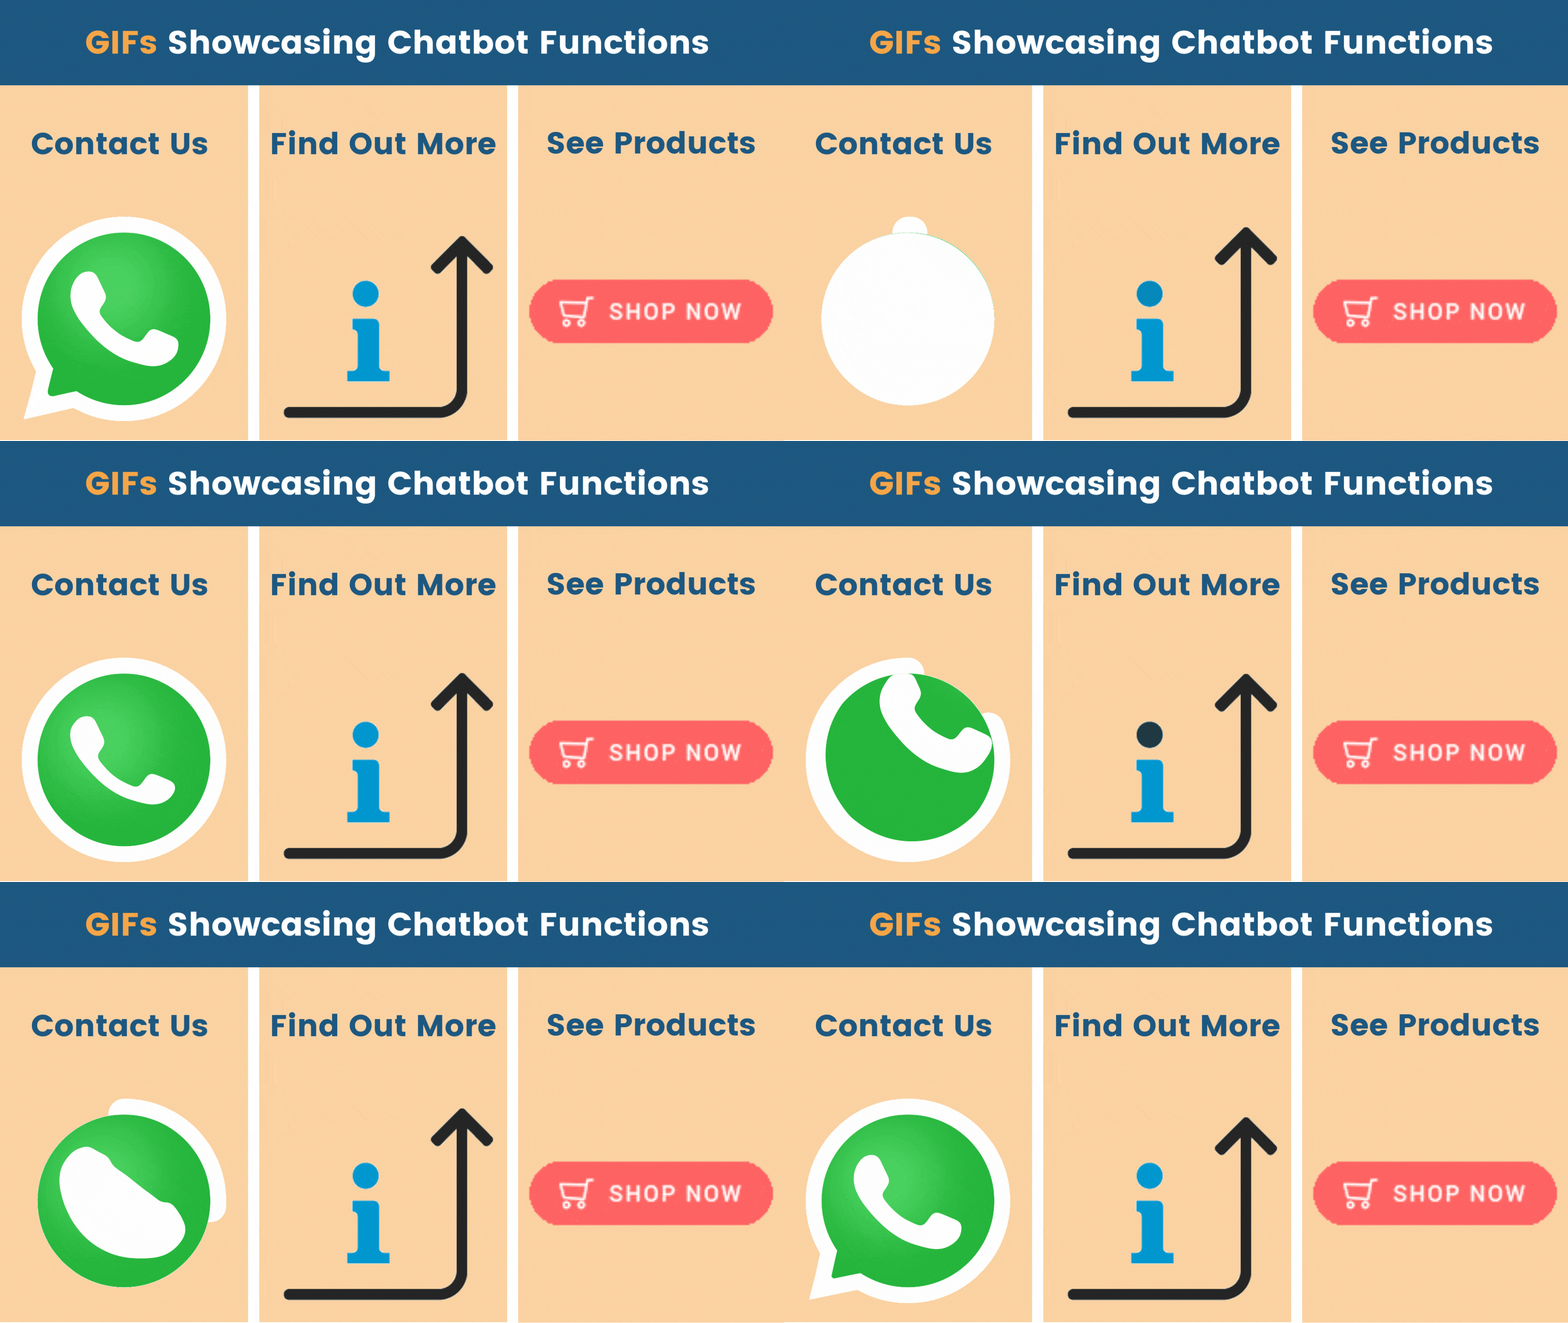
Whatever you decide for your new Chatbot trigger visuals, they couldn’t be easier to implement!
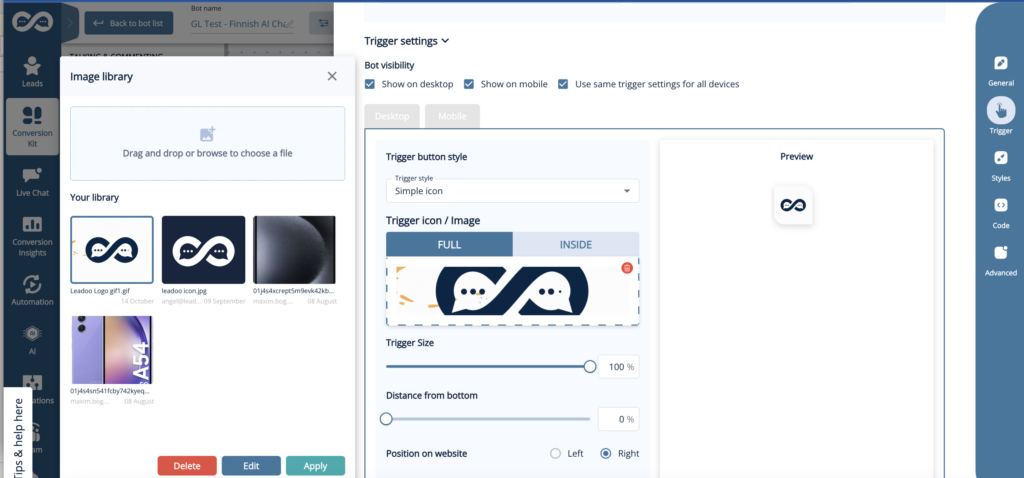
Open any ChatBot in the Leadoo platform, and under ‘Settings’ → ‘Trigger’ you’ll see the below. Where you can customise exactly what the chatbot triggers involve, with your full library of images and GIFs. All with a helpful preview mode so you can test to your heart’s content!
Once you’ve decided on formatting and messaging, your Chatbots will appear onsite with the new visual triggers. Just like before, you can still have messaging or user prompts above your Chatbots (as seen below).
But with the triggers now supporting different image and GIF types, you can now make your Chatbots even more visually engaging and appealing!
In our next webinar, Helen and Gavin will take you through a few of new features in the bot builder and a quick refresher on how to make some simple changes to your bots. You’ll leave with a better understanding of how our bot builder has evolved, and how to make your bot editing tasks simpler as a result!
Some topics covered include:
Sign-up to learn how to make a bot from scratch or to sharpen your skills on bot editing. If you are not available at the time of the live webinar, make sure to register for the event to receive the recording to watch at your convenience!
The Lookup tool is one of Leadoo AI’s advanced bot-building features, allowing you to create more dynamic and interactive conversations in your Inpage, Chat or Visual bot.
By using the Lookup tool, you can integrate logic into your bot conversations to pull results from a table stored in your account. This can be useful for suggesting products, providing articles, offering downloadable content, or displaying course dates.
Note: If you don’t see the Lookup options in your platform, contact your Customer Success Manager to activate them.
Read on for two examples of how to use the Lookup tool in either a Chatbot or Inpage bot.
In this example, we have a selection of eBooks localised for different markets. For instance, a visitor on the Australian page will receive the Australia eBook, while a visitor on the German page will receive the German eBook, and so on.
We aim to use just one bot across all pages, making it easier to implement, build, and update.
First, create a table with column headers and save it as a CSV file. The table should look like this:
So, not only can they prioritise customers who already have shown intent but also talk to them about relevant interests based on their activity.
| URL | Button text | Asset URL |
| United Kingdom | Download the eBook | https://www.leadoo.com/unitedkingdomebook.pdf |
| Germany | Download the eBook | https://www.leadoo.com/germanyebook.pdf |
| Spain | Download the eBook | https://www.leadoo.com/spainebook.pdf |
| France | Download the eBook | https://www.leadoo.com/franceebook.pdf |
Navigate to Conversion Kit in the left-hand menu, select General Bot Settings, and then choose Look-up Table, or visit this link: Look-up Table.
Click + Add New at the bottom of the screen. Name your table, then click Quick Import in the top-right corner to upload your CSV file.
Your table will now appear below. Note: Only the first 50 rows are visible for preview.
Next, we’ll add a simple SingleChoice node with country options as an example of how the Lookup node works. This will serve as a starting point for more complex implementations. (You can automate this step based on the webpage URL—more on that below.)
Open the Variables Panel and create a text variable called Country.
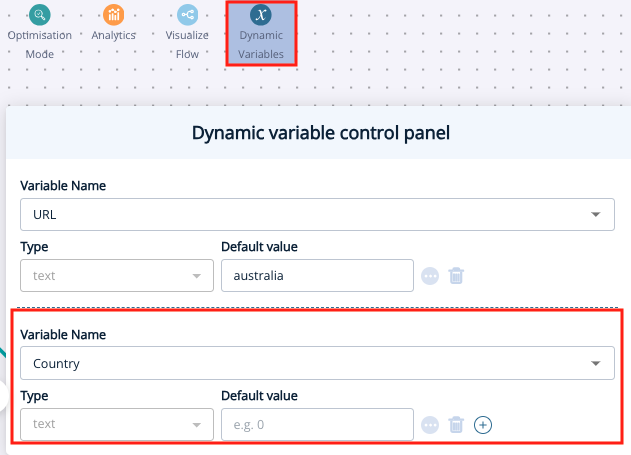
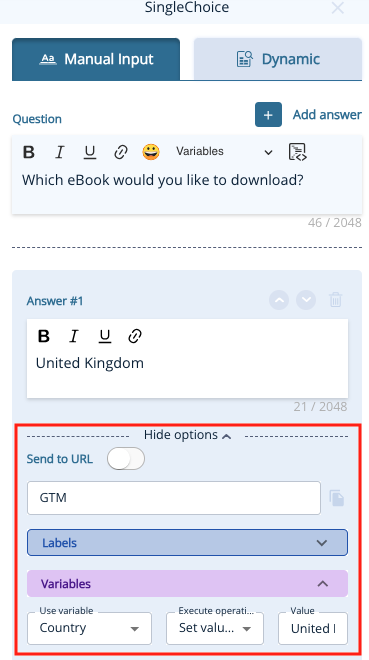
Add a SingleChoice node to your decision tree and apply your variable to each option.
Click Show Options > Variables, and select your variable from the dropdown.
Set the operation to Set Value to, and type the country name in the Value box.
When the visitor selects a country, the bot will set the value of the Country variable accordingly.
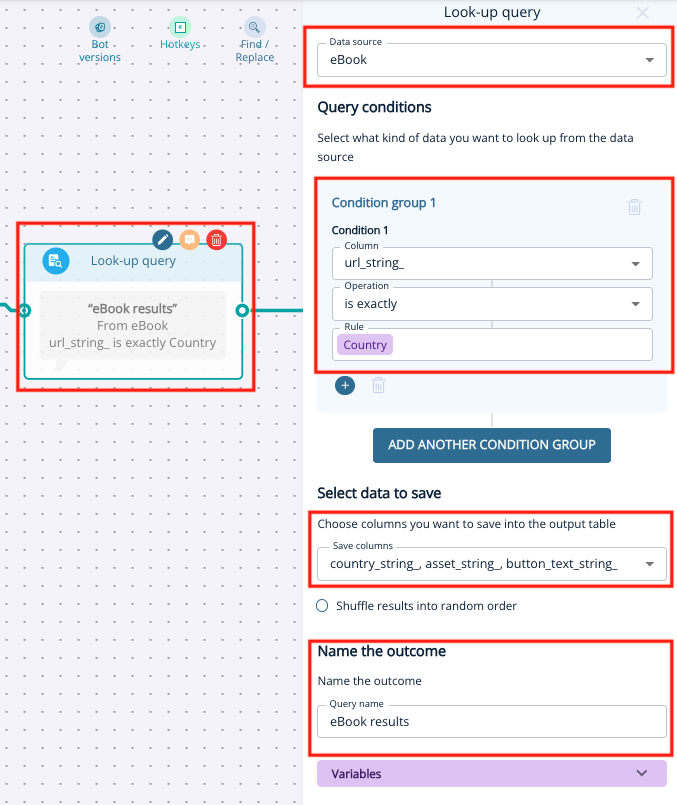
Next, add a Look-up Query node from the node menu.
Choose your table under Data Source, then configure the following:
Under Save Columns, choose Button Text and Asset URL. This is the information the bot will remember for later use.
Finally, give your query a name (e.g., “eBook Results”) for easy selection in the next step.
Now, add a SingleChoice node and click the Dynamic tab.
Enter your question as usual, then configure the dynamic content:
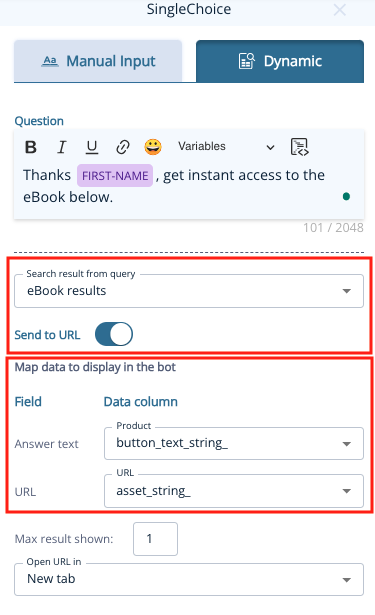
Create a node for a successful download and one to handle cases where the Lookup fails.
Tip: If the button text doesn’t appear correctly, save your bot, reopen the node, and select Asset URL again in the URL field.
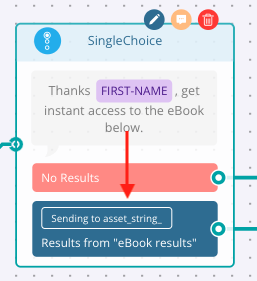
Before adding your bot to a webpage, you can test it by adding a default value (e.g., “United Kingdom”) in the Dynamic Variables Panel.
If you have multiple assets across many pages, manually setting this up for each one isn’t scalable. You can automate this step by adding a variable that reads the webpage URL.
Note: For this automation to work, the visitor must have interacted with the bot (e.g., by selecting an option).
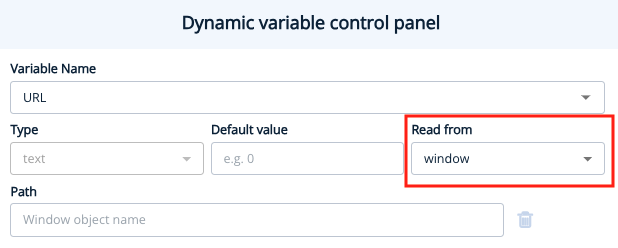
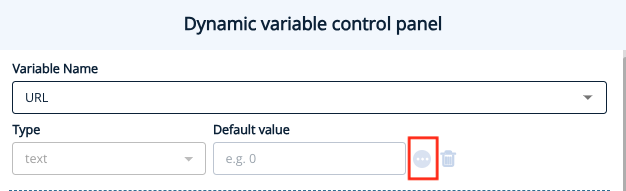
Change the operation to Includes/Like and select the URL variable under Rule.
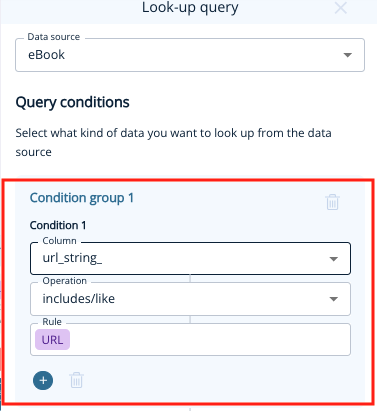
⚠️ Testing the bot with the Read from Window/URL option active is not possible in preview mode, as it will look at the builder’s URL. To test within the platform, set a default value (e.g., “United Kingdom”), and temporarily remove the window object or RegEx.
In this example, we’ll help visitors find the date and location of their desired course more quickly, without them needing to search multiple pages.
Create a CSV file containing the relevant course data. It should look something like this:
| Course name | Location | Date | Course URL |
| Software Development Intensive | London | 12th May 2024 | https://www.learntocode.com/softwareintesive-london |
| Software Development Intensive | London | 15th June 2024 | https://www.learntocode.com/softwareintesive-london |
| Software Development Intensive | Edinburgh | 1st July 2024 | https://www.learntocode.com/softwareintesive-edinburgh |
| Software Development Intensive | Edinburgh | 1st January 2025 | https://www.learntocode.com/softwareintesive-edinburgh |
| Data Analysis | London | 15th May 2024 | https://www.learntocode.com/data-london |
| Data Analysis | London | 2nd June 2024 | https://www.learntocode.com/data-london |
| Data Analysis | Birmingham | 3rd September 2024 | https://www.learntocode.com/data-birmingham |
| Data Analysis | Liverpool | 3rd September 2024 | https://www.learntocode.com/data-liverpool |
| Data Analysis | Liverpool | 6th February 2025 | https://www.learntocode.com/data-liverpool |
Follow the same steps as outlined above to upload your table.
Now, we’ll gather two pieces of information from the visitor: the course name and the location. To simplify the build, add a Dynamic Variable for each option.
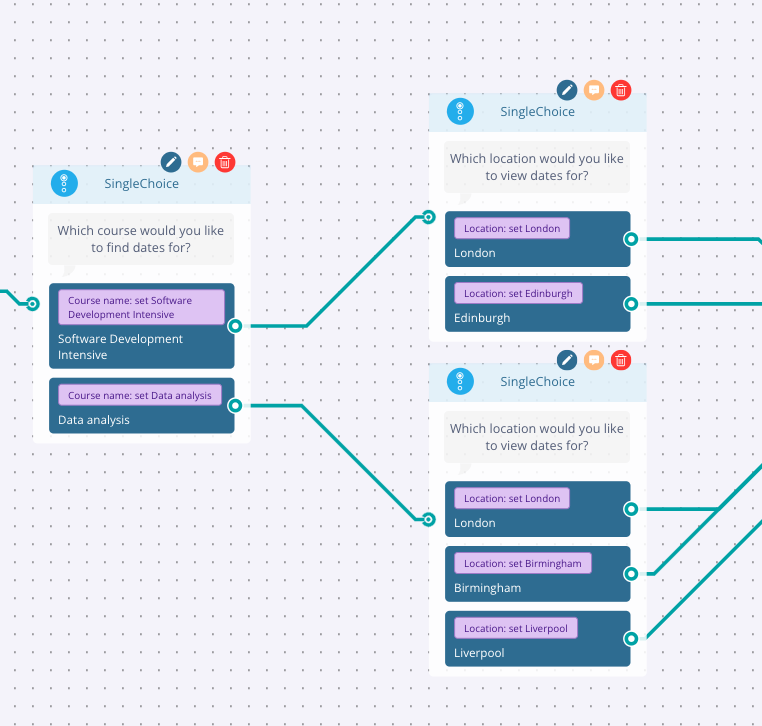
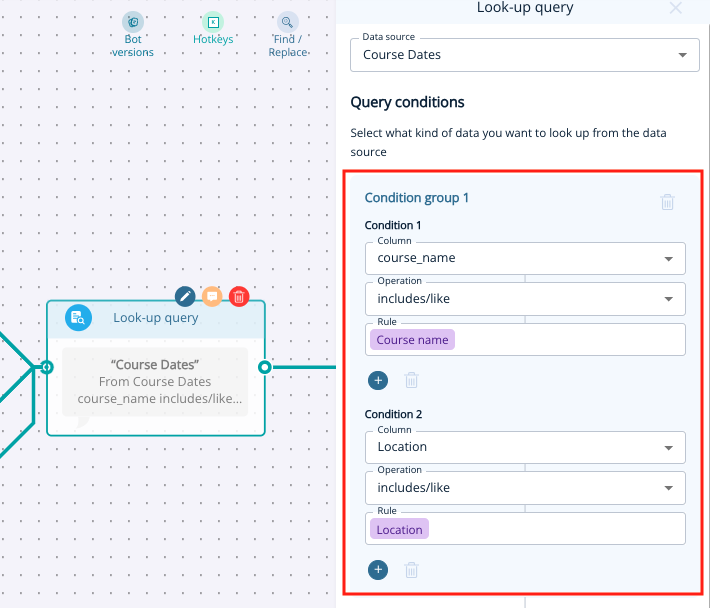
Add a Look-up Query node, selecting your course table as the data source. Set two conditions:
Save all columns and name the query (e.g., “Course Dates”).
Add a SingleChoice node with the following settings:
Also, enable an “Other” option, such as “Enquire About This Course,” to create a potential conversion.
Test the bot to ensure it displays the correct course dates and functions as expected.
To update your Lookup tables, first modify your original CSV file with the new information. Ensure that existing column titles remain unchanged, and if you need to add columns, insert them on the right.
Manually update your tables in General Bot Settings > Look-up Table, by selecting the table and clicking Update Lookup to upload the new CSV file. Your table will update automatically (only the first 50 rows will be visible).

For further assistance with the Lookup tool, contact your Customer Success Manager or our support team at [email protected].
At the start of 2024, we launched Leadoo AI. It brings the power of AI into our Conversion Platform, by allowing our tools to respond to user questions with AI generated responses – in realtime and in any language.
Join us on the webinar to see how it works under the hood, and how Leadoo customers are using it drive leads and better UX on their websites.
We’ll cover:
💡 Knowledge Base – How to train Leadoo AI on the content you want. We’ll go through what a Knowledge Base is, how it works and some examples of how we’ve been using it.
💬 AI Prompts – Bending AI to your will! Make sure that the AI talks in your tone of voice, answers questions how you want it to and how it can steer conversations towards conversions.
🤖 AI Demo – We’ll show you a few customer examples of how it all works on websites in practice. But for now, you can watch a 90 second overview of it below!
Gone are the days when your website was merely a destination for content and contact forms. Your ideal customers are now digital native buyers, demanding a more personalised online experience. In 2024, your website must become one of your top-performing sales channels.
Leadoo’s VP of Sales, Brett James, will talk you through how it can be.
With best practice on how to get more leads from your site; advice on building business cases for website performance; and breakdowns of what a conversion optimized website could mean for you as a marketing or sales leader – you won’t want to miss this insightful webinar!
In this webinar, our conversion experts will show you the advanced Leadoo bot building techniques they use to drive conversions for customers. We’ll cover:
🗓️ How and why to use labels for logic, integrations & behaviour/intent tracking 🗓️
🥇 How to use scoring to filter your leads 🥇
🔀 How to use the advanced logic router to personalise conversations based on user behaviour 🔀
🧮 Intro to variables and their potential (calculations, capturing user entered data, creating conditional logic based on webpage information) 🧮
🔎 Intro to the lookup node and it’s uses (returning information from a larger data source based on user need and retaining a single point of reference) 🔍
Empower your sales teams with actionable, real-time data.
In this webinar you’ll discover ways to automate your outbound sales processes and make more out of your website visitors, using Leadoo’s tech.
We’ll cover how to:
🎯 Send real time Sales Alerts to specific team members 🎯
🪄 Capitalise on high intent behaviour from your prospects 🪄
🔄 Create automated workflows to filter the hottest leads 🔄
Feeling lost in the dark about your customer journeys? Stop relying on guesswork and hours spent wrestling with Google Analytics data.
Leadoo’s plug-and-play insights give you the clarity you need to make data-driven decisions based on real visitor behaviour.
In this webinar, Gavin & Helen will cover how to:
🔎 Turn website visitors into qualified leads. Uncover buying intent with Company Identification, Prospector & Sales Alerts
💡 Understand what visuals and dialogue visitors are engaging with, through Bot Insights and Conversation Insights
🎯 Target your marketing spend by understanding the full journey of your conversions (not just the last touch) with Source Insights
🏊 Deep dive into individual journeys with Visitor Tracking to better target sales conversations
During this webinar, we’ll walk you through everything you need to know to start using Leadoo’s Live Chat. You’ll leave knowing how to:
⚙️ Configure your account and notifications
🌐 Onboard team members into Live Chat
📊 Segment and filter your chats
💬 And pick up some handy tips for quicker responses along the way
If you’re using Live Chat but aren’t fully confident using it on your own, or just want to see it in action, this is a great chance to unpack it with our Conversion Experts!

