What is it?
The Lookup tool is one of Leadoo’s advanced bot-building features, allowing you to create more dynamic and interactive conversations in your Inpage, Chat or Visual bot.
By using the Lookup tool, you can integrate logic into your bot conversations to pull results from a table stored in your account. This can be useful for suggesting products, providing articles, offering downloadable content, or displaying course dates.
Note: If you don’t see the Lookup options in your platform, contact your Customer Success Manager to activate them.
Read on for two examples of how to use the Lookup tool in either a Chatbot or Inpage bot.
Use case #1: Delivering an eBook download
In this example, we have a selection of eBooks localised for different markets. For instance, a visitor on the Australian page will receive the Australia eBook, while a visitor on the German page will receive the German eBook, and so on.
We aim to use just one bot across all pages, making it easier to implement, build, and update.
Step 1: Create Your Table of Information
First, create a table with column headers and save it as a CSV file. The table should look like this:
| URL | Button text | Asset URL |
| United Kingdom | Download the eBook | https://www.leadoo.com/unitedkingdomebook.pdf |
| Germany | Download the eBook | https://www.leadoo.com/germanyebook.pdf |
| Spain | Download the eBook | https://www.leadoo.com/spainebook.pdf |
| France | Download the eBook | https://www.leadoo.com/franceebook.pdf |
Note: The button text is duplicated for each row to ensure it always displays correctly.
Step 2: Upload to Leadoo
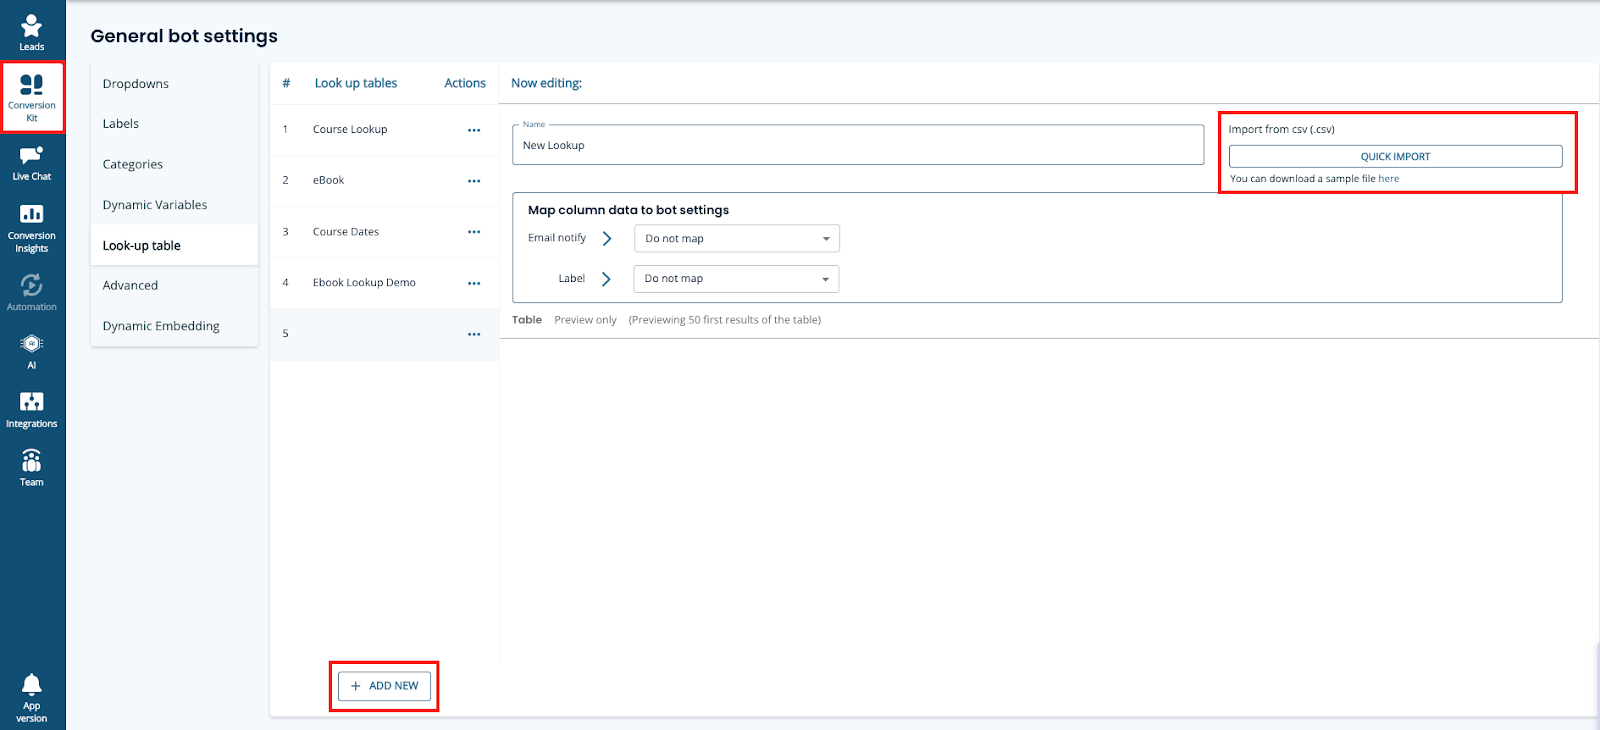
Navigate to Conversion Kit in the left-hand menu, select General Bot Settings, and then choose Look-up Table, or visit this link: Look-up Table.
Click + Add New at the bottom of the screen. Name your table, then click Quick Import in the top-right corner to upload your CSV file.
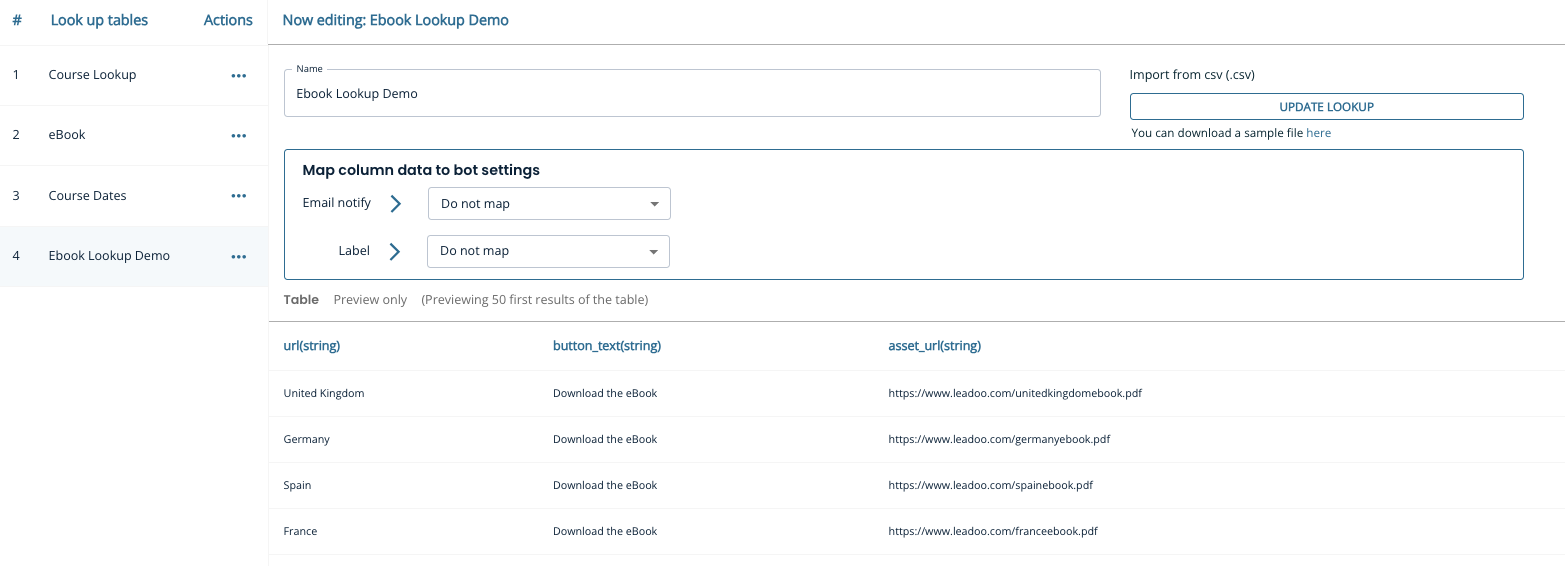
Your table will now appear below. Note: Only the first 50 rows are visible for preview.
Step 3: Use your table in your bot
Next, we’ll add a simple SingleChoice node with country options as an example of how the Lookup node works. This will serve as a starting point for more complex implementations. (You can automate this step based on the webpage URL—more on that below.)
Step 4: Create a New Variable
Open the Variables Panel and create a text variable called Country.
Step 5: Add a SingleChoice with Options
Add a SingleChoice node to your decision tree and apply your variable to each option.
Click Show Options > Variables, and select your variable from the dropdown.
Set the operation to Set Value to, and type the country name in the Value box.
When the visitor selects a country, the bot will set the value of the Country variable accordingly.
Step 6: Add the Look-up Query Node
Next, add a Look-up Query node from the node menu.
Choose your table under Data Source, then configure the following:
- Column: URL
- Operation: Is Exactly
- Rule: Select the Country variable.
Under Save Columns, choose Button Text and Asset URL. This is the information the bot will remember for later use.
Finally, give your query a name (e.g., “eBook Results”) for easy selection in the next step.
Step 7: Display Dynamic Content in a SingleChoice Node
Now, add a SingleChoice node and click the Dynamic tab.
Enter your question as usual, then configure the dynamic content:
- Search Result from Query: eBook Results
- Answer Text: Button Text (This is what will be displayed on the button.)
- URL: Asset URL (This is the hyperlink.)
- Open URL in: New Tab
Step 8: Add Success and Failure Nodes
Create a node for a successful download and one to handle cases where the Lookup fails.
Tip: If the button text doesn’t appear correctly, save your bot, reopen the node, and select Asset URL again in the URL field.
Step 9: Test Your Bot!
Before adding your bot to a webpage, you can test it by adding a default value (e.g., “United Kingdom”) in the Dynamic Variables Panel.
Automating Step 4: Visitor Selection
If you have multiple assets across many pages, manually setting this up for each one isn’t scalable. You can automate this step by adding a variable that reads the webpage URL.
Note: For this automation to work, the visitor must have interacted with the bot (e.g., by selecting an option).
Step 1: Create a New Variable
- Create a new variable called URL.
- In the advanced options (click the three dots), select Read from > Window, and choose an object that contains the page URL (e.g., window.location.pathname).
- Alternatively, for more advanced users, you can use Read from > URL and write a regular expression (RegEx) to capture specific parts of the URL.
Step 2: Adjust the Look-up Query Conditions
Change the operation to Includes/Like and select the URL variable under Rule.
Step 3: Test your bot!
⚠️ Testing the bot with the Read from Window/URL option active is not possible in preview mode, as it will look at the builder’s URL. To test within the platform, set a default value (e.g., “United Kingdom”), and temporarily remove the window object or RegEx.
Use Case #2: Displaying Course Dates
In this example, we’ll help visitors find the date and location of their desired course more quickly, without them needing to search multiple pages.
Step 1: Create and Upload Your Table
Create a CSV file containing the relevant course data. It should look something like this:
| Course name | Location | Date | Course URL |
| Software Development Intensive | London | 12th May 2024 | https://www.learntocode.com/softwareintesive-london |
| Software Development Intensive | London | 15th June 2024 | https://www.learntocode.com/softwareintesive-london |
| Software Development Intensive | Edinburgh | 1st July 2024 | https://www.learntocode.com/softwareintesive-edinburgh |
| Software Development Intensive | Edinburgh | 1st January 2025 | https://www.learntocode.com/softwareintesive-edinburgh |
| Data Analysis | London | 15th May 2024 | https://www.learntocode.com/data-london |
| Data Analysis | London | 2nd June 2024 | https://www.learntocode.com/data-london |
| Data Analysis | Birmingham | 3rd September 2024 | https://www.learntocode.com/data-birmingham |
| Data Analysis | Liverpool | 3rd September 2024 | https://www.learntocode.com/data-liverpool |
| Data Analysis | Liverpool | 6th February 2025 | https://www.learntocode.com/data-liverpool |
Step 2: Upload to Leadoo
Follow the same steps as outlined above to upload your table.
Step 3: Use Table Information in Your Bot
Now, we’ll gather two pieces of information from the visitor: the course name and the location. To simplify the build, add a Dynamic Variable for each option.
Step 4: Add a Look-up Query Node
Add a Look-up Query node, selecting your course table as the data source. Set two conditions:
- Column: Course Name
- Operation: Includes/Like
- Rule: Course Name Dynamic Variable
- Column: Location
- Operation: Includes/Like
- Rule: Location Dynamic Variable
Save all columns and name the query (e.g., “Course Dates”).
Step 5: Display the Results
Add a SingleChoice node with the following settings:
- Search Result from Query: Course Dates
- Answer Text: Date
Also, enable an “Other” option, such as “Enquire About This Course,” to create a potential conversion.
Step 6: Test Your bot!
Test the bot to ensure it displays the correct course dates and functions as expected.
Updating Your Lookup Tables
To update your Lookup tables, first modify your original CSV file with the new information. Ensure that existing column titles remain unchanged, and if you need to add columns, insert them on the right.
Manually update your tables in General Bot Settings > Look-up Table, by selecting the table and clicking Update Lookup to upload the new CSV file. Your table will update automatically (only the first 50 rows will be visible).
For further assistance with the Lookup tool, contact your Customer Success Manager or our support team at [email protected].

